Toyota Corolla e150 is a sedan model of this series produced in 2008. Considering the fact that Japanese manufacturers produce new Corolla cars every year, modifications released years earlier quickly become outdated. Maybe for some it is a solution to the issue of a new purchase. But is it worth it when it’s enough to tune an old car? This is a cheaper option that will not only make the appearance more aesthetically pleasing, but also improve the technical characteristics.
Conventionally, any passenger car can be divided into three main parts: engine, body and chassis. The body includes such parts as doors, hood, trunk lid, radiator trim, mud flaps and other additional elements of the car's appearance.
What can we change in our car ourselves? Let's consider only tuning, which is needed not so much for the aesthetics of the body, but to solve the issue of necessity:
- Replacing simple headlights with higher quality xenon ones as a more durable, economical option.
- Installation of high pressure headlight washers to protect against contamination.
- Installation of protective fender liners to improve the aerodynamics of the car and increase the service life of the body.
Improved ride quality
Tuning Toyota Corolla E120 and E150 involves changing the design of the car and improving the driving characteristics of the car. One of the expensive modification options is replacing the engine with a more powerful one, however, there is another way to increase the power of a Toyota Corolla - this is chip tuning.
The procedure is a software adjustment of the operation of the engine control unit. Thanks to this tuning, the power of the standard engine installed on the Corolla can increase by 10 percent or more.
The advantages of chip tuning carried out on Toyota Corolla include:
- Increasing the maximum speed of the machine.
- Reduced fuel consumption.
- Improving the acceleration dynamics of Toyota Corolla.
- Increased throttle response.
An alternative way to improve dynamics and power is to mechanically tune the Corolla engine. The standard factory filter is replaced with a sports one, it increases the resistance to the incoming air flow and changes the exhaust to a direct-flow one. In this way, you can slightly increase the power of the power unit.
Replacing the suspension on a Corolla stabilizes the car on the road, eliminates roll and makes the Toyota more manageable. Depending on the chosen driving style, the suspension is made hard or soft. The first type of suspension is designed for aggressive driving; however, any defects in the road surface negatively affect the comfort of the driver and passengers. A soft suspension dampens vibrations resulting from hitting a bump or hole, but the car becomes worse to drive.
One of the popular types of Corolla tuning is lowering the suspension. A budget-friendly way to perform such car tuning is to cut off a few centimeters of the standard springs. However, in order to avoid problems with the traffic police, it is recommended to install a more expensive option: hydraulic or electro-hydraulic suspension. With its help, the driver can independently adjust the vehicle's ground clearance.
Interior tuning of Toyota Corolla 150
The next stage is creating convenient and comfortable movement. Internal tuning is like renovating an apartment. Isn’t it nice to live in a nice and well-kept room, where every element is well chosen and functions for your benefit? Simple and low-cost accessories that will serve in your car include: an addition to the trunk, floor mats, seats, a steering wheel cover (or braid) and much more.
Interior tuning of Toyota Corolla 150
Additions to the trunk
Trunk mat for Corolla 150
More on the topic:
- Spare parts for trucks
Polyurethane mat - for a neater appearance and convenient cleaning of the trunk. Made from quality materials. Made to match the trunk relief.
The trunk net is one of the additional elements of the trunk, which in different situations provides convenient operation of the cargo. The mesh is stretched over the entire volume of the trunk, thereby creating additional sides. It is made of nylon material. Has four fastenings.
Floor mats
Interior mats for Toyota Corolla 150 will make the interior more elegant. The choice of design and quality of rugs depends only on you. Rugs have different shapes. A well-chosen accessory will help you quickly clean the interior. When choosing, pay attention to the height of the “sides” and the shape of the patterns. The higher the “side” and the more regular the pattern (it should “reflect” the lower surface of the seats), the better your floor will be protected from dirt.
Wool or fabric rugs are perfect for the summer. But they have a big problem with water resistance. Therefore, it is still recommended to use polyurethane.
Seats
Bucket seats for Corolla 150
"Buckets." For those who love a sporty lifestyle behind the wheel, it is proposed to replace the driver and passenger seats with “buckets”. “Bucket” is a sports seat made in “anatomical” shapes. It allows you not only to feel comfortable behind the wheel, but also with the help of special belts increases safety while driving.
Seat covers and jerseys. If you want to not only keep the appearance of the seat in “new” condition, but also make the interior fresher and more interesting, you should purchase covers or T-shirts. Pricing policies are very different. As practice shows, the price for T-shirts is much lower than for covers. But no one will say that T-shirts are worse than covers. It is best to choose according to your budget and taste.
Changing brake discs
When making modifications to the design of the Toyota Corolla, the brakes are tuned. This is due to the fact that the standard braking system may not withstand the increased load on it after increasing engine power and replacing the suspension. To change brake discs on a Toyota Corolla, use the following set of tools:
- Spanners.
- Compression bottle.
- Jack.
- “Shoes” necessary to secure the wheels in a stable position.
- Solid oil and machine oils.
To replace brake discs on a Toyota Corolla, the following measures are taken:
- Brake fluid is pumped out of the cylinder. A syringe is used for these purposes. When tuning a Toyota Corolla, you can save a little on buying new brake fluid. However, the old one can only be used if it has not lost its transparency. The technical liquid is poured into a clean and dry container and covered with a lid.
- Stops are placed under the rear wheels of the Toyota Corolla. The “boots” secure the raised car body. Next, proceed to dismantling the front wheel. To increase the stability of the car, the front part of the Toyota Corolla e120 or e150 is fixed with bars. This is necessary to comply with safety regulations: if you do not use additional stops, there is a risk that a car falling off the jack will crush the driver during work on replacing brake discs.
- After completing the preparation, they proceed directly to tuning the car brakes. The caliper bolt is unscrewed from below, it is lifted and turned on the upper bolt, and then fixed with wire. In some cases, it is difficult to turn the caliper: to do this, slightly unscrew the bolt located on top.
- The linings are removed and the lower bolt is finally dismantled, the caliper is disconnected from the fastening element. As a result, the part remains hanging on the cord.
- The steering wheel is turned towards the removed wheel, then the fasteners (bracket) are unscrewed.
- The freed mounting holes are cleaned of dirt and dust, degreased, and bolts of the M8 modification are screwed into them.
- A new brake disc is put on the wheel hub, then the mounting bracket is screwed on.
- The bolts are lubricated.
- The brake piston is lowered into the cylinder.
- Return the steering wheel to its original position.
- Screw the wheel and lower the jack. Remove the front bars.
Subsequent brake discs are replaced in a similar manner. After tuning is completed, the container is filled with brake fluid and air is pumped into it to create compression.
When tuning a car's brake system, the factory calipers are replaced with parts made of ceramics. They are not cheap, however, their use increases the braking ability of the car in critical situations on the road, and the wear of the brake disc is reduced by 80%.
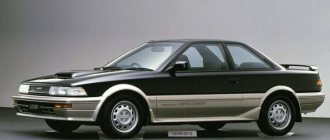
Old Corolla lights
This idea is not new. Many manufacturers of headlights and car components have long established the production of front and rear lights that surpass standard ones in technical characteristics and appearance. For the 2008 Toyota Corolla, experts proposed tuning, which includes only one set of optics and very harmoniously complements the streamlined body shape of the Japanese car. The photo shows the original optics for the Toyota Corolla, which was originally installed at the factory.
You can see that on a Corolla car it is not particularly beautiful or unique! They did the same thing in the 90s.
Toyota Corolla body
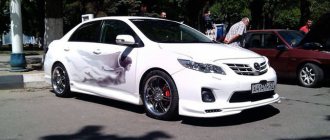
In addition to improving the driving characteristics of the Corolla, they are tuning the appearance of the car. The car is repainted in bright colors, while changing the color structure: glossy cars are made matte or painted in paints that change shade depending on the angle of lighting. During external tuning, a Toyota Corolla is covered with protective and decorative films, and airbrushed images are applied to the sides of the car.
To give the car a sporty appearance, the following auto-tuning of the exterior is carried out:
- Standard bumpers and sills are replaced with aerodynamic body kits, the hood and doors of the car are replaced with similar parts made of carbon fiber or carbon fiber.
- Additional air collectors, a hood deflector, and a spoiler with LEDs acting as brake lights are installed.
- Installing fender liners will increase the level of sound insulation of the Corolla and will not allow dirt to get into the arch.
- The car's rims are replaced with cast or titanium ones. 16- and 17-inch models are popular among drivers. The bottom of the car and the space under the radiator grille are illuminated with LEDs.
When externally tuning a Corolla, the standard optics are also replaced. The headlights are changed to brighter and more beautiful ones: xenon is installed, LED running lights are installed, and fog lights are installed independently. When tuning optics, drivers use “angel eyes” type headlights. The rear optics are tinted, bright LEDs are installed instead of lamps, and during tuning the shape and “light pattern” of the headlights are also changed.
Installation of xenon lamps
Replacing standard optics with xenon headlights improves the quality of road illumination at night and in poor visibility conditions. In addition, the appearance of the car improves. During operation, due to temperature changes, dust, dirt, small stones and branches, the headlight glasses become cloudy.
When tuning the standard optics of the Corolla e120 and e150, they use Depo brand xenon headlights.
Toyota Corolla E120-E150 is equipped with high-pressure washers for headlights.
Installation process of xenon headlights
The cost of one set of xenon lamps for tuning starts from about 8,000 rubles. You can find more expensive options. The set contains a special block suitable for the polarity of Toyota vehicles. It is not recommended to buy xenon lamps of a different polarity for tuning, since a different set may not last long.
For convenience, the car is driven into a pit. Then the boot is unscrewed. You should carefully examine the plane of the body, where there are holes with a diameter of approximately 8 millimeters; two of them need to be used. Through these holes, the low light units and fog lamps are fastened. The work requires a delicate approach, since there is a high probability of dropping the bolt for attaching the bracket with blocks.
Tuning of xenon lamps is carried out according to these instructions:
- According to the diagram, you should make brackets for the side members, taking into account that the top point of the bracket should be under the headlight with a gap of 2-3 mm, but not lower or higher, since it will not fit into its place.
- After the brackets are made, they are fixed to the blocks.
- Next, the wires are connected to the sides, which is not difficult.
- Choose xenon on a website or in a store selling car parts carefully. The IPF hid XD41 model is suitable for the Corolla 150. It is advisable to buy two sets, for use and for stock. Xenon wires are long. The wiring is equipped with a 15 amp fuse, which is perfect for cars. If we talk about the blocks, we note that they are housed in a good casing made of high-quality plastic. The wiring is well insulated and ready for immediate assembly.
- The blocks are connected to the system. Then the lamps installed instead of halogen are replaced. For those who are doing xenon tuning with their own hands for the first time, it is not easy to do such work, but it is possible using the instructions for use. To begin with, the bumper is unscrewed and removed, then the headlights are removed and the xenon is carefully inserted. After the headlights are installed in the optics, the fog lights should be inserted. And everything is assembled in reverse order. There is nothing complicated, but you will have to tinker.
The installation of lamps is done with extreme care, leaving no traces of grease or lint on their surface. If there are such marks, they are wiped with a soft cloth. Thus, you will get white light, which is much nicer than yellow, and its power is stronger.
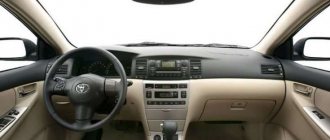
Salon
When tuning the interior of a Toyota Corolla, the standard sound insulation is improved by treating the body with soundproofing materials and mastics. In the same way, the soundproofing layer of the hood, trunk, and walls separating the engine compartment and luggage compartment from the car interior is improved. The car's acoustic system is also being modernized: instead of the standard audio system, a more functional multimedia is installed, a multi-option touch screen appears on the dashboard, the speakers are changed to more powerful ones and equipped with a car subwoofer for deep and clear bass sound.
When reupholstering the cladding, they strive to achieve a harmonious and stylish design. To achieve this, the upholstery materials are changed to more expensive ones, and the elements of the dashboard, seats, and interior body lining are made in two or three colors.
Inside the Corolla, the standard lighting is tuned: interior lamps are replaced with LEDs, LED lighting is installed in the glove compartment and on the doorways.
Installing new optics
Modern optics were purchased for Toyota Corolla 2008.
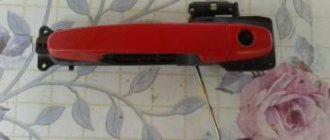
Replacing standard lights on a 2008 Toyota Corolla can be done by absolutely anyone with a minimum set of tools. Removing the Coroll tail light occurs as follows: open the trunk, then remove the plastic cover and disconnect the wires. After this, the casing covering the bolts securing the light on the Corolla is removed, and it is dismantled. Installing a new light is performed in the reverse order.
Please note that to remove the rear light you need to remove 3 bolts.
External differences are noticeable immediately! The new lights look much better!
Now, you can start replacing the front optics on the Toyota Corolla 2008.
Tuning price
The cost of tuning a Toyota Corolla hatchback or sedan in the 120 body and the E150 model depends on the type of work performed:
- External tuning, which includes repainting, installing body kits, applying airbrushing, installing underbody lighting, replacing rims and installing additional air ducts, deflectors and spoilers, will cost the driver 25-45 thousand rubles.
- Chip tuning of the engine, replacement of parts with more advanced ones, modernization of the suspension (installation of stiffer or softer springs), replacement of brakes - 30-50 thousand rubles. Installation of hydraulics or electrohydraulics will cost drivers 10-15 thousand rubles.
- Arranging the interior, reupholstering the upholstery of the seats, dashboard and body, replacing the audio system and acoustics, and improving sound insulation will cost 25-30 thousand rubles. When using seat covers, the cost of work can be reduced by 5-10 thousand rubles.
To improve driving performance, design and increase comfort of use, Corolla 110, Toyota Corolla 100, Toyota Corolla 130 and 150 cars are tuned. These cars are distinguished by their unpretentiousness, reliability and high maintainability. You can buy Japanese cars of these models at a low price. And by investing a little in car tuning, you can get a beautiful, comfortable and powerful vehicle.
Aerodynamic body kits for Toyota Corolla 150
“They greet you by their clothes, and see you off by…”, so it is with our car. First of all, the appearance of your Corolla must meet the best modern standards. Of course, well-chosen body kits will give a sophisticated look, thereby attracting the attention of most car enthusiasts. The details of the body elements emphasize the modern style and relevance of this model range in our time.
Body kits
This is a whole “package”, which consists of four parts: front bumper, rear bumper, spoiler and door sills. The most popular and aesthetic kit today is “RS”.
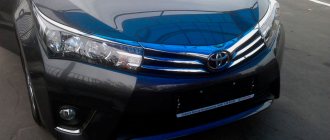
RS front bumper . The restyled model, which included a number of changes, received smoothed corners, enlarged air intakes, and additional intakes for cooling the brake pads and radiator. In the upper space of the bumper there is a Toyota logo, from which two lines diverge, repeating the arc of the hood. In the center there is a seat allocated for the state. number. The central part is supplemented with intermediate air intakes. There are two holes at the bottom for daytime running lights. A massive skirt located below (serves as a stiffening rib) to protect the body from various impacts.
Tuning the front bumper of Corolla 150
Spoiler RS . A cute and at the same time useful addition to the roof of your car. The spoiler is made in the RS style and fits perfectly into the kit. Attaches to the trunk roof using self-tapping screws or special sealant. In addition to adjusting the upper design, this element contributes to good aerodynamics while riding.
Tuning: spoiler Corolla 150
Door sills RS . The set of side trims fits perfectly and complements the design. Components that add aggressiveness and sporty appearance to the car. In addition, they protect the lower part of the body from contamination. They are installed on standard mounts (no additional changes to the body are required). The thresholds are made of high-quality ABS plastic.
Tuning: door sills for Corolla 150
RS rear bumper . The rear bumper trim is an integral element of tuning in the style of Toyota Corolla RS. Gives an aggressive look to the rear of the body and visually reduces ground clearance. Attached with a special adhesive sealant.
Tuning the rear bumper of Toyota Corolla 150
Body parts
For tuning with your own hands and in your own style, you can select individual body parts. Today the market offers a wide selection of body accessories:
- front (rear) bumper and front (rear) bumper covers,
- sills and fender arches,
- radiator grilles,
- cilia,
- linings on the hood, mirrors, front fenders and roof,
- deflectors/fairings of body elements,
- spoilers and visors on the rear window,
- meshes in body parts,
- door seals, noise and vibration insulation,
- body protection elements.
And this list goes on and on. The main thing in tuning is not to go too far, but to do everything with taste.
Using film for tinting
Working with film greatly simplifies the task of the car owner; it has its own characteristics, but the main advantage is the ability to remove it when unnecessary. This method is equally good for cars manufactured in 2009 and for older ones (2007 and earlier). It fits optics of any size and shape. Unlike varnish, film can not only change the appearance of the headlight, but also protect it from impacts, which will greatly extend the life of the lamp.
The light transmission requirements are the same as for the varnish, but you do not need to remove the headlight. In order to secure the film, you need to do the following:
- Wash, dry and degrease the surface of the lantern.
- Cut out a piece of film to the desired shape, not forgetting to leave a margin of 2 cm on each side.
- Remove the protective layer and apply the film to the surface to be tinted.
- Level the film, expelling air bubbles. If they are large, you can pierce them with a thin sewing needle.
Pros and cons of tuning
The advantages of this type of tuning include the following:
- Small price.
- Original appearance.
- The ability to do it yourself without spending a lot of time and effort.
- Does not require intervention in the vehicle design or special permits.
- Inspectors often do not pay attention to such modifications to the external characteristics of the car.
The method also has disadvantages: not all craftsmen are able to apply varnish in an even layer. Unattractive layers and air bubbles may form. In order for the effect to be complete, you will need to remove the headlight, then install it back. This causes some difficulties and labor costs. Even the highest quality varnishes and paints will fade in the sun over time, so their shade will become paler, fade, and spots may appear.
The tinting will remain forever, if you want to get rid of it or do it again, the headlights will have to be changed.
Actions:
- remove the strips located to the left of the radio;
- the same measures with a visor attached to clips;
- Unscrew the 2 bolts with a Phillips screwdriver of a suitable size and remove the panel, disconnecting the wires;
- carry out the analysis using a six-pointed star screwdriver;
- once the flimsy cover is removed, remove the structure from the frame;
- using a star polyhedron, unscrew 6 bolts: they hold the displays;
- remove the arrows sitting on the pins by prying them up with a screwdriver from below and marking the ends of the places with masking tape;
- Unsolder the old diodes by heating the soldering iron tip to 400 degrees.
- solder in their place - new ones;
- check the functionality using a tester: the beeper mode will satisfy your desire if, when you touch the ends of the device, you see that the diode lights up;
- if desired, re-solder the 3216 diodes on the displays;
- assemble the panel, install it in the car and enjoy the new glow.