20.10.2014
ODO 174,753 km
Engine 1ZZ-FE, automatic transmission, FWD. Let me make a reservation right away: the engine is not original, it is a contract engine, the total mileage is unknown, installed on 04/09/2014, mileage since the installation date is 5,553 km (174,753-169,200 km), motor oil MOTUL 8100 Eco-nergy 5W30 (SL) Previously ( in September 2014) traces of oil leakage were noticed, nothing had happened before, topped up on 10/20/2014 2 times: 700 ml of Oil. Here it is leaking(
The gasket was purchased (Toyota cat. No. 11213-0D040 (11213-22050), price: 681.84 rubles), awaiting installation.
25.10.2014
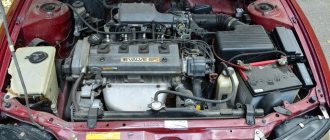
ODO 174,917 km Car: Toyota Voltz 2002, FWD, automatic transmission Engine: 1ZZ-FE Place: at the dacha, in person Ambient temperature: -14 Celsius
It took a long time for my son and I to get to the service location (so that no one would disturb us), so it was already dark when we started and completely dark when we finished. I combined the gasket replacement with changing the engine oil. While we got to the place, we dug in two times in the country streets.
Drained the oil. I took off the cover and looked
A little upset: Varnish
(lacquer). A thin layer of brown to black hard or sticky carbonaceous substance that forms on moderately heated surfaces due to the polymerization of a thin layer of oil in the presence of oxygen. The piston skirt and inner surface, connecting rods and piston pins, valve stems and lower parts of the cylinders are varnished. The varnish significantly impairs heat dissipation (especially of the piston), reduces the strength and persistence of the oil film on the cylinder walls. (oil-club.ru).
I wiped the lid and joints with AI-92 gasoline. I installed a new gasket. I applied sealant to these places
I screwed everything in and tightened it.
Replaced Toyota No. 90430-12031 O-ring for engine drain plug (Consumables Toyota Voltz 2002, FWD, automatic transmission)
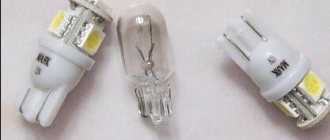
There was an oil filter Toyota DENSO Oil filter No. 90915-YZZE1
But, since I couldn’t unscrew the old one, I froze, I didn’t install the filter. Today (10/27/2014) having studied oil-club.ru, I decided that it was NOT DESTINY.
Started up, warmed up and off we went.
26.11.2014
On the advice of a Drayvovite driver, I decided to look into the spark plug wells and check them for the presence of oil inside. Where could it have come from? But you can underpress the gasket, i.e. Do not tighten the coupling bolts and nuts. Result: there is oil in well 4, but I don’t know when it got there, because when I installed the gasket I didn’t check the well. I unscrewed the spark plugs, checked them, wiped them, screwed them back in. Still, I decided to tighten the two central bolts on the cover. And rightly so, they were somehow rather loosely tightened.
Why is a gasket between the cylinder head and the valve cover needed?
The valve cover is necessary to protect the cylinder head mechanism from dust and dirt; the seal also performs other functions:
- Provides tight installation of the cover to the cylinder head flange;
- Seals the volume that the lid closes and prevents oil leakage.
The part is not critical for the operation of the internal combustion engine - the engine will work quite normally without it. But it serves to clean the power unit, increases fire safety, and improves the ease of maintenance of the motor. In addition, the sealant makes a significant contribution to maintaining the technical characteristics and purity of motor oils.
In the modern automobile market, there are many engine models with different cylinder heads. However, all internal combustion engine gaskets are designed in fundamentally the same way. This is a flat-shaped sealing element that follows the shape of the plane of contact with the cylinder head.
Replacing piston rings with 1ZZ-FE (1)
Alexey Sladkikh (CorollaUSA)https://users.auto.ru/75338.html [email protected] Tula, July 2006
Good day to you! If you are reading this article, then you, like me, have been tormented by oil guzzling and chain rattle on the 1ZZ-FE. Let me make a reservation right away: I had no intention of doing a major overhaul of the engine, so I only changed the rings. I didn’t measure anything, didn’t look at the gaps, didn’t change the caps. I was just interested in checking the opinion that replacing the rings solves the oil problem. It was for this purpose that I got into the engine. Most likely, I will definitely miss something in my story, make a mistake somewhere, or call something differently from what it’s actually called. Don’t judge strictly, the material is large, and I’m not a professional, you can’t keep track of everything... Well, , let's get started?
Jack up the right front and remove the wheel. Then we unscrew everything from below that prevents us from getting to the engine crankcase (protection, plastic mudguards, etc.)
Unscrew the drain plug and drain the oil. We drain the antifreeze from the block (there is a faucet on the back side, pictured below) and from the radiator (the drain plug is at the bottom, mine is on the right).
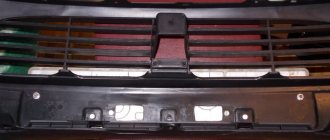
Unscrew the 2 screws and 2 plastic plugs securing the decorative cover and remove it.
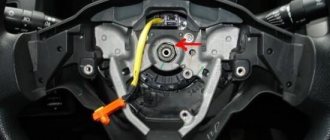
Disconnect the 4 connectors from the spark plug coils.
Unscrew the 2 nuts securing the strip with wiring.
We unscrew the 4 bolts securing the coils and remove them. We turn out the candles.
Disconnect the ventilation hoses from the valve cover.
We unscrew the screws and nuts securing the valve cover, see if anything else is screwed on that is in the way - unscrew it, remove it...
I advise you to unscrew the PCV valve, wash it and evaluate the condition...
You can read about its operating system at the link: https://autodata.ru/st/09_pcv/pcv.htm
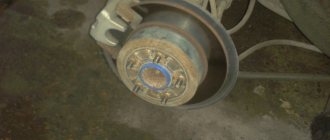
It's time to unscrew the bolt on the crankshaft pulley. Tighten it to your heart's content, prepare a good socket head and a long knob... Direction - counterclockwise. According to the book, a special device is used to unscrew it, which locks the pulley (pictured below). Of course, there was nowhere to take it, so, remembering the experience of the same bolt on the G8, I simply stopped the flywheel at the junction of the engine and gearbox. Look below, there is a plastic cover there, remove it and insert something powerful between the teeth of the flywheel, like a large screwdriver. Make sure that it won’t jump out when rotating, get out from under the car and go try to unscrew the pulley. The first time it is unlikely that you will be able to secure the screwdriver so that it does not fall out... It is optimal, of course, to have an assistant... Unscrew the bolt and remove the pulley. A key remains on the shaft, do not lose it. However, it sat firmly on me and clearly had no intention of falling out. We look around, assess the condition of the oil seal, whether oil is leaking from under it. If yes, well, you’ll have to change it. It's not difficult, the main thing is accuracy. When you put the pulley in place, wipe it from sand and dirt and lubricate the seat in contact with the oil seal in a circle with engine oil.
Now let's take care of the fuel rail, it also needs to be removed. Disconnect the connectors from the injectors...
Next, remove the black plastic part from the fuel line.
We pull it up, it snaps off. This will make it possible to rotate the fuel pipes relative to each other and move the ramp away from the work area. You can completely disconnect this connection and remove the ramp completely - I didn’t succeed, even with the help of a smart book...
We unscrew the fastening bolts, pull the ramp towards ourselves and remove it. It is impossible to predict where the injectors will remain, in the ramp or in the head, but most likely they will be in the ramp. It is likely that there is pressure in the ramp and splashing around gasoline cannot be avoided, prepare a rag or oilcloth and cover it when removing the ramp, at least you will protect yourself and the surrounding area from abundant spraying of gasoline
Don't forget to remove the 2 plastic bushings on which the ramp was attached
The injectors on the ramp will look like this
Pay attention to the rubber o-ring at the bottom of the injector. If it is not there, it is likely that it remains in the block head. There are 4 such rings, one per injector. The manual strictly states that all o-rings (and indeed almost all the rubber bands that are in the engine) should not be reused. I don’t know, I don’t know, all my rings turned out to be soft and, in my opinion, quite suitable for further use. Look at your own situation...
Immediately brief recommendations for assembly. The places under the lower sealing rings in the block head will most likely be covered in dust and dirt; everything needs to be carefully cleaned. Remove the rings from the injectors and carefully clean them of dirt/sand. We wipe the injectors themselves. Those who wish can wash them; there are plenty of materials on this topic on the Internet. Next, I would advise lubricating the lower rings with regular engine oil and immediately installing them in the cylinder head. We also lubricate the upper O-rings, put them on the injectors, lubricate them again on top and install the injectors in the ramp, as in the figure below. Then you will put the ramp assembled with the injectors in place, in the head, at the same time checking whether the injectors fall into the O-rings and adjusting the direction as necessary.
Next, remove the intake manifold. We unscrew the fasteners. Next, rely on your intuition, because... The throttle body is attached to the manifold on the right, and it is almost impossible to describe in detail every wire and hose that fits there. Just see what bothers you and disconnect.
The connectors are made according to the mind; you won’t be able to insert them into the wrong sockets. There is a gasket under the manifold; it cannot be reused (again according to the book). I installed a new one, fortunately it’s inexpensive.
Let's continue...
A good spanner wrench (breaking the edges is like nothing to do...) with an extension cord (because it’s hard...) slowly! squeeze the tensioner and remove the belt.
Unscrew and remove the right engine mount. Before this procedure, the engine from below must be slightly jacked up to avoid sagging due to removal of the support. I advise you to choose the location for installing the jack responsibly, so that the jack does not interfere with the removal of the oil pan, and there is an opportunity to further lift the engine to remove the screw securing the belt tensioner. More on this below...
We unscrew the nut (upper arrow) securing the tensioner and the bolt (lower arrow) on which the entire tensioner structure is attached to the block. Here you will need to jack up the engine, because the bolt is long and it will not be possible to remove it without jacking it up. Remove the tensioner assembly. We assess the condition of the bearing. There was almost no lubricant in mine, I had to correct this deficiency. Now it’s like new. We look carefully at the tensioner bushings; they may also need to be brought into perfect condition. More on this towards the end...
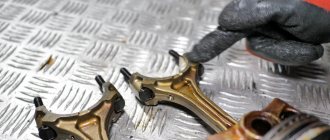
We unscrew 3 bolts and remove what the right engine mount was attached to
Unscrew the 2 nuts and remove the hydraulic chain tensioner
We unscrew the 2 bolts and move the sensor to the side so that it does not interfere
Minus 6 bolts - and the pump is in our hands. Don't lose the o-ring. Think for yourself about the prospects for its further use. If anything, sealant is a good thing. I don’t remember exactly, but 2 or 3 bolts are short compared to the rest! Be sure to note where they were and when assembling, put them only in their places! I don’t recommend screwing long bolts into short holes at all; you won’t tighten them completely and there is a very real chance of damaging the cover. Well, or the bolt will break, as happened to me... Pulling out the fragment is a separate story
We unscrew the bolt securing the power steering pump pulley (we lock the pulley with a screwdriver in place) and two nuts securing the pump itself. There is no need to remove it at all, just leave it on the bolts.
We unscrew the 2 bolts securing the generator, pull it out of place and move it aside...
We unscrew the remaining screws/nuts/studs around the perimeter of the cover and, using a screwdriver, pry it off and remove it. Pry gently, without scratching the surface too much
Remove the star at the bottom. During subsequent installation, be careful that the letter “F” on it should face you.
Unscrew the bolt and remove the left chain guide.
Using screwdrivers (or just your hands), we pull the lower gear towards ourselves. It is not necessary to remove it at all, the main thing is to pull it out to such a state that you can remove the chain. Pull it out and remove the chain.
Unscrew the 2 bolts and remove the right damper.
We unscrew the bolt and remove the valve that controls the oil supply to the VVT clutch. We assess the condition, wash and clean. I would like to note that it is very difficult to remove (at least for me), so be careful. Do not try to pull on the connector, it will easily break.
A little lower, under the valve, you can unscrew the bolt and remove the filter through which the oil enters the clutch. The recommendations are the same, wash, clean, depending on the situation...
We unscrew the bolts of the camshaft covers in the indicated order and remove the covers and shafts. Treat this procedure carefully; each cover will subsequently need to be placed in the place where it was and oriented in a certain direction. It is best to place them somewhere to the side in the exact order in which they were on the engine. Under the shafts you will find valve adjusting cups, 16 in total. We take it out and lay it out so that later we don’t confuse which valve is which cup.
We unscrew the 10 bolts securing the block head in the indicated sequence. Here you will need a good tool, because... The bolts are tightly tightened.
If according to science, then you need the so-called “10 mm bi-hexagon wrench”, in reality it turned out to be an ordinary internal sprocket, in the photo there is a bolt head and a wrench for it:
Since I did not have this key in stock, there was nowhere to look/buy, and the importance of the tightening operation was beyond doubt, a knight’s move was made and, along with other junk required during this operation, a special key was ordered and purchased Toyota, just for this purpose. Here it is:
Did you unscrew the screws? Wonderful, there’s just a little bit left. Just a little bit left until the disassembly operation is over...
Now is the time to work under the car. You need to unscrew the 2 bolts securing the muffler exhaust pipe to the exhaust manifold. You don't have to remove the exhaust manifold, because... the block head can be removed together with it. I also unscrewed a couple of bolts securing the exhaust manifold to the cylinder block, I think you will have to do the same.
Then you need to unscrew the fasteners around the perimeter of the engine pan and remove it. Immediately remove the oil filter, change it anyway...
Unscrew the 2 nuts and bolt from below and remove the oil intake. There is a gasket underneath, don't lose it. We assess the cloggedness of the mesh, wash...
Well, actually, based on disassembly, that’s all. You can try to pull off the block head... Let's look carefully again to see if everything is disconnected from it and if nothing is in the way; if we find something, turn it off. The head is relatively not heavy, I removed it alone and did not experience any particular inconvenience in terms of its weight. If you doubt yourself, call an assistant...
When to replace
This gasket must be replaced immediately after a leak is detected. If you do not replace it on time, then soon the entire surface of the engine, as well as all units near the internal combustion engine, will be covered in oil.
Then dust and dirt will certainly stick to the oily elements. Dust not only significantly spoils the appearance of the engine, because the valve cover is the first thing that catches your eye. A layer of oil and dust on the surface of the internal combustion engine greatly worsens heat exchange processes - the engine temperature will rise.
During operation of the engine with a leaking valve cover, oil will inevitably get to the sensors and other electronic devices - the sensors may fail. If the leak is quite severe, the oil level will quickly drop - driving without oil leads to very sad consequences.
This is interesting: Symptoms and signs of crankshaft sensor malfunctions and checking it
Most often, the cover is changed in the following cases:
- Engine overhaul;
- Determination of oil leaks at the seal installation site;
- Cylinder head repair, timing belt repair, unit maintenance.
The frequency of replacement differs on different car models - it all depends on the gasket material. Original products are of higher quality, non-original and cheaper ones are most often a low-quality copy from the Middle Kingdom.
The service life of the gasket depends entirely on the quality of the product and the material. The average price of an element is small, so everyone tries to buy something inexpensive, because the element is insignificant. Many people do the same. As a result, oil leaks under the hood. There is no need to do this.
Among the reasons for replacing the valve cover gasket, the first thing to highlight is the low quality of consumables for the car. It happens that you buy a product at an average price, but after a few days of intensive use of the car, the leak appears again.
When choosing, you should carefully examine the surface of the gasket and its materials; it is important to make sure that the part is elastic. Hard gaskets will not provide the required tightness, and gaskets that are too soft will certainly be pressed through during installation.
Another popular reason that leads to replacement is improper installation. The gasket is destroyed during its installation.
Background
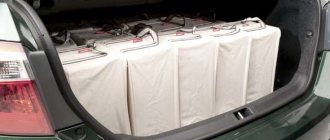
A long time ago, in a distant galaxy, one of our regular clients decided to buy an SUV, but since he had a limited budget, he hesitated between an almost new Chevrolet Niva and an older RAV4.
And then, finally, it happened. A 2001 RAV4 came to us with a 1ZZ-FE 1.8 liter engine and a heart-warming story about the happy new owner. Since the car was bought in a neighboring region, at a local service station they lifted it up on a lift, measured the compression, which turned out to be 11 in all pots, and after giving an excellent rating, they let us go on our way. But it was not there! On the way home, it turned out that the car was eating oil in buckets. The reason lies in a factory defect. On 1ZZ-FE engines until 2004, there were only two drainage holes in the groove of the piston oil scraper ring; after a mileage of 140,000, they coked and the rings stuck. Later, four holes were made in the piston on each side, which solved the problem. Therefore, there is only one way out: we replace the old pistons with new-style pistons, as well as rings and connecting rod bearings. Piston kit 13101-22180. There is a good write-up on the selection of spare parts in this article. By the way, the previous owner aggravated this situation by pouring the birthmark oil L... (well, you get the idea) - you have to dislike the Japanese so much.
Do-it-yourself replacement of the internal combustion engine valve cover gasket
If we don’t talk about a specific car model, the gasket is changed as follows.
First of all, I disconnect all the hoses and pipes that are connected directly to the valve cover. Next, I unscrew the gas pedal drive cable. Then I unscrew the bolts and remove the cover. Then I remove the old gasket.
Note: How to check the pressure in a car's air conditioner yourself
In order for the sealing element to work effectively and to avoid leaks in the future, it is important to thoroughly clean the surfaces of oil. You also need to thoroughly degrease both surfaces - both the cover and the cylinder head. Gasoline or carburetor cleaning fluid is suitable for degreasing.
Next, you can install the cylinder head cover and tighten the bolts. Here it is better to use a torque wrench - it is important not to overtighten.
1NZ-FE report on timing chain replacement
I read horror stories on the Internet about how people’s hands are torn off, blood flows in a battle with this bolt. My biggest fear was not being able to unscrew it. Therefore, I started not with the pallet, but with the bolt.
I just forgot. So, either VD helped so much, or luck, but the first time he did not give in.
Place a driver and a reinforced 17mm socket on the bolt, and place the handle of the key against the drive. We unscrew the spark plugs and unfasten the contacts from the coils to avoid buying new ones.
I didn't give in. Tryn, and it's done Hurray, I thought That's it.
Mistakes that novice mechanics make
Errors in installing the gasket are another reason for replacement. As mentioned above, during the replacement process it is necessary to thoroughly clean the contact planes. If this is not done, the seal will soon leak and will have to be replaced.
Novice mechanics often rush and forget about this point.
Another common mistake is neglecting the torque wrench. The fasteners are tightened sufficiently. In this case, the sealing element is pinched, squeezed out, and there can be no talk of any kind of sealing.
Also, due to improper tightening, the seal is pressed unevenly onto the planes.