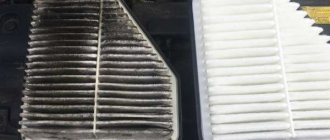
The cabin filter cleans the air coming in from outside. It traps dust, pollen and foreign bodies. Using a carbon filter allows you to clean the air from odors and harmful impurities.
During the operation of the car, the filter element gradually becomes clogged. As a result, its throughput is reduced. The stove and climate system begin to work less efficiently.
The problem with a clogged filter can be solved by cleaning or replacing it. If you are installing a new product, you must purchase an original filter element or follow the recommendations of experienced owners on choosing a consumable. In order for the filter to perform its intended functions efficiently, maintenance intervals must be strictly observed.
Importance of the filter element
The filter prevents the following from entering the cabin:
- asphalt particles;
- dust;
- pollen;
- road salts;
- dispute;
- pieces of leaves, etc.
The permeability of this element ensures air exchange in the cabin.
Cabin filter replacement frequency
The Toyota Corolla manufacturer indicates the desirability of changing the cabin filter every 20 thousand km. However, this frequency is only sufficient on good roads. In Russian conditions, to maintain normal air exchange in the cabin, it is recommended to install a new element every 10 thousand km.
It should be changed less often if the car is used in the northern regions of the country, where low temperatures last longer and there is a small amount of dust in the air.
In the southern steppe regions, the procedure must be performed more often due to the high rate of clogging. Strong winds are common here, lifting a lot of small debris into the air.
The fact that it is time to replace the dust-retaining element is indicated by a persistent unpleasant odor inside the car, the rapid appearance of a layer of dust on surfaces, and a decrease in the intensity of the air flow. Fogging of windows also indicates the need to perform the procedure.
How often should I replace it?
According to the regulations for the ninth generation, replacing the Toyota Corolla cabin filter must be performed at even-numbered maintenance, that is, every 20 thousand kilometers.
In most modern cars, this periodicity is more frequent, and the filter is not always able to work adequately for such a long time.
Therefore, in most cases, it makes sense to talk about the wisdom of replacing the cabin filter on Corollas every 10,000 km, with the only exception being the northern regions - their winters are long, so the rate of filter contamination with dust and organic matter is noticeably lower.
The most severe operating conditions are in non-chernozem regions: in the summer, the filter actively collects pollen, fluff, road dust and soot microparticles from the exhaust; in the fall, wet leaves are added to this, which quickly lead to the development of rot on the filter curtain.
Criterias of choice
The filter must be the correct size for the car's socket. Dimensions may vary slightly depending on the year of manufacture and manufacturer. If a parameter mismatch is detected, the element cannot be installed. Standard options are suitable for Toyota Corolla, marked with article number 87139-YZZ07. Coal models mounted on this vehicle are designated No. 88568-52010.
Pros of a carbon filter
Carbon models have a layer of activated carbon. It blocks not only dust particles, but also vapors:
- sulfur dioxide;
- benzene;
- ozone;
- carbon monoxide, etc.
The carbon version is capable of trapping many harmful compounds that make up exhaust gases, as well as trapping unpleasant odors. It is believed that pathogenic microorganisms cannot multiply in it.
Choosing a cabin filter
Catalog number of the original (factory) cleaning element: 87139-YZZ07, 88568-52010 , depending on the configuration, body type E120, E150.
The starting price for filters is from 1000 rubles from an official dealer. You can find it at car markets for 300 rubles cheaper. For many car enthusiasts, such amounts are beyond their means, so they are forced to look for cheap alternative options.
Proven and high-quality analogues:
- Mann,
- Bosch,
- TSN,
- Filtron,
- Champion,
- Patron,
- Oreon.
The average price is from 550 rubles depending on the region.
Step-by-step instructions for replacing the cabin filter on a Toyota Corolla
The process of replacing the cabin filter on a Toyota Corolla has some peculiarities. You should remove all items stored in the glove compartment. If you need to change the filter element in winter, it is recommended to warm up the interior, because After freezing, plastic becomes brittle and can break during manipulation.
The glove compartment should be opened and pressed on its sides to release the stops. The cover is removed from the grooves on the lower mount. This will allow you to access the panel. It is secured with latches, so it is easy to remove.
Then you need to carefully remove the used element so that the debris that has accumulated on it does not fall onto the furnace fan. Be sure to compare the old and new elements. Their dimensions must match.
After this, you need to clean the air duct of dust and seeds that have fallen inside. You can use a soft brush. A new element is inserted into the socket. Then, carefully, so as not to damage the latches, mount the protective panel back. Only after this can the glove compartment be installed.
Replacing the filter yourself
If you have “correctly growing” hands, replacing the cabin filtration element of a Toyota Corolla is not difficult. Before you change the cabin filter on your Corolla 150 yourself, empty the glove box.
Algorithm for replacing the cabin absorber:
- Empty the glove compartment;
- If replacing in the cold season, it is better to pre-warm the car, since cold plastic is fragile and therefore often cracks when pressed;
- To dismantle the glove compartment, carefully move the side walls and open the fixing elements of the drawer pull-out;
- Remove the glove compartment from the hook-shaped fasteners at the bottom of the glove compartment;
- Behind it is a cover covering the cabin filter. To remove the part, simply press down on the side clips attached to the body
- Take out the anti-dust element. Avoid getting debris into the air duct and heating fan, perform the manipulation very carefully, without pulling the filter with force;
- Insert a new filter.
After completing installation of the new absorber, secure the filter cover and then reassemble the glove box.
Cabin filter for Corolla 150
The cabin filter cleans the air coming in from outside.
It traps dust, pollen and foreign bodies. Using a carbon filter allows you to clean the air from odors and harmful impurities. During the operation of the car, the filter element gradually becomes clogged. As a result, its throughput is reduced. The stove and climate system begin to work less efficiently.
The problem with a clogged filter can be solved by cleaning or replacing it. If you are installing a new product, you must purchase an original filter element or follow the recommendations of experienced owners on choosing a consumable. In order for the filter to perform its intended functions efficiently, maintenance intervals must be strictly observed.
Timing for replacing the cabin filter Corolla 150/120
The importance of timely replacement of the filter element is not always obvious. Meanwhile, as it becomes polluted, the amount of fresh air entering the cabin decreases sharply. Since the car's climate system cannot operate without an influx of air mass, it begins to use internal air, as if operating in recirculation mode. At the same time, the amount of dust in the cabin gradually begins to accumulate, and the increased humidity contributes to the rapid fogging of the glass and creates favorable conditions for the proliferation of pathogenic microflora.
Replacement process
1. Initially, you need to purchase a new filter for the car’s interior, and open the glove compartment as far as possible.
2. Next, using a screwdriver, you need to unscrew the screws that are located on the lower right wall of the glove compartment. After unscrewing the screws, you need to pull the loop out of the rod into which the screw was screwed, thereby releasing the glove compartment itself. During this procedure, it is important not to lose the screw.
3. In order to remove the glove compartment from its hinges, you need to squeeze the glove compartment on the sides and pull it towards you, this will allow the compressed protruding linings to pass through the edges of the glove compartment compartment.
4. In the depths of the compartment under the glove compartment, there will be a small plastic box in which the Toyota cabin filter is located. To get directly to the filter, you need to remove the plastic cover from the box; to do this, you need to squeeze the fixing tabs.
5. After removing the cover, the filter must be pulled towards you, so it will be removed from the housing. The removed filter must be held horizontally so as not to spill any debris that has accumulated on it.
6. A new one is installed in place of the removed filter. When installing the filter, the arrows or the inscription UP on it should be located at the top, that is, towards the installer (after the filter is installed correctly, the inscription or arrow should be visible).
7.After the filter element is installed, it is necessary to close the cover of the filter housing; to do this, you need to lightly press it until you hear a characteristic clicking sound.
8. Next, the glove compartment container is installed in place; it should be squeezed from the sides again, as when removing it. The hinge is reinstalled and the screws are tightened in the lower right side of the glove compartment.
Cabin filter, what is it?
The cabin filter on the Toyota Corolla serves as an air purifier that comes from outside.
Its main function is to prevent dust and foreign elements from entering the vehicle interior.
This prevents the entry of these elements into the lungs of passengers, and accordingly ensures environmentally friendly operation of the vehicle.
When should I change it?
According to most recommendations of experts and doctors, the cabin filter must be changed twice a year, namely in the spring (after the winter period) and in the fall (after the summer period).
This is due to the fact that it is during these seasons that the most frequent clogging occurs. Most automakers recommend replacing the element once every 50,000 km.

