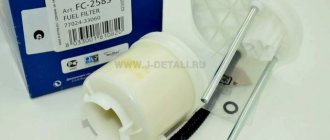
The fuel filter for Toyota Corolla 120/130 (ninth generation) and 140/150 (tenth generation) differ from each other in design and size. Also within each generation there are differences depending on the type of engine.
On all cars of both generations with gasoline engines, in addition to the main fuel filter (fine filter), there is also a mesh (coarse filter, pump filter). It serves for the primary screening of large particles of debris that may be in the fuel tank.
The main manufacturer of original fuel filters for Corolla 150 and 120 is Denso.
The design of the fuel filter and its necessity
Its presence in the fuel system of any vehicle is an important point. It plays a big role in the reliability and trouble-free operation of the motor. Two such devices can be installed in the car. One is installed at the inlet of the fuel pump, the other can be installed in the line, between the pump and the fuel rail.
The first of them is mounted in the pump housing, so to change it it is necessary to remove it from the gas tank. The design features of filter modules depend on the modification of the car body. Thus, Toyota Corolla cars with the 120th and 150th bodies, produced in the period 2007-2008, have different filter modules, but the principle of replacing them on both modifications is absolutely the same.
Fuel filters have the same purpose when installed in a vehicle's power supply system; this is to clean the incoming gasoline or diesel fuel into the engine cylinders from various impurities, solid particles, and water. This ensures long-term, trouble-free engine service.
Toyota Corolla in the back of E120
To replace you will need the following:
- Phillips screwdriver;
- flat screwdriver;
- clean cleaning material;
- 8 mm head with knob (optional);
- vacuum cleaner.
Step-by-step replacement instructions:
- We remove the rear seats. We lift the seats (without touching the backrests) and, with a little effort, remove their fastenings from the grooves in the body;
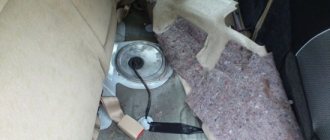
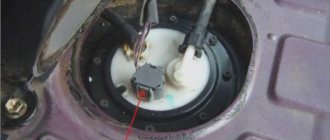
- Closer to the left side of the body there is an access hatch to the fuel tank. Carefully lift it, using a flat screwdriver to help it in a circle, if it cannot be removed by hand;
- Under the hatch, by pressing the locking button, remove the power supply and move it to the side;
- We wipe off dust or vacuum the space under the lid;
- Relieve the pressure in the system. To do this, with the fuel pump switch turned off, start the engine and let it run until it stalls.
- Disconnect the return hose. To do this, take out the yellow bracket (if you can’t pull it and get it out the first time, you can push the ends apart with a flat screwdriver, then it will be easier to remove) and, with a little effort, pull it up and disconnect it. Use a clean rag to wipe off any spilled gasoline.
- Disconnect the supply hose. To do this, press the clamps on the sides of the hose tip and disconnect. Use a cleaning cloth to remove spilled gasoline. It can be significantly greater than in the previous case if the pressure is not relieved;
- Using a Phillips screwdriver (or an 8 mm socket with a wrench), unscrew the 8 screws securing the fuel pump cover;
- Carefully remove the flask so as not to damage the fuel level sensor float;
- Disconnect the fuel level sensor terminal;
- By pressing the clips in a circle, we disconnect the upper part of the case;
- Disconnect the fuel level sensor. To do this, press down on it until the fasteners come out of the grooves.
- Disconnect the fuel pump connector (from the pump itself, not from the top of the housing);
- Similar to the upper part of the housing, disconnect the lower part where the pump is located. Do not lose the bottom rubber gasket;
- We take out the fuel pump along with the seal;
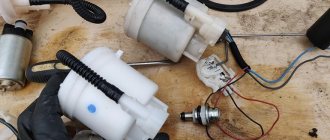
- Remove the fuel coarse filter. To do this, use a screwdriver to carefully pry off the fixing cap at the point of attachment to the pump, then remove the filter;
- Disconnect the return outlet tip (on the lower part of the housing) and the o-ring with the valve (on the upper part);
- We take a new fuel pump and install all the elements on it in the reverse order.
We recommend:
How to replace the cabin filter on different Toyota models
Signs that replacement is needed
If you read the car's operating instructions, it states that the change should be made after 80,000 km. It happens that the filter element lasts more than 100 thousand km, and sometimes it has to be thrown away earlier than the specified period. This depends on the quality of the fuel used. While the quality of domestic automobile fuel does not meet Japanese standards, this must be taken into account when operating the car.
READ MORE: Pros and cons of the Toyota Corolla car
What should the owner of a Toyota Corolla be wary of during its operation? Do not allow the machine's fuel filters to become completely clogged. This can reduce the service life of the engine. Contamination does not occur immediately, but over a period of time. Therefore, the following signs of machine behavior should raise alarming concerns:
- Uneven operation of the engine in different operating modes.
- Slower acceleration, worsening vehicle dynamics.
- Instability when starting the engine.
- Spontaneous engine stop.
About fuel filters for the Toyota Corolla model
Retail chains and automobile markets can offer a choice of at least three different types of such products for Toyota Corolla. Today, their production is established in China and Korea, and original products from Japanese companies are supplied for sale. There is no consensus among owners about which one is better or worse. Everyone believes that the most important thing is the correct installation of the sealing gaskets from the entire kit.
The choice of a fuel filter for a Toyota Corolla depends on several factors, such as the modification of the body and the year of its manufacture. Products for cars manufactured before and after 2007 are strikingly different in design. There are such fuel supply products that changing the filter element is only possible with the whole module. Since 2008, Toyota Corolla has been equipped with modules that allow changes to be made separately from the fuel pump.
Toyota Corolla in the back of E150
To replace you will need the following:
- flat screwdriver;
- pliers;
- hammer;
- wooden attachment (or special puller);
- cleaning material;
- vacuum cleaner.
Step-by-step instruction:
- Remove the rear seats;
- Under the seats, remove the cover hiding the niche for access to the fuel tank. It is sealed at the factory with sealant. If the filter has not been replaced, most likely it is simply covered. We help with a screwdriver in a circle if it is glued or does not give in;
- Turn off the power supply (press the button and pull it up);
- Vacuum under the lid or wipe with a rag;
- Relieve the pressure in the system. To do this, with the fuel pump switch turned off, start the engine and let it run until it stalls;
- We remove the hoses. We remember where each one is connected, or better yet, mark it;
- Using a special tool, unscrew the fixing ring. If there is no device, use a wooden pointer to press it against the edge of the ring and tap it with a hammer in a circle counterclockwise;
- Carefully, so as not to damage the float, remove the flask;
- Unfasten the level sensor and fuel pump chips from the top of the housing;
- We remove the fuel pump from the housing, having first disconnected the internal circulation tube;
- We disconnect the lower float part from the frame by pressing the clips at the base of the body;
- Remove the fuel coarse filter. It is seated on the cone through a rubber ring. Attached with three clips. If it doesn’t give in, we help with a screwdriver;
- Press the button on the top of the filter housing and remove the fuel pump;
- Disconnect the wire from the fuel pump;
- Remove the fuel pressure valve from the filter housing;
- Remove the clip securing the fuel filter housing;
- Remove the movable frame by pressing the latches at the base of the upper part of the flask;
- Let's put everything back together in reverse order.
We recommend:
How to replace the cabin filter on different Toyota models
About changing the filter element on the 120th Toyota Corolla body
I would like to immediately warn you about the strictest compliance with fire safety rules when performing this operation. Before starting work you need to prepare:
- Empty container for remaining fuel.
- Rags or rags.
- New filter element.
- Sealing gaskets.
- Flathead and Phillips screwdrivers, as well as a vacuum cleaner.
To begin removal, you need to lift the rear passenger seat of the car, and then remove the underbody upholstery. It is secured with two screws and a piston. To release them, you will need a “10” key and a screwdriver.
READ MORE: Toyota Corolla dashboard
The mat is lifted onto the seats and secured with seat belts so that it does not interfere with further operations. It is necessary to remove the foam layer under the mat. After this, the fuel pump cover will become visible, which can be easily removed if you pry it off with something sharp. Do not begin replacement until all debris accumulated there has been removed with a vacuum cleaner.
The pipes are removed from the fuel pump and the remaining gasoline is drained into an empty canister. After this, you should start the Toyota Corolla engine to completely exhaust the available fuel in the power system. After stopping the engine, turn it over with the starter several more times and remove the terminals from the battery.
After this, you can begin to remove the block with the pump. You will need the help of a Phillips screwdriver and an “8” wrench, as well as a rag or rag for spilling gasoline. When the block with the pump is removed, you can begin to dismantle the filter element.
It is necessary to release two latches on the body and several clips. Then you can easily remove it from the case with little effort. Having taken out the old one, insert a new fine cleaning element into the fuel pump housing. At the final stage, the fuel intake mesh is washed and purged, and assembly is performed in the reverse order.
Required Tools
In order to successfully replace the fuel filter on a Corolla 150, you need the tools from the table below.
Table - Tools required to replace the fuel filter on a Corolla 150
| Tools | Note |
| Screwdriver | With a flat, durable tip and a cross-shaped |
| Head | "at 8" |
| Vacuum cleaner | To prevent debris from entering the gas tank |
| Pliers | Can be replaced with pliers |
| Capacity | To prevent fuel residues from entering the body |
| Technical hair dryer | It will only be required if the service hole is too tightly fixed to the floor of the car. |
| Brush | For better cleaning of contaminants |