The steering rack of the Rav 4 3rd generation, with reasonable use of the car, rarely fails before 100 thousand km. If, when driving on an uneven road, significant vibration is felt in the steering wheel, it is difficult to return (or does not return at all) to the zero position after turning, then the unit needs to be repaired. To do this, the steering rack is removed and defective parts are replaced.
How to tighten the steering rack correctly: what you need to know
The steering rack is the main element in the steering mechanism of the vast majority of cars. Due to the steering rods and steering tips attached to the rack, the turning force is transmitted to the wheels when the steering wheel is rotated.
Regardless of whether the steering is equipped with power steering (hydraulic power steering, electric power steering or hydroelectric power steering) or not, the steering rack continues to be a key element.
During operation, the driver may notice the following:
- the steering rack knocks when driving over bumps and when turning the steering wheel, the steering wheel began to “dangle” and pull out of your hands on bumps, the rotation of the steering wheel became too easy;
- if you shake the steering wheel in the “zero” zone (the wheels and steering wheel are straight), large play is noticeable, and the wheels do not respond to sufficiently significant angles of rotation of the steering wheel when deviating from “zero”.
These symptoms do not indicate problems with the steering and rack. In this case, it is often possible to minimize wear and tear without repairs. To do this, you need to adjust the rack by tightening it. Read more in our article.
Negative points for the steering rack
The repair procedure is quite expensive. In order not to resort to this ahead of time, you will need to pay attention to those factors that have a negative impact on the RAV4 steering rack.
- Fans of sharp turns should know that if the wheels are turned all the way, this is fraught with an increase in the load on the steering mechanisms;
- If, while driving at high speed, the wheel falls into a deep hole, this may result in a deformed shaft or rack housing;
- Due to hitting an obstacle, for example, a curb or speed bump;
- Untimely replacement of oil seals, which allowed water and dirt to get inside.
More: Car owner reviews of the Toyota Corolla Fielder
How to make adjustments
Tightening the steering rack involves interacting with that part of the mechanism through which force is transmitted from the steering shaft to the rack. In general, the force after turning the steering wheel is transmitted using a helical or spur gear that meshes with a rack.
The gear is mounted on a bearing. In this case, the pressure of the gear to the toothed part should be tight (without gaps). For this reason, additional pressure springs are installed.
- If the rack-and-pinion pair is out of adjustment, it may require more effort from the driver to turn the steering wheel. In this case, you need to loosen the pressure of the gear to the toothed part, replace the lubricant, etc.
- If the rack is loose, there is a loosening of the fastening of the rack housing, the mounting bracket for the crankcase lever and the steering bipod, you can remove the knocking and play by tightening it.
Moreover, even if you tighten the steering rack correctly, this is a temporary solution. After several tens of thousands of kilometers, the driver will again encounter play and knocking in the rack. In this case, secondary tightening of the adjusting nut is not recommended. It is necessary to carry out a complete repair of the steering mechanism or replacement of the rack.
Adjusting the steering mechanism: features
Let us immediately note that steering racks installed from the factory usually require tightening, not loosening. Loosen the rack as part of adjustment or after repair. It is important to understand that the decision to tighten the rack involves a deviation from the initial factory settings.
Initially, the rack is configured at the factory in such a way that the pressure of the gear-rack pair is as tight as possible, while the steering wheel rotates easily and without effort. For this reason, you need to know how to tighten the steering rack. It should also be understood that tightening the steering rack does not always eliminate play and knocking, but you can reduce the play or knock of the mechanism.
Considering that the bushings are plastic, the first tightening “selects” the gap. However, if after such a tightening you tighten the rail again, the bushings will simply break or become completely deformed.
How to adjust the steering rack
Next, we’ll look at how to tighten the steering rack on a car. This can be done in a regular garage by driving the car into a pit or lifting it on a lift. The fact is that all work will need to be done under the car (taking into account the location of the steering rack).
- First you need to find a special adjusting nut on the rack body. On different cars, the nut can be in different places; the top of the nut is often covered by a cap.
- After removing the cap, you may also need a special tightening wrench. Often, if such a key is not available, you make it yourself.
- The next step is tightening the steering rack. During the tightening process, you must be careful not to overtighten the nut (remember, overtightening will damage the plastic bushings inside).
- Typically, no more than 1/3 of a full turn of the adjusting nut is required to securely lock the rack-and-pinion pair.
- In general, the optimal adjustment should be made so that the steering wheel rotates easily and freely, while play and knocking are minimized or completely absent.
Of course, when adjusting, it is optimal to measure the steering play with a special device - a play meter. Taking into account the fact that such a device is usually not at hand, the tightening of the nut is determined by your own sensations on the steering wheel (the need for tightening or loosening).
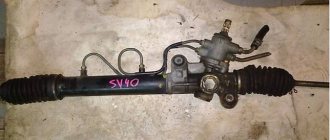
Removing the steering rack Rav 4 (2005 – 2012)
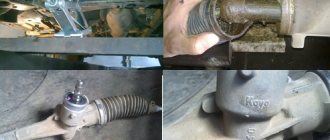
We unscrew the lock nut and the adjusting plug (photo)
Steering rack for Rav 4 2006 onwards. easy to dismantle yourself. To work, you will need keys for 24, 17 and 10, as well as a balloon for dismantling the front wheels of the crossover. The procedure is as follows:
- Rav 4 is driven into the inspection hole, the front wheel bolts are loosened with a wheel wrench. The car is jacked up, the wheels are removed, and the front part is placed on supports .
- The steering wheel is set to a straight course, the terminals are removed from .
- The foot mat is pulled back, releasing the latches holding the casing trim to the hole for the steering column. The cover itself is removed.
- The steering wheel rotates until the terminal connection bolt appears. Marks are applied for correct assembly . The fastener is unscrewed, the intermediate shaft is disconnected from the steering mechanism and removed into the cabin.
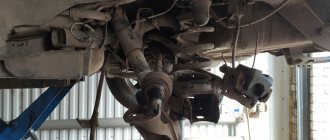
- Instead of removing the subframe, it is more advisable to remove the rear engine support.
- The boot is removed, and the steering rack complete with tips is moved to the left. To remove the unit, you need to slightly lift the engine crankcase with a pry bar (with emphasis on the subframe).
We unscrew the steering shaft nut, drill out the core by one and a half millimeters, unscrew it with a wrench to disassemble the shock absorbers (photo)
Recommendations
After completing the adjustments, the rack should also be checked while running. It is important to pay attention to the fact that after turning the steering wheel, the steering wheel itself must return to the zero position (steering wheel straight) without driver assistance. If you have to turn the steering wheel by hand (the steering wheel does not return to zero), this indicates obvious problems with the rack (too tight the adjusting nut, wedging, etc.).
To check the steering return, just go through a turn and, at the exit of it, press the gas, briefly removing your hands from the steering wheel. If the steering wheel does not tend to return to the zero position and needs to be turned independently, then the nut on the rack may be overtightened and needs to be loosened.
Source
Signs of a faulty steering rack
The steering rack of the RAV 4 2007 did not cause any particular complaints from the owners during the entire period of operation. If the car is used wisely, problems with this unit do not begin before the mileage of 100 thousand kilometers. Yes, there have been cases of complete replacement of the rack with much lower mileage, but these cases are isolated. This is due to the ruthless operation of the car, or a factory defect (it should be noted that the latter rarely happens).
Therefore, every owner should be able to recognize the first signs of a rack breakdown in order to contact a service station in time. Let's look at these symptoms:
- One of the most common breakdowns is a leak of power steering fluid; this occurs due to a violation of the density or integrity of the sealing rings. You can detect this problem when checking the level in the tank, or by noticing a puddle under the car when parked.
- When driving on uneven roads, a knock is heard from under the hood, and the steering wheel vibrates noticeably.
- When driving on a flat road, the car “floats” and there is play in the steering wheel.
- After turning the steering wheel, it does not return to its original position, or returns with force.
We disassemble the steering mechanism of Rav 4 2007
Analysis of the mechanism on Rav 4 produced in 2007 and 2008 is similar to the analysis of this unit on cars of previous years, since we are talking about crossovers of the same generation. On the removed steering rack, the unit responsible for adjusting the pressure sleeve is disassembled. To do this you need:
Holding the shaft, lightly tap the housing and remove the clamping sleeve (photo)
- Tighten the locknut, unscrew the adjusting plug and try to pull out the bushing. If she does not give in, then move on to the next point.
- Unscrew the nut of the “worm” (i.e., the steering shaft) using a special wrench (sold as a wrench for disassembling shock absorbers produced in our country). The steering shaft nut is pre-drilled with the drill slightly extending into the body (the depth of the hole is a couple of millimeters).
- Holding the shaft, knock it out with gentle blows to the rack body.
- The clamping sleeve is held in place by a rubber seal, so you need to lightly tap it with a knob and then pull it out of the seat.
You can bend the horizontal shaft bushing with something or simply break it (photo)
Repairing the Rav 4 steering rack involves removing another bushing and a needle bearing.
Remove the bushing and needle bearing
The photo shows the Rav 4 steering rack disassembled. Elements requiring replacement are obtained in the following order:
- The whiskers are bent with three needles and the sleeve is pushed outward by the internal (horizontal) shaft. It is more convenient to work when the assembly to be disassembled is clamped in a vice.
- After removing the shaft, you can see a needle bearing in the well that needs to be removed. In some cases, repair of the rack and pinion mechanism becomes necessary precisely because of the knocking of this part.
- Removing the part involves drilling a hole. In this case, you need to get into the bearing race. Then it is simply knocked out of the rack body.
On a Rav 4 30 car in the 2009 body (pre-styling version), the needle bearing is removed in exactly this way. The drilled hole is subsequently sealed.
Drill a hole to get into the edge of the needle bearing and knock it out (photo)
Replacing steering rack rav4 3rd generation
One of the main elements affecting the safety of any vehicle is the steering rack. Although the third generation Toyota RAV-4 is a completely reliable car, it has its weaknesses.
One of the pain points is the steering rack, which is sensitive to corrosion. When moisture gets on it, destruction occurs. We are talking about a car mileage of 20-30 thousand km. In the previous publication we talked about removing the second generation RAF rack.
Today we will look at the design and replacement of the RAV4 , which has been produced since 2007. This unit provides for the installation of hydraulic power steering.
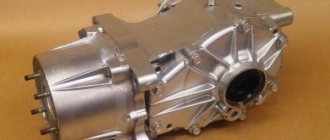
What's included in the steering rack package?
The node has no individual weak positions. It is necessary to understand the design, to know what elements the unit we are considering consists of:
- The body is made of aluminum. There are moving mechanisms inside.
- The drive gear and gear plate are responsible for the operation (move) of the shaft in the desired direction.
- Bearings are responsible for the silent operation of the gear.
- Springs prevent gaps and play between the gear and the bar.
- The operation of the mechanism (rack) in the required range is the prerogative of the limiters.
RAV4 3rd generation. Replacing the steering rack yourself
Symptoms of a problem
The manufacturer claims the possibility of operating the unit we are considering with a mileage of 100 thousand km. This is subject to compliance with the rules of maintenance and proper operation. Replacement is possible at an earlier stage, due to:
- With a factory defect.
- Improper operation of the vehicle.
- With the condition of the road surface.
Untimely repairs can lead to replacement, which is an additional expense. Symptoms of technical illness are as follows:
- Hydraulic booster fluid leak. The O-rings have failed. It is necessary to pay attention to the amount of liquid in the tank. Periodically inspect vehicles in the parking lot.
- Driving on uneven roads may indicate a malfunction. In this case, a knock is heard from under the hood, and vibration in the steering wheel is felt.
- If the car floats on a flat track, there is play.
- When performing a maneuver, the steering wheel does not return to its original position. Difficulties may arise: physical effort is required to return the steering wheel to its original position.
To remove and install a new element, it is recommended to use original spare parts.
| Year of manufacture of the vehicle | Catalog no. |
| 2006-2012 | 45510-42080 |
| 2013-2015 | 45510-42160 |
You can use ATG, Lizarte, General Ricambi products.
RAV4 3rd generation. Replacing the steering rack yourself - cleats
When to replace a failed unit
RAV4 steering rack is carried out:
- If the element cannot be restored (restored).
- When cracks and deep chips appear on the body of the unit we are examining.
The element in question affects safety. Therefore, technical work should be carried out by service center specialists. Locksmiths have the necessary equipment and special tools to carry out diagnostics.
RAV4 3rd generation. Replacing the steering rack yourself - replacement
Removing the steering rack
The algorithm RAV4 steering rack is as follows:
- Space is freed up in the engine compartment: the MAF is removed.
- Next, the air purifier is removed.
- The air filter is disconnected.
- The hoses are dismantled.
- Inside, you need to unscrew the crosspiece of the steering cardan.
- Then, remove the steering shaft boot.
- Then disconnect the second steering shaft driveshaft.
- After this, there will be free access to the regulator with tubes, which must be dismantled.
- The RAV4 steering rack is being replaced .
RAV4 3rd generation.
Replacing the steering rack yourself - fastening The process takes approximately two days. The delivery time for the new item should be taken into account. You can purchase repair funds for prompt replacement at specialized or large service stations.
Due to a certain complexity and taking into account the consequences of incorrect dismantling, it is recommended to shift responsibility to the service center professionals.
RAV4 3rd generation. Replacing the steering rack yourself. Conclusion
Do you repair electric steering racks on Mazda 6?
Good afternoon. Yes, we can repair it within one day.
Recently I began to hear a knocking sound in the steering rack. This is fine? Can I somehow fix it myself?
No, this shouldn't happen. Regarding self-repair of such important mechanisms, we are always against it. Not only because they are interested in providing services, but also because then we will have to correct your mistakes during independent repairs, and this is much more difficult. When there is a knock in the rack, in order to determine the cause, you must initially completely disassemble it. Only knowing how the mechanism should be designed can you notice its malfunction. Not everyone, even the most experienced driver, is sufficiently knowledgeable about the internal structure of the rack.
Assembly order
To avoid difficulties when driving a car, assembly work is performed in the following sequence:
- A new bearing is pressed inside the housing. The correct spatial position relative to the shaft is ensured;
- The steering shaft is lubricated. For this purpose, the composition recommended by the manufacturer is selected;
- The quality of the completed stage is checked. There should be no obstacles when turning the shaft by hand;
- The backlash is controlled by rocking. If it is present, tighten the nuts or check the position of the upper ball radial bearing
Attention! The presence of play in this element of the Toyota RAV 4 steering rack is unacceptable. A new spare part is selected taking into account this parameter. Installation of the horizontal shaft is carried out by removing the vertical one.
The price for repairing a Toyota RAV 4 steering rack varies significantly. Many service stations not only provide services, but also sell components. This saves time on repair work. If during the repair of the steering rack after completing the dismantling work it turns out that it is necessary to replace some spare part, it can be immediately purchased and installed in place. When choosing a suitable car service company, it is worth studying the available offers on the market. This will allow you to choose the best option in terms of cost and quality of repair.
Post Views: 1,291
Steering rack malfunctions Toyota RAV-4 1 1994-2000
The main sign of a breakdown is a knocking sound in the steering rack of the Toyota Rav 4 1 1994-2000, coming from under the front axle. At first it is barely noticeable and appears only when driving on uneven roads. Without taking any action, the knocking will intensify and begin to radiate into the steering wheel. Further connivance is fraught with failure of the unit and, as a result, an increase in the likelihood of getting into an emergency situation. In this case, we are no longer talking about repairs - a complete replacement of the Toyota RAV-4 1 1994-2000 steering rod will be required. At best, you will limit yourself to replacing the Toyota RAV-4 1 1994-2000 steering rack oil seal, crosspiece or steering tips.
Here are some more signs of a faulty steering gear:
turning the steering wheel is difficult in both directions, and a whistle is emitted;
the steering wheel turns poorly, but the effort disappears after gaining speed, an itching sound is heard;
the steering wheel does not rotate well when the power steering fluid temperature is below 30 degrees, when it warms up to 50 degrees and above, the situation returns to normal;
replacement or repair of the Toyota Rav 4 1 1994-2000 steering rack is required if the angle of rotation of the steering wheel differs from the angle of rotation of the wheels, the car skids and control becomes noticeably difficult;
the steering wheel vibrates when driving in a straight line;
The steering wheel does not return to its original position or turns spontaneously.
Disassembly procedure
To repair the steering rack, it must first be disassembled. This is done in the following sequence:
- The steering shaft and the clamping sleeve are removed;
- The locknut and adjusting plug are twisted, the sleeve is pulled out;
- The steering shaft nut is unscrewed and the shaft is removed;
- The bushing and needle bearing are removed.
The last stage requires a certain sequence. First, the whiskers are bent using three needles, which allows the sleeve to be pushed outward with a horizontal shaft. For ease of disassembly, the assembly is fixed in a vice. After removing the shaft, the needle bearing becomes accessible and can now be pulled out.
Most often, repair of the Toyota RAV 4 steering rack is required due to wear of the needle bearing.
Holes are drilled to remove the part. To achieve your goal, you must get into the support cage. After this, it is simply knocked out to remove it from the rack body. The drilled hole is then sealed during the assembly process.
After disassembly, the condition of the parts is assessed. All worn-out parts are replaced with new parts. Replacement is carried out using a special tool.
You can buy the necessary components in a specialized store. When choosing, the Toyota RAV 4 generation and year of manufacture are taken into account. The characteristics of the third and fourth generations are slightly different.
Moscow services for repairing racks and power steering of Toyota Rav 4
You can come to any of our car repair shops to have your Toyota RAV 4 rack repaired. Our car services can be found in different parts of Moscow, which will allow you to choose an option closer to your location. To avoid standing in line, just call the phone number and make an appointment with a specialist!
We hire only qualified specialists, so it is simply impossible to run into someone who is not competent enough! The work is carried out in accordance with all technical requirements (you can familiarize yourself with it before starting work). In addition, we provide a guarantee for our work; our specialist will advise you in more detail. With him you can discuss all the nuances of the upcoming rack overhaul or replacement.
You can call us at any time during business hours. Even if you plan to arrive within half an hour, we recommend that you notify us of your arrival by calling in advance. This way, we can reduce your waiting time at the reception. The technician will already know basic information about your car and the main complaints.
There was a knocking sound from the steering rack. pulled up. The knocking noise disappeared, but the steering wheel became difficult to turn. after a while the knock appeared again and the steering wheel was rebuilt. Do you really need to change the rack? price 20000.
Serge, check the condition of the intermediate steering shafts. I also had this problem. At the service station they said the rack needs to be changed, then I went to an official dealer, they looked and said the intermediate steering shafts needed to be replaced. I bought spare parts from an online store, they cost about 5 thousand and the repair itself cost 2.5. Read the details here - https://avtotalking.ru/komu-doverit-remont-avtomobilya/
What did you pull up? Knocks on the steering rack are usually broken crosspieces or steering cardan. Maybe, of course, the shaft is knocking, but then the seals have long since come to an end and the Gur fluid should run out. Are there any leaks?
I have a 2006. I have already changed the rack because it is not repairable. The right side is knocking. The issue price is 17,000 rubles.
on the 3rd generation, the rack is perfectly repairable, the right bushing breaks, which is replaced separately, no amount of tightening can fix this; you can find drawings on the internet without any problems
In Barnaul I tried this topic, but no one has done it yet. so just a replacement.
Rav4 itself has a third Long, my friend bought the same one. In Barnaul we already have a guy with golden hands who replaced this bushing for 3,500 rubles. The knock is gone. This guy is located in the center, the Old Bazaar area.
Diagnostics and repair of RAV4 rack
Fracture of the rack - deformation
one or another of its components, for example, one of the teeth of a rack or gear, requires the immediate intervention of a specialist. This problem can be recognized by a sudden knocking sound in the area of the front axle of the car or a crunching and grinding sound when turning the steering wheel while driving. Sometimes even the steering wheel can jam. But even if this does not happen, then further operation of the car with faulty steering becomes dangerous. Only a car service technician can determine exactly which rack unit the breakdown occurred in and how to fix it, after diagnosing the entire mechanism.
To do this, so that nothing interferes with the free rotation of the car’s wheels, it is installed on a lift. The master, rotating the steering wheel from one extreme position to the other, observes the uniformity of their rotation. Thus, it determines the presence of play in the rack mechanism. If you hear a knocking or grinding noise, these are most likely signs of a gear failure. In this case, all deformed and
worn parts must be replaced.
If the malfunction consists only of a gap that has formed, then at an early stage of its occurrence you can get rid of it by tightening the loose components. If the backlash is caused by worn parts, then replacing them is inevitable. The technician will be able to accurately determine the scope of repair work and, accordingly, the cost of repairing the RAV4 steering rack only after disassembling it and visually inspecting the components.
Source
Dismantling procedure
Carrying out repair work on your own is associated with a number of difficulties: lack of tools, equipment, experience and knowledge. Auto repair shop specialists have everything they need to perform quality repairs. They are familiar with the steering rack repair technology, as they have undergone the necessary training.
The car service company's specialists will diagnose the steering rack and then begin repair work. They will have at their disposal not only the necessary tools, but also a repair kit for performing repairs.
Dismantling work is carried out in the following sequence:
- The car is driven into a viewing ditch. Loosen the bolts on the front wheels. The car is lifted on a lift or using a jack, and the wheels are removed. The front part is fixed on supports;
- Having aligned the wheel in the direction of travel, remove the terminals from the battery;
- Loosen the housing lining clamps. The cover is removed to provide free access to the elements underneath;
- Rotate the steering wheel, waiting for the terminal connection bolt to appear. Marks are made according to which the steering rack will be assembled;
- After unscrewing the fasteners, remove the intermediate shaft of the steering mechanism;
- The rear support of the internal combustion engine is removed;
- The boot is removed. The steering rack along with the tips is shifted to the left and removed.
Advice! All fasteners are placed in one place, as they will be required during the assembly stage. Damaged elements are replaced with new ones.