Vehicles are quite complex mechanisms that constantly require maintenance. For example, sometimes it happens that urgent adjustment of the rack on a Toyota Avensis 250 hatchback or any other car is necessary.
It is worth noting that it is not always advisable to contact a service center. Often they can only delay the malfunction, but they will charge a fairly substantial amount for the services. Thus, it makes sense to repair the Toyota Corolla 120 steering rack yourself. We'll talk about how this happens now.
Toyota Avensis steering rack replacement
Preventative inspection of the steering rack is the best way to maintain its performance and avoid costly repairs.
Unfortunately, not all Toyota Avensis owners know about this or try to remember to carry out regular diagnostics. The following factors may indicate possible malfunctions in the steering mechanism:
- difficulties experienced while driving;
- trace of oil under the car;
- noise accompanied by vibration;
- rod corrosion;
- the appearance of rack play;
- leaking around the seals.
The need for repairs can only be determined by a specialist and an experienced driver. As for replacement, although this measure will lead to large expenses, it will definitely allow you to forget about the steering rack for several years. Why is this so? The fact is that problems in the operation of the mechanism probably affected all the related parts. Repair will allow you to get rid of the problem for a while. In a few months, she will assert herself again and require new cash injections.
The cost of repair and replacement services may vary. In many services the price of both types of work is not less than 65 USD. Despite the perceived complexity, removal and subsequent installation can be performed by the owner himself.
Tools are likely to be found on the shelves in the garage, and the necessary information, including important notes and recommendations, can be taken from this manual:
Source
Where to begin
Most often, problems manifest themselves in the fact that the steering rack begins to knock. It is this situation that we will talk about in the article. As a rule, the Toyota steering rack knocks in only two places: the adjusting unit, and also near the bushing, which is located on the side opposite the driver (if the steering wheel is on the left, then the bushing is on the right).
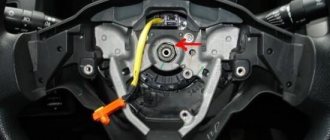
If you don’t know how to remove the steering rack on a Toyota Wish, then you need to start by removing the steering shaft protection. Everything here is unscrewed by hand. No special effort is required for removal.
The bolt that secures the intermediate shaft to the crosspiece is completely unscrewed. It is important that the wheels are straight, the steering wheel is locked, and there is no key in the ignition. Otherwise, the steering wheel will be able to turn after removing the rack, which will lead to a break in the airbag wiring.
Then the front of the car is hung out and the front wheels are removed. Next we proceed to the actual removal of the rack. It is quite difficult to pull it out without first disassembling it, so first you should tighten the steering ends and the subframe (it is attached with 4 bolts to the body, as well as 3 nuts and 3 bolts to the rear cushion). If everything is done correctly, the subframe and rack will lower and hang on the levers. Now unscrewing the faulty element itself will not be difficult.
The main signs of a faulty Toyota Avensis steering rack
- Poor vehicle handling;
- Presence of oil under the car;
- Vibration hitting the steering wheel;
- Presence of corrosion deposits on the rod.
Only a specialist at a service station can make a final and correct diagnosis. Replacing the steering rack is not a cheap procedure, but it also becomes necessary because it prevents damage to all other parts.
If desired, this procedure can be carried out independently, which will save some money. But you shouldn’t skimp on the rack itself, as this can cause even more damage to the car.
How to replace a bushing
A new bushing can be made from fluoroplastic, but it is important to adhere to the original drawing as closely as possible. Then it is necessary to make a longitudinal cut on the element, without which the sleeve cannot be installed in the right place. The part must be installed with a cut in the direction of movement of the machine to reduce the load on the element.
The bushing is lubricated and carefully straightened. Using the free end of a rolling pin, we check the quality of the fit. Using an aluminum washer, we press everything into place.
Then everything happens in the reverse order to the process of dismantling the steering rack.
If you want to learn more about how to replace a Toyota Vitz steering rack, the video located on our website will help you with this. It explains in detail in a few minutes how to repair this unit with your own hands.
Removing and replacing Toyota Avensis rack
First of all, you need to make sure that the front wheels are set to the position corresponding to driving straight ahead;
Remove the steering column hole cover;
Disconnect the second intermediate shaft of the steering column, while the steering wheel itself should be secured with belts to prevent rotation. This must be done in order to prevent damage to the spiral wire;
During the removal process, special marks will need to be applied to the first and second intermediate shafts of the steering column, which will greatly assist during installation and will greatly facilitate it when aligning the applied marks;
Of the two bolts, one should be loosened, the second should be completely unscrewed, which will allow the intermediate shaft No. 2 to be disconnected. The tightening torque should be 35 Nm;
Remove the bottom cover of the steering column hole;
Remove the front wheels, with a tightening torque of 105 Nm;
Remove the engine protective covers on the right and left sides;
Disconnect the tie rod ends from the steering knuckles;
For models with xenon headlights, remove the body position sensor;
For models with power steering, use a special tool to disconnect the discharge and return pipes from the steering mechanism. When using a special tool, the length of the torque wrench must be at least 345 mm. During the tightening process, the special tool and the torque wrench should be placed parallel;
Further actions
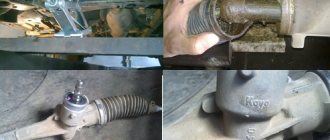
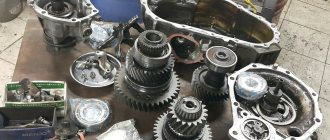
When the unit is removed, we take it to the workbench and begin disassembling the element. To begin with, the rubber boot is dismantled. A 12mm wrench will help you unscrew the bolt. Afterwards, you need to remove the intermediate shaft. The locknut is unscrewed using a gas wrench. We unscrew and take out the shaft pressure cup and put on the intermediate shaft again. With a light blow of a copper hammer, the shaft is removed along with the bearing.
It may also be interesting: The starter clicks but does not turn, what is the problem? Causes, diagnosis, repair
The rack turns and the lock nut is unscrewed using a 41 wrench. Next, we proceed to dismantling the adjusting cup (for this we will need any flat object). Then the spring with the pressure piston is removed.
Removing the left boot must be done as carefully as possible so that the element does not tear (in no case should you use sharp objects). Then we proceed to unscrew the left rod. On the reverse side, the clamp is loosened and the boot is dismantled. The rolling pin of the lath is removed and placed on the side.
On the left side we will see an aluminum pressure washer, behind which is hidden a bushing that requires replacement. The washer is hooked and knocked out, after which access to the sleeve will be free.
Do-it-yourself step-by-step repair of the steering rack in Toyota cars
Such a complex technical mechanism as a car requires constant maintenance for stable operation. All components in a car are important. And the breakdown of one or another unit will, at best, lead to discomfort during operation, and at worst, to expensive repairs. Failure of the control system in Toyota cars falls into the category of expensive repairs. Therefore, it is important to avoid breakdowns and prevent potential problems that could lead to system failure. But if the control is out of order, you can still try to repair it yourself.
What is a steering rack
If you imagine the wheels and steering wheel as planes, then they will lie perpendicular to each other. And to make them interact, a system is needed to connect the nodes. This is what the steering rack serves for, which not only forces the wheels to turn along a vertical axis by transmitting force from the steering wheel, but also softens its movement.
The system forces the front wheels to synchronously deflect from the zero point (that is, the position when the wheels are strictly parallel to the car body).
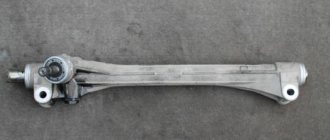
Steering rack components
Under the influence of the steering force, the wheels are deflected due to a system of gears and a notched beam. Since all modern Toyota vehicles are equipped with power steering (hydraulic or electric), a system with technology-appropriate parts is being considered. Thus, the steering rack consists of the following parts:
- drive shaft;
- gear;
- distributor;
- gear beam;
- housing with hydraulic cylinders;
- pressure pipelines;
- protective anthers;
- internal traction.
In the unit, all the above parts are interconnected. Failure of one or more parts will result in serious operating difficulties. First of all, this concerns rubber boots and cuffs, which protect the mechanism from moisture, sand and dirt flying from the road.
However, all rubber parts are consumables. They, as a rule, change during routine repairs of rods and tips. However, things are much more complicated if the main shaft gear or rack wears out. In this case, you cannot do without a complete overhaul of the unit or even replacement with a new one.
How to understand that repair work is required
You can determine that it is necessary to repair the steering rack of the Fielder 2005 by the following characteristic signs:
- oil leaks;
- extraneous sounds are heard from the power steering system;
- during turns it is necessary to apply more force;
- The steering wheel play has increased.
In any of these cases, it is worth carrying out a thorough diagnosis, and then starting to repair the Toyota Corolla E120 steering rack.
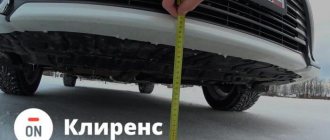
Video advice on adjusting the rack on a Toyota Avensis 250 body:
Removing the steering rack
To repair this system in Toyota cars with your own hands, first of all you should take care of the necessary set of tools and working conditions. Lying under a car in the yard, this is very difficult, if not impossible. What to do:
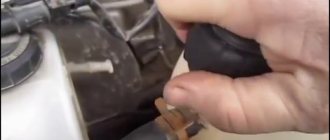
- A special fluid is drained from the power steering reservoir.
- The nuts securing the rods are unscrewed.
- The rod ends are pressed out. To do this, you will need a special tool that allows you to quickly and effortlessly remove this control unit.
- The front axle is detached from the body. In common Toyota models, for example, Vanguard, Imi, Premio and Vish, these are ten bolts with a head size of “19” and five nuts with a head size of “17”.
- To completely dismantle the rack, it is necessary to disconnect the collector. To do this, unscrew two bolts at “12”.
- The steering protective shield is dismantled, which protects the device from mechanical damage while driving.
- The steering cross is disconnected from the steering rack.
- The power steering lines are disconnected. It is important to mark which one is the input and which is the output, so as not to get confused during reassembly. It is best to first unscrew the top fastening of these hoses.
- The rack has been released and must now be removed. To do this, it first moves to the left, which allows you to move the steering rod down. Then the entire assembly is shifted to the right and removed from its seat. For complete dismantling, the mechanism is lowered down.
What do we have as a result?
Thus, the steering rack is a very important element of the vehicle. If an element malfunctions, driving a car will be difficult and even somewhat unsafe. Thus, it is important to immediately begin repairing the unit when a malfunction is detected.
There is not always a need to contact a service center - alternatively, you can do everything yourself . We have prepared detailed instructions for you that will help you disassemble the steering rack on a Toyota. At the same time, if you lack the necessary skills and tools, it is better to entrust everything to the hands of professionals.
Video review of Toyota steering rack repair: