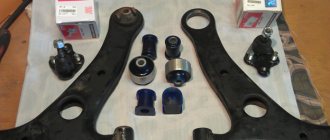
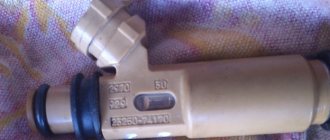
About 1.5 years ago I was bothered by a knock in the steering rack, took it apart, replaced the bearings and spring. I didn’t change the steering rack bushing; there was nothing to change. The rack moved freely in the bushing by hand, but did not knock. And now the GS 1KIT6720 Steering Rack Repair Kit has appeared on sale. I bought it to replace the old one.
The old bushing is 0.2mm thicker than the new one. This is approximately 0.2mm + 0.2mm = 0.4mm on the inner diameter. Of course, many will say, the bushing in your rack is not worn out, 12 years, 300 thousand km. and I never turned the steering wheel. Well, how long will such a bushing last? I think the rack will continue to knock on the right side after installing this new bushing. It costs 1,000 rubles, and you’ll have to pay at least 5,000 rubles to reassemble the rack. And the rack kept knocking and will continue to knock...
AND NOW ABOUT THE BUSHING! . It’s useful to look at the catalogs to see why the bushing is wrong!
This is where the size mismatch actually comes from. YOU NEED BUSHING LM6081 HAS INNER DIAMETER 1MM LESS! SUCH FUCK..., ONLY IN RUSSIA THERE CAN BE ABOUT THE SAME - LET'S PUT IN A REPAIR KIT, LET THE PEOPLE FUCK THEMSELVES FOR THEIR MONEY... AND THE MAIN THING FOR US IS TO SELL.
Recommendations
Comments 9
Hmm... based on the drawing www.drive2.ru/l/473534095511519452/ Just the same, 81 is not correct... and 44 is the plane! But it's better to read the comment below. very well written. Foil for the original bushing, and new bearings. It’s just that we haven’t been able to break the chetop yet... This fluoroplastic is in the firebox. Did you manage to remove the original bushing without damaging it? . Did you remove the rack?
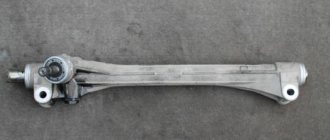
The original bushing can be removed without problems using 2 self-tapping screws. The wall thickness of the bushing removed from the rack is greater than that of the new LM6044. What's the point of installing such a bushing? The catalog says bushing LM6044 is installed on FIAT 500//// Internal diameter 26 mm External diameter 32.8 mm Height/Depth 24.5 mm Material plastic Wall thickness (32.8-26)/2=3.4 mm.
LM6081 — TOYOTA Corolla 2000—2008, TOYOTA Corolla (E140, E150) 2006—2013, TOYOTA Auris Internal diameter 25 mm External diameter 32 mm Height/Depth 23 mm Material plastic Wall thickness (32-25)/2=3.5 mm. This is data from the drawing, what is really there in fact xs.
autosteering.ru/L-M6081 In stock Warehouses Master Service: Belgorod: 9 Ekaterinburg: 4 Krasnodar: 4 Krasnoyarsk: 2 Moscow: > 10 Rostov-on-Don: 4 St. Petersburg: 5,666 RUR Retail Everything is for sale, everything is in availability.
LM6081 does not break.
WHERE DOESN'T IT BEAT? Motorherz HLM00003 or LM6081 MSG For example, there are more than 10 pieces in stock... autosteering.ru/L-M6081
In existential and similar online stores.
Blog Post
Japanese cars are among the leaders in the car market in terms of reliability and durability, and, of course, Toyota is no exception.
A component such as a steering rack can easily serve its owner for several years without interruption. In any case, this unit usually produces a working life of 200 thousand kilometers without any problems. In situations where Toyota Corolla rack repair is required earlier, the car owners themselves are often largely to blame. For example, impacts on the rack body when driving onto a curb or any other obstacle lead to faster wear. The same can be said about maneuvering that is performed too abruptly. Don’t think that this problem is unique to classics - SUVs suffer from excess loads on the rack no less, and sometimes even to a greater extent. Therefore, regardless of which Toyota car you own, it is better not to exceed the recommended preventive diagnostic intervals. Experts recommend getting checked at least twice a year.
Steering rack: typical problems on Toyota Corolla 150
- The steering wheel does not completely return to its original position after turning: the rack and shaft are deformed due to an impact, an accident, an accident;
- Knocks in the area where the mechanism is located: wear of the steering rack teeth, silent blocks, fasteners;
- The shaft on the rack is eaten: mismatch of the angle between the teeth and the screw;
- Formation of liquid leakage from the housing: deformation due to impact, corrosion;
- The steering wheel rotates in both directions with a large, uncharacteristic force: deformation, damage to rubber seals, pump washers;
- A slight whistle under the hood when turning the steering wheel: the power steering pump belt is loose;
- At different speed modes, the steering wheel behaves differently: the formation of scuffing on the rotor;
- Vibrations when turning the steering wheel: insufficient oil level in the system, power steering, wear of elements.
The list is not exhaustive and in each situation may be supplemented by new factors not previously identified. Faults appear either singly or in combination with other faults. During the diagnostic process, be extremely careful and do not make mistakes. If you don’t have experience in repairs, entrust the job to the specialists from the service station.
Symptoms of a problem
- The very first and most reliable sign is the appearance of a characteristic knocking sound in the area of the front linkage and axle . At first it is quiet and appears on rough roads, but later it intensifies and can be felt in the steering wheel.
- The steering wheel is very tight at low speeds, and as it accelerates it becomes softer, but a vibrating sound appears.
- The actual angle of rotation of the front wheels does not match the degree of rotation of the steering wheel. In this case, the car becomes uncontrollable and throws around corners.
- The Toyota Corolla 120 steering rack is leaking. Liquid appears on the boots, usually when the level in the tank drops. If measures are not taken in time, rust may appear and the shaft seals may fail, and the tip may also break.
- When the power steering temperature drops, the steering wheel turns hard to the sides. The problem disappears when warming up to 50-60 degrees.
These are the main problems that you should pay attention to and diagnose the condition of the mechanism in order to avoid further wear.
It is important that if you do not pay attention to warning signs in time, consequences may arise that will require you to invest a large amount of money and jeopardize the safety of driving your car. In critical cases, there is a strong roar, squeaks and absolute uncontrollability of the car.
Repair and replacement of steering rack for Toyota Corolla 150
Any repairs begin with a comprehensive diagnosis. This can be done either independently or by specialists from service centers. Steering gear type: Toyota Corolla NZE 121.
- Visual assessment of the general technical condition, identification of defects;
- Dismantling followed by diagnostics on a special stand. The operation of the steering mechanism is as close to reality as possible;
- Cleaning from dirt, oil, fossilized deposits. The effectiveness of the inspection increases when the unit is cleaned, defects are visible, and it is possible to visually assess its performance;
- Disassembly into component elements, replacement of damaged ones, restoration, installation of new consumables.
A little theory
Toyota Corolla car
equipped with a control system with an electric booster and a special transmission mechanism. This EUR scheme allows you to transfer the rotation of the steering wheel to a horizontal plane, facilitating rotation of the gearbox around its axis. Next, he pushes the levers connected to the wheels, causing them to turn in the desired direction.
Main design details:
- Frame.
- Gearbox.
- Worm shaft with bearing.
- Support bushings.
- Anthers.
- Shaft cross.
- Crawler.
It would probably be superfluous to say that not only the enjoyment of driving, but also the safety of others and our loved ones depends on the smooth operation of these units. Therefore, it is highly undesirable to delay the restoration of parts.
Repair or replacement
Each case is individual. It should be understood this way: if the mechanism is subject to restoration - repair, in all other situations - complete replacement with new consumables. In order to achieve partial savings, you can combine repair and replacement. The exact dimensions of the spare parts are indicated in the operating instructions, where there is a graphic drawing of the steering element.
Based on the results of a comprehensive diagnostic, a list of necessary new spare parts, consumables, repair kits for seals, and rubber products is compiled, and preparations for repairs begin.
Assembling the rack Rav 4 2010
The old metal bearing is replaced with a new plastic replacement during assembly. It needs to be pressed into the body. Next, lubricant is applied to the steering shaft and the part is inserted into place. Rotation of the shaft by hand should be carried out without significant effort. The play is checked by rocking. If there is one, you need to tighten the nut. If this does not help, then you need to check the upper radial ball bearing. The peculiarity of this element of the rack on the Rav 4 is that it should not play in principle. A new spare part is selected taking this factor into account. When installing a horizontal shaft, the vertical one must be removed.
Replacement sequence
- We install Toyota Corolla 150 on an inspection channel, an electric lift. We remove the front wheels, unscrew the steering tips, knock them out of the seat on the steering knuckle;
- We substitute a hydraulic telescopic stand to support the weight of the engine and body. The design of the Toyota Corolla 150 is designed in such a way that it is impossible to disassemble the steering mechanism without removing the subframe;
- Gradually lower the rack, unscrew the lower motor mount, remove the rack assembly with steering rods and ends;
- We fix the mechanism in a vice and proceed to complete disassembly into its component elements;
- We wash, clean the components, remove parts with obvious signs of wear, defects, and damage. We install new consumables, lubricate with Litol or graphite-based analogues. We pay special attention to the condition of the oil seals and the pressure bushing. And also, springs, worm (axial shaft), teeth, anthers, clamps;
- We lay the restored rack on the subframe, fix it with two bolts at the edges, and install it in its original place in the car. Finally, tighten all the bolts again.
The replacement work for the Toyota Corolla 150 is over. During the repair, we inspect the condition of adjacent parts and mechanisms: gearbox, brake caliper, lines, alternator belt. If necessary, we replace worn components.
Subject to the recommendations and sequence of actions, the next major overhaul of the dispenser is after 60 - 80 thousand km. mileage Original spare parts, a moderate driving style, professional installation are the key to a long service life of the car.
We disassemble the steering mechanism of Rav 4 2007
Analysis of the mechanism on Rav 4 produced in 2007 and 2008 is similar to the analysis of this unit on cars of previous years, since we are talking about crossovers of the same generation. On the removed steering rack, the unit responsible for adjusting the pressure sleeve is disassembled. To do this you need:
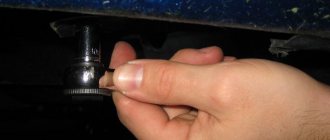
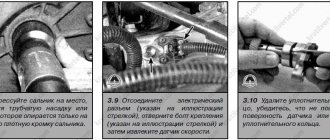
Holding the shaft, lightly tap the housing and remove the clamping sleeve (photo)
- Tighten the locknut, unscrew the adjusting plug and try to pull out the bushing. If she does not give in, then move on to the next point.
- Unscrew the nut of the “worm” (i.e., the steering shaft) using a special wrench (sold as a wrench for disassembling shock absorbers produced in our country). The steering shaft nut is pre-drilled with the drill slightly extending into the body (the depth of the hole is a couple of millimeters).
- Holding the shaft, knock it out with gentle blows to the rack body.
- The clamping sleeve is held in place by a rubber seal, so you need to lightly tap it with a knob and then pull it out of the seat.
You can bend the horizontal shaft bushing with something or simply break it (photo)
Repairing the Rav 4 steering rack involves removing another bushing and a needle bearing.
Remove the bushing and needle bearing
The photo shows the Rav 4 steering rack disassembled. Elements requiring replacement are obtained in the following order:
- The whiskers are bent with three needles and the sleeve is pushed outward by the internal (horizontal) shaft. It is more convenient to work when the assembly to be disassembled is clamped in a vice.
- After removing the shaft, you can see a needle bearing in the well that needs to be removed. In some cases, repair of the rack and pinion mechanism becomes necessary precisely because of the knocking of this part.
- Removing the part involves drilling a hole. In this case, you need to get into the bearing race. Then it is simply knocked out of the rack body.
On a Rav 4 30 car in the 2009 body (pre-styling version), the needle bearing is removed in exactly this way. The drilled hole is subsequently sealed.
Drill a hole to get into the edge of the needle bearing and knock it out (photo)
Types of bushings for installation on the control mechanism
- bronze: the best material today, but it requires a perfect and even cylindrical base shape. Not all manufacturers will provide similar characteristics;
- fluoroplastic: a good anti-friction material, but when systematically exposed to elevated temperatures it is subject to deformation without repeated restoration;
- caprolon bushing: has average wear resistance and friction force, but due to its budget cost and appropriate quality, it is in demand on the market. Due to a certain plasticity of the material, workpieces have to be processed with high precision. This is only possible in factory conditions, which reduces the rate of crafts;
- polyethylene rephthalate, also known as TECAPET: this material is used for the manufacture of premium cars due to its high technical characteristics.
The article does not mention a mechanism with an electric drive type. In essence, there is no difference when replacing a steering rack bushing or other component part. After reading the recommendations, we decided to try to fix the breakdown ourselves - go for it, but be extremely careful and attentive.