The reasons for a non-working standard car radio may be unexpected for many drivers with little experience in independently servicing cars. This often results in the car owner removing the radio and taking it in for repairs, but it turns out to be fully functional. This fact makes it necessary to search for information, for example, why the Toyota Corolla radio does not work, but any service station technician can tell you about this.
Radio for Toyota
In this case, as in many others, the fuses are to blame. Or rather, their only fault is that they protected the on-board network from high voltage. Toyota Corolla and Avensis are equipped with a well-balanced on-board electrical circuit. It is capable of taking on high loads. This quality is largely due to the fuse boxes located on the driver's side of the cabin, in the glove compartment and under the hood.
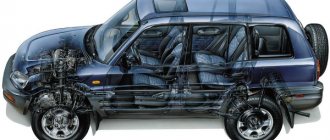
On-board electrical circuit
You will definitely not be mistaken in the reasons if your radio and cigarette lighter do not work at the same time. The point is not only in the fuse, but also in the fact that in this case the car radio and the car cigarette lighter are on the same circuit. This is usually typical for cars before 2008.
Car cigarette lighter
Removing and installing the Toyota Corolla steering wheel
You will need: a flat-blade screwdriver, a 17mm socket, a TORX T40 wrench, a wrench, and an extension.
WARNINGS
Diagnosis and repair of electronic passive safety systems (SRS) require special equipment and accessories. If they fail, contact a specialized service station.
To avoid injury from unauthorized activation of pyrotechnic charges, do not disassemble the system elements yourself. However, when repairing the steering, electrical equipment and body, the driver's airbag module may interfere with the work. If it is necessary to remove and install it, you can carry out the work yourself, strictly adhering to the rules for operating the system.
Disconnect the battery before starting work. Attempting to remove the airbag without turning off the power may result in unexpected deployment of the airbag.
You can begin the following operations to remove the airbag only after the activator capacitor has completely discharged. To discharge the capacitor, you must wait at least 10 seconds after disconnecting the wire from the negative terminal of the battery.
Do not disassemble the airbag module.
Do not drop the airbag module and do not allow water, grease or oil to come into contact with it.
An airbag module removed from a vehicle must be stored on a flat, horizontal surface with the module facing facing up.
The airbag module must not be exposed to temperatures above 95 °C. When installing the module in the steering wheel of a car, be outside the deployment zone of the airbag.
The first time you turn the ignition on after installing the airbag module in the vehicle, stand outside the vehicle and turn on the ignition switch by reaching under the lower steering column cover.
1. Disconnect the wire from the negative terminal of the battery.
Picture 1
2. Remove the airbag (see “Removing and installing the driver’s airbag”).
3. Squeeze the clamp of the horn wiring harness block and the audio system control key block.
Figure 3
4. ...and disconnect the block.
Figure 4
5. Mark the position of the steering wheel hub relative to the shaft.
Figure 5
6. Loosen the nut securing the steering wheel to the steering shaft.
The steering wheel is seated very tightly on the shaft splines, so do not completely unscrew the wheel fastening nut: if there is a sharp impact during removal, the steering wheel will jump off the splines and may cause injury. You can prevent the steering wheel from turning using the locking mechanism of the anti-theft device of the ignition switch. To do this, remove the key from the ignition switch and turn the steering wheel until the shaft is secured by the anti-theft device. After loosening the steering wheel nut, disable the anti-theft device by inserting the key into the ignition switch and return the steering wheel to the straight-ahead position.
Figure 6
7. Use sharp blows to knock the steering wheel off the shaft splines. Finally unscrew the nut and remove the steering wheel.
8. Install the steering wheel and removed parts in the reverse order of removal.
Source
content .. 247 248 249 250 ..Toyota Corolla E150 (2010+). Difficulty starting a hot engine
Causes of poor hot starting
According to statistics, the main reasons for poor engine starting after idle time at high temperatures are:
-Enriched fuel mixture, which is formed due to low-quality gasoline (its light fractions evaporate, and a kind of “gasoline fog” is obtained). -Faulty coolant sensor. At high ambient temperatures, there is a possibility of its incorrect operation. -Faulty ignition. It may be incorrectly set or there may be problems with the ignition switch.
The first thing you need to do to ensure that the engine starts normally when hot is to refuel at proven gas stations, and also monitor the condition of your car’s fuel system. If, after even a short stay in the heat, the engine does not start, then first open the throttle valve (press the accelerator pedal) or remove the filter cover and leave it open for a couple of minutes. During this time, the evaporated gasoline will evaporate and you will be able to start the engine normally. If this procedure does not help, then it is necessary to troubleshoot among the components and mechanisms described above.
Nodes that can cause problems
-Poor quality fuel, evaporation of its light fractions -Faulty coolant sensor -Crankshaft position sensor -Mass air flow sensor -Fuel injectors -Fuel pump -High pressure fuel pump -Idle speed regulator -Fuel pressure regulator -Diesel idle system -Ignition module
Why does a warm engine stall?
Some motorists are faced with a situation where an already running and warmed-up engine suddenly stalls. Moreover, this happens after the sensor has recorded a set of normal operating temperatures. There may be several reasons for this.
-Poor quality fuel. This situation is typical, for example, if you are driving away from a gas station, and after a short period of time the engine begins to “cough”, the car jerks and stalls. The solution here is obvious - drain the low-quality fuel, bleed the fuel system and replace the fuel filter. It is also advisable to replace the spark plugs, but if they are new, you can get by by blowing them out. Naturally, you shouldn’t go to such a gas station in the future, but if you have saved your receipt, you can go there and make a claim about the quality of the fuel.
-Fuel filter. If the engine stalls, you should also check the condition of the fuel filter. And if according to the regulations it is already necessary to replace it, then this must be done, regardless of whether it is clogged or not yet.
-Air filter. The situation is similar here. The engine may “choke” on the rich mixture and stall shortly after starting. Check its condition and replace if necessary. By the way, this way you can also reduce fuel consumption.
-Gasoline pump. If it does not operate at full capacity, the engine will not receive enough fuel and, accordingly, will stall after a while.
-Generator. If it completely or partially fails, it stops charging the battery. The driver may not immediately notice this fact, start the engine and drive away. However, it will only drive until the battery is completely discharged. Unfortunately, it will no longer be possible to start the engine on it again. In some cases, you can try to tighten the alternator belt. If this procedure does not help, you need to call a tow truck or call your friends to have your car dragged to a garage or service station.
Fuel injection engine will not start when hot
Since an injection engine is somewhat more complex than a carburetor engine, there will be more reasons why such an engine will not start. In particular, they may be malfunctions of the following components and mechanisms:
-Coolant temperature sensor. In hot weather, it may fail and supply incorrect information to the ECU, in particular, that the coolant temperature is higher than normal. -Crankshaft position sensor (CPS). Its failure will lead to incorrect operation of the ECU, which in turn will not allow the engine to start. -Mass air flow sensor (MAF). In hot weather, the sensor may not cope with the tasks assigned to it, since the temperature difference between the incoming and outgoing air masses will be insignificant. In addition, there is always the possibility of its partial or complete failure. -Fuel injectors. Here the situation is similar with a carburetor engine. The fine fraction of gasoline evaporates at high temperatures, forming an enriched fuel mixture. Accordingly, the engine cannot start normally. -Fuel pump. In particular, it is necessary to check the operation of its check valve. -Idle air control (IAC). -Fuel pressure control. -Ignition module.
Difficult to start on a hot diesel engine
Unfortunately, diesel engines can also sometimes fail to start when hot. Most often, the causes of this phenomenon are malfunctions of the following components:
-Coolant sensor. Here the situation is similar to that described in the previous section. The sensor may fail and, accordingly, transmit incorrect information to the ECU. -Crankshaft position sensor. The situation is similar to an injection engine. -Mass air flow sensor. Likewise. -High pressure fuel pump. In particular, this can happen due to significant wear of the bushings and oil seal of the pump drive shaft. Air enters the pump from under the seal, making it impossible to build up operating pressure in the pre-plunger chamber. -Diesel engine idle system. -Fuel pressure control. -Ignition module.
Carburetor engine will not start when hot
The reasons why the carburetor does not start well when hot are more or less clear; the volatility of gasoline is mainly to blame. The bottom line is that when the engine warms up to operating temperature, the carburetor also heats up, and after turning it off, within 10-15 minutes, the fuel begins to evaporate, making it difficult to start the car.
content .. 247 248 249 250 ..
Installing cruise control on a Corolla E150
All owners of Toyotas, and in general other brands of cars, have long known that any car initially includes the installation of additional options, and their availability depends only on the configuration and, accordingly, the final cost of the car. As a rule, all wiring and mounting points for additional options are present, and only in rare exceptions are they not present.
On vacation, I usually drive a car, the distance is just over 1,500 kilometers, and while driving, my right throttle leg gets tired and goes numb. Although some people say that the leg usually gets tired from pressing the clutch, I have a manual transmission, but this is not so. So, against the backdrop of this problem, I wondered about installing cruise control.
What is cruise control in a car?
I think many have heard what cruise control is? But most likely, even if the car has it, few people use it over short distances, and over long distances it turns out to be very necessary.
Well, in general, cruise control, in its own words, is an automatic, user-specified, adjustment of the vehicle’s speed.
How to use cruise control? We pick up the desired speed, activate cruise control and the car drives at the speed we set, while we can remove our foot from the gas pedal. We will describe below how to use cruise specifically on the Toyota Corolla E150.
Components for installing cruise control on Toyota Corolla E150
The steering wheel contact is spiral, the steering column cable, the steering spiral, in general, as soon as it is not called names, simply put, “spiral” - article 84306-12110 , average price 9,000 rubles, analogues from 1,000 rubles. For those who have a multifunction steering wheel (control buttons on the steering wheel), there is no need to purchase this item, you already have it installed. In the future I also plan to install buttons on my steering wheel; I already have a spiral.
On-board electrical system 2008 - undergo regular maintenance
When increasing the load on the vehicle's electrical network using on-board electronics, do not forget to carry out preventive maintenance and inspection of the electrical network. Some models will require a complete replacement. This is especially justified if you are increasing the functionality of the car. This approach will keep the devices operational. In most cases, it is fuses that provide effective protection in the electrical network from overloads. For this reason, if devices are not working, including the car radio and car cigarette lighter, this is where the problem should be looked for.
Fuses can be replaced as a complete set from time to time. A good time to update would be when your Toyota Camry radio does not work. Thus, you will completely eliminate not only one of the problems, but also carry out a major overhaul of the on-board electrical network.
Steering wheel buttons to control the radio
Every driver wants everything in his car to be perfect and as comfortable as possible, but finances do not always allow this, so you have to take a model with a cheaper configuration. And after buying a car, start improving the car in every possible way, adding various options.
Such options may be heated seats, installation of a multimedia system, alarm system, installation of cruise control and other gadgets and options that will increase the level of comfort inside the cabin.
In this article we will talk about how to connect the buttons on the steering wheel to the radio on a Toyota Coroll or Prius - there is not much difference.
Let's start with the fact that the simplest option would be to attach the standard radio to the buttons. We'll talk about it today. Let's buy buttons for the steering wheel and connect them to the radio.
Selecting the necessary parts and tools
First of all, you need to select the buttons. As a rule, they are standard; their size and type depend only on the year of manufacture of the model. The purchased kit should contain two sets of buttons - left and right.
As always, such parts are divided into original and non-original. Since the original is very difficult to find - this can be done at various Toyota disassemblies, many people buy non-original parts.
They will work perfectly, their only drawback is that over time they will rub considerably. Therefore, it is better to look for original ones.
We couldn't find them at the disassembly site and therefore had to order buttons from the online store. You can see them in the photo below.
No additional adapters are needed, but it is worth finding out whether your car is designed for audio steering or not. If yes, then you can safely install them.
As for spare parts, we will need: a screwdriver - flat and Phillips. This is where the list of tools ends.
Instructions for installing buttons on the steering wheel
Before installing the buttons, they need to be partially modified. First of all, we will have to modify the button on which the phone is drawn. To do this, we need to disassemble it and get to the circuit.
In the photo below we see the diagram with which we will continue to work. This is necessary so that we have the “ASLD” button we need. It's very easy to do. We lay the circuit in front of us and cut off the two contacts going to the button.
Why does the standard radio in Toyota not work?
If there is no malfunction of the device, then the reason for the radio not turning on is related precisely to the electrical circuit. From experience, there can be two types of malfunction:
- blown fuse for the head unit;
- blown 100 amp fuse in the main fuse box;
- problems in the power supply system that require inspection by a qualified auto electrician.
If the screen is on, then the problem is not with the power supply. The problem of a blown fuse often appears in those cars in which the car radio and the car cigarette lighter are located on the same section of the network. This is also typical for Toyota models of previous generations. At the time of release of the vehicles, additional functionality of the devices was not expected. Accordingly, the network capabilities are not designed for the current load.
Please note that when the screen is turned off, you need to consider the issue of a non-working standard car radio for other reasons. Try applying 12 V to the device as a test.
The problem is often the car cigarette lighter. Note that in more powerful cars, it is separated into a separate circuit. Its operation is controlled by a separate fuse. This, for example, is typical for the Land Cruiser. Usually the cigarette lighter and Toyota Corolla radio do not work at the same time. As was said, the problem is in the design of the on-board network of cars of the previous generation and the increase in the power of on-board electronics, which are not designed for an electrical circuit.
Problems with the car radio may arise after the network is shorted to ground (body). Typically, such a network malfunction causes a number of fuses to melt. The cigarette lighter in cars before 2008 is often used as a voltage source for external devices. When the car radio is turned on, the fuse will most likely fail.
How to remove a TOYOTA steering wheel: Control system
and check that the ignition is turned off. After these manipulations, we proceed to removing the steering wheel.
Open two plugs on the bottom of the steering wheel
Next, unscrew the screws (T30 sprocket). The screws unscrew with force!
We take out the pillow and disconnect the connector. Do not shake the pillow, carefully place it aside away from heat (the sun is an engine...)
We put marks on the steering column and steering wheel for further installation and unscrew the nut
a wrench with a 19-mm head (do not unscrew the nut completely; this will save your chin from hitting the steering wheel). Pull the steering wheel towards you by lightly tapping it.
The steering wheel has been removed. Next, the steering wheel can be reupholstered or replaced.
We install a new spiral cable on the latches and connect the wires.
We put the terminals back on the battery. Turn on the ignition.
We tighten the screws, snap the plugs, and put the terminals back on the battery. Turn on the ignition and check for an airbag error.
If there is an error, check the connection of the airbag connectors, having first disconnected the terminals from the battery.
How to remove a TOYOTA steering wheel Photo and video
Below you will find an interesting video clip.
Share your opinion and tell us on social media. networks. After all, How to remove a TOYOTA steering wheel is a very interesting topic, don’t you think?)) You can look at the reviews and opinions of other readers below, in x.
Toyota multifunction steering wheel does not work VIDEO
I bought a car, it already had a multifunction steering wheel, but it was not connected, when I removed the airbag to check if everything was connected correctly, I saw there were 2 10-pin chips, one chip had 3 wires (horn, cruise control, steering wheel paddle shifters), on the second chip was the wiring for the buttons and the sound signal, I put all the wires in one chip, after which I bought an adapter to adapt the standard buttons and the Pioneer radio, it didn’t want to be programmed, it didn’t respond to the remote control commands, but even if you do everything according to the instructions, the buttons in the end, they will still live their own lives, and stop functioning when the dimensions or the neighbor are turned on.
paddle shifters on a Toyota multifunction steering wheel
At night I noticed this feature: when you press the buttons, the backlight of the buttons comes on while you press them, but when you release them they go out. The backlight simply does not work on the dimensions. The steering wheel is the same as on corolla, filder, ractis, rav4
ractis filder corolla
Toyota multi steering wheel feature
CAN buses for Corolla 120, Camry and others
If you decide to seriously upgrade your Toyota Corolla, Avensis or Camry, which includes connecting a number of on-board devices, we recommend connecting all on-board devices to the CAN bus. In this case, as a protection, outputting the charge to the body (ground) is only a backup method of protecting the network. This is a specialized data transmission system with a hardware solution that allows you to conceptually solve the problem of network congestion.
The bus design almost completely eliminates overloads, which completely eliminates malfunctions. With such an architecture, it is almost impossible to encounter a Toyota Camry radio that does not work. When you turn it on, you will always be pleased with the calmly burning screen of your updated Toyota Carolla 120 or previous generation Camry.
Toyota Corolla steering wheel buttons
Do you own a Toyota Corolla, but there are still no buttons for the radio and cruise control on the steering wheel? This is not a problem: to install everything, you need to purchase buttons for the steering wheel and a cruise control switch, and all these functions will become available. No bleeding is required, you just need to connect it.
Purpose
What is the purpose of the cruise control button? For example, using cruise you can slow down or speed up the car by 1 km/h with one press of a button. Below are step-by-step instructions on how to connect the cruise control switch lever and tape recorder control buttons to the steering wheel.
Tools that will be useful during the work: a screwdriver with T30 star bits, a wrench size 19. For a car with an assembly of 17 MMT and 32, there is no need to change the screw cable.
Instructions
That's it, the cruise control switch is connected.
Connecting buttons
Unfortunately, there are no buttons for the speed limiter in version 84250–12020. There is one option, but it is quite expensive, and not everyone is willing to spend that much.
You can do it differently. Disassemble a fragment of buttons with a picture of a phone.
On the diagram you need to find a button with the inscription ASLD, from the original location of the button two cables run along the board to the opening, then the original wiring - they are all there.
Next, you need to cut the tracks going to this button and connect them with wires to suitable contacts. It is necessary to check all wires with a tester and do not damage them with screws during assembly.
How to remove the airbag - there was already a description, screw the buttons, neatly lay out the cables and connect the connector to the screw cable.
The most important step is to trim the ears of the airbag, but this is best left to a professional. You also need to remove the stiffener, because if you leave it, it will interfere with the signal (as you know, in this case the signal button does not work).