The standard acoustics on Camry in 40 and 50 bodies (and on some modifications of the “thirty”) can be controlled using buttons on the steering wheel.
The main problem that car owners encounter is the disks getting stuck in the drive. The car changer is designed for 6 discs, and often they get stuck in the records, after which it becomes possible to remove them only by disassembling the tape recorder.
Many car owners associate the malfunction of the multimedia control buttons on the steering wheel with an error in the head unit. But you shouldn’t rush to conclusions, and before removing the radio from the Camry, it’s better to check the integrity of the steering wheel button cable and the CAN bus: in 95% of cases, the problem lies precisely in this.
It is worth noting that even the basic configuration of the Camry can be equipped with a full-fledged multimedia center equipped with a navigator, Bluetooth, TV and a connector for connecting a rear view camera. Depending on the model of the PG, you can even retain the functions of the buttons on the steering wheel.
Camry multimedia features
To do this, you need to purchase a 2DIN car multimedia center and a special adapter frame for Toyota Camry. It is quite possible to replace the standard system yourself, following a certain sequence of actions.
Camry multimedia features
The standard acoustics on Camry in 40 and 50 bodies (and on some modifications of the “thirty”) can be controlled using buttons on the steering wheel.
The main problem that car owners encounter is the disks getting stuck in the drive. The car changer is designed for 6 discs, and often they get stuck in the records, after which it becomes possible to remove them only by disassembling the tape recorder.
Many car owners associate the malfunction of the multimedia control buttons on the steering wheel with an error in the head unit. But you shouldn’t rush to conclusions, and before removing the radio from the Camry, it’s better to check the integrity of the steering wheel button cable and the CAN bus: in 95% of cases, the problem lies precisely in this.
It is worth noting that even the basic configuration of the Camry can be equipped with a full-fledged multimedia center equipped with a navigator, Bluetooth, TV and a connector for connecting a rear view camera. Depending on the model of the PG, you can even retain the functions of the buttons on the steering wheel.
Camry multimedia features
To do this, you need to purchase a 2DIN car multimedia center and a special adapter frame for Toyota Camry. It is quite possible to replace the standard system yourself, following a certain sequence of actions.
Connecting a rear view camera to the head unit
When choosing a rear view camera for the Toyota Camry 40, preference should be given to a device that will be mounted together with the included license plate light.
Rear view camera installed in the license plate light
This device will save you from several troubles:
- you don’t have to make a hole in the trunk lid, which can become a source of corrosion,
- The camera wiring will be reliably protected from moisture.
First you need to disassemble the trunk lid trim by removing the clips. Then the plastic cover (“saber”), on which the Toyota badge is located, is unscrewed. The license plate light bulb is removed and the camera is installed.
The wiring is connected as follows:
- wires with yellow tulips are connected to the camera on one side and to the Camry 40 radio on the other,
- the red one on one side is connected to the wire where + appears when the gearbox selector is in position R. Near the radio, this wire is connected to the KZH activation terminal to the radio wiring,
- The red tulip wires must be connected to constant + and the black wire to ground -.
Replacing the radio
The replacement of the shgu itself is practically identical to the repair, however, for those who are encountering a similar problem for the first time, we will describe the detailed replacement process:
- Using any flat small tool, pry up the trim of the central air ducts and remove it.
- Disconnect the emergency light from the connector.
- Disconnect the pads.
- If the car has a gear knob, then unscrew it and remove it.
- Pull the safety catch to the maximum and, opening the armrest, pull the pad towards you.
- Unclip the panel and set it aside.
- Unscrew the glove box with a Phillips screwdriver and pull it out.
- Disconnect the cigarette lighter connector and the AUX line input connector.
- Unscrew 4 bolts: 2 under the climate control unit and 2 above the radio.
- We pull out the radio and climate control unit.
- We disconnect the connectors from the climate control unit and the radio, and turn off the antenna.
- We unscrew the metal “ears” that connect the climate control unit and the radio, separate the parts, put the radio aside and put a new radio in its place.
- We connect back the climate control unit and the radio.
- We install GPS and TV antenna.
- We connect all the connectors from the new car radio kit with the standard wiring connectors.
- All that remains is to put the main device in place of the old radio and tighten it.
- The device is ready to use! You can turn on your radio and delight your eye with the new capabilities of your Toyota.
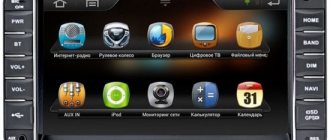
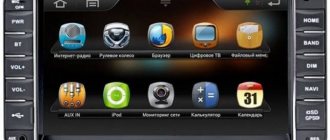
How to choose the right Android radio for Toyota Camry 40
Replacing the standard Camry radio is the desire of car enthusiasts who lack the functionality of the “native” head unit. Installing a USB MP3 adapter provides several convenient features, but does not completely solve the problem. Therefore, the only option is to install another entertainment system.
Before purchasing a new radio for your Toyota Camry, you need to understand what features you require. If you only need to play audio from a flash drive or phone, then installing a USB adapter is enough , but if you want to watch videos, surf the Internet or need navigation, then only replacing the head unit will help.
One of the main characteristics of the radio is the performance of the processor; do not rush to buy a head unit according to the principle: “The more cores, the cooler!” It is not always so. The second most important aspect is the amount of RAM; for a car radio, 2-4Gb is enough. Screen size and resolution are the next criteria.
Where to buy a car radio for Toyota V40
In principle, such radio tape recorders can be found in virtually any car store that sells similar products and there, directly on site, you can buy and find out additional information about this or that radio tape recorder.
There are also a number of sites and pages on the Internet where you can order and buy a radio tape recorder online. Thus, one of the most popular types of ordering products via the Internet is Aliexpress.
Using this method, you can also buy both a new and “combat” model of a car radio, and a used one, which, although worn, is ready for use (as they say, an old horse does not spoil the reins).
However, buying in this way is not safe, because behind the beautiful and laconic words of the seller, that the radio is multifunctional and at least one can be driven, when purchasing there may be some kind of relic of technical progress, with which it is not realistic to work.
Therefore, if you have chosen this particular method, we strongly advise you to check the integrity and functionality of the device before purchasing and paying, and also check reviews from other buyers of products from the company from which you want to buy an adapter radio.
So, we will show you the most popular and effective types of radio tape recorders:
Popular cars
26 Aug 2010 at 01:13 pm
In this article I want to talk about replacing a standard CD/MP3 player with a built-in 6-disc changer with a more modern, albeit Chinese, multimedia combine “ALL-IN-ONE” with GPS navigation HITS HT6818BG. I will not describe the pros and cons of Chinese systems for a “standard” installation; they are approximately the same for all. I’ll tell you in more detail about removal and installation using the TOYOTA CAMRY in the 40th body as an example. First, remove the trim of the central air ducts. To do this, just pry it with a credit card or other suitable tool (good nails will also do