Payment for goods and downloading of the book in electronic form (PDF format) is made on the website.
To do this, you need to find the book you are interested in and click on the “Buy” button. The price of the book is indicated on the button.
For convenience, the price on the website for residents of Russia, Belarus and Kazakhstan is presented in rubles.
For residents of Ukraine in hryvnias, and for all other countries - dollars.
After clicking on the “BUY” button, a payment window will open where you can select a payment system with which you can pay for the selected book using any bank card (Visa, MasterCard, MIR, etc.)
When you click on the “Pay by bank card” button, the Portmone payment system will open, which is the easiest way to make a payment.
In addition, the website offers four payment systems for payment:
- Yandex (payment from any bank cards, Yandex Money account, QIWI Wallet, terminals, etc.);
- Portmone (payment from any bank cards, Portmone account);
- PayPal (payment from any bank cards, PayPal account);
- WebMoney (payment from any bank cards, payment from WebMoney wallets).
Payment via Yandex Cashier
After selecting payment via Yandex, the Yandex Cashier payment system will launch, where you need to select a convenient payment method (bank card, QIWI, Yandex Money account, etc.)
After specifying payment details and confirming payment, payment for the goods will occur.
If you have a bank card in a currency other than the ruble, then the money will be debited from the card at the rate of the Central Bank of Russia at the time of the purchase.
This payment method is optimal for residents of Russia, Kazakhstan and Belarus.
Official website of the Yandex Kassa payment system https://kassa.yandex.ru
Thermostat
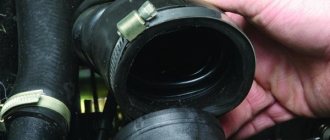
It is highly recommended not to dismantle the thermostat unless absolutely necessary. Removing the part is quite simple: you need to drain the coolant and unscrew the two fastening nuts, dismantling the inlet pipe. Next, remove the unit, as well as the gasket from it.
Click to enlarge
The part is installed in the pipe by reverse assembly. Having replaced the gasket, we first mount the unit, and then the inlet pipe, tightening the two fastening nuts. Filling the coolant, you need to make sure there are no leaks after the engine warms up.
To check the thermostat, you need to lower the part into water and slowly raise the temperature. The thermostat valve will open at a certain temperature. Optimal temperature: from 80 to 84 degrees, permissible should not exceed 95 degrees. The valve lift should be 8 millimeters.
Payment via Portmone
After selecting payment through Portmone, the payment system will launch, where you need to select the payment method: bank card or Portmone account.
The price in the Portmone payment system is converted into dollars at the exchange rate of the Central Bank of the country where you are located.
If you have a bank card in a currency other than the dollar, then the money will be debited from the card at the rate of the Central Bank of your country at the time of the purchase.
After specifying payment details and confirming payment, payment for the goods will occur.
Official website of the Portmone payment system https://www.portmone.com
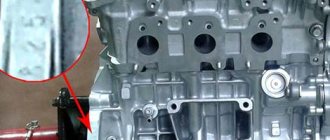
water pump
The main part of the 3S-FE engine cooling system is the water pump. Thanks to this unit, the movement of antifreeze and the functioning of the technology as a whole occur cyclically.
Dismantling
To dismantle the coolant pump, you must first drain the antifreeze and get rid of the timing belt. Then remove the generator and the generator drive belt tensioner bar. We dismantle the intermediate pulley, inlet pipe and antifreeze bypass pipe. Next, you need to unscrew the three fastening bolts and get rid of the seals, dismantle the water pump. The pump cover is removed by unscrewing the three mounting bolts.
Click to enlarge
Install
The pump is installed in the reverse order. First, you need to replace the water pump cover (tightening torque 9 Nm), and then the part itself. To do this, you need to install new seals, temporarily tighten the mounting bolts, mount the generator and the bar, and then tighten the mounting bolts to a torque of 9 Nm. Then we install the antifreeze bypass pipe with a torque of 10 Nm and the inlet pipe (9 Nm). After installing the intermediate pulley (43 Nm), install the generator. The mounting bolts connecting to the bracket are tightened with a torque of 53 Nm, and the mounting bolts connecting to the pump are tightened with a torque of 22 Nm. We install the timing belt, fill it with coolant and make sure there are no leaks.
Payment via PayPal
After selecting payment via PayPal, the PayPal payment system will launch, where you need to select the payment method: bank card or PayPal account.
If you already have a PayPal account, then you need to log into it and make a payment.
If you do not have a PayPal account and you want to pay using a bank card via PayPal, you need to click on the “Create an Account” button - shown with an arrow in the picture.
PayPal will then prompt you to select your country and provide your credit card information.
After specifying the information required to make the payment, you must click on the “Pay Now” button.
Official website of the PayPal payment system https://www.paypal.com
Dismantling instructions
Before changing the thermostat, you must remove the previously installed device. To perform dismantling yourself, you must follow the instructions below:
Drain the antifreeze; Remove the air filter; Unscrew the 2 bolts and the fastening nut; Remove the recirculation valve; Loosen the air hose going to the mass air flow sensor
After this, move the meter itself; The connection diagram of the hoses to the thermostat may differ, but it is important to disconnect all pipes; Disconnect the electrical wire going to the thermostat. It is not present on all types of devices; Unscrew the stud and nut of the temperature sensor; The thermostat gasket may stick in the seat
It is necessary to remove the thermostat by slightly shaking it, as shown in the image below.
Dismantling
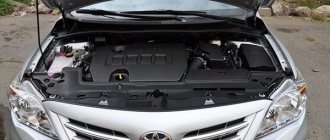
On different cars, the technology for replacing a thermostat may differ. It may be necessary to dismantle interfering components. Or, on the contrary, the car owner has access to the thermostat immediately after lifting the hood.
Payment via WebMoney
After selecting payment via WebMoney, the payment system will launch, where you need to select the payment method: bank card or WebMoney wallet.
If you already have a WebMoney wallet, then you need to log into it and make a payment.
If you do not have a WebMoney wallet and you want to pay in another way, you need to select any of the methods that WebMoney offers and make the payment
After specifying payment details and confirming payment, payment for the goods will occur.
Official website of the WebMoney payment system https://www.webmoney.ru/
Diagnostics of a removed thermostat
Instructions on how to check a thermostat removed from a car:
- Pour enough cold water into the pan;
- Put the thermostat down;
- Start heating, taking thermometer readings and monitoring the condition of the thermostat;
- When boiling is reached, working thermostats change state;
- In order to make sure that the thermostat does not have problems in operation, it is necessary to monitor its operation when cooling the water.
Heating of the regulator in the container
There are many ways to check a thermostat, but the above is the simplest and most accurate. It makes no sense to linger too long at the verification stage, therefore, once you are convinced of the malfunction, you need to move from diagnostics to replacement.
Downloading a book
After successfully completing the payment (by any method) and returning to the KrutilVertel store from the payment system website, you will be taken to the successful payment page:
On this page you need to indicate your e-mail, where access to download the book will be sent.
If you are already registered on our website, then simply follow the link to your personal account.
The book you purchased will be in your personal account, from where you can always download it.
Please note that after making the payment, you need to return back from the payment system website to the KrutilVertel website.
If for some reason you did not return back to the site and closed the payment system tab with a message about the successful completion of the payment, please let us know - we will send you a letter indicating access to download the book.
Basic faults
A valve stuck in the closed position can have more serious consequences. After reaching a temperature above the nominal temperature, the liquid continues to circulate in a small circle. If the car owner does not check whether the thermostat is working, the engine will boil. Unlike gradual excessive wear when the valve is constantly open, its closed position can lead to a major overhaul of the engine at the first emergency situation. Jamming of pistons, warping of metal parts, destruction of rubber products and other serious consequences accompany engine boiling, so if the first signs of a thermostat malfunction appear, it is necessary to diagnose it and, if necessary, replace the jammed product with a new one.
If the rubber thermostat gasket breaks, coolant leaks may appear. Very often, seal failure is associated with oil getting into the cooling system. In this case, the vehicle exhaust may acquire a white tint. In such cases, replacing the thermostat will not solve the problem, since its root is hidden elsewhere.
A visual check of the thermostat can detect mechanical damage. In such cases, the thermostat housing or gasket may be damaged. In this case, troubleshooting the problem yourself will not take much time.
Problems when paying with bank cards
Sometimes difficulties may arise when paying with Visa/MasterCard bank cards. The most common of them:
- There is a restriction on the card for paying for online purchases
- A plastic card is not intended for making payments online.
- The plastic card is not activated for making payments online.
- There are not enough funds on the plastic card.
In order to solve these problems, you need to call or write to the technical support of the bank where you are served. Bank specialists will help you resolve them and make payments.
That's basically it. The entire process of paying for a book in PDF format on car repair on our website takes 1-2 minutes.
If you still have any questions, you can ask them using the feedback form, or write us an email at [email protected]
Design features of the Toyota Corolla cooling system
The engine cooling system is liquid, closed type, with forced circulation of liquid. The system consists of a cooling jacket, radiator with electric fan, expansion tank, water pump, thermostat and hoses. The circulation of liquid in the system is created by a water pump. From the pump, the liquid is supplied to the engine cooling jacket, washes the cylinders and combustion chambers and then, depending on the position of the thermostat valve, returns to the pump through the bypass channel (at low temperatures) or through the radiator (at high temperatures). The engine cooling system also includes a cabin heater radiator and heating channels for the throttle body of the power system.
Radiator with horizontal fluid flow, tubular-tape aluminum core and plastic tanks. The radiator tanks contain inlet and outlet hose pipes to the engine water jacket. A tap is installed in the left tank to drain coolant from the system.
The expansion tank serves to compensate for the changing volume of coolant depending on its temperature. It is made of translucent plastic. The filler neck of the tank is closed with a plastic plug with two valves: inlet and outlet. The exhaust valve opens at a pressure of 78.5–122.7 kPa (0.80–1.25 kgf/cm2), ensuring an increase in the boiling point of the coolant and preventing intense vaporization. When a liquid cools, its volume decreases and a vacuum is created in the system. The inlet valve in the plug opens at a vacuum of about 7 kPa (0.07 kgf/cm2).
NOTE
The serviceability of the plug valves is very important for the normal operation of the cooling system. However, when problems arise (for example, boiling coolant), car enthusiasts pay attention only to the operation of the thermostat and forget to check the valves. Leaking of the exhaust valve does not lead to a decrease in the boiling point of the coolant, and its jamming in the closed state leads to an emergency increase in pressure in the system, which can cause damage to the radiator and hoses.
A centrifugal water pump provides forced circulation of liquid in the cooling system. It is located on the front surface of the cylinder block and is driven from the crankshaft pulley by a poly-V belt, common with the generator and air conditioning compressor. The pump has sealed bearings that do not require replenishment of lubricant. The pump cannot be repaired, therefore, if it fails (liquid leakage or bearing damage), it is replaced as an assembly.
A thermostat with a solid heat-sensitive filler maintains normal operating coolant temperature and reduces engine warm-up time. The thermostat is installed in a housing mounted on the cylinder head. At a coolant temperature of up to 77 °C, the thermostat is completely closed and the liquid circulates through a small circuit, bypassing the radiator, which speeds up engine warming up. At temperatures above 80 °C, the thermostat begins to open and at 95 °C it opens completely, allowing fluid to circulate through the radiator.
The electric fan of the cooling system (with a plastic multi-blade impeller is used for additional cooling of the radiator, it is turned on and off by a signal from the electronic unit of the cooling system. Moreover, depending on the intensity of the thermal regime and the operating algorithm of the air conditioner, the electric fan can rotate at low and high speed. The electric fan assembly with the casing is fixed on the radiator of the cooling system. The system is filled with liquid (antifreeze) Toyota Super Long Life Coolant (red), which does not freeze at ambient temperatures down to –40 ° C.
WARNINGS
It is not recommended to fill the cooling system with water, since antifreeze contains anti-corrosion and anti-foaming additives, as well as additives that prevent scale deposits. Coolant is toxic! Avoid inhalation of its vapors and contact with skin. Correct any leaks in the cooling system in a timely manner to prevent coolant vapors from entering the vehicle interior during operation. Your health is more valuable than a new cooling system pipe or a tube of sealant!
Source: https://toyotauto.net/corolla/osobennosti-konstrukcii-sistemy-ohlazhdeniya.html
Air removal methods
If you observe on the dashboard that the operating temperature of the engine is constantly exceeded (100 degrees or more), follow a number of steps to identify the problem:
- examine the joints of the pipes, the water pump and the expansion tank for leaks;
- check the fluid level in the tank;
- make sure that the cabin heater is functioning properly;
- If the temperature sensor is installed outside the cylinder head, check the operation of the electric fan by closing the contacts.
Before bleeding the cooling system, it is necessary to eliminate all leaks, if any are found. A water pump seal that has lost its seal should be replaced (as a rule, together with the pump), hose clamps should be tightened, and so on. There is no point in removing an air lock from a leaking cooling system.
Checking the heater and fan sensor will help you more accurately determine the location of the air bubble. When the engine temperature reaches a critical threshold and the heater does not heat up, it means that the plug is in a small circulation circuit - in the stove itself or in the supply pipes. If the sensor does not turn on forced airflow in time, then it has entered an area where the movement of antifreeze has stopped - the bubble is in a large circuit.
Method one - blowing
This simplest method requires caution from the car enthusiast, since it is performed on a fully warmed-up engine. The order of operations is as follows:
- If necessary, add fluid to the minimum level and warm up the power unit to operating temperature. Carefully unscrew the cap of the expansion tank.
- Wear gloves and disconnect the thin coolant pipe at the highest point. For an engine with an injector, this is the throttle valve heating unit; on a carburetor engine, it is the intake manifold or the lower part of the carburetor itself.
- Wipe the reservoir neck thoroughly. Place a wide bowl under the removed hose and blow into the expansion tank. When clean antifreeze flows from the pipe, put it on the fitting and secure it with a clamp.
If your vehicle has a thermostatic main radiator cap, try removing the air lock through it. Open both plugs and blow into the neck of the expansion tank.
Method two - complete replacement
This option is suitable for all cases when it is not possible to detect and push a bubble out of pipelines. The point is to completely empty the system and fill it back with antifreeze, following all the rules. The disadvantage of the method is the difficulty of implementation in road conditions.
The procedure is performed in the following order:
- Drain the antifreeze into a wide basin, placing it alternately under the plug on the cylinder block and the main radiator.
- Replace all caps and tighten them.
- Loosen the clamp and remove the throttle body or carburetor heater pipe (the highest point of the system).
- Insert a funnel into the neck of the expansion tank and slowly pour coolant in a thin stream. Air will be removed through the removed hose.
- Monitor the moment when antifreeze runs out of the pipe and immediately put it on the fitting.
Before emptying, be sure to fully open the cabin heater tap.
When the throttle (or carburetor) heating hose is put on and secured with a clamp, add fluid to the container to the required level. Next, check the functionality of the cooling by completely warming up the engine until the thermostat opens and the electric fan turns on.
Method three - road
When faced with overheating of the power unit on the road, try to remove the airlock using this method:
- Having secured the car with the handbrake, lift the front part with a jack to a height of 0.3–0.4 m.
- Slowly unscrew the expansion tank cap, start the engine and turn on the cabin heater to maximum mode.
- Pour antifreeze into the tank in a thin stream until its level reaches the upper limit. Increase the crankshaft speed to 3000 rpm and wait until it warms up completely.
- Squeeze the lower hose leading to the radiator with your hand. The air should escape through the expansion tank. Use gloves or thick cloth to avoid getting burned.
The procedure ends when air stops coming out of the tank. Feel the remaining pipes - they should warm up. Make sure the stove produces a hot stream.
To avoid having to fuss with removing air pockets, always fill in antifreeze according to the instructions described in the previous section. This is the best way to force air out of the system. Fix leaks in a timely manner, do not drive with endless additions of coolant.
How to remove an air lock from an engine cooling system
So, let's start with simple cars (old foreign cars, domestic auto industry). On such cars, air is removed from the cooling system as follows:
- All you have to do is drive the car onto the overpass. This must be done in such a way that the front part is slightly raised.
- Next, you need to unscrew a special cap on the radiator, after which the engine can be started.
- After several minutes of operation at idle, the air is bled from the engine cooling system.
However, this method will not help solve the problem on more modern cars. On such vehicles, the cooling system is of a completely closed type, that is, to de-air the air must be “expelled”. To do this, you can go in two ways.
The first method involves unscrewing the cap of the expansion tank, then the engine with the cap open runs at idle for some time, then you need to get into the car and accelerate intensively, raising the speed to 3-3.5 thousand rpm. Next, you need to tighten the cover and check the operation of the system.
If this method does not help, then the upper pipe that comes from the stove is weakened. You need to be prepared for the fact that the antifreeze itself will begin to leak. Next, the engine starts, and you need to monitor when air bubbles disappear from the leaking coolant. Their disappearance will indicate that the air lock has been successfully removed from the system. Let's look at this method in more detail using the VAZ Kalina model as an example.
Before starting work, you should prepare the keys for dismantling the plastic protective elements. You will also need a screwdriver to loosen and then tighten the clamps.
So, the first step is to remove the plastic protection. This protection on the specified vehicle model is attached to the body using studs that have rubber seals. Next, you need to remove the clamp from the upper or lower pipe. Now you need to unscrew the cap of the expansion tank
If the engine is hot, be careful as hot coolant may splash out of the reservoir! Then cover the neck of the tank with a clean rag. Next, pull a suitable rubber tube onto the neck
After this, you need to supply some air to the tank by blowing into the tube. It is advisable to do this using a compressor.
- After air is supplied to the tank, antifreeze should begin to flow out of the pipe from which the clamp was previously removed. After this, you need to make sure that there are no air bubbles in the leaking coolant, then quickly put the pipe over the fitting, put the clamp in place and tighten it. At this stage, the deaeration process can be considered complete.
- Next, you will need to bring the coolant level to normal (usually “on cold” it is poured 4-5 mm higher than o, since after warming up the internal combustion engine, the liquid will increase in volume and rise to o).
You can determine the presence of air in the engine refrigeration system by conducting independent diagnostics and eliminating the causes. We carry out diagnostics based on the above criteria.
Signs:
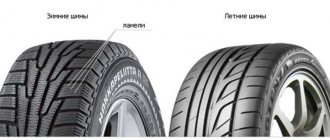
- Checking the system for leaks. Over time, clamps weaken, oxidize, or break completely. The hose also has shock absorption; over time, it bursts and cracks; either heat or cold gradually destroy the rubber.
- Problems with the thermostat. If the engine heats up very quickly after starting, that is, the cooling fan has already turned on, and the temperature sensor shows that it is about to push the needle into the red scale, then this indicates a non-working thermostat or the presence of air in the pump discharge pipe. In this case, the thermostat valve will be in the closed position, the coolant will move in a small circle. The opposite may also happen. The engine takes a very long time to warm up after starting. This means that the thermostat valve is fully open or there is an air lock in the thermostat. In all cases, you will have to remove air from the engine cooling system.