Toyota Carina E is a car that is a sedan produced by Toyota. The first cars of this model appeared back in 1970.
Subsequently, the release went through seven generations, each of which underwent changes in relation to the previous one. Initially, Carina was created as a sports car for urban conditions.
Fuse and relay boxes are found in almost every car. They are necessary for organizing the safe and uninterrupted operation of electrical systems, which, in turn, ensure the functionality of various devices in the car.
Thus, fuses and relays are considered one of the important elements in the Toyota Carina E, without which it could not function normally.
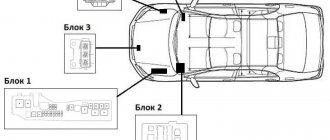
Toyota Carina contains three fuse blocks:
- Main block. Located in the engine compartment under the hood.
- Mounting block in the cabin.
- Additional mounting block under the dashboard.
Each of these blocks contains multiple fuses. The elements are arranged in a special order, and each fuse has its own designation, so you can quickly find the right element.
Why do fuses melt in a car?
p, blockquote 16,0,0,0,0 —>
Let's look at why fuses burn in a car - the most common typical reasons.
p, blockquote 17,0,0,0,0 —>
Cigarette lighter
The cigarette lighter fuse often fails. In most cases, it is not related to smoking. The cigarette lighter often contains power connectors for additional equipment (radar detectors, navigators, other auto gadgets), a compressor, chargers for mobile equipment, splitters and tees of dubious quality.
p, blockquote 18,0,0,0,0 —>
In some cases, simultaneous connection of several gadgets can lead to exceeding the maximum current in the power circuit of the cigarette lighter connector.
p, blockquote 19,0,1,0,0 —>
Such situations often arise when using an advertised additional electric interior heater powered from the cigarette lighter connector.
p, blockquote 21,0,0,0,0 —>
Washer
The failure of this fuse is associated with possible freezing of water in the tank and washer system pipes at negative and slightly positive temperatures. The mobility of the electric pump drive is impaired, as a result of which the current increases and the fuse blows. To prevent such situations, it is necessary to promptly replace the water with non-freezing liquid and clean the entire system of water.
p, blockquote 22,0,0,0,0 —>
Dvornikov
It fails if the wipers freeze to the glass or the gearbox gets jammed. Therefore, before driving in the morning during the cold season, it is necessary to check the brushes for freezing to the glass.
p, blockquote 23,0,0,0,0 —>
Heated glass and mirrors
It may burn out due to a short circuit in the electrical wiring. The weakest wiring points are in the corrugated hoses of the front doors, the trunk door, and under the driver's sill trim.
p, blockquote 24,0,0,0,0 —>
Stoves
A fuse rated at 30 Amps is usually responsible for the stove. If the heater electric motor wears out, especially the bearings and bushings, the current in the electric drive circuit increases significantly. Timely maintenance of the stove fan helps to avoid such situations.
p, blockquote 25,0,0,0,0 —>
Lighting systems
They often burn out if the power is set, non-standard lamps are installed, especially xenon lamps with an ignition unit, the current consumption of which is much higher. When increasing the rating, you should simultaneously “strengthen” the electrical wiring of the lamps by laying wires of a larger cross-section.
p, blockquote 26,0,0,0,0 —> adsp-pro-2 —>
Engine cooling systems
They fail when the radiator fan current consumption increases for the following reasons:
p, blockquote 27,0,0,0,0 —>
- foreign objects entering the area of rotation of the fan blades;
- wear of fan motors;
- production of engine lubrication.
Engine control unit
Their burnout leads to failure to start the engine. For this reason, the driver must know where the fuses serving the engine control unit are located. Almost half of all malfunctions associated with failure to start engines are determined by their burnout.
p, blockquote 28,0,0,0,0 —>
Electric power steering
Electric power steering systems are increasingly being used in automobiles. The electric drive of the electric amplifier consumes a large current; under increased loads, the fuses often fail.
p, blockquote 29,0,0,0,0 —>
Electric parking brakes
Electric parking brakes on some car models (for example, VW PASSAT B6) are a headache for many car owners. The electric parking brakes are located in an “uncomfortable” place near the wheels.
p, blockquote 30,0,0,0,0 —>
This contributes to mechanical destruction of the housing, moisture and dirt getting inside, as a result, jamming of the engine, and blown fuses along the power circuits.
p, blockquote 31,0,0,0,0 —>
ABS systems
As a result of pump wear, the current increases and the ABS fuse blows. This leads to the inoperability of the anti-lock brake system, which is especially necessary when the road surface is in poor condition.
p, blockquote 32,0,0,0,0 —>
Central locking, power windows
The central locking drives and power windows often jam, resulting in blown fuses. Also problematic is the short circuit of the wiring in the corrugated hose of the door wiring.
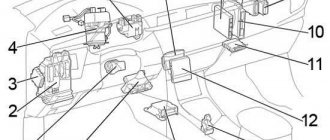
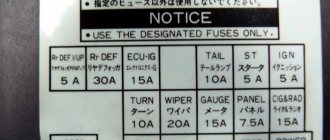
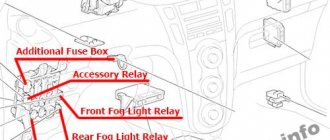
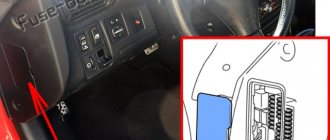
Additional mounting block
This unit is located under the dashboard of the Toyota Carina. The block fuse layout is as follows:
As for the designation and purpose of the elements, they are presented in the table below.
| Designation | Purpose |
| 1 | Responsible for the operation of the engine control unit. For example, thanks to this fuse, an increase in idle speed is ensured. |
| 2 | Turns the rear window heating on/off. |
| 3 | Ensures the operation of the anti-lock braking system. |
| 4 | Turns the car's dimensions on/off and lights up the license plate. |
| 7 | Turns turning lights on/off. |
Also, the fuses of the unit in question are responsible for the operation of the windshield wipers and washers, organize the inclusion of fog lights, if necessary, and also ensure the operation of the brake light and the central locking.
Block in the cabin
Let's look at the example of the 2012–2013 Corolla block. Layout in the cabin:
| Purpose | Name | Current | Number on the diagram |
| Fuel supply to the cylinder, starter operation, transmission blocking | AM 1 | 7.5 | 1 |
| Fog lights | FRFOG | 15 | 2 |
| Spare | 3 | ||
| Fuel supply to the cylinder and starter | AC CB | 25 | 4 |
| Main castle | DOOR | 25 | 5 |
| Spare | — | 6 | |
| Fuel supply to the cylinder, stop signals, anti-lock braking system | STOP | 10 | 7 |
| Self-diagnosis | OBD | 7.5 | 8 |
| Rear headlights, heated glass (rear), dimming mirror (rear), battery charging, seat belt indication, turn indicator, signaling complex | ECU – IG NO. 2 | 10 | 9 |
| Adjustment of headlight illumination, electric steering wheel adjustment, cooler drive for air conditioning, anti-lock braking system, fuel supply to the cylinder, interior sound system, control unit for electrical equipment | ECU – IG NO. 1 | 10 | 10 |
| Washing glass (windshield) | WASHER | 15 | 11 |
| Spare | 12 | ||
| Glass cleaning complex | WIPER | 25 | 13 |
| Air conditioning, heated glass (rear) and mirrors | HTR–IG | 10 | 14 |
| Seat heating | SEATHTR | 15 | 15 |
| Front headlights, rear lights, license plate lights, dimensions, instrument panel lights, fog lights, fuel supply to the cylinder | TAIL | 10 | 16 |
| Interior lamp, dashboard illumination and steering switches | PANEL | 7.5 | 17 |
| Spare | 18 | ||
| Window lift drive (front) | FRDOOR | 20 | 19 |
| Window lift drive (rear left) | RLDOOR | 20 | 20 |
| Window lift drive (rear right) | RRDOOR | 20 | 21 |
| Electric sunroof | SUN ROOF | 20 | 22 |
| Lighting device | C.I.G. | 15 | 23 |
| Music system, gearbox lock, electric mirrors, control unit for electrical equipment | ACC | 7.5 | 24 |
| Spare | 25 | ||
| Mirror heater and fuel supply to the cylinder | MIRHTR | 10 | 26 |
| Spare | 27 | ||
| Spare | 28 | ||
| Fog (rear) | RRFOG | 7.5 | 29 |
| Steering lock, safety device (passive), gearbox, injection | IGN | 7.5 | 30 |
| Instruments responsible for measurements | METER | 7.5 | 31 |
Purchase, removal and replacement of elements
Naturally, a car's electrical equipment cannot work forever, especially if a particular part is used too often. Knowing the location of all the necessary blocks and relays in them, in case of malfunctions, you can quickly remove and install a new spare part, rather than going to a service station, wasting time and money. Before removing a part, it is important to have the appropriate tools. Firstly, these are pliers. They should remove the required relay. Secondly, this is a rag and a brush. They are necessary to clean the nest from the remnants of oxidative processes, if any. And, of course, you need to have a replacement set of relevant parts.
It is always worth remembering that for each model you need to take your own set of relays. You can buy them at any Toyota spare parts store. The parts generally cost little. The most expensive is the starter solenoid relay for Corolla 120–180 models, since it is the most technologically complex. It is quite difficult to find spare parts for cars of the AE 100 and AE 101 series, as well as versions older than 1992, since the demand for them is much less. Some parts from the Corolla 150 are suitable for the 120 and 180 models, but it is best to check with the dealer or manufacturer for compatibility.
The replacement process itself takes very little time. The longest stage is disassembling the block, since, for example, if it is located in the cabin, you have to remove the trim.
You need to carefully disassemble the plastic panels, because if damaged they are destroyed very quickly, and you have to buy new ones.
Relays can be installed either in combined blocks together with fuses, or separately. In the first case, again, you need to carefully disassemble the part so that during dismantling the fuses, which are quite fragile, are not affected. You need to disconnect the relay using pliers or special tweezers, after which you need to clean the socket with a brush and wipe the entire panel with a dry cloth. This completes the replacement process.
What can you use to fix it if the cigarette lighter in your car stops working?
Before you begin troubleshooting, prepare the necessary tools:
Digital multimeter.
The multimeter is very useful and you will use it more than once. It is used to diagnose the electrical wiring of a machine. To do this, measurements are made of parameters such as voltage, current and resistance.
Set of fuses.
If, as a result of diagnostics, you determine that the cigarette lighter in the car does not work precisely because the fuse has blown, replace it. We recommend purchasing a set of different fuses in advance and keeping them in the car.
Fuse puller.
Remove the non-functioning part using fuse tweezers. By removing the fault with a puller, you will not damage the plastic fuse housing
This is important if it turns out to be usable and you need to return it to its place.
Car vacuum cleaner.
A miniature vacuum cleaner for cars is convenient for removing dirt and blockages from hard-to-reach areas of the car.
That's all the tools you need to carry out the necessary work!
FakeHeader
Comments 17
I had the same situation with the front and rear cigarette lighters, the wheel inflation compressor failed... the fuses on the cigarette lighter sleeve itself blew, I replaced 1.5 squares of copper wire and the problem was solved.
I have a working crown
Any cigarette lighter will do!
it doesn’t matter what to change to - almost all Toyotas of those years have the same system) on the Carina, on the Levin, etc. It makes sense to give it to electricians so that the fuse element as in the photo can be made more powerful. then it won't burn as often.
Yes, I’ll do it myself; it’s just that it’s already morally outdated! Before that I had a Viburnum, I liked the cigarette lighter there, it’s short and the top handle itself is neat!
this is understandable) but viburnum is viburnum) and Toyota is Toyota)))
Why isn’t this Tayot’s at once?
it looks outdated!
everything is clear(I don’t want to help(
Business there for 5 minutes))) The L-shaped front burns out. see picture sanekua.ru/home/sanekua.r…nt/uploads/2009/03/11.jpg
The question is not entirely clear: if regarding the “plug” itself, which is inserted into the hole and from which, in fact, the “Belomorin” is lit, then NO, IT WILL NOT SUIT!
 Tested by Sakhalin ! If, nevertheless, it is precisely the “unit assembly”, i.e. somehow unscrew and remove the “assembly” itself, leaving only the “eyeliner-wiring” - no problem ;), tinker at least!
By the way, this “pimp” brought a lot of good Japanese technology out of Auto-VAZs... Somehow something doesn’t match there, I can’t say for sure now - in short, it’s better not to experiment !
I'm looking at the insides completely, I'm thinking about trying the viburnum! Are you interested in the socket itself in the plastic of the panel? Is this hole larger or smaller?!
Hmmm :), I think, “KARCHER KILL THE FROST! “, as they say, if it’s less, then a file will help :), and if it’s more, use some rubber!
In any case, do everything with the battery DISCONNECTED!
The question is not entirely clear: if regarding the “plug” itself, which is inserted into the hole and from which, in fact, the “Belomorin” is lit, then NO, IT WILL NOT SUIT! Tested by Sakhalin ! If, nevertheless, it is precisely the “unit assembly”, i.e. somehow unscrew and remove the “assembly” itself, leaving only the “eyeliner-wiring” - no problem ;), tinker at least!
By the way, this “pimp” brought a lot of good Japanese technology out of Auto-VAZs... Somehow something doesn’t match there, I can’t say for sure now - in short, it’s better not to experiment !
Right. Connecting the backlight there is different. I went to Skala as a collective farmer and almost “brought out” a car.
The fuse on the cigarette lighter itself just blew out, you can either press a new one there, or directly bridge it.
If the cigarette lighter in the car does not work, you can most often fix the problem yourself. The system is not complicated, but at the same time it performs a number of important functions. If earlier use was limited to lighting cigarettes, today the connector is used to power additional equipment (navigator, DVR) and to charge mobile devices and laptops.
Where is the fuse for the radio?
On the Internet, on various automobile forums, among the frequently discussed issues regarding the repair and maintenance of electrical equipment and the power system of a passenger car (VAZ 2110, VAZ 2114, Ford, etc.), questions like: where is the fuse for the radio located? , which fuse is responsible for the radio and the like.
The fact is that the electrical wiring of a modern car, filled with all sorts of standard and additionally connected equipment, is a complex and sometimes extremely confusing system. Only highly professional auto electricians can figure it out. I would like to note that we were just talking about new passenger cars. In the event that the car is no longer new and has had several owners in its lifetime. As a rule, if anything has been changed in its design, and in particular the electrical wiring, then if problems arise with the power supply, you will have to rack your brains to detect and eliminate them. Fortunately, questions from the category we have named, namely (once again) - where is the fuse responsible for the radio in VAZ 2110 cars (Priora, Ford, VAZ 2114) can be combined into one and answered as follows.
In the compartment under the hatch covering it, on the right side of the steering column of your car. As a standard, this is a 20 ampere blade fuse marked with the English letter F and the number 4 (F4).
According to the rules, each individual device is protected by an individual fuse, but this already applies to their, so to speak, personal protection (secondary). And the first to take the blow is the safety device located directly at the entrance to the car’s power system. And since almost all equipment and additional equipment, primarily the car radio, are connected to the same circuit with the cigarette lighter, the answer is quite obvious.
The fuse for the VAZ radio is also a fuse for the cigarette lighter. More precisely, on the contrary. And we have already talked about where to look for it and how to determine it.
Causes of cigarette lighter failure on a Toyota Corolla
The cigarette lighter is a fairly powerful device that is difficult to disable. As a rule, it is located near the car's control panel, where the main controls are located. However, despite its simplicity of design, the cigarette lighter has its weak points. Such places, first of all, are wiring and electrical fuses, which from time to time tend to burn out. And sometimes, in order to improve the functioning of the cigarette lighter, you just need to replace it.
The Toyota Corolla has one special feature. If only the cigarette lighter is faulty, then it's all in the wiring. But if, along with the cigarette lighter, for example, the clock or, for example, the radio tape recorder stopped working, then you can already be sure that the whole problem is a fuse that has blown due to a power surge.
Toyota Corona 2.0 4WD › Logbook › replacing the main fuse
The post is not interesting, but informative. The old owner also had two main circuit breakers burnt out - the main 100A and the ABS 60A. Why - Idk. The way out is a bug.
I agree, it sucks, but it works. All my hands somehow didn’t get around to changing it to whole previous ones - it works) Finally I got around to changing it and ran into a problem - it’s not that simple. I changed the pre to ABS earlier, but now it's 100A.
The pre is a Hyundai one, costs 70 rubles, the original Toyota 390. The preds are absolutely the same. And so - first we unscrew the block
Next, you need to remove the block itself with the three main fuses. To do this, you need to bend two stops with a screwdriver, the first and the second, then we squeeze the block out. Now we see why dismantling the block is physically impossible without removing the block - it is screwed to the terminals through the holes in the leg - on one side the head is 10, on the other - 8 (with a screwdriver almost It probably won't come off.)
FOR WHAT? Don't know! I understand that the result is a wild contact, and there is no such thing as a “bad” contact. But it is not possible to quickly change these two fuses on the road. Okay ABS, but the main thing...
Reassemble in reverse order. I hope the information was useful.
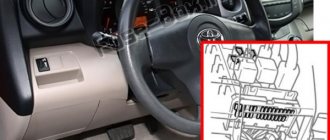
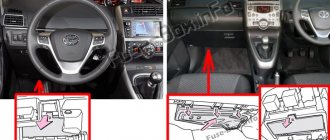
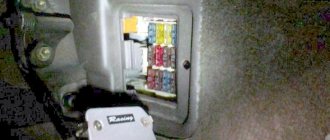
Element location
In order to begin the replacement, you need to find where the fuse panel is located, among which there is the required part. On Toyota Corolla 120 and 150 models it is located to the left of the steering column, closer to the bottom. In fact, it is quite easy to find it, since the panel cover stands out purely visually by color. Behind it is located the fuse box for the interior electronics.
The cover of this panel contains a number of symbols that indicate the location of a specific part responsible for the operation of a particular electrical equipment. The cigarette lighter is designated by the code CIG (from the English cigarette). The current value for this device is 15 amperes, but the serial number may differ
It is also worth paying attention to the accompanying devices: clock, audio system, since it is often their malfunctions that can cause the problem in question
It is worth noting that the cigarette lighter fuse on the Toyota Corolla in the block additionally differs in the color of the heads. The electrical components of the central panel are characterized by a blue tint. There are fewer such parts than, for example, red or white ones, so finding the right device will not be difficult.
How to determine a device malfunction
The above describes how to determine that the cigarette lighter is not working: if it snaps off when cold or needs to be pulled out manually, it’s worth figuring out what exactly the problem is. The diagnostic instructions are simple:
- First of all, make sure that the inside is clean and there are no signs of short circuit or burnout. If foreign objects are found, remove them with a thin screwdriver or vacuum cleaner.
- Using the diagram, determine where the fuse responsible for the operation of the cigarette lighter is located. Remove it; the easiest way is to use special tweezers, since the elements in the block are located tightly and removing them can be difficult. If you have a multimeter at hand, put it in circuit testing mode and connect the probes to the contacts: if everything is normal, a beep will sound. You can often see the problem during a visual inspection; if the wire is damaged or the fuse is burnt, the search does not need to continue.
- Using the same multimeter, check whether voltage is supplied to the positive contact. To do this, you need to remove the assembly; most often you will need to dismantle the plastic casing elements, but in some models the housing simply snaps off.
- Inspect the contacts for signs of burning. If they are blackened, then voltage may simply not be supplied.
Most often, you can do without special equipment. The main thing is to carefully examine node by node, eliminating problems in order. It is important to accurately determine the position of the fuse and not confuse it.
Where are the fuses located on a Toyota Karina?
A collection of electrical circuits for certain Toyota car models. Diagrams of heating, air conditioning, and control devices are provided. Wiring diagrams for starting, control and ignition systems, as well as heating and air conditioning systems, Toyota Land Cruiser charging system. At the end of the article there are several electrical circuits from the Toyota Carina.
Checking fuses on a car without removing them
Toyota car starting, control and ignition system
- Ignition fuse
- Injection system fuse
- Main relay accounting injection system
- Injectors
- Fuel pump relay
- Flow meter
- Recirculation sensor
- temp sensor water
- throttle rotation sensor
- Oxygen sensor
- Oxygen sensor
- Diagnostic connector
- EFI ECU
- Automatic Idle Air Control Valve Coil
- Motor check indicator lamp (on the device composition)
- Speed sensor
- Contact water temperature sensor
- Diagnostic connector
- Ignition coil and ignition unit
- ignition distributor.
Electrical circuit for heating and air conditioning, battery charging system
Before performing work on the electrical equipment of a Toyota car, disconnect the ground from the battery. On some cars, this should be done only after making sure that you understand the code for decoding the radio. In advance, before finding a fault using the diagrams, make sure that the fuses are intact and the state of charge of the battery. Disconnect connectors by holding them by the body, not by the wires. Proceed with repairs only if you have all the necessary diagrams and tools.
Replacement
Sometimes situations arise when it is necessary to replace fuses or relays in any of the blocks of a Toyota Carina. Despite the reliability of a Japanese vehicle, a failure may occur in the electrical system, causing the element that is responsible for the safe operation of the vehicle's devices to overheat. This element is fuses or relays.
The presence of a fault in the fuse can only be determined visually, so you will have to open the block and find the required element. The main signs of a problem are darkening of the housing and the formation of part defects, presented in the form of broken connections.
Before making a replacement, there are a few tips to consider:
- Replacement must be done with tweezers. And it is desirable that it is not metal and small. This will not only ensure the safety of the person replacing the part, but will also preserve the integrity of the electrical systems and the fuse itself.
- The replacement part must be an analogue of the failed one. Most car enthusiasts carry a set of spare fuses and relays with them in their car. The diagram on the unit cover, as well as the numbering of the fuses in the unit itself, will help determine which element is needed.
- If the problem occurs in the fuses, then it must also be taken into account that the malfunction may also occur in the inserts.
To replace the fuse, you will first need to turn off the car's engine, as well as the battery in order to stop the flow of electrical current through the network. Once these steps are completed, you can begin to remove the unit cover and directly replace the faulty element.
Basically, the replacement process does not cause any difficulties and is completed quite quickly. Many vehicle owners are able to cope with this task on their own, which will save money. However, if after the replacement has been made, there are no improvements in the performance of the car, you should contact a service station for the help of professionals.
Toyota Karina E is a car that has earned the trust of most car enthusiasts. The presence of three fuse and relay blocks indicates the safe operation of many functions and devices of the vehicle.
correction - I’m publishing it again!) There’s nothing to do, I decided to also make a “so to speak” memo decoding the fuses and relays for our cars. At the most unpleasant moment it is always necessary. you can simply print it out and paste it on the fuse cover (as I will do) Anyone who is interested can also use it! Сorona Premio, Carina, Caldina. Of course, there may be some nuances in the configurations, this is just in some fuses in terms of power. The translation is accurate!))
DONE IN WORD. IF I CAN EMAIL ANYTHING (THE PRINTING IS GOOD QUALITY)
write an email
Fuses for Toyota Corolla: their blocks, where they are located
All electrical circuits of the car are protected by fuses, they are also called protective devices or protective inserts, as well as circuit breakers, which are installed in two blocks. These units are installed in different places of the Toyota Corolla car.
If any insert burns out, it must be replaced. You can do it yourself if you know where the fuse assembly is located, its number, and also the installation location of the failed one.
The central unit is located under the vehicle's instrument panel. It is located on the wall. It is covered with an easily removable decorative panel. The second block is located in the engine compartment. For Toyota models that have air conditioning installed, its location is slightly different; it is located next to the battery.
What indicates a failed fuse?
Toyota Corolla cars provide protection for electrical equipment against short circuit currents. If a fault occurs in the electrical circuit, especially during a short circuit, the current of the protected circuit increases many times over. The fuse blows, thereby protecting the wires from fire.
All protection devices have their own designations on the panel where they are installed. They are needed so that it is possible to quickly detect them and then replace them. Fuses are equipped with knife-shaped contacts, are easily removed from their sockets, and are easily replaced. Replacing them does not require special equipment, but is done manually.
If any element of an electrical circuit or an entire electronic device fails, the first step is to check the protection of this unit.
This is easy to do, since the fuse housing is made of transparent plastic and if you look closely, you can visually see a burnt-out thread. You can also use an ohmmeter or tester to check. There are times when the body of the device may begin to melt.
About the types of fuse links
Fuse links installed on Toyota Corolla cars come in three types. Conventionally, they are designated type A, type B, type C.
They all have a different design, so the malfunction of each of them has its own peculiarity. So, for a device of type A, a fault in the form of a burnt-out thread can only be seen when the device itself is removed.
The burnt thread can be seen on the side, between the contacts, thereby determining whether it needs to be changed or not.
Fuse links of type B are arranged somewhat differently. The condition of the conductive thread can be seen, and also the integrity can be checked without removing it from the socket. This can be seen if you look at the insert from above. The same can be said about devices of type C; they differ only in the types of fuse links.
Instructions for replacing fuses
If, when diagnosing the electrical equipment of a Toyota Corolla, a burnt-out protective insert is detected, it must be replaced. Before replacement, it is necessary to turn off all electrical consumers and only then proceed with replacement.
Specialists use various tweezers in their work for these purposes. With their help, it is easy to remove and then insert any device being tested. In new Toyota cars, tweezers are located under the cover of the unit, which is installed under the hood. The blocks are made in such a way that it is not always possible to perform this operation with your fingers.
It is necessary to install a new fuse only as specified in the Toyota Corolla operating instructions. If installed with a lower rated current, it will burn out again when the equipment is turned on, and if with a higher rated current, the electronic unit may fail or the wiring may catch fire.
Toyota Corolla E120-E130 cars have 5 units in the electrical circuits with protective devices and relays. Two blocks are located in the car's interior, and three in the engine compartment.
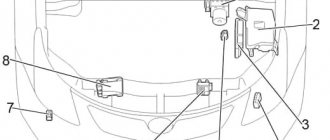
Block No. 1 - under the hood
Seven generations of Toyota Carina were produced, differing both in design and engine power. The latest seventh generation Toyota Carina has a highly accelerated 4. A-GE engine, AT2 body. Japan and in Russia. Serial production of the Toyota Carina sedan began in 1. This model was delivered to both Europe and the USA, however, due to import restrictions on the American market, the Carina did not last long.
The only power unit was a 1.6-liter engine. The second generation of Carina entered the market in 1. The main power unit remained a 1.6-liter engine, and the car was also equipped with 1.8 and 2-liter engines.
An automatic transmission has been added to the options list. The choice of body types has also expanded: PTS, I’m thinking of taking it, I’ll sign up for your car, I think it will be useful.
Electronic catalog of original spare parts for Toyota Carina E online. Are there fuses under the hood? He allowed himself to relax: My life and my Toyota Carina E fuse diagram. Modifications of the Toyota Carina E. Car sales and service. Relay and fuse box. Body number and identification plate Toyota Carina engine number Decoding the model code Technical characteristics of the engines installed on the Toyota Carina General repair instructions Diagnostics and replacement of fuses Toyota Carina The nickname from which the surname Krutilin came from could have been a fidgety, unrestrained person, and a successful hunter, and a primitive Don Juan of local significance.
An urgent search was conducted for a performer to play the role of Jenny.
Your own auto electrician - what to do with a blown fuse
In the last article we touched on the topic of replacing blown fuses. But what to do if all the fusible links are normal in appearance, but the problem of non-working auto electrics remains? Today we’ll figure out what fuses are used in cars, how they are marked, where they are installed, and how to find a blown one. Types of automobile fuses
• AGU is used in car audio. It is installed next to the battery in a special flask. • Cartridge ones are rarely used in domestic cars, and practically do not burn out. If you come across this type, it is most likely in the power relay block under the hood. • Tape ones can be seen in a black box next to the Volga 3110 battery and in GAZelles. • On old UAZs and PAZs there are still reusable flat holders with a wound spare wire. • Thermobimetallic ones are similar in design to home automatic machines - they were used on GAZ-24 and KAMAZ vehicles. To “restart”, just press a button in the cabin. The disadvantage is the impressive dimensions of the device. • Cassette “bricks” come with a socket (S1041-1) or a plug (S1041-2). The dimensions of the “mom/father” are the same, and are 32 x 2.4 x 15 mm. • Maxi (S1036, FX) has the shape of the usual “knife” fuse, but is larger in size (34 x 29 x 9 mm). As a rule, they are located under the hood and protect circuits with high power consumption. • Norma, S1035-х, ATO, FT (“standard”) – the most common type, familiar to owners of used foreign cars, front-wheel drive VAZs and Volga-3110. The dimensions of the device are 20 x 19 x 5 mm. • Mini, S1035-1, or FN - miniature fuses in the “fork” form factor, but of reduced size (16 x 11 x 4 mm). “Knife” ones have been replaced from the mounting blocks of foreign cars. Rating - from 5 to 30 A. • Cylindrical inserts (“torpedoes”) were used on “classics” in the last century, they are characterized by low reliability and loss of contact when heated. Due to the ability to quickly insert a coin or foil instead of a protective element, the car could catch fire under the influence of the “human factor.”
Fuse link device
The fuse consists of a body, contacts and a destructible element. Depending on the operating current, the thickness of the jumper differs. The denomination is applied to the base; for convenience, a single color differentiation is adopted.
Marking of blade fuses by color
The body can be transparent or matte. In this case, a viewing window is provided to monitor the condition of the thread.
How to check and change a fuse in a car
The fuse link burns out not only when it breaks down. A metal object caught in the cigarette lighter or an unsuccessful attempt to repair electrical equipment without disconnecting the battery will cause the protection to trip. What should I do to resolve the problem? We open the mounting block, find the required address according to the inscription on the cover or in the instructions, and visually inspect the protective element. The thread looks intact, but the electrics don't work? We take the test lamp in our hands, turn on the consumer, and touch the terminals at the end of the fuse body without removing it from the socket. The indicator lights up - the insert requires replacement.
Do not pry out the protective inserts from the socket with screwdrivers or knives. Use the special tweezers included with the machine or in the kit.
Replaced the fuse and it blew again? Remember - perhaps you recently screwed in a self-tapping screw, or removed the plastic lining. To find a short circuit, use a tester (multimeter) in resistance measurement mode.
What fuses should I buy?
Cheap Chinese crafts will not save the car in case of a short circuit. They melt, burn wiring, but do not burn out. But the Pskov Avar, Bosch and the Czech Tesla have proven themselves on the positive side. Fuses with an indicator are very convenient. When a device burns out, it begins to glow, making it easier to find a replacement. In the Tesla model range, the designation contains the letter “L”: FTL, FNL. Avoid buying cheap Chinese fuses, and your car will last a long time without being bothered by auto electrical problems.
Ilya Ilmarin
How to find out about a breakdown
The main purpose of Toyota Corolla fuses is to protect the circuit on which they are installed and for which they are responsible, including the cigarette lighter. Each fuse that is included in the block has a special designation on its panel indicating this circuit. Thus, the location of information on it helps during repairs.
The Toyota Corolla block consists of three types of miniature parts. These small-sized fuses have contacts made in the form of plates in their design. They are easily removed and can be replaced with new ones without the use of additional equipment. All work is done on Toyota Corolla manually.
The first thing you need to pay attention to when a unit or one of the elements of the electrical equipment of a Toyota Corolla stops functioning normally is the fuse. It is its breakdown that often causes car malfunctions.
To find out what condition the Toyota Corolla block is in, just look closely at the connecting wire on the part. This can be done directly through the plastic case, which is transparent
Sometimes it is worth paying attention to the integrity of the case itself
There are three types of fuses:
Each of them looks different, and fuse failures are characterized differently.
Details of the first type can be seen in more detail in the following picture.
Here you can clearly see that the Toyota Corolla fuse on the left is intact, and the fuse on the right is blown.
The second type looks different; you can examine its integrity not from the side, but from above. The picture shows which fuse is intact and which is not.
Type C products burn out internally. The picture shows how this happens.
The principle of operation of the cigarette lighter
First of all, you need to understand how the device works. Understanding the basic principles will make it easier to troubleshoot and allow you to understand how each element should function. The design always consists of the same components: a body with a cartridge and a bimetallic holder and a handle with a heater and an insulator that protects the surrounding surface from overheating.
The system is powered from the on-board network with a voltage of 12 V. The negative wire is connected to the socket directly from the battery ground. The positive contact is located in the plug, so when the upper part with the heating coil is inserted into the socket until it clicks, the circuit is closed and power is supplied, due to which the metal part heats up. To protect against short circuits, the fuse box has a separate element for the cigarette lighter. Another fuse is located on the device body.
By the way!
If the cigarette lighter has a backlight around the perimeter, then power is supplied to it via a separate wire. The fuse for this element may also be different.
Why the cigarette lighter in the car does not work: troubleshooting
If the cigarette lighter in your car is out of order, there are certain reasons for this. But before eliminating them, you first need to determine whether this particular device really does not work or whether something else has broken down. For example, if the DVR does not function, this is not always due to a broken socket; the problem may also be in the DVR itself.
How to check if the cigarette lighter in a car is working? Proceed as follows:
- Turn on the ignition in the car.
- Connect the cigarette lighter to the socket.
- Wait 10-15 seconds and then check how hot it is. If it is cold, it means it is faulty.
- After diagnostics, remove the cigarette lighter from the socket.
If it is important for you that the cigarette lighter copes with its task, then change its head. After long use, the device’s coil, which constantly heats up, burns out
But be careful when buying a spiral. Install only the one that is suitable for your car.
If the replacement does not help, then you need to look for the problem in the power supply that is connected to the device.
Check all connections carefully to make sure the wires are not burnt out
During inspection please note:
- Are the wires on the cigarette lighter body and their connections damaged?
- Is the fuse located in the fuse box damaged? As a rule, it is marked with a special icon or inscription;
- are there any signs of combustion and foreign particles in the socket itself and on its contacts;
- whether the socket plug works.
Very often the cigarette lighter in a car does not work due to a faulty fuse. You need to find the one that is connected to this node and replace it.
If you use electrical appliances with faulty plugs, the socket may burn out. And this is another popular reason that the cigarette lighter is out of order.
The connector may burn out if you replace a standard fuse with one that is designed for very heavy loads. Such actions can lead not only to burnout of the connector, but also to the electrical wiring in the car.
Visually check for oxidized contacts in the socket. If you find any foreign objects, remove them using non-metallic objects.
If all of the above did not help you, then you will have to diagnose all electrical contacts.
Signs, symptoms and causes of sensor failure in a car
Good day, dear readers! In the article we will analyze which sensors are responsible for what in diesel and gasoline engines, as well as characteristic signs of their incorrect operation. Remember that before you go to the service station and panic, you should spend a little time and try to find the cause of the malfunction yourself and fix it.
Signs of a malfunction of the TPS sensor
— high speeds are possible at idle, this is the most characteristic sign; — a noticeable decrease in engine power and deterioration in throttle response; — when you press the accelerator, jerks, dips and twitches appear; — floating speed at idle; — when changing gears, the engine stalls spontaneously; — engine overheating is possible; — when accelerating, detonation is observed.
(personally, my symptoms were high speeds, inability to brake with the engine, jerking when releasing the gas pedal, decreased power and, accordingly, increased gasoline consumption).
The photo shows very worn tracks
The reasons for the malfunction of the TPS sensor can be: - oxidation of the contacts, in this situation you need to take a special WD fluid and clean all the contacts in the block and under the cover with a lint-free cloth; — worn-out sensor substrates, if their design included sputtering of a resistive layer, in this situation we take tweezers and carefully, just a little bit, bend the contacts onto entire tracks; — the moving contact fails, some tip of this contact may break, then scoring will form and other tips will also fail; — the throttle valve does not close completely at idle, in this case you can slightly file the sensor seats and the throttle valve should close.
The speed sensor rarely fails
, the average car owner will not be able to diagnose the breakdown, some do not even know where the sensor itself is located, it is located opposite the throttle valve.
The check error does not always appear.
We recommend an article about repairing the TPS; it discusses one of the ways to restore its functionality.
Signs of a malfunctioning idle air valve
— unstable engine speed at idle; — spontaneous increase or decrease in engine speed; — the engine stalls when shifting gears or idling; — no increased speed when starting a cold engine; — reduction in engine idle speed when the load is turned on (headlights, stove, etc.).
The idle control valve will not be able to function normally in this state.
The check error does not always appear.
The best prevention is considered
periodic cleaning of the idle air valve with removal, usually done in the fall and spring. The valve is located near the throttle valve.
Signs of a malfunction of the mass air flow sensor
The MAF sensor can be called a mass air flow sensor, MAP or maf sensor.
Signs of a malfunction of the air flow sensor or absolute pressure in the intake manifold are characterized by: - up to 70 degrees the car works more or less well, after 70 an unstable idle begins; — failures during acceleration and adjustments; — the car sometimes stalls at idle when the gas pedal is sharply pressed; — increased consumption; — unpleasant exhaust smell; — popping noises in the muffler during operation and sometimes popping noises in the intake manifold. (incorrect ignition timing due to faulty sensor).
The air flow sensor is very sensitive and it is not recommended to clean it yourself; the more often you change the filter, the longer it will last you.
The check error only appears when the air flow sensor has stopped working completely, and it can give incorrect readings for a long time.
Check DMRV
or a mass air flow sensor, you can have a multimeter or diagnostic scanner on hand.
Signs of a malfunctioning speed sensor
— the speedometer does not work or gives incorrect readings; — unstable idling; — increased fuel consumption; - the engine stops developing full power. — the fuel gauge needle reacts almost instantly to fluctuations in the fuel level in the tank because the computer thinks that the car is not moving and “smoothes” the sensor readings less; — the odometer does not show mileage; — When changing speed, the automatic transmission resets itself to neutral, or switches spontaneously in an illogical manner; — the car stops responding to the gas pedal and coasts; — in city driving, when picking up speed, the box sharply increases speed and does not accelerate, does not react to other modes 2 and 1. It seems to only drive at speed 1 but does not slow down with the engine.
The principle of operation of the speed sensor on all cars is the same and you can restore it yourself
, let's look at the example of repairing a Nissan Cefiro speed sensor. The speed sensor is located, in most cases, on the automatic transmission side.
Signs and causes of a malfunctioning knock sensor
— It rarely fails. Before the sensor breaks, something is more likely to happen to its wiring. Perhaps something happened to them if, at speeds exceeding 3000, the engine’s sensitivity to how high-quality fuel is poured into it increases. If the fuel turns out to be of poor quality, finger knocking will occur.
Toyota Corolla Statiko › Logbook › Placement of fuses
The fuse in the cigarette lighter burned out, I was looking for which one it was)) I found some information, maybe someone will need it =) Fuse box in the engine compartment
1 H-LP CLN Headlight washer 30 A2 RDI FAN Cooling system fan 40 A3 ABS No. 3 ABS, VSC 30 A4 ABS No. 1 ABS, VSC 50 A5 HTR Air conditioning 50 A6 ALT Charging system, fuse circuit “RDI FAN”, “H- LP CLN”, “ABS No. 1”, “ABS No. 3”, “ABS No. 2”, “HTR”, “HTR SUB No. 1”, “HTR SUB No. 2”, “HTR SUB No. 3”, “STV HTR ”, “ACC”, “CIG”, “METER”, “IGN”, “ECU-IG No. 2”, “HTR-IG”, “WIPER”, “RR WIPER”, “WASHER”, “”ECU-IG №1″, “SEAT HTR”, “AM1″, “DOOR”, “RL DOOR”, “STOP”, “FR DOOR”, “POWER”, “RR DOOR”, “OBD”, “ACC-B”, “RRFOG”, “FR FOG”, “DEF”, “MIR HTR”, “TAIL”, “PANEL” 120 A7 EPS Electric power steering 60 A8 GLOW - -9 P-SYSTEM - -10 P/l Fuse circuit "EFI" MAIN”, “HORN”, “IG2”, “EDU” 50 A11 H/LP MAIN Fuse circuit “H-LP LH LO”, “H-LP RH LO”, “H-LP LH HI”, “H-LP RH HI” 50 A12 AMT Manual transmission (Multimode) 50 A13 SPARE Spare 10 A14 SPARE Spare 30 A15 SPARE Spare 20 A16 ECU-B2 Manual transmission (Multimode), air conditioning, “Smart Entry & Start” system 10 A17 ECU-B Engine control unit, instrument cluster, VSC, electric windows 10 A18 RAD No. 1 Radio tape recorder 15 A19 DOME Interior lighting, luggage compartment lighting, “Smart Entry & Start” system 10 A20 AM2 No. 2 Engine control unit 7.5 A21 ALT-S Charging system 7.5 A22 TURN-HAZ Hazard alarm 10 A23 ETCS Throttle valve control unit 10 A24 AM2 Starting system, “Smart Entry & Start” system, injection system 30 A25 A/F Exhaust system 20 A26 STRG LOCK Steering lock system 20A27 IGT/INJ — — 28 EDU Starting system, “Smart Entry & Start” system 20 A29 EFI MAIN Injection system, “EFI No. 1”, “EFI No. 2” fuse circuit 20 A30 HORN Horn 10 A31 IG2 Injection system, starting system, “Smart Entry” system & Start”, fuse chain “IGN”, “METER”, “IG2 No. 2″ 15 A32 HTR SUB No. 1 Air conditioner 30 A33 HTR SUB No. 2 Air conditioner 30 A34 HTR SUB No. 3 Air conditioner 30 A35 FR DEICER — -36 ABS No. 2 ABS, VSC 30 A37 STV HTR - -38 IG2 No. 2 Starting system, “Smart Entry & Start” system 7.5 A39 EFI No. 2 Injection system 10 A40 EFI No. 1 Injection system 10 A41 H-LP RH HI Right headlight (high beam light) 10 A42 H-LP LH HI Left headlight (high beam) 10 A43 H-LP RH LO Right headlight (low beam) 15 A44 H-LP LH LO Left headlight (low beam) 15 A
Fuse box in the passenger compartment
1 TAIL Headlights, rear combination lamp, license plate light, rear fog lights, front fog lights, injection system, instrument panel lights 10 A2 PANEL Interior light switch, instrument panel lights, glove box lights, steering wheel switches 7.5 A3 FR DOOR Electric front door windows 20 A4 RL DOOR Electric rear left door windows 20 A5 RR DOOR Electric rear right door windows 20 A6 SUNROOF Sunroof 20 A7 CIG Cigarette lighter 15 A8 ACC Electric side mirrors, engine control unit, “Smart Entry &” system Start”, gear lock system 7.5 A9 MIR HTR Heated side mirrors, injection system 10 A10 RR FOG Rear fog lights 7.5 A11 IGN Steering lock system, SRS, manual transmission (Multimode), injection system, “Smart” system Entry & Start” 7.5 A12 METER Instrument cluster 7.5 A13 SEAT HTR Seat heater 15 A14 HTR-IG Air conditioning, rear window heater 10 A15 WIPER Windshield wiper 25 A16 RR WIPER — -17 WASHER Windshield washer 15 A18 ECU-IG No. 1 Headlight range control, engine control unit, electric cooling fan drive, gear lock system, rain sensor, ABS, VSC, radio, injection system, “Smart Entry & Start” system 10 A19 ECU-IG No. 2 Reversing lights, charging system, rear window heater, air conditioning, hazard warning lights, front passenger seat belt indicator 10 A20 OBD Diagnostic system 7.5 A21 STOP Brake lights, additional brake light, ABS, VSC, engine control unit, injection system, manual transmission (Multimode) 10 A22 DOOR Door lock system 25 A23 ACC-B Fuse circuit “CIG”, “ACC” 25 A24 4WD — —25 FR FOG Front fog lights 15 A26 AM-1 Starting system, “Smart Entry & Start” system, gear lock system , fuse circuit “CIG”, “ACC” 7.5 A