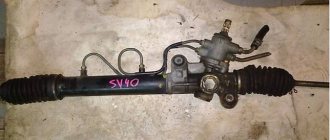
The Toyota Corolla steering rack is a very important part for driving a car, which is a mechanical unit with the help of which the steering wheel is turned to horizontally tilt the front wheels.
In this article we will look at the main types of steering racks, their advantages and disadvantages, as well as signs of a faulty steering rack.
Nowadays, you can find three options for rack and pinion mechanisms, differing in their operating principle:
- Mechanical – the simplest version of steering , in which the wheels are turned directly by the driver’s physical strength.
- Hydraulic – a mechanism in which the driver’s physical impact on the steering wheel is enhanced by the hydraulic booster.
- Electric is a steering option that is similar in principle to hydraulic steering, the difference being that an electric motor is used instead of a hydraulic booster.
Reasons for replacement
- One of the common causes of malfunction is a careless driving style, accompanied by falling into potholes and driving on uneven roads at high speed. When driving like this, all mechanisms will quickly wear out , an obsessive knock will appear, and controllability will deteriorate.
- The next important reason is the acceleration of the car when the steering wheel is in the extreme left or right positions.
- Also, frequent driving onto curbs and other hills has a negative impact on the life expectancy of this mechanism, as this is a noticeable load on the steering.
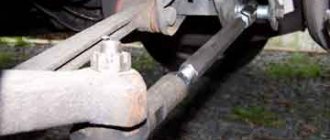
Replacement sequence
- We install Toyota Corolla 150 on an inspection channel, an electric lift. We remove the front wheels, unscrew the steering tips, knock them out of the seat on the steering knuckle;
- We substitute a hydraulic telescopic stand to support the weight of the engine and body. The design of the Toyota Corolla 150 is designed in such a way that it is impossible to disassemble the steering mechanism without removing the subframe;
- Gradually lower the rack, unscrew the lower motor mount, remove the rack assembly with steering rods and ends;
- We fix the mechanism in a vice and proceed to complete disassembly into its component elements;
- We wash, clean the components, remove parts with obvious signs of wear, defects, and damage. We install new consumables, lubricate with Litol or graphite-based analogues. We pay special attention to the condition of the oil seals and the pressure bushing. And also, springs, worm (axial shaft), teeth, anthers, clamps;
- We lay the restored rack on the subframe, fix it with two bolts at the edges, and install it in its original place in the car. Finally, tighten all the bolts again.
The replacement work for the Toyota Corolla 150 is over. During the repair, we inspect the condition of adjacent parts and mechanisms: gearbox, brake caliper, lines, alternator belt. If necessary, we replace worn components.
Subject to the recommendations and sequence of actions, the next major overhaul of the dispenser is after 60 - 80 thousand km. mileage Original spare parts, a moderate driving style, professional installation are the key to a long service life of the car.
The Toyota Corolla steering rack is a very important part for driving a car, which is a mechanical unit with the help of which the steering wheel is turned to horizontally tilt the front wheels.
In this article we will look at the main types of steering racks, their advantages and disadvantages, as well as signs of a faulty steering rack.
Nowadays, you can find three options for rack and pinion mechanisms, differing in their operating principle:
- Mechanical – the simplest version of steering , in which the wheels are turned directly by the driver’s physical strength.
- Hydraulic – a mechanism in which the driver’s physical impact on the steering wheel is enhanced by the hydraulic booster.
- Electric is a steering option that is similar in principle to hydraulic steering, the difference being that an electric motor is used instead of a hydraulic booster.
Symptoms of a problem
- The very first and most reliable sign is the appearance of a characteristic knocking sound in the area of the front linkage and axle . At first it is quiet and appears on rough roads, but later it intensifies and can be felt in the steering wheel.
- The steering wheel is very tight at low speeds, and as it accelerates it becomes softer, but a vibrating sound appears.
- The actual angle of rotation of the front wheels does not match the degree of rotation of the steering wheel. In this case, the car becomes uncontrollable and throws around corners.
- The Toyota Corolla 120 steering rack is leaking. Liquid appears on the boots, usually when the level in the tank drops. If measures are not taken in time, rust may appear and the shaft seals may fail, and the tip may also break.
- When the power steering temperature drops, the steering wheel turns hard to the sides. The problem disappears when warming up to 50-60 degrees.
These are the main problems that you should pay attention to and diagnose the condition of the mechanism in order to avoid further wear.
It is important that if you do not pay attention to warning signs in time, consequences may arise that will require you to invest a large amount of money and jeopardize the safety of driving your car. In critical cases, there is a strong roar, squeaks and absolute uncontrollability of the car.
Steering rack: typical problems on Toyota Corolla 150
- The steering wheel does not completely return to its original position after turning: the rack and shaft are deformed due to an impact, an accident, an accident;
- Knocks in the area where the mechanism is located: wear of the steering rack teeth, silent blocks, fasteners;
- The shaft on the rack is eaten: mismatch of the angle between the teeth and the screw;
- Formation of liquid leakage from the housing: deformation due to impact, corrosion;
- The steering wheel rotates in both directions with a large, uncharacteristic force: deformation, damage to rubber seals, pump washers;
- A slight whistle under the hood when turning the steering wheel: the power steering pump belt is loose;
- At different speed modes, the steering wheel behaves differently: the formation of scuffing on the rotor;
- Vibrations when turning the steering wheel: insufficient oil level in the system, power steering, wear of elements.
The list is not exhaustive and in each situation may be supplemented by new factors not previously identified. Faults appear either singly or in combination with other faults. During the diagnostic process, be extremely careful and do not make mistakes. If you don’t have experience in repairs, entrust the job to the specialists from the service station.
Choice of 120 and 150 body
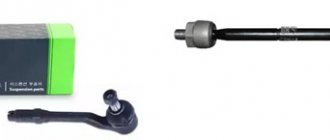
Before purchasing, make sure that the old rack cannot be repaired. After all, the cause of the breakdown may be in the repair kit or boots, but the main part may not be damaged. If a purchase is still necessary, here are a few rules:
- Pay attention to the VIN code so as not to run into a fake.
- You can use the old rack code to purchase an identical part.
- Of course, take into account the technical characteristics of the car: dimensions, location of the steering wheel, transmission unit, type of amplifier and other features.
- It is worth mentioning separately about used steering racks. This may be a completely justified purchase, given the high cost of the new part and the “survivability” of this design.
- Do not forget to purchase new anthers at the same time , in case they are not included in the package.
- Regarding brands, of course, it is better to use original parts. Although there are many manufacturers close to the original, such as Bosch, TRW, General Ricambi and JP Group.
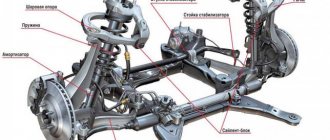
The principle of operation of the mechanism
The rack and pinion mechanism of machines with a hydraulic booster is equipped with a cylinder and a spool valve connected to the shaft. After starting the engine, the liquid is pumped under pressure by a pump. When the steering wheel rotates, oil is supplied to the cylinder cavity, reducing the force when the wheels deviate to the left or right. Oil seals installed at the ends of the aluminum rack housing prevent fluid leakage.
When the steering wheel is rotated, the controller connects the amplifier (the gain depends on the speed of the car). The driveshaft is connected to the drive shaft shank, which moves the rack and pinions along with the ends and hubs. The deflection of the steering knuckles is ensured by the drive shaft joints and bearings in the upper cups of the MacPherson struts.
Repair
Repairing the Toyota Corolla steering rack can be done in several ways:
- Shaft surface repair. For this type of repair, it will be necessary to sand the surface of the steering rack shaft using a grinding machine.
- Distributor repair. The shaft is also grinded; in addition, it is worth replacing the internal and external oil seal and o-rings.
- Shaft restoration. First, the actions listed above are performed, and then the shaft with the babit is built up. The last step will be chrome plating and polishing.
Repair and replacement of steering rack for Toyota Corolla 150
Any repairs begin with a comprehensive diagnosis. This can be done either independently or by specialists from service centers. Steering gear type: Toyota Corolla NZE 121.
Inspection stages:
- Visual assessment of the general technical condition, identification of defects;
- Dismantling followed by diagnostics on a special stand. The operation of the steering mechanism is as close to reality as possible;
- Cleaning from dirt, oil, fossilized deposits. The effectiveness of the inspection increases when the unit is cleaned, defects are visible, and it is possible to visually assess its performance;
- Disassembly into component elements, replacement of damaged ones, restoration, installation of new consumables.
Hello everyone, today we’ll talk about self-repair of the EUR or, more simply, the steering column itself... I’ll start with a little background about what and why I went there, so I’ll answer simply, if anyone has been following my on-board vehicle for a long time and carefully reads every entry, he’ll remember how I suffer with this damn steering wheel, this is the only but crippling sore of the Corolla in the 120th body... so I’m stubborn and won’t stop there, after all this I decided to try the contract column, and I didn’t like it after a couple of weeks of use and a knock of unknown origin appeared again, and not metal or plastic, but annoying and intrusive like a child’s ratchet in the steering wheel area... so, having smoked the forums and together with FLaB4eG I decided to get into the EUR on my own
So, after surfing a bunch of forums, conclusions were drawn about the problems of the EUR 1. Wear of the spline connection of the upper output shaft of the EUR and the upper shaft 2. Wear of the bearings of the EUR gearbox 3. Wear/play in the splines of the EUR gearbox (worm-wheel)
so, as a test speaker, I took my original speaker, which came with the car and was more damaged than the contract one... I won’t tell you the principle of removing the speaker from the car, everything is simple: 1. Remove the steering cardan shafts 2. Unscrew and remove the AIRBAG, not forgetting before this removes the terminals from the battery 3. Remove the steering wheel 4. Disconnect all the chips suitable for the column 5. Unscrew the three bolts securing the column and carefully remove the column without damaging the wiring
Well, let's get started?!
Before you start disassembling and repairing, make sure that you have a circlip puller in your garage or at your friends’ place; it will be more handy with straight ends... believe me, it’s been tested by me
Well, a few spare parts that will be needed: 1. Bearings for the EUR gearbox, bearing numbers 6301ZZ and 6201ZZ 2. Lubricant for steering mechanisms 90363-12002 (human advice, do not take it, as it is very expensive for 20 grams of lubricant
in the photo there are three bad ones, since the ones in the blue boxes are not the same, they were suggested to me on the forum, but they don’t fit, I suspect that they are from the pre-Restyle or vice versa from the 150th body, and the one in the original package is what I need, the second one you will have to find somewhere in your stores, always closed
Well, now a couple of nuances when removing the column itself: 1. The power supply wires of the EUR and the control wire are connected to the control unit, which is installed behind the instrument panel!
One chip is marked in the photo, you still need to remove the farthest chip from you, which is also included in this block, unfortunately I couldn’t take a photo
2. The wire on the ignition switch needs to be pulled out only with the ignition on, otherwise you won’t succeed, as I understand it there is a magnetic lock in addition to the chip and without power the chip will not come out, I sat on this puzzle for about an hour) I already wanted to pry off the chip with a knife))
I wrote about this mom and dad a little higher
As a result, after disconnecting all the beleberd with wires, the steering wheel and other unnecessary crap, we have this picture:
here it is a column
Well, then, as I said, we unscrew the three bolts securing the column itself (2 are screwed in vertically and 1 horizontally - I advise you to unscrew it first for ease of dismantling) By the way, the cardan shafts can be removed together with the column, but it is extremely inconvenient to pull out the column with cardan shafts like this how little space there is. Lay out the column and see what we have:
It is better to remove the immobilizer transponder so as not to damage it, you can see that the column with the cardan has been removed, but again this is not convenient and I decided to point out the defect and nuances that may arise
Well, then let’s start analyzing the column, don’t be alarmed, there’s nothing scary there:
First unscrew the top two bolts with a 10 mm wrench
and don’t be afraid to remove the EUR motor itself, this is the picture you should see
There is nothing scary or suspicious, but again, if you believe the forums, then this small spline connection sometimes eats up and a small knock may appear, then I will show how it is treated
Well, now we take the special key for the stoppers in our hands and remove the retaining ring
It’s best to do this with a partner, or as a last resort, put a sharp thin knife or a small flat screwdriver nearby so you can pick it up
then unscrew the three bolts from the bottom cover
this is the cover
and also remove the stopper and try to remove the cover
this is what we have in the end
and there remains the last stopper which is the most inconvenient, it is located in the upper part of the assembled column and does not allow the upper industrial shaft to come out, carefully when removed there is a washer and a rubber ring that works as a buffer
this is all petty nonsense
Well, then we separate the column and the upper part, this is done simply, there are no photos due to restrictions by moderators, and I didn’t want to split the post into two parts, but I’m always ready to answer any questions
Well, then we proceed to disassembling the gearbox, this is done in an elementary way, we knock out the shaft with the working gear, this should be in your hands:
shaft with gear on which there is a blue polymer coating
Next, we knock out the worm with the bumps on some kind of wooden block, with careful and gentle blows at the junction with the EUR motor
BOOM BOOM and a worm should fall out
assembled in the case it looks like this:
this is the EUR gearbox
There is no need to try to remove the gear from the shaft!
Only the worm can be disassembled; the bearings and buffer bushings are removed from it
ATTENTION! the bearings have black metal bushings and do not throw away the old bearing
these black bushings will need to be carefully removed by bending the edges and placed on the new bearing
without these bushings, the bearing will hang on the worm, don’t be alarmed if the metal of the bushing bends when you remove it; when you put it back in place, then the whole thing will flare out as it should and straighten itself out!
Well, then we proceed to the repair 1. We change the bearings on the worm, accordingly swapping the black bushings and prepare the worm for landing in the housing.
2. The wear of the joint between the upper output shaft and the upper shaft is treated as follows: The shaft is mounted on the column shaft:
like this
Everything is carefully measured in what position of the steering wheel reach you want to leave the column (after assembly, this adjustment will no longer work for you, you will see why later) and welded at three points, this is done in order to select the play in this connection:
this is how it happened for me
does not affect safety!
3. And now the saddest news is that if you have a breakdown in the joint of the working pair of the EUR gearbox, then alas, this is incurable in no way, only replacing the column will help, the only thing that can help you temporarily is to put more thick lubricant into this gearbox, but again it won't last long
Well, the last thing is to put everything back together in reverse order and see this:
collected
Returning to the splines of the EUR motor, I can suggest this way to solve the problem if you still have these splines eaten:
put copper foil on the slots and assemble, my slots are fine, but since I’ve already taken them apart, it won’t be a waste!
BY THE WAY!: when installing this same stopper that presses the worm and bearings, there is NO NEED to try to drive it in or inexplicably push it in! Take the 27 socket and gently press it with your hands, it will snap into place on its own.
SUMMARY I would like to note the following: having repaired what seemed to me like a donor column, I still did not fix the problem, the only thing that helped was replacing the bearings, because... mine were already loose... so I decided to try to assemble one from two columns, in the end I welded the shafts back, which is why I did welding at three points semi-automatically, so that I could cut the whole thing off at any time... I measured both worms properly and both gears, and came to the conclusion that I just had wear out in the working pair of the gearbox... and put the whole thing together, as a lubricant I used thick synthetic lubricant Chevron Delo Grease EP NLGI 2
If I missed something, I’ll edit it and add it later.
Thank you to everyone who had the patience, I hope this will help someone, and if you don’t need it at all, just read and take note that everything is simple and you can safely climb, and, as usual, I’m always ready to answer any questions
Thank you all, good luck to everyone)
Lubrication as a way to restore auto parts
To temporarily restore the functionality of a rack with an external electric amplifier, a technique is used to fill the internal volume with thick lubricant. A hole needs to be drilled in the aluminum housing. After cutting the thread and removing traces of chips with a vacuum cleaner or rag, screw a grease nipple into the channel.
When drilling, take into account the thickness of the casing wall: the drill should not damage the movable rod, made of alloy steel.
The lubricant is supplied by a transmission syringe with an extension tip, which is screwed onto the grease fitting. It is necessary to apply 300-400 g of material into the steering mechanism housing, and then remove the tip of the syringe and close the oiler with a rubber cap. The technique allows you to eliminate knocking by filling the gaps with oil, but due to continued wear, the rack begins to make noise again. The method is sometimes used by sellers of high-mileage cars to hide mechanical defects. In this case, repairs can be easily recognized by the tight rotation of the steering wheel.
Selection of lubricants
To fill the rack housing with an electric amplifier, use:
- Lithium material Litol-24, which can withstand temperatures up to +120°C and protects steel elements from corrosion. Due to its low price and prevalence, it is widely used when repairing racks in garage conditions. The disadvantages are the low resource, not exceeding 2-3 thousand km, and increased density in cold weather.
- Fiol-1 grease is lithium-based, which has a soft consistency and fills well the hidden cavities inside the rack. The material can withstand cyclic cooling and heating (in the range of -40°...+120°C).
- Synthetic thick lubricant Molykote EM-30L, which does not destroy plastic and rubber parts and can withstand heating up to +150°C. The advantage of the material is its resistance to water. If EM-30L is not available, you can use analogues of Liqui Moly Thermoflex Spezialfett or Efele MG-213, designed for lubricating plain bearings and rack and pinion gears.
In addition to the materials listed, you can use Arctic Green Grease AGG2, manufactured by Ravenol. The advantage of imported lithium greases is their low freezing point. Additional additives introduced into the composition reduce the friction force.
Source