As I wrote earlier, posting posts on a blog does not match the real time of replacement or order.
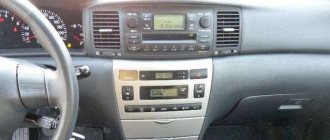
Today we’ll look at how to change tie rods and tie rod ends on a Toyota Corolla e120. I changed all this myself, with my own hands, without resorting to the help of a service station, except for wheel alignment after replacing spare parts. I purchased spare parts as usual from exist, except for the screw clamps for the tie rod boots, which I purchased at a regular hardware store.
What is the impetus for replacement?
There are many reasons - poor handling, excessive knocking in the front of the car, etc. All of the above and much more are the result of steering failures. If your car becomes less obedient on the road, or a knocking noise has appeared, then you should have your car checked as soon as possible. Untimely replacement of rods can lead to failure of other associated components, for example, tips. By paying attention to your car in a timely manner, you will spend less money and time on repairs. The procedure for replacing parts is quite simple and does not require any special knowledge. The step-by-step instructions below will be sufficient. You just have to read everything carefully and act according to the steps described.
Toyota Funcargo › Logbook › replacing spark plugs, coil tips and air filter.
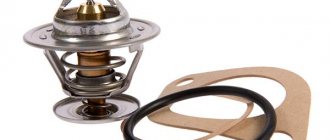
Hi everybody. Not so long ago and not so long ago, in general, about 3 months, strange things began to happen to the car. At a speed of 70-90 km per hour, with a gradual increase in speed, the engine began to twitch as if the fuel was running out or the current was lost; as soon as the accelerator pedal was pressed a little harder, everything returned to normal. Despite the fact that this did not happen all the time, but whenever the car wanted, but in approximately the same speed range of 70-90 km. hour. After scouring the Internet, I decided to change the spark plugs and coil tips, as well as the air filter. This time I took the usual 100r candles - NGK BKR5EYA-11. I took domestic tips, since there was no money for candles, and I couldn’t bear to buy tips that were more expensive than candles)) so NK-11 was purchased - 130 rubles each. And of course, the air filter, as always, is KNECHT LX1002-320rub.
What can I say: the tips fit perfectly, I didn’t even expect them. Removing the old ones was not a problem; when removed, they fell apart into dust, the new ones stood up amazingly. I replaced the spark plugs and filter without much trouble. During this procedure, I noticed that oil began to gradually squeeze out from under the valve covers, from the chain side and the rear side. From what I read earlier about replacing the valve cover gasket, there were a lot of interesting things: before installing a new gasket, lubricate the chain side with sealant, tighten the bolts with a torque wrench, etc. I would be very glad to receive some practical advice below, since I wanted to change the gasket for a long time, and there is a little oil in the spark plug wells on the coils. I already know that I should use the original gasket. After 2 days of driving around the city, there were no problems with the engines, but time will tell, the week ahead. Smooth roads everyone. And so, after a week of trips around the city and on the highway, we have the following: 1. Jerking (interruptions) with the engine disappeared completely. 2. I liked driving with iridium spark plugs more; the car is somehow more responsive, but not by much.
What tools may be needed for replacement?
In order to replace steering rods, you will need a certain set of tools that will be useful to us in our work and will make replacing steering rods convenient and comfortable. Thus, we will need:
- Jack;
- Balloon wrench;
- Standard ball joint remover;
- A special wrench made from a pipe and an open-end wrench for 32. At the end of another pipe, the edge of a bolt for 32 is welded. Below is a photo of a homemade tool that will make the work easier.
In addition to the tools, we will need two sets of tie rods - one on one side and the other. By the way, it is worth noting that steering rods need to be replaced in pairs. They are not that expensive, but changing one and then waiting for the other one to fail is pointless.
Reasons for deterioration
There are two main reasons why tie rod ends fail. Like a ball joint, the steering end works on the basis of a ball mount, which is afraid of only a few things - moisture, dust, drying out. All three of these reasons negatively affect the tip. And if dust or moisture gets under the rubber band, replacement cannot be avoided. Sooner or later you will have to make a replacement, since corrosion and clogging will render the part unusable and make driving a car quite dangerous.
What are the best rods to buy?
When repairing your car, you should pay special attention to the spare parts that are used during the repair. As a rule, spare parts of the first, second and third, and so on, are available for sale on the domestic market. All of them differ accordingly in their price, quality and, most importantly, service life. Each motorist, based on the availability of resources, selects spare parts. Our advice, of course, is to buy original spare parts. Despite the fact that they cost a little more than Chinese spare parts, the service life will pay for everything. Having installed the original, it will work at least twice as long. The wear resistance of such parts is several times higher than that of “China”.
If you yourself have decided on the type of spare part, then you can proceed directly to preparing the car and repairing Toyota Corolla steering rods. In the photo below you can see which tie rods we bought.
The price of our spare parts is 4800 rubles per unit. In total, it turned out to be 9,600 rubles for two with tips. The spare part is original, and after replacement it will last for more than one year in normal operation.
Article number and cost of the original steering rack for the Corolla 120 and its analogues
The original Toyota Corolla 120 steering rack has article number 4551012290. Its cost ranges from 20 to 45 thousand rubles for a new product. If you purchase a used rack from a car wrecker, the price depends on its condition.
So for a spare part from a damaged car with low mileage you will have to pay 14-16 thousand rubles. Many owners note that such a rack can last 120-140 thousand km until replacement is required.
If you purchase a rack from a foreign car dismantling site, the price will range from 6 to 15 thousand rubles. From the accompanying documentation, the car owner has the opportunity to find out the approximate mileage of the car from which the spare part was removed. This information helps you navigate the condition of the slats and determine the advisability of purchasing it.
When buying a steering rack with an unknown residual life, the car owner will pay from 1.5 to 5 thousand rubles. In this case, the spare part may fail and require repair immediately after installation.
Finding a rack from third-party manufacturers is quite problematic. The only company that mass produces this spare part is SAT. Therefore, car owners have to look for analogues of the original product among Toyota products intended for other car models.
Table - Analogs of the original Corolla 120 steering rack
| Manufacturer | vendor code | Cost, thousand rubles |
| SAT | ST4551012290 | 8-10 |
| Toyota | 45510-12330 | 12-25 |
| Toyota | 44250-01021 | 28-48 |
| Toyota | 44250-01020 | 31-41 |
| Toyota | 45510-02090 | 32-45 |
Instructions for replacing steering rods on a Toyota Corolla
First you need to drive the car into the garage. The replacement procedure is quite long and requires the presence of a room in which all work will be carried out from start to finish. As you already understand, during the replacement of rods, the car completely loses its functionality and is not able to move independently.
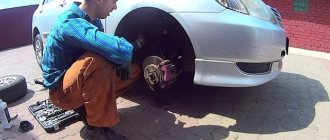
Having driven the car into the garage, we need to remove the wheels. To do this, without lifting the Corolla, loosen the wheel bolts, then lift the car and completely remove the wheel. The photo shows the process of loosening the wheel bolts.
Next, you need to turn the steering wheel as much as possible in the direction from which you are not changing the part, that is, in the opposite direction. This will make all other work more convenient. After the wheels are turned out, you should bend the cotter pin, which is located on the tie rod end pin, and then unscrew the nut on the pin. To do this, we move the thrust boot, press the spring clamp on the shaft and on the steering rack itself and carry out all the work. In the photographs below, arrows show the places where it is necessary to carry out the above actions and the spring clamp.
After everything is freed from the fastenings, it is necessary to remove the tie rod end. To do this, take our puller for ball joints, secure it and remove it from the hub ear. It's not at all difficult to do this. If it is not clear how to remove and use the puller correctly, you should read the instructions for the puller before starting the process. Essentially, this tool, through a system of levers, pulls one part out of another.
So, we removed the tip. The next stage of our replacement will be to unscrew the steering rod itself. This is where we need our homemade key. Practice shows that it is very easy to unscrew it, the main thing is to tear it out of place, then carefully unscrew it and remove it. We look at the photo, it shows the process of removing the traction.
After the rod is completely unscrewed, you need to do the following: take a tape measure, measure the exact distance from the tip to the end of the rod itself. This is necessary in order to more or less maintain wheel alignment. When unscrewing the rod end, be sure to count the number of revolutions of the tip itself.
Next, we take the old rod and the new one and compare them. They must be the same in length and shape. Let's look at the photo.
After comparison, you need to apply lubricant to the new steering rod set, then tighten the boot, carefully screw the tip into the rod, and be sure to count how many revolutions you make, there should be exactly as many as you counted during disassembly.
Before installation, you must also remember to replace the lock washer. Using a chisel, you should finish the rod, after which we tighten the boot, install the old or new clamp, insert the tip into the ear of the hub, tighten all the nuts. This completes the replacement of the steering rod on one side of the car. Put the wheel on, secure it with the bolts, remove the jack and re-tighten the wheel bolts. The rod replacement procedure can be considered complete. The same should be repeated on the other side. In total, the procedure should take no more than half a day.
Typical problems
The most common problem with the Toyota Corolla 120 steering rack is its knocking and crunching. However, the steering may continue to operate normally. If you tighten the rail, the extraneous sounds often go away.
In most cases, the cause of the knocking is backlash. Many car owners, when the rack fails, believe that the EUR is loose. To fix the problem, you need to purchase a special repair kit and rebuild the unit.
A typical problem with the Corolla 120 is the occurrence of a gap between the rack and the rod. In most cases, the malfunction is not serious and can be resolved by tightening the connection.
Destructions inside the rack lead to vibration when the steering wheel rotates. In advanced cases, the rattling is transmitted to the body. The most common parts that fail are bushings. They can also cause the rack to knock.
A deformed shaft leads to inaccurate control. Only replacing it can correct the situation.
Another typical problem with the rack is the steering wheel biting. This makes returning to the starting position difficult. The need to exert excessive force reduces road safety. In this case, the steering column and power steering are subject to severe wear.
How to understand that repair work is required
You can determine that it is necessary to repair the steering rack of the Fielder 2005 by the following characteristic signs:
- oil leaks;
- extraneous sounds are heard from the power steering system;
- during turns it is necessary to apply more force;
- The steering wheel play has increased.
In any of these cases, it is worth carrying out a thorough diagnosis, and then starting to repair the Toyota Corolla E120 steering rack.
Video advice on adjusting the rack on a Toyota Avensis 250 body:
Further actions
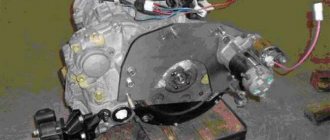
When the unit is removed, we take it to the workbench and begin disassembling the element. To begin with, the rubber boot is dismantled. A 12mm wrench will help you unscrew the bolt. Afterwards, you need to remove the intermediate shaft. The locknut is unscrewed using a gas wrench. We unscrew and take out the shaft pressure cup and put on the intermediate shaft again. With a light blow of a copper hammer, the shaft is removed along with the bearing.
You may also be interested in: Chassis repair and wheel alignment at the Sokol service station
The rack turns and the lock nut is unscrewed using a 41 wrench. Next, we proceed to dismantling the adjusting cup (for this we will need any flat object). Then the spring with the pressure piston is removed.
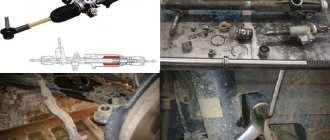
Removing the left boot must be done as carefully as possible so that the element does not tear (in no case should you use sharp objects). Then we proceed to unscrew the left rod. On the reverse side, the clamp is loosened and the boot is dismantled. The rolling pin of the lath is removed and placed on the side.
On the left side we will see an aluminum pressure washer, behind which is hidden a bushing that requires replacement. The washer is hooked and knocked out, after which access to the sleeve will be free.
Removing the steering rack Rav 4 (2005 – 2012)
We unscrew the lock nut and the adjusting plug (photo) Steering rack for Rav 4 2006 onwards. easy to dismantle yourself. To work, you will need keys for 24, 17 and 10, as well as a balloon for dismantling the front wheels of the crossover. The procedure is as follows:
- Rav 4 is driven into the inspection hole, the front wheel bolts are loosened with a wheel wrench. The car is jacked up, the wheels are removed, and the front part is placed on supports .
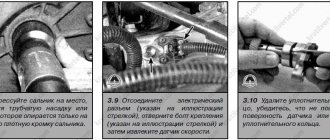
- The steering wheel is set to a straight course, the terminals are removed from .
- The foot mat is pulled back, releasing the latches holding the casing trim to the hole for the steering column. The cover itself is removed.
- The steering wheel rotates until the terminal connection bolt appears. Marks are applied for correct assembly . The fastener is unscrewed, the intermediate shaft is disconnected from the steering mechanism and removed into the cabin.
- Instead of removing the subframe, it is more advisable to remove the rear engine support.
- The boot is removed, and the steering rack complete with tips is moved to the left. To remove the unit, you need to slightly lift the engine crankcase with a pry bar (with emphasis on the subframe).
We unscrew the steering shaft nut, drill out the core by one and a half millimeters, unscrew it with a wrench to disassemble the shock absorbers (photo)
When is it possible to repair the Corolla steering column and other components?
Typically, the decision about whether an old rack can be restored is made based on the number of worn elements that need to be replaced. If there are too many of them, repairs are not only economically unfeasible, but also often ineffective, since a new rack in this case will be the best guarantee of safe driving of this car.
Another point when it is not possible to repair this unit is deformation of the rack. If it is too large, the repair will also not guarantee safe operation of the car.
Source