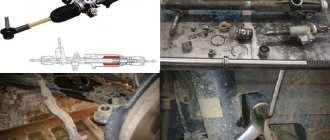
Quite expensive and time-consuming tuning with replacement of the Toyota Corolla 120 steering column can be done either at a Toyota service station or in your own garage with your own hands. But, before going to great lengths, you need to make sure that the cause of the extraneous knocks that are heard in the steering wheel and body is precisely a faulty steering rack.
In the experience of car enthusiasts described in the article, there are also easier repair methods.
Diagnostics of the steering rack from experienced
Turn off the engine and begin to rock the steering wheel from side to side with a swing of about 5-7 cm. If you hear a tapping sound, then the cause is the steering system mechanisms. However, if the knocking sounds like a clicking sound somewhere very close under the steering wheel, then this is a sound from an electrical cable. You shouldn't pay attention to him.
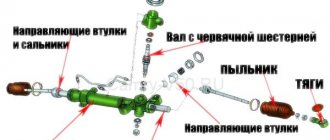
Toyota Corolla steering mechanisms include a steering column, cardan shafts, as well as the steering rack itself with rods and ends. The malfunction of an individual mechanism is best determined by the method of exclusion.
First you need to rule out faulty tips as the cause of the knocking. An assistant will be needed here. When he lightly swings the steering wheel from side to side, you need to take the tips one by one with your palm. In a faulty hinge with large play that requires repair, the sound will be felt in the palm of your hand.
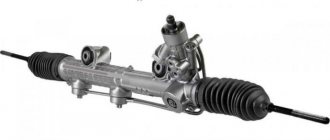
The steering column itself or the shaft extending from it to the rack rarely fails. The steering rack suffers much more with high mileage. In addition, it rusts badly from dampness and salt. This can also cause its premature failure.
Operation of the mechanism and its malfunctions
As with most modern cars, the Corolla's directional control is controlled by the front wheels. They are the helmsmen, and they are controlled by the steering mechanism and drive. The steering column connects the wheels to the control system.
The operating features of the Toyota Corolla steering rack in the 120 body, as in the 150, as well as in cars produced in 2001, 2002, 2003, are similar, and most often the faults have the same nature, diagnostic and repair scheme.
Malfunctions, as well as operational problems, that most often appear in the steering mechanism are the occurrence of a slight knock. He says that the bushings have worn out, which creates a slight tapping noise due to the play. Replacing this component can be done by yourself and does not cause much difficulty.
The second element that often breaks down during operation and which you can repair yourself is the lower cross.
Another reason to pay attention to the steering mechanism is the deterioration of vehicle handling. This may indicate that the steering rod has worn out - it has become deformed or the threads on it have broken.
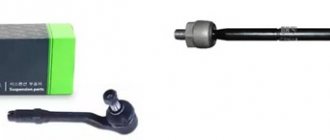
The steering tip is another important element in the system. The reason for its failure may be moisture and dust getting on the elastic band, as well as its drying out.
Steering rack lubrication
One of the most cost-effective ways to restore a Toyota Corolla steering rack is to repair it without dismantling it. For this operation, you need to stock up on an M6 grease nipple with a rubber cap for it and Mannol lubricant in the amount of 400 g. You also need to select a suitable drill and tap for cutting threads for the grease nipple.
The picture shows two oil cans with caps, but for this repair you need to choose one. The one for which there is both a drill and a tap.
Next, you need to drive the car into the pit and arrange good lighting at the location of the steering rack. In the rack itself, choose a place where you can get close with a drill, thread-cutting tool and syringe press.
In the chosen location, we first drill a hole, then we try to extract as much as possible of the chips and metal chips formed during drilling. To do this, you can use a vacuum cleaner and all kinds of wire hooks with strips of rags.
Moreover, we do the drilling very carefully so that after passing through the rack body the drill does not go deeper and damage other parts.
We cut the thread and screw the oiler into the hole. To prevent spontaneous unscrewing of the oiler during further operation, you can apply a thread locker to its threaded part before screwing it in. This composition is sold at any auto store. Buy the smallest volume offered.
Next, using a syringe press, fill the column with lubricant.
The amount of lubricant for repair was taken arbitrarily - 400 g. We wipe the surface of the rack next to the grease can and put a rubber cap on it. It is noticed that the steering wheel becomes a little heavier, but the rack knocks are no longer audible.
Photo instructions for repairing the steering rack on Toyota Will VS
Symptoms: knocking in the steering rack, which occurs when driving over small irregularities (a disease of all Corolla-like vehicles with electric power steering).
The servicemen's diagnosis is to replace the rack (in practice, it doesn't help for long and costs a lot). Solution: replace everything in the rack that can knock. And there are only two places for knocking in such racks - the adjustment unit and in the area of the bushing located at the opposite end of the rack (in the case of right-hand drive cars - the left side of the rack). And since nothing needs to be changed in the adjusting unit, the entire repair comes down to replacing the factory bushing with a custom-made one. Patients: Will VS 2002 1.5L (electric power steering!)
We climb into the pedal assembly and remove the protection from the steering shaft, unscrew it by hand and remove it easily:
We completely unscrew the bolt securing the intermediate shaft to the crosspiece:
IMPORTANT! Place the wheels straight, remove the key from the ignition, and lock the steering wheel. This is done in order to prevent, after removing the rack, the steering wheel from turning by more revolutions than required. Otherwise, a break in the airbag snail wires and a malfunction of the latter is inevitable.
We hang it in front of the car and take off the wheels (the front ones are enough).
Next comes the removal of the steering rack. It has been proven from my own experience that it is possible to unscrew the rack fastenings without additional disassembly, but pulling out the rack is very labor-intensive. Don’t waste time, twist the subframe - you’ll save a lot of time and effort.
But first, the steering tips: we take out the cotter pin, unscrew the nut, hit the place indicated below with a sharp blow of a hammer, and the pin falls out on its own (we do this on both sides
We unscrew the subframe, 4 bolts to the body, 3 bolts in the area of the rear engine mount and 3 nuts there.
After this, the subframe, together with the rack, gently (if you planned the unscrewing of the last bolt correctly) lowers and hangs on the arms and anti-roll bar. Everything - the rail is in full view: unscrew:
We remove it and take it to the workbench
Let's start disassembling it: 1) Remove the rubber boot.
2) Take a 12mm wrench and unscrew the bolt shown in the photo.
3) Remove the intermediate shaft.
4) Unscrew the lock nut (we used a gas wrench)
5) Unscrew the pressure cup of the rack shaft.
6) Then we put on and secure the intermediate shaft again, then with a light blow on it with a copper hammer we remove the entire shaft with the bearing.
7) Turning the rack over, we disassemble the adjusting unit: use a 41 wrench to unscrew the lock nut
 Then we unscrew the adjusting cup using any flat object, remove the spring and the pressure piston.
9) Remove the left boot, very carefully so as not to tear it (we draw inside around the circumference of the boot with a non-sharp object)
10) Unscrew the left rod from the rack using keys 29 and 22.
11) On the reverse side, loosen the large clamp and unfasten the boot.
12) Remove the rolling pin from the rail and set it aside.
13) We look at the rack from the left end - we see an aluminum pressure washer, behind it is the notorious bushing.
14) Use a hook to hook the washer and knock it out, then remove the sleeve.
Here it is - the bushing that causes all the ailments. )
For left hand drive
We modify the pre-made fluoroplastic sleeve according to the attached drawing.
15) We make a longitudinal cut on the new bushing, which is necessary to compress it and put it in place. We orient the cut towards the direction of movement of the car - in this direction the rack experiences the least load.
16) Lubricate the bushing and carefully straighten the bushing; use the free end of a rolling pin to check the fit of the bushing.
17) Using a suitable head, press in the aluminum washer. We insert the rolling pin into place. We insert the shaft into place; to do this, use a 22mm wrench to swing the rolling pin around its axis and at the same time push the shaft - at a certain moment the gears align and the shaft falls through. We tighten the shaft pressure cup until it stops and lock it with a lock nut. We assemble the adjusting unit, tighten the adjusting cup as far as it will go and release it 90 degrees, lock it with a lock nut. Subsequently, the tightening torque can be adjusted on the car after a test drive, if you have some skill; the mechanism should be tightened to the point where, when exiting a turn, the steering wheel itself returns to the straight position. Pull the rod into place, the boots into place, tighten. Rail for a subframe, subframe for a car. Near the rear (relative to the rear of the car) fastenings of the subframe to the body there are holes on the body and on the subframe, the combination of which prevents caster from slipping. (holes in photo)
Tips to the levers, set the wheels straight, the steering wheel is straight from the very beginning. We pull everything together and climb into the salon. There we weaken the upper crosspiece, move the shaft between the crosspieces upward and place the lower crosspiece on the intermediate shaft. We're tightening everything up. Subsequently, you can similarly align the steering wheel if, when driving straight, the steering wheel points slightly to the side.
About the versatility of repair and related issues
This repair can be considered universal for most cars, both for the Toyota Corolla 120 and for models of the Toyota family that are later and belong to a higher class of models.
And yet, before you decide to drill the rack housing, you need to check for play two more crosspieces of the steering mechanism, which are located in the cabin under the steering wheel. Another source of knocking may be the telescopic pipe that regulates the reach of the steering wheel. Quite often, the knocking comes from these parts, and it will be very disappointing when, even after all the work of filling the rack with lubricant, the knocking does not stop.
Sometimes crosspieces with large gaps are installed directly at the manufacturer, and they begin to knock after a short mileage. Despite the brand name of the car, sometimes the cause of knocking can be the bolts for fixing the crosspieces on the shaft. They are often not straightened, they turn away and knocking noises arise in these joints.
It is the Toyota Corolla steering racks that begin to make knocking noises and usually require repairs only after a mileage of more than 100 thousand kilometers. First of all, the knock begins to be heard when the wheels hit uneven roads - potholes and potholes. This sound is quite loud, but has a dull tint and does not radiate to the steering wheel; vibration shocks are not felt by your hands.
Reasons for replacement
- One of the common causes of malfunction is a careless driving style, accompanied by falling into potholes and driving on uneven roads at high speed. When driving like this, all mechanisms will quickly wear out , an obsessive knock will appear, and controllability will deteriorate.
- The next important reason is the acceleration of the car when the steering wheel is in the extreme left or right positions.
- Also, frequent driving onto curbs and other hills has a negative impact on the life expectancy of this mechanism, as this is a noticeable load on the steering.
What is needed to remove the rack
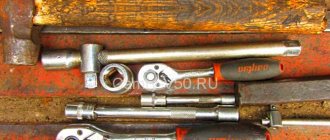
Before starting work, you should prepare for it accordingly. You will need:
- A set of keys.
- Tip remover.
- Wooden supports.
- Rags.
- Liquid key.
- Hammer.
- Screwdriver (thin).
- Jack.
Once you have prepared the required tools, you can begin work.
What tools will be needed for the work?
Required Tools
In order to replace a failed or poorly functioning mechanism, it is necessary to prepare a certain set of tools in advance:
- wooden supports;
- liquid key;
- thin screwdriver;
- medium hammer;
- a set of socket wrenches and a set of sockets with a ratchet;
- puller for tips.
Preparatory activities
Before changing anything, we strongly recommend that you read the service manual, which consistently describes the entire process and tips for its implementation. Generally, there are 3 steps to complete first:
- The machine should be placed on as level ground as possible, and then the parking brake should be locked. To secure the vehicle, it is necessary to place bricks under the wheels.
- The steering wheel is set to neutral position.
- Then you need to loosen the wheel nuts, and this must be done one at a time.
Loosening Wheel Nuts
Having completed the preliminary work, the car is placed on a jack and the wheel is removed from one side. After which the car is lowered again, but on wooden supports. The wheels on the other side should be removed in the same way. The described steps are aimed primarily at gaining access to the steering tips, which will greatly simplify the removal of the steering rack.
Advice! Before unscrewing the bolts, they are cleaned with a metal brush and treated with a WD-shkoy.
Unscrew the absorber
While the liquid consistency destroys rust, it makes sense to look under the hood and clear the area for access to the problematic mechanism. In order to remove the steering rack, it is necessary to remove the alarm siren and gas adsorber, having previously unscrewed the corresponding terminals. The extracted solutions are removed so as not to interfere.
Removing the tips
Experts emphasize that very often the steering rack is replaced along with the tips. They are dismantled using a conventional puller or knocked out with a hammer. Using pliers, the key is removed from the fastening nut, after which it is unscrewed.
Removing the steering tips
A fork-shaped mount should be inserted under the rubber seal, and the upper part of the pin should be placed on the base of the tip bolt. The puller nut is tightened to the maximum, and then a hammer is used to strike the rack mount, so that the tip can be removed without any problems. Removal and installation of all elements must be carried out extremely carefully.
Description of replacing the steering rack on a Toyota Corolla 120
The work of replacing the steering rack on a Corolla 120 is carried out according to the instructions given below.
Read also: Local repair of chips on a car
- Remove the boot.
- Unscrew the cardan shaft bolts.
- Move to the side to disconnect the cardan.
- Unhook the boot.
- Raise the car on a lift or place it above the inspection hole, hanging it in front of the car using jacks.
- Remove the front wheels.
- Unscrew the subframe.
- Unscrew the tie rod end nut.
- Unscrew the nut and disconnect the tie rod ends.
- Lower the subframe down.
- Remove the 4 bolts that secure the steering rack.
- Remove the steering rack.
- Remove the boot.
- Unscrew the steering column shaft.
- Remove the tie rod boots.
- Unscrew the rods. In this case, you should remember which side is which, since their sizes are different.
- Replace the steering rack and reassemble everything in the reverse order of removal.