- After replacing the front struts and rear shock absorbers, it was decided to also change the ball joints and rear silent blocks of the lower arm of the front suspension, since after replacing the struts there was still an incomprehensible rattling sound in the front suspension.
- We need to put things in order in the suspension.
- So for your information: the chronology of events is not observed on the blog when writing articles, work is carried out at different times, perhaps something is described later than it was done, therefore the price of spare parts will differ from the current one at the time of writing due to fluctuations in the dollar exchange rate.
Purchasing spare parts for the front suspension
Having studied reviews on the Internet and prices, it was eventually purchased in August 2014 (spare parts were changed on 06/13/2015), as usual on the existential: Silent block of the lower front suspension arm rear VTR TO0133R 2 pieces for 879 rubles 96 kopecks and a ball joint, front lower Sidem 45095 2 pieces for 1108 rubles 28 kopecks each.
Silent block VTR TO0133R
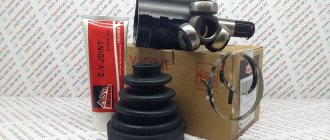
Ball joint Sidem 45095
We are going to service station 76 express, car service on Lenina, 149 Chita
I don’t know why I decided to change the silent blocks and ball joints there, maybe it’s just that their location in the city is convenient, but in the end it turned out that this is just a terrible place to service a car, with illiterate specialists.
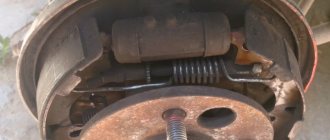
Repressing the rear vertical silent blocks of the front suspension arm
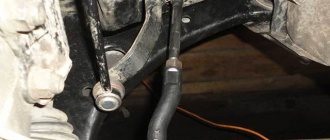
We lifted the car onto a lift, the problem arose when removing the levers; during operation, all the bolts rusted and as a result, one bolt broke when unscrewed on the front horizontal silent block.
Broken front suspension arm bolt 90119-14086
The situation was complicated by the fact that the nut of this bolt is a “cracker” (that’s what they call it), which is welded inside the front beam and there is no direct access to it. I had to saw the beam with a grinder to knock down the cracker and pull out a piece of the bolt.
Cut in the front beam
Removing the front suspension arm
With the help of welding and a pneumatic chisel, the cracker gave way, and the rest of the bolt was safely removed from the beam; they spent half an hour poking around to get it out. The levers were removed and taken to re-pressing the silent blocks. The front horizontal silent blocks are in good condition, I only replaced the rear vertical ones.
Removed the front suspension arms
The silent blocks were pressed in crookedly, but as “very competent specialists” said: “it’s normal, you can drive, it doesn’t affect anything.”
In general, the other day I changed the steering tips and rods (photo report will be later), removed the levers to look at the condition of the silent blocks and lubricate them with graphite grease for the future, and so it’s clear that the silent block is already starting to crack from uneven load, it’s clear that the crack is due to the inclination silent block, so you need to press the silent blocks evenly.
Pressed silent blocks
The service technicians left the slot like that, they said that for the future, so as not to cut the beam next time, although there was something that prevented us from tightening the bolts, welding the nut from the inside and welding the slot. Such “competent” specialists did not think of this. That’s what I did, the nut was welded, the slot was welded and, to prevent rye, it was painted over with spray paint.
A slot in the beam, and they let go
Welded front beam
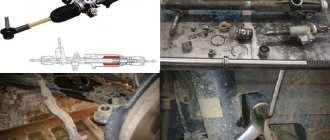
Replacing ball joints on a Toyota Corolla
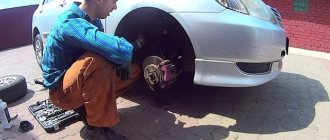
There were no problems replacing the ball joints; first I sprayed all the bolts with liquid wrench. Using a wrench and a large pipe-lever, the nuts were unscrewed. The ball joint was removed without a puller, with one blow to the steering knuckle in the ball joint area, it fell out. As the STO workers said, the ball ones would still be fine, don’t throw them away, let them lie around just in case.
Poor quality wheel alignment at service station 76 in Chita
After all the work was done, a wheel alignment was done (700 rubles), after their manipulations the car began to tilt to the right.
Another specialist came to them, redid the alignment, after that the car still tilted, they couldn’t find anything, they shrugged their shoulders and that was it, even though they had new equipment.
It was necessary to take the money from these “specialists”, well, no negative reviews, including this article I wrote about them.
As a result, after driving 1600 kilometers, the good front tires became worse than the bad rear ones. Next year we need to get new summer tires, I think I’ll bring these to the service station as a gift.
I did a wheel alignment in another person’s garage for 400 rubles, with old equipment, and everything became fine, it doesn’t go anywhere and the steering wheel is straight.
On the left is a bad tire, on the right is a “good” tire.
So it is recommended, if possible, to do all the work yourself, it will be of higher quality and the spare parts will last a long time. Then I’ll buy myself a hydraulic jack and weld myself a mini press for repressing the silent blocks and redo all the silent blocks.
Source: https://corollka.ru/zamena-sajlentblokov-i-sharovyx-opor-na-toyota-corolla-e120.html
How to choose a ball joint for a Toyota Corolla E120: review of analogues and original components
When choosing a ball joint, it is necessary to take into account the structural characteristics of the vehicle - the best option would be to purchase a part that has a similar form factor and type of fastening to older models. It is important to consider the quality of the part: you should not purchase second-hand components or low-grade replicas.
| Manufacturer | vendor code | Cone size, mm | Installation side | Compatibility by car year | Approximate cost, rub. |
| Toyota | 4333019115 | 15.6 | Left | 2001-2006 | 1467 |
| FLENNOR | FL594-D | 15.6 | On right | 2001-2006 | 720 |
| RUVILLE | 916912 | 15.8 | On right | 2001-2006 | 920 |
| SIDEM | 845603 | 15.8 | Left | 2001-2006 | 860 |
| SIDEM | 845604 | 15.6 | On right | 2001-2006 | 860 |
| RUVILLE | 916934 | 15.6 | Left | 2001-2006 | 920 |
Note! You must select ball joints for the Toyota Corolla E120 strictly according to the vehicle’s VIN number, having first checked the component parts for compatibility on the manufacturer’s official website.
If you purchase a part of an unsuitable design, it is advisable to replace the product - otherwise, safety during vehicle operation will be reduced.
Ball joint on Toyota Corolla: check and replacement
Home… Repair and maintenance
Before we talk about replacing the part, it’s worth talking about what a ball joint is.
This part is a part of the car suspension, which provides rotational linear (limited) movements in all directions, but only in the plane of its mounting.
It looks like a partially fixed ball with a finger. The ball joint on the Toyota Corolla performs exactly the function described above.
Ball joint maintenance and inspection
Over time, any part in a car wears out and needs maintenance. As for the ball, there is basically nothing to service here; it can only be changed. However, the question arises: how to determine whether the support needs to be changed or not? This is very easy to do, you just need to follow the steps below:
- We jack up the car, but do not remove the wheel;
- We take a pry bar, wrap a rag around it and try to install it between the wheel and the ball itself;
- After installing the mount, you need to apply force and make sure that the hinge has play; if there is none, then the ball joint can be left alone.
Signs of a bad ball joint: it's time to save your car!
You can diagnose the end of service life of components by the behavior of the vehicle - the ball joint must be changed if the following signs are present:
- Noise in the car suspension when overcoming obstacles - extraneous sounds when crossing holes or potholes indicate a low level of lubrication and deformation of the support;
- Creaking when turning the steering wheel is characterized by abrasive objects getting into the lubricant, as a result of which the edges of the ball were ground off. If the damage is minor, the part can be washed and lubricated, but if it is completely worn down, the support must be replaced;
- The car rolls during straight-line movement - the presence of high play in the support indicates complete wear of the part. Play in the ball prohibits the operation of the car according to traffic rules: the car can easily fall on its side;
- Uneven tire tread wear - diversified wear of the rear and front tires is not a direct sign of ball wear, but often occurs when the edges of the support are worn down.
In case of these signs, it is not recommended to delay the repair and replacement of the ball joint: otherwise, complete failure of the suspension is a matter of time.
Toyota Corolla front suspension
- So, the front suspension is a fairly necessary part of the car; the handling of the car and its behavior on the road depend on it.
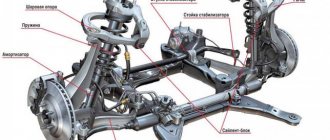
- The front suspension consists of the following components:
- shock absorber struts;
- coil springs in the form of a cylinder;
- anti-roll bar;
- transverse lower arms.
The design of the front suspension is thought out in such a way that, coupled with the diagonal separate hydraulic brake drive circuit, the car becomes quite stable when braking on slippery road surfaces.
Front suspension maintenance
The Toyota Corolla has a MacPherson type front suspension. The high reliability of this design makes the machine quite popular all over the world, including in Russia.
In order to determine the technical condition of the front suspension on a Toyota Corolla, you should perform the following procedure:
- During maintenance, it is necessary to visually check protective covers, shock absorber struts, ball and rubber-to-metal joints, as well as bushings and rubber cushions for damage.
- The backlash of the joint (ball joint) should be determined. This can be done by manually swinging the lower lever vertically, then you should “hang” the vehicle wheel by the upper and lower parts around the longitudinal axis located horizontally.
- During a technical inspection, a leak in the shock absorber strut is usually detected, as well as scoring on the working rod surface, deformation and damage to other suspension parts.
- If signs of deformation are detected on them, the stabilizer bar and lower arms must be replaced.
- If the frame cross member, stabilizer bar and body front end are deformed, then the wheel angles change their parameters, making it impossible to adjust these parts. In order to avoid deformation of these parts, you should check the tightness of the bolts.
Removing and installing suspension
On a Toyota Corolla, it’s quite easy to install or remove the front suspension; to do this you need to:
- Using the parking brake, brake the vehicle.
- The front of the car must be mounted on a strong and reliable support, then you need to remove the front wheels in order to gain access to the front suspension parts.
- After carrying out the above actions, all that remains is to unscrew and unscrew the “finger” nut of the steering rod ball joint.
- Using a puller, you need to press out the “finger” of the steering rod ball joint. Pressing out is done from the rotary lever.
- After this, you need to unscrew and unscrew the nuts of the hinge pins on both sides.
- Again, using a puller, we press out the “fingers” of the hinges, but from the lower arms.
- Next, you should disconnect the stabilizer bar and the lower arms from the frame cross member, after which the stabilizer bar and the lower arms are removed together.
- The caliper is removed from the directional pads along with the wheel cylinder. Next, the caliper is suspended from the car body and secured with a wire, however, you should make sure that the brake hose is not stretched or twisted.
- To complete the procedure, unscrew the “top support” mounting nuts and remove the rack.
- In order to install the suspension, you need to carry out the above steps “in reverse”.
How to check the ball joint on your car: a quick and proven method
The design of the ball joint does not require maintenance: the simplicity of the part and resistance to physical impacts prevents the need for regular inspection of components.
However, if the vehicle is operated on roads with insufficient surface quality or under constant overload, it is recommended to carry out diagnostic procedures - you can check the integrity of the ball joint on a Toyota Corolla E120 as follows:
- We lift the car with a jack, having previously driven it onto a flat area;
- Without removing the wheel, wrap the pry bar or crowbar with a soft rag and install it between the wheel and the support;
- Next, we apply little pressure on the lever: the presence of play in the support indicates the integrity of the part, and if the crowbar is clamped, the product will have to be replaced.
It is important to know! The manufacturing company recommends replacing ball joints every 60-80,000 km or after 2 years of vehicle operation during yard storage.
If replacement is necessary, it is advisable to install new parts on both wheels of the vehicle, which will increase the maneuverability of the vehicle and increase the service life of the components.
Replacing the ball joint Toyota Corolla 2007-2010 - Autoliterature
You bought a new Toyota Corolla, drove it for a year, and something began to bother you. On a good straight asphalt road the car behaves almost flawlessly. But as soon as you drive onto a gravel road, or hit some kind of bump, you immediately hear a knock under the car. On the right side or on the left it is not clear. Besides this, something began to pull to the side.
In general, the car is not as stable on the road as before; tire markings do not help. Most likely, we will have to replace the ball joint for Toyota Corolla 2007 - 2010
d, the work is not planned, but necessary.
We'll figure out. First we make a diagnosis. Place the car on a level surface and set the parking brake.
Raise the car using a jack. We fix the car. Next, we approach the wheel, presumably where the knocking is coming from, and begin to move it. First, horizontally, if you feel play, it means the tie rod end is broken. Then we grab the wheel vertically and carry out the same actions.
If you feel free movement here, it means the ball joint requires replacement.
And so, you have determined that the ball joint has failed. There are several options to resolve this issue. The first and most reliable is to purchase a new original part and replace it yourself. The second option is to restore the ball joint.
But in a garage, this option is not considered due to the lack of necessary equipment. In a workshop where you can take your car for repairs, they will dismantle it and do a crimp for you. But this, as a rule, is a temporary measure and quickly makes itself felt.
Therefore, to replace the ball joint Toyota Corolla 2007-2010
was successful, the first option is recommended.
Unscrew the wheel nuts and remove the wheel. Using pliers, remove the pin (cotter pin) from the hole, the ball joint bolt and unscrew the nut. To remove the ball joint from the trunnion, you will need a parts puller. If you don’t have it, then you can use the barbaric method.
Take a heavy hammer or light sledgehammer, and with a directed blow, hit the ear of the trunnion sharply. It will be very good if you have an assistant working with you. He must install the tension. Usually, after the first impact, the conical pin of the ball joint flies out of its seat.
Yes, I lost sight of it, don’t unscrew the nut completely, leave two or three turns.
Once the support is out of its seat, remove the three bolts securing the ball joint to the lower arm. Only then can you completely unscrew the nut and remove the hinge.
The ball joint is one of the main elements of the car’s chassis, in particular the suspension, and a lot will depend on its integrity. The tires will wear out ahead of time due to poor camber; knocks and impacts can damage other components. Well, your safety comes first, of course. This means that it turns out that replacing the ball joint of a Toyota Corolla 2007-2010 is not a trivial operation at all, but a rather serious undertaking to prevent more serious consequences as a result of wear of this part. Further. We take a new part and assemble it into a single whole, that is, we put on the boot, fill it with lubricant and install the retaining ring. Then install it on the lever and tighten the nuts. After this, preferably with the help of your friend, move the lever with the ball joint to the trunnion and insert the conical pin into its seat. When you tighten the nut, the pin will not turn, since during tightening its cone fits tightly into the socket. This completes the renovation. Put the wheel back in place and have a nice journey.
Instructions for replacing the ball
At the first stage we need to raise the front of the car. This can be done using a jack. Having done this, we will see the following picture - the nut with which everything will begin is highlighted in red. By the way, about removing the wheel - you can remove it, or you don’t have to touch it.
When we have found the bolt, the next step is to pull out the locking spindle, which prevents the nut from unwinding. After the protection is pulled out, we need to loosen all the ball nuts and bolts, starting with the bottom bolt, and then unscrew them all.
After all the parts are unscrewed, we need to knock out the ball joint - don’t expect it to come out on its own. A heavy hammer or small sledgehammer is best for this job. The photo below shows two ball bearings - a new support and an already knocked out old one. As we can see, the difference is extremely large.
After the old support has been removed, and the place it occupied has been cleaned and processed, you can begin installing a new ball joint. We install it in place and, sparing no effort, tighten all the nuts and bolts one by one. At the end, you need to make sure that everything is tightened very well and that the spindle is inserted, which will prevent the main nut from unscrewing.
Having dealt with one side, we can move on to repairing the other. In order to change the ball joint on the Toyota Corolla on the other side, we need to lift the second side and perform all the above steps again. After the ball joints have been changed, it is necessary to run it for about 50-100 km, and then recheck the tightness of the bolts on the ball joints.
As we can see, changing these spare parts is not difficult at all and does not take much time. As for the service life of this part, it is worth noting that its service life depends only on road conditions and the driving skills of the driver of the car.
Toyota Corolla suspension
The chassis of a car experiences high loads every day: it absorbs all the unevenness of the road, dampens vibrations, and is exposed to shocks and vibrations. The Toyota Corolla suspension is soft and highly reliable, but even with it troubles can occur that require repair.
Is it possible to carry out repairs in the garage?
The service life of the Toyota Corolla suspension directly depends on the operating conditions of the vehicle.
The more often you move on poor-quality road surfaces at high speed, the more likely it is that an unpleasant creaking, knocking, grinding noise will occur, indicating a malfunction in the car.
You can get rid of these problems yourself, knowing the cause of the malfunction and having the necessary tools for repair at hand.
The suspension of the 2008 Toyota Corolla by now, as a rule, requires careful attention, since an almost ten-year-old car, even in very good conditions, begins to experience metal fatigue.
Cars of this generation are equipped with a relatively rigid, but ergonomic suspension that can absorb fairly noticeable impacts.
If you are the owner of a car produced in 2006–2008, you should not wait for a squeak to appear in the suspension. When the mileage approaches the 100 thousand km mark, it is necessary to carry out a routine check of the chassis in order to identify possible faults in advance and eliminate them. Such repairs will cost much less than those carried out on an emergency basis, when knocking or creaking will be clearly audible.
What should I do?
The Corolla 150 and 120 are durable and reliable cars, but they do not last forever, so to extend the life of your car, you need to pay attention to it.
It is recommended to promptly change consumable parts such as stabilizers: thanks to them, the car holds the road better and maneuvers without skidding. As a rule, they need to be changed at around 80 thousand mileage.
You can replace them yourself if you have a car design diagram.
It wouldn't hurt to replace the silent blocks along with the stabilizers. Every 150 thousand km it is recommended to change the ball joints.
What to do if there is a knock?
The front suspension can knock for various reasons, but if you drive at high speeds (150 km/h and above), the knock is normal, and you should pay attention to it when it occurs at low speeds, when driving on relatively flat surfaces.
This problem can be solved quite simply. To do this, you need to tighten the bolt that secures the silent block: they unscrew due to shaking, so you can hear characteristic sounds on bumps. A knock in the rear suspension can occur for the same reasons.
A silent block that is not tightened properly may fail and will need to be replaced. You need to put the car on stands, remove the wheel, unscrew the bolt and two nuts securing the ball joint arm from below.
To do this, you need to use heads 17 and 19. The bolt and nuts secure not only the part, but also the transverse rod of the suspension. You will have to pull out the lever, otherwise you won’t be able to get to the desired part. The most convenient way to do this is while under the car.
If you have a pit or a lift, it will be much more convenient to work.
Tip: after you pull out the lever, you need to insert a pipe of the same diameter in its place.
After this, you can take a small hammer, with which you will need to knock the rubber part out of its place. After removing the silent block, the seat must be thoroughly cleaned, all dirt and traces of oil must be removed.
The inside of the new rubber will need to be lubricated before it can be installed in place. After this, the parts need to be assembled in reverse order. If a creaking or knocking noise appears in the front suspension, the rear suspension should also be checked, even if there is no creaking in it yet.
In order for the wear of consumables to be uniform and the load to be distributed correctly, silent blocks must be replaced in pairs.
This will not only ensure the suspension works correctly and eliminate extraneous sounds, but will also save time by not having to do the same job twice.
Rubber parts must be replaced in a timely manner. If you do this in advance, there will be no harm; you should not bring the condition of the silent blocks to critical. If they are worn out to the maximum and cannot perform their functions, the metal parts of the suspension will begin to rub against each other. This will lead to premature wear of the chassis and costly repairs.
Toyota Corolla III (KE) - 1981
Toyota Corolla ball joints guarantee the reliability, controllability, mobility and safety of your car on the roads. Original and branded spare parts are always available in warehouses at reasonable prices. However, speaking of repairs, even more important for driving safety is regular maintenance and timely repairs, subject to vehicle maintenance regulations:
- works well,
- does not lose its performance over long runs,
- more reliable and safer to operate
We make it easy to keep your car in good condition and provide great deals on our entire range of parts. Everything you need for service and repair can be found right here in our digital warehouses. Instead of endlessly searching for a retail auto parts store near you that doesn't necessarily have the parts you need, just pick up the phone and we'll deliver the auto parts you need to your door.
The main emphasis when selecting spare parts is based on the company’s experience.
It is profitable and safe to buy from us for a number of main reasons:
- Autocompas.ru is one of the leading online stores of auto parts, with daily traffic on the site of more than 30,000 people,
- Certified and reliable suppliers provide a full range of auto parts within access to their warehouses,
- The system has more than 500 suppliers and manufacturers who regulate prices with an eye on competitors and strive to make their goods more profitable to purchase.
Problems when paying with bank cards
Sometimes difficulties may arise when paying with Visa/MasterCard bank cards. The most common of them:
- There is a restriction on the card for paying for online purchases
- A plastic card is not intended for making payments online.
- The plastic card is not activated for making payments online.
- There are not enough funds on the plastic card.
In order to solve these problems, you need to call or write to the technical support of the bank where you are served. Bank specialists will help you resolve them and make payments.
That's basically it. The entire process of paying for a book in PDF format on car repair on our website takes 1-2 minutes.
If you still have any questions, you can ask them using the feedback form, or write us an email at
How to remove the lever and change the ball joint on a Toyota Vitz 2002
We will demonstrate how to replace a ball joint on a 2002 Toyota Vitz (P10). We will replace the ball due to a torn boot. If the boot is torn recently, then you will not hear any extraneous sounds until it starts knocking. Replacing the ball is not difficult, but to do this you need to dismantle the lever.
Selecting spare parts for Toyota Vits
The original ball joint on the Vitz is not available for sale; the manufacturer recommends replacing the lever assembly. There are a large number of substitutes on the market, but it is better to give preference to famous manufacturers.
Ball joint for Toyota Vitz P10:
- Monroe L13537,
- Delphi TC1006,
- Moog TO-BJ-2274,
- SWAG 81 94 3077,
- Blue Print ADT38642.
Tools and materials for work
- jack;
- power wrench;
- ratchet crank;
- wheel bolt wrench;
- seventeen straight spanner wrench;
- head at seventeen;
- metal brush;
- penetrating lubricant;
- ball joint pin remover;
- pliers;
- installation;
- circlip pliers;
- torque wrench;
- slotted screwdriver;
- the mandrel is slightly larger than the outer diameter of the ball;
- ball mandrel for outer diameter;
- wheel chocks;
- hammer.
How to remove the lever and the process of replacing the ball, see the photo report.
1
We place the car on the pit, jack it up and remove the wheel. For insurance, place the removed wheel under the threshold or lower the car onto a rack. We also install wheel chocks under the rear wheels.
2
We clean the dirt off and spray the ball fastening nut and the two lever fastening bolts with penetrating lubricant.
5
Using pliers, pull out the cotter pin and unscrew the nut securing the ball pin. Seventeen turnkey nut.
6
Unscrew the front lever mounting bolt. To unscrew, use a power wrench and a 17mm socket.
7
Unscrew the rear through bolt securing the lever. We hold the nut with a spanner wrench, and use a power wrench with a 17-mm head to turn the bolt head.
8
We install the puller and press the ball pin out of the fist.
10
Using a mounting tool, remove the front silent block and then pull the lever toward you from the second silent block.
13
We clean the dirt and use pliers to remove the ball retaining ring. There is also a retaining ring without holes; it is impossible to take such a ring with pliers. If this is the case, remove the ring using a slotted screwdriver.
14
We install the ball on the mandrel and hit the pin with a hammer until the ball comes out of the lever.
16