The design of car transmissions uses a special clutch that allows the power flow to be broken at the moment of gear shifting. During operation, the unit wears out, which leads to a drop in dynamics with a simultaneous increase in fuel. Replacing the clutch on a Toyota Corolla with a robot allows you to restore normal operation of the gearbox.
Replacing the clutch allows you to restore normal operation of the car.
Detailed instructions for performing the work
Description of the sequence of actions when installing a new clutch on a Corolla robotic gearbox with an E150 body:
Clutch installation is carried out sequentially.Place the car on a lift and open the hood.
- Remove the decorative cover from the engine and disconnect the cables from the battery.
- Remove the battery from the engine compartment.
- Remove the protective plastic shield installed on top of the radiator.
- Unscrew the bolts and remove the clamps securing the air filter housing and the pipe on the throttle assembly.
- Disconnect the gearshift drives and unscrew the bolts securing the support to the body.
- Raise the car on a lift and remove the protective shields of the gearbox and engine housings.
- Unscrew the central bolt securing the drive on the left wheel, and then remove the disk and tire from the hub, having first unscrewed the 5 nuts.
- Remove the ball joint fasteners in the lower control arm on the left.
- Unscrew the plug and drain the oil from the gearbox housing.
- Remove the left wheel drive assembly with outer and inner joints.
- Unscrew the actuator mounting bolts and remove the mechanism, first unfastening the wiring harness connector.
- Place a temporary support under the engine pan.
- Unscrew the fastenings of the gearbox housing to the engine and place a hydraulic stand under the gearbox housing.
- Carefully move the box body to the side and lower the assembly onto the stand.
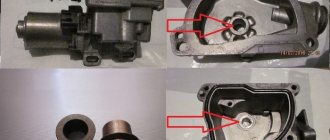
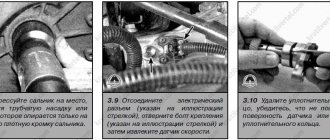
- Remove the worn disc and basket from the engine, and remove the old release bearing (located under the clutch control fork) from the gearbox input shaft. Inspect the plane of the flywheel; if wear of more than 0.5 mm or uneven wear is detected, the part must be replaced.
- Check the condition of the axle shaft seals; if damage or oil leakage is detected, install new parts. The cavity of the clutch housing should be cleaned of wear products (for example, with a solvent followed by blowing with compressed air).
- Mount the new basket and disk in their original place, observing the tightening torques and manufacturer’s requirements.
- Place the box in place and mount the electric clutch control drive.
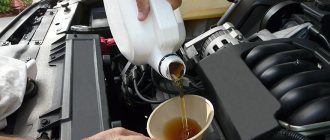
- Mount the suspension elements and shields in their original places and fill the gearbox housing with fresh oil using a transmission syringe. When assembling, observe the thread tightening torques prescribed by the manufacturer.
- Install the box cushion, air filter and plastic shields in the engine compartment.
- Connect the battery and begin setting up the actuator. Operating the vehicle without first adjusting the clutch control drive on the robot is prohibited.
Replacing the clutch disc of a manual transmission Toyota Corolla 1.4 4ZZ-FE
I replaced the clutch disc on my Toyota Corolla 120.
The reason for replacing the clutch was the clutch slipping when driving at high speeds. The revolutions grew, but there was no traction, then it suddenly seized. It’s very inconvenient to drive like this; at the right moment, for example when overtaking, the car could simply roar and not accelerate. After reading various instructions and forums, I found out that such slipping indicates wear of the clutch disc or, in rare cases, failure of the clutch basket.
Clutch disc
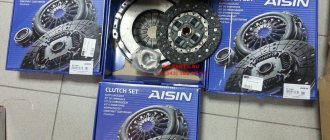
I decided to order only the clutch disc from existential. I was thinking about purchasing either Exedy or Aisin, there were good reviews for these discs, but I still chose Aisin. The Aisin clutch is installed on the assembly line on these cars, so in principle it is the original, only at a much lower price. The original clutch disk for exist costs 4,000 rubles, I bought an Aisin clutch disk for 1,200. They say that someone ordered the original and there was an Aisin disk in the Toyota box. Before the replacement, I was worried that it could not only be the clutch disc; the car would have to sit with the box removed until other spare parts arrived.
Aisin Clutch Disk
I will say right away that replacing a clutch is a long procedure. To replace, you need to prepare: accordingly, a tool, WD 40 just in case, lubricant for tripods, 2 clamps for the boot, a mandrel for centering the clutch disc (someone centered the disc by eye, and everything immediately fell into place), preferably oil for replacement in the gearbox.
It is advisable to change the clutch in a pit and you also need a device for lifting the engine, or just a rope to tie it up. Since when the gearbox is removed, the engine remains hanging on only one right mount.
We begin the replacement by lifting the car onto the bars, the front wheels must be lifted in order to pull the drives out of the gearbox grenades, to do this you can unscrew the ball joints and bend the wheel, the drives have enough space to get out of the grenades.
We remove the battery and air filter housing for easy access to the box.
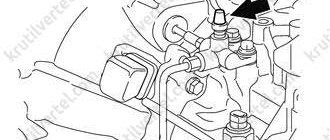
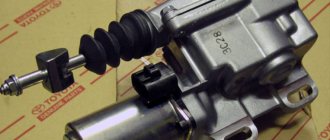
We unscrew the mass, the clutch slave cylinder, unscrew the starter (you don’t have to pull it out), unplug all the electrical connectors of the gearbox, unscrew the three engine mounts. Then we unscrew the box from the engine, it is secured with six bolts, and it is placed on the guides.
To remove the box, I had to knock out the right grenade, since it prevented the box from coming out, and I didn’t want to unscrew the lower beam, so I needed to drain the oil from the box and it would be advisable to prepare new oil. I didn’t bother in advance and poured the old one back in, I’ll have to change it at the first opportunity. According to the technical documentation, 1.9 liters of 75W90 GL4 oil is poured into our gearbox.
After this, remove the gearbox. We unscrew the clutch basket, while making a mark on the flywheel and on the basket to put everything as it was. When removing the basket, the reason for the slipping became visible - a “bald” clutch disc, the disc was worn down to the rivets, and the rivets were even starting to wear out on the basket, so I replaced the clutch disc just in time.
"Bald" clutch disc
Clutch disc worn down to rivets
Well, in general, the basket is in perfect condition, the flywheel is also in perfect condition. The clutch, as expected, turned out to be produced by the Japanese company Aisin, so Aisin is the original manufacturer of the clutch for the Toyota Corolla 120 1.4 4ZZ.
Next, we install a new clutch disc, attach the basket, and center the clutch disc so that the input shaft fits in without distortion. And then we tighten the bolts diagonally with a force of 19 Nm with a torque wrench. All car enthusiasts are recommended to purchase such a key, since it is needed for almost all types of work on the car, for example, when changing the valve cover gasket, I also used it. Well, we collect and put everything in place.
Well, that's it, a day of work and the new clutch is in place. The car was simply unrecognizable, it practically came to life, at first it was even unusual to drive, it was immediately hooked and traction appeared.
Initialization process
The robotic gearbox differs from classical mechanics in the use of an electric actuator that controls the operation of the clutch.
After replacing the disk or basket, you need to reset the settings in the control unit.
Initialization is carried out using a laptop connected to the diagnostic connector, or by manipulating the brake pedal and gear selector.
The robotic box uses an electric actuator.
Description of the sequence of actions:
- Stand on level ground and set the parking brake.
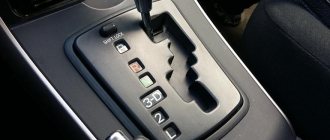
- Locate the diagnostic connector located under the hinged cover on the lower edge of the instrument panel on the driver's side. Install a jumper wire between pins 4 and 13, located in the top and bottom rows, respectively.
- Wait 15 seconds and then turn the key in the lock to the ignition position.
- After initializing the ignition, quickly press and release the brake pedal 7 times. If the procedure for entering the initialization mode is completed correctly, a double buzzer will sound.
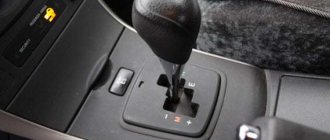
- After giving the signal, press and hold the brake pedal, and then initialize the clutch using the selector. The lever should be moved sequentially through positions N to position E, and then to M. After this, it is necessary to move the selector 4 times through the upshift point + (with an intermediate return to position M), and then move the selector to E and N.
- After completing the operation, release the brake pedal and then press it again. If the procedure is completed correctly, 3 series of sounds, 2 signals each, will be heard. The driver then has 2 seconds to apply the brake three times. The end of the clutch initialization procedure is confirmed by 3 short signals from the buzzer.
- Turn off the ignition system and remove the jumper from the connector. If, when performing manipulations, no sound signals are given or the time interval between pulses exceeds 1 second, then turn off the ignition and start the procedure again. Before starting a new initialization procedure, wait at least 15 seconds.
Additionally, it is recommended to configure the robotic box control system:
- With the car stationary and the ignition on, move the selector to the neutral position.
- Turn the key in the lock to the ignition off position, and then quickly turn on the system for 40 seconds.
- Turn off the ignition for 15 seconds, then start the engine and simultaneously press the brake pedal. If the sequence of actions is performed correctly, the LED indicating the neutral position of the lever will begin to blink. After 10 seconds, the lamp will turn on in a constant glow mode, indicating the completion of the adaptation procedure.
If the car was serviced in a specialized service center, then initialization is performed using a computer.
A laptop or diagnostic tool is connected to the OBD-II connector inside the car, and then the setup program is launched. The programming procedure takes up to 10 minutes.
Possible consequences of improper care of the mechanism
If the adjustment is incorrect or the disc, basket or release bearing is worn excessively, transmission performance will deteriorate. At the initial stage, the car will accelerate poorly after the start; as the gaps further increase, the dynamics will continue to fall. When the critical output value is reached, the clutch will stop transmitting torque, which will lead to immobilization of the car with simultaneous display of information about errors in the instrument cluster. You can deliver the car to the repair area by tow or on a recovery platform.
Tips and tricks for extending the “youth” of your car’s clutch
If the car is moving in city traffic jams, then when idle at a traffic light, it is recommended to move the selector to the neutral position. Some drivers periodically operate the gearbox in manual shift mode, which allows them to adapt the control unit to their driving style. An additional way to extend the life of the clutch and the entire gearbox is to change the oil every 60 thousand kilometers. If extraneous noise appears from the gearbox, the unit should be diagnosed. Failure of the synchronizers or wear of the forks negatively affects the operation of the clutch.
To increase the clutch life of a robotic gearbox, it is necessary to avoid sudden acceleration from a standstill. Before engaging reverse gear, wait until the vehicle has come to a complete stop. The transmission with an actuator is not designed for off-road driving; attempts to get out of deep snow or mud by rocking lead to accelerated wear of the clutch and breakdown of the electric drive. The clutch life of a robotic transmission rarely exceeds 90 thousand km, and improper operation reduces the service life by 2–3 times.
Replacing the device
During long-term use, mechanical wear of some system elements occurs. Most often, this is caused by overheating; serious disturbances in the system occur, threatening unforeseen consequences. Typically, this manifestation is slipping, which can occur both at a sharp start and when driving at high speed. Error P0810, which appears in the diagnostics, may confirm your fears.
READ MORE: Initialization of the robot box of a Toyota Corolla car
There is only one way to fix such a malfunction: you need to replace the complete clutch kit, i.e. bearing, basket and disc.
Manual transmission - manual transmission
- First, remove the ball from the lever, remove it from the gearbox, spin the wheels, dismantle them.
- Using a pry bar, remove the box, this will give access to the flywheel.
- Now disassemble the clutch itself, there you will find a slipping problem, which consists of a worn and worn disc.
- Replace the old disk with a new one, and then follow the same algorithm, only in reverse order, assemble everything and mount it in place.
Robotic box
Either a breakdown of the electrical transmission system or a mechanical malfunction in the robot can occur.
Electrical failure can occur due to several reasons:
- an error occurs in the Toyota Corolla settings;
- a violation occurred during transmission initialization.
This malfunction manifests itself in the form of a strong jerking of the Toyota Corolla at startup. Similar manipulations occur when entering the neutral position. The display displays the error code and this helps to accurately verify the correctness of the diagnosis by comparing the codes and symptoms.
After a certain period of time, the system begins to work correctly. If there is an error in the control (it is coded P0810), then both electronic and mechanical failure is very likely.
Code P0900 indicates a motor circuit break or breakdown.
In a Toyota Corolla “robot”, replacing the clutch can be done independently if you follow this plan:
- Buy an original kit consisting of a clutch disc, basket, release bearing.
- Disconnect the air flow sensor, unscrew the clamps from the air duct and the latches from the air purification filter, then remove the bottom of the filter.
- Unscrew the screw that secures the gearbox and release the connectors, but do not remove the bolt itself completely.
- Unscrew the bolts at the top.
- Drain the oil from the Toyota Corolla gearbox by first unscrewing the hub nuts and removing the ball joint. Next, remove the shafts.
- Place the front cushion under the gearbox, then remove the drive shafts from the box.
- With the installation of thrust stands on the engine and gearbox, you can remove the previously unscrewed bolt from the gearbox.
- Take care of the transmission mounting bolts, unscrew them only in a circle, then use a pry bar to pull the gearbox away from the engine. In this way the box can be dismantled.
- Remove the damaged part from the flywheel, check the correct operation of the flywheel (if its surface is completely smooth and free of splinters).
- Proceed to install the clutch in the desired location, center the disc.
- Replace the bearing and mount the box using the same algorithm, but in reverse order.