Once you reach the mileage limit of 100 thousand km, you should be careful with the clutch, as the first signs of malfunction may appear:
- “driving” the clutch at high speeds;
- Extraneous noise emitted by the release bearing;
- unstable gear shifting (extraneous sounds, shocks when shifting).
Over time, a specific smell may appear, which also indicates a malfunction of the unit.
You should not ignore these signs, since failure to correct the problem in a timely manner may result in more serious repairs. The manufacturer provides diagnostics for this unit. It can be done using special software from official dealers.
The results make it possible to determine the exact number of clutch connections, as well as the serviceability of the unit and whether the clutch in Toyota Corolla really needs to be replaced. The mileage indicator is conditional, since much depends on driving style and operating conditions of the car. If the car is driven only in the city, the clutch will wear out the fastest.
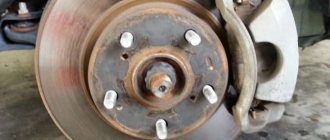
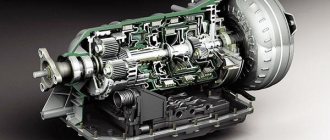
Toyota Corolla Clutch
Toyota Corolla and Auris are equipped with a dry-type single-plate clutch with a central diaphragm spring.
Pressure plate
mounted in a stamped steel casing 3, bolted to the engine flywheel.
Driven disk
5 is installed on the splines of the gearbox input shaft and is clamped by a diaphragm spring between the flywheel and the pressure plate.
Clutch release bearing A is a closed type that does not require lubrication in operation, mounted on a guide sleeve pressed into the hole in the clutch housing. The guide bushing is a non-separable unit that includes an oil seal and a front bearing of the input shaft. The bearing is mixed by clutch release fork B, mounted on a ball joint screwed into the clutch housing. The fork is inserted into the grooves of the bearing coupling without additional fastening.
Toyota Corolla Clutch
and its release drive: 1 — clutch release fork; 2 — clutch release bearing; 3 — clutch housing with pressure plate; 4 — working cylinder of the hydraulic clutch; 5 - driven disk
The free arm of the clutch release fork, sealed with the 8th clutch housing with a rubber boot, is acted upon by the working cylinder of the hydraulic clutch release.
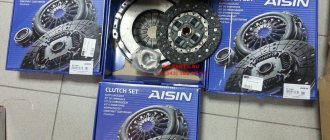
Toyota Corolla clutch replacement
If the clutch fails, we recommend replacing all its elements at the same time (driven and driven discs, clutch release bearing), since replacing the clutch is labor-intensive, and the service life of undamaged clutch elements has already been reduced, therefore, if they are installed again, the clutch may need to be replaced again after a relatively short mileage.
You will need: an 11" wrench (a socket head is more convenient), a screwdriver, and a mandrel for centering the driven disk.
1. Remove the gearbox
If you are installing the old pressure plate, mark in any way (for example, paint) the relative position of the disc housing and the flywheel to install the pressure plate in its original position (to maintain balance).
Source
Initialization
Replacing the clutch on a Toyota Corolla robot will be done correctly if initialization is necessary after installing new parts.
The process of resetting the transmission ECU to zero is called initialization.
This operation is required when:
- failures in the operation of the checkpoint;
- partial and complete disassembly of the gearbox;
- replacing parts, sensors, ECUs.
It is important to carry out this only for those elements of the gearbox that have been replaced. This procedure should not be carried out unless absolutely necessary, as it significantly reduces the life of the clutch.
Bleeding the hydraulic clutch
- If clutch fluid gets on painted surfaces, it should be washed off immediately.
- If any work has been done on the clutch system, or if air may have entered the clutch system lines, bleed air from the clutch hydraulic system.
- When replacing clutch fluid, ensure that the used fluid in the clutch line between the reservoir and the bleeder nipple is replaced before bleeding the system.
1. Fill the brake fluid into the reservoir.
2. Bleed the air from the clutch line:
- Remove the bleeder cap.
- Connect the vinyl tube to the slave cylinder bleeder fitting.
- Press the clutch pedal five times, and then loosen the slave cylinder bleeder valve while pressing the pedal.*1
- When fluid stops flowing, tighten the slave cylinder bleeder plug and release the clutch pedal.*2
- Repeat steps *1 and *2 until all air has been removed from the brake fluid.
When replacing brake fluid, add brake fluid so that the level in the reservoir is between the MIN and MAX marks.
- Check that all air has been removed from the clutch system piping.
- Tighten the slave cylinder bleeder fitting. Tightening torque 8.4 N*m.
- Press the clutch pedal at least 10 times and make sure it works.
Consequences of improper care of the mechanism
It is also necessary to remember how long the car runs on the original clutch. If you do not take into account the period of maximum possible operation of the mechanism without maintenance, then the car begins to slip and skid literally out of the blue. Also, the reverse gear may not turn off or, on the contrary, it will turn off for no reason.
Therefore, after removing all components of the clutch system, it is necessary to carefully check everything and, if there is severe wear, replace certain parts. This applies to both automatic and manual transmissions. A well-made replacement eliminates the presence of play and squeaks in the gearbox. Therefore, the assembly process must be performed carefully and carefully.
Now you need to decide on the question, which clutch is better to install? It is worth knowing that the clutch for a 1.6 liter engine and a 1.5 liter engine will be the same.
So, it is best to install original parts of the coupling mechanism. However, if they are too expensive or are out of stock, then you need to “stock up” with high-quality analogues.
Bleeding the hydraulic clutch release of Toyota Corolla
If, when the pedal is pressed all the way, the clutch does not disengage completely (“drives”), which is accompanied by a characteristic grinding of gears when engaging gears, air may have entered the clutch release hydraulic drive. Remove it by bleeding the hydraulic drive. In addition, pumping is performed when filling the hydraulic drive with liquid after replacing it or repairing system components associated with its depressurization.
You will need: brake fluid, bleeding hose, 10mm wrench, container for drained fluid.
1. Check the level of working fluid in the master brake cylinder reservoir (the reservoir is common to both master cylinders) and, if necessary, bring it to normal.
2. Remove the protective cap from the clutch slave cylinder bleed valve.
3. Place a hose on the valve and lower its end into a container with a small amount of brake fluid. Have an assistant press the clutch pedal four to five times at 2 to 3 second intervals and then hold it down. Turn the valve 3/4 turn. Liquid with air bubbles will flow out of the hose into the container.
4. Close the valve and ask an assistant to release the clutch pedal.
5. Repeat operations 3 and 4 several times until liquid begins to emerge from the hose without air bubbles.
WARNING
While bleeding the hydraulic drive, periodically check the fluid level in the clutch master cylinder reservoir. Do not allow the fluid level in the reservoir to drop below the “MIN” mark on the wall of the reservoir. Add fluid in a timely manner, otherwise when the bottom of the tank is drained, air will enter the system and pumping will have to be repeated again.
6. Close the valve, put on the protective cap and, if necessary, add fluid to the clutch master cylinder reservoir.
Source
Mechanical faults of the MultiMode gearbox.
Mechanical failure is mechanical wear of clutch parts. Basically, this is wear and overheating of the clutch,
in which the clutch loses its functionality. The main sign of clutch failure is slipping. This leads to a loss of torque at high speeds or during sudden starts. In the event of mechanical failures, the system enters emergency mode and resets the transmission to neutral.
Displays error code P0810. To eliminate the problem, you need to replace the clutch kit, which includes the basket, clutch disc and release bearing.
Crunching sound in MMT when shifting from second to third gear
. This is due to wear of the third gear synchronizer. The reasons are partly not due to timely oil changes, failure to adapt the clutch or its violation. In the neglected version, it leads to failure of the third gear gear pack and the gear selection mechanism.
Noise from the MMT when the car is moving.
Due to untimely oil changes or oil leakage, the bearings of the primary and secondary shafts fail. Eliminated by replacing the rear bearings of the primary and secondary shafts.
Bleeding the clutch release hydraulic drive
If, when the pedal is pressed all the way, the clutch does not disengage completely (“drives”), which is accompanied by a characteristic grinding of gears when engaging gears, air may have entered the clutch release hydraulic drive. Remove it by bleeding the hydraulic drive. In addition, pumping is performed when filling the hydraulic drive with liquid after replacing it or repairing system components associated with its depressurization. You will need: brake fluid, bleeding hose, 10mm wrench, container for drained fluid. 1. Check the level of working fluid in the master brake cylinder reservoir (the reservoir is common to both master cylinders) and, if necessary, bring it to normal.
2. Remove the protective cap from the clutch slave cylinder bleed valve. 3. Place a hose on the valve and lower its end into a container with a small amount of brake fluid. Have an assistant press the clutch pedal four to five times at 2 to 3 second intervals and then hold it down. Turn the valve 3-4 turns. Liquid with air bubbles will flow out of the hose into the container. 4. Close the valve and ask an assistant to release the clutch pedal. 5. Repeat operations 3 and 4 several times until liquid begins to emerge from the hose without air bubbles. WARNING. While bleeding the hydraulic drive, periodically check the fluid level in the clutch master cylinder reservoir. Do not allow the fluid level in the reservoir to drop below the “MIN” mark on the wall of the reservoir. Add fluid in a timely manner, otherwise when the bottom of the tank is drained, air will enter the system and pumping will have to be repeated again. 6. Close the valve, put on the protective cap and, if necessary, add fluid to the clutch master cylinder reservoir.
Clutch slave cylinder - removal and installation. Clutch hydraulic drive - bleeding
Clutch slave cylinder - removal and installation.
1. Disconnect the cable from the negative terminal of the battery.
2. Disconnect the hydraulic tube from the clutch slave cylinder (see Fig. 4.2, a, b). If possible, when working with union nuts, use a special (split) spanner wrench to avoid rounding their edges. Prepare a small container and place a rag around the clutch slave cylinder to absorb the hydraulic fluid that will flow when the tube is disconnected.
3. Remove the working cylinder mounting bolts.
4. Remove the clutch slave cylinder.
Rice. 4.2,a. Unscrew the union nut of the hydraulic tube, then unscrew the working cylinder mounting bolts - model with a gasoline engine
Rice. 4.2,6. Clutch slave cylinder –
diesel model
1. Install the slave cylinder onto the clutch housing, but do not fully tighten the mounting bolts. Make sure that the cylinder rod fits into the socket of the fork lever (“fork”),
2. Connect the hydraulic pipe to the slave cylinder, then tighten the mounting bolts securely. Tighten the union nut securely using a special spanner.
3. Fill the reserve reservoir with DOT 4 brake fluid and bleed the clutch as described in paragraph 5.
Clutch hydraulic drive - bleeding
1. The clutch hydraulic drive should be bled (bleed) in cases where any system components have been removed or the fluid level in the reserve tank has dropped so much that air has entered the hydraulic drive. The procedure for bleeding the clutch hydraulic drive is identical to the procedure for bleeding the brake system hydraulic drive.
2. Fill the reserve reservoir with fresh DOT 4 brake fluid.
Warning. Do not reuse fluid that leaves the system during bleeding, and do not refill the system with fluid that has been stored in an open container.
3. Locate the bleeder valve on the clutch slave cylinder body. Remove the dust cap from the valve fitting and place a piece of transparent hose on it. Place the other end of the hose in a transparent container and pour brake fluid into it to a level of about five centimeters, so that the end of the hose is immersed in it.
4. Ask an assistant to depress the clutch pedal and hold it in this position. Open the outlet valve so that the liquid begins to flow out through the hose. Close the valve as soon as liquid stops flowing. After closing the valve, ask an assistant to release the pedal.
How to bleed the clutch of a Toyota Corolla 120 body
PERFORMANCE ORDER 1. All air must be removed from the hydraulic system if any of the system elements were removed or the master cylinder reservoir was empty. The bleeding procedure is similar to the procedure for bleeding the brake system. 2. Fill the master cylinder reservoir with fresh brake fluid of the required type (see subsection 2.1).
* Do not reuse hydraulic fluid that has been drained from the hydraulic system during bleeding or fluid that has been left in an open container for a long time.
3. Raise the vehicle and place it on supports to gain access to the clutch release slave cylinder, which is located on the left side of the clutch housing. 4. Locate the release valve on the clutch release cylinder (just above the hydraulic tube connection). Remove the dust cap from the valve and place the plastic tube over the valve. Place the other end of the tube in a clean container filled with approximately 6 cm of brake fluid. The end of the tube must be lowered into hydraulic fluid. 5. Have an assistant press the clutch pedal and hold it in this position. Open the bleeder valve on the slave cylinder, allowing hydraulic fluid to flow through the hose. Close the valve when liquid stops flowing through the hose. After closing the valve, ask an assistant to release the clutch pedal. 6. Repeat this operation until all air has been removed from the hydraulic system. Clean hydraulic fluid without air bubbles should flow through the tube. Monitor the hydraulic fluid level in the master cylinder reservoir; if the fluid level drops too much, air will enter the hydraulic system again and you will have to start over. 7. Install the cap on the exhaust valve and lower the vehicle. Check the operation of the clutch release drive before operating the vehicle.
Clutch release slave cylinder
Switch blocking engine start
Other on the site:
Diagnosis of the fuel injection system If a malfunction occurs in the fuel injection or ignition systems, first make sure that all electrical connectors of the system are securely connected and not damaged by corrosion. Then make sure.
System leak test More accurate results can be obtained by testing the system for leaks, which can be carried out by some workshops. To do this, compressed air is directed into the combustion chamber through the holes.
Troubleshooting using diagnostic codes - fault code P0335/P0336 OPERATING PRINCIPLE AND PURPOSE The crankshaft position sensor (magnetoinductive type) consists of a magnet and a coil located near the engine flywheel. Position sensor rotor teeth
Source