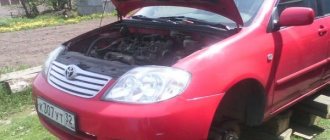
Replacing a robotic clutch on a Toyota Corolla is one of those procedures faced by owners of these cars. For the most part, this is due to the fact that the Japanese manufacturer has not developed the robotic clutch for its cars and therefore they are very capricious in operation and very often fail. As a rule, only 70,000 - 100,000 runs on our roads are enough for them and they begin to run out of steam and gradually die.
Replacing this part at a service center will cost you a pretty penny. Therefore, there is a proposal not to spend a lot of money on service, but to buy a robot clutch and replace it, so to speak, at home - do it all with your own hands.
Why do you need a clutch?
To smoothly and evenly transmit torque to the drive wheels, the car is equipped with a transmission system. In this system, the main role is played by the gearbox and clutch.
A flywheel is rigidly attached to the drive shaft of the motor, the crown of which, after turning on the ignition, is connected with splines to the starter gear. The starter wheel turns the flywheel, which starts the crankshaft and the engine itself. After starting the engine, the starter is turned off, and Bendix returns the shaft with the starter gear to its place, and the flywheel continues to rotate with the engine.
Car clutch kit
In addition to starting the engine, the flywheel is responsible for transmitting rotation from the engine crankshaft to the gearbox. More specifically, it is the drive disc in the clutch system.
The gearbox is responsible for changing gears and transmitting a certain torque to the drive wheels, most suitable for specific driving conditions. To ensure that the engine runs without stopping while changing gears, a clutch is provided.
Initialization
Once everything is in place and the car is actually ready to leave the garage, we need to carry out the process of initializing the clutch - this is necessary so that the gears shift correctly and do not spoil the new parts. This process is quite complex, so it is best to contact a specialist who will quickly carry out the setup with knowledge of the matter. After initialization, the car is completely ready to travel.
It is very important to know here that this procedure must be performed every 20 thousand kilometers traveled. By following this procedure, you extend the life of your clutch and allow it to do its job efficiently.
Clutch operating principle
The clutch performs the function of smoothly interrupting and supplying torque from a running engine to the input shaft of the gearbox. The key part of the unit is the driven disk, consisting of mutual friction plates that have an increased level of friction, the hub and reducing torsional vibrations of the damper springs.
The task of pressing the clutch disc to the flywheel is performed by a basket, inside of which there is a pressure disc. While driving, the surface of the pressure plate tightly presses the friction clutch, ensuring contact between the engine and the gearbox.
To turn on the speed and move away or change gear while driving, the driver presses the clutch pedal and exerts a force on the release bearing fork. This, in turn, presses the leaf spring of the clutch basket, which is part of the pressure plate.
Under the pressure pressure of the bearing, the upper part of the spring petals is pressed inward, and the lower part goes outward, raising the pressure disk, releasing the clutch friction clutch.
Consequently, by pressing the clutch pedal, the driver smoothly interrupts the transmission of torque to the box and can switch the required speed, and then slowly release the pedal and move away or continue driving. In this case, the engine runs without interruption. This is the principle of operation of the clutch, which explains the purpose of this unit in the car.
Advantages of contacting ATC "YAUZA MOTORS"
All of our technical centers accept cars with robotic transmission breakdowns without restrictions on make, model, or year of manufacture. Experienced car service specialists are well aware of the features of robotic transmissions of premium and budget models of passenger cars from all well-known manufacturers, and can repair units installed on outdated modifications.
Original equipment and gentle tools allow you to replace the unit and adapt the transmission without compromising the performance of the associated mechanisms. The main advantages of ordering repair work from the service stations of the YAUZA MOTORS network for Moscow car owners will be:
- accurate diagnosis of the breakdown location;
- optimal choice of method for restoring the automatic transmission (repair or replacement);
- affordable prices;
- simple ordering procedure;
- possibility of complex work;
- convenient location of the ATC network in various areas of Moscow.
An additional bonus for regular customers will be cumulative discounts valid in all of the company’s car services.
Why doesn't the clutch work?
Each individual clutch element has its own wear life. The most basic consumable of the unit is the friction clutch, because it is this element that experiences the highest load. The rubbing surface of the clutch becomes very hot, gradually wears off and becomes smooth.
As a result, over time, the engagement of the friction disc with the flywheel and gearbox is lost. It turns out that the engine runs and revs, but without the automatic transmission clutch, torque is not transmitted, and when changing gears the car still does not move.
If you handle the clutch assembly carefully, it will serve 150,000 km at a decent level.
Knock in Toyota clutch
Along with the friction clutch, other clutch elements suffer, including the basket diaphragm spring and release bearing. Often, when replacing a clutch, the entire set is changed, because even if the remaining parts, at first glance, are still alive at the time the clutch wears out, they may be on the verge of wear.
If we consider the breakdown of the clutch assembly, without its drive, we can highlight the following aspects in which the mechanism requires repair:
- Abrasion of friction plates, deformation or oiling of the clutch driven disc;
- Wear of the clutch driven disc and damper springs;
- Wear of teeth on the spline joints of the driven disk;
- Weakening of the diaphragm spring or breakage of its petals;
- Release bearing failure;
- Chips and depressions on the surface of the flywheel and pressure plate.
With such breakdowns, the clutch moves or sticks, the free play of the pedal increases, and shocks are felt. An increase in vibration may indicate wear on the damper springs that dampen torsional vibrations of the flywheel.
Also, the diaphragm spring of the basket gradually wears out. When pressed strongly, with a long delay, the steel blades of the diaphragm experience increased load, gradually bend, lose their uniform tower shape, and break.
Therefore, beginners are advised to release the clutch pedal at a traffic light, press sharply at the start, set the speed and slowly let it go until the car picks up speed well, and then completely release the pedal.
Tips for prolonging youth
The weakest point in the Corolla that always suffers is the clutch. And before we talk about replacing it, it’s worth talking about how you can extend its life. The first and main thing you should do is try to switch to neutral when you stand at traffic lights or in a traffic jam for a long time. In addition, for this type of clutch it is necessary to change the oil every 60,000 kilometers, and not as provided for in the technical passport of the car. Performing such actions will help prolong the youth of this technical unit. However, all this is not for long, up to a maximum of 150 thousand mileage. After this, hums and malfunctions will gradually appear; they can only be eliminated by replacing the robot.
Clutch replacement
On a Toyota Corolla, replacing a faulty manual clutch begins with the purchase of suitable parts and consumables. You will also need a set of tools, the help of a partner or a lifting device, as well as support if you carry out the procedure yourself.
Original clutch: article number, price + analogues
If you buy an original clutch package as a set with a clutch disc, basket and release bearing, the price for a set of original Aisin components will be about 10,000 rubles (product code KT-316A). You can also choose cheaper analogues: NIPPARTS (N2012007) or BLUE PRINT (ADT 330255) with an approximate cost of 6,000 and 9,000 rubles, respectively.
Tools and equipment
Before work, prepare a set of necessary tools and devices for dismantling the box:
- a torque wrench with a set of heads and extended wrenches for unscrewing bolts in hard-to-reach places. Also prepare open-end wrenches; they may be needed if, when unscrewing, the fasteners will spin and, in order to unscrew them, you will need to fix the fasteners on the reverse side;
- set of screwdrivers, hammer, pliers;
- large pry bar with flat end;
- a traverse, a winch or a device of similar function that can hold the gearbox and engine;
- jack for dismantling the drive wheels;
- something like a stand for the lower part of the gearbox (a hydraulic gearbox puller is best).
All of the above are just basic tools and devices. In the process of dismantling the box and replacing the clutch, you will need a lot of auxiliary equipment.
Hanging methods and safety measures
When replacing the clutch, you will need comfortable access to the underbody of the car. Otherwise it is impossible to dismantle the box. If the car owner has a well-equipped garage with an inspection hole, it is enough to fix the car over the hole and get to work.
In this case, important safety measures will be to prevent spontaneous movement of the machine. Therefore, after installing the car in the appropriate place, do not forget to turn on the parking brake, and for additional security, place anti-rolling shoes under the wheels.
Clutch pedal play
If there is no hole or lift, use the option of lifting the car with jacks. To do this you will need 4 jacks. You should jack up the car evenly on all four sides, when you raise the vehicle to a height acceptable for lower work, place wooden safety bars under the side members so that if it comes off the jack, the car will not collapse.
Disconnecting components, cables, removing drive shafts
To get to the clutch and replace the assembly, you will have to completely remove the box. Start removal under the hood and then continue under the car.
Under the hood
- Disconnect the negative terminal wire from the battery.
- Remove the air filter pipe by unscrewing the clamp on it. Then open the cover of the air cleaner housing, pull out the filter element, unscrew and remove the plastic filter housing.
- Remove the expansion tank of the engine cooling system.
- Disconnect the clutch cylinder along with the hydraulic line pipes.
- Disconnect the wire from the reverse light sensor switch, which is located on top of the transmission.
- Remove the ground wire on the gearbox by unscrewing the mounting bolt.
- Remove the cable from the gear shift levers. To do this, remove the mounting pins with small pliers and remove the washers.
- Remove the gearbox cable rods from the bracket, and also disconnect the plugs of all wires that are connected to the internal combustion engine and the gearbox. Next, attach the cables and wires to the top with wire so that they do not interfere.
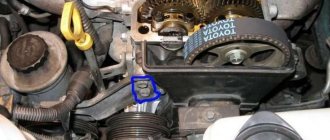
- Unscrew the three bolts (2 on top, 1 on front) connecting the engine and gearbox.
- Unscrew the left engine block support cushion.
Toyota Corolla Clutch
Toyota Corolla and Auris are equipped with a dry-type single-plate clutch with a central diaphragm spring.
Pressure plate
mounted in a stamped steel casing 3, bolted to the engine flywheel.
Driven disk
5 is installed on the splines of the gearbox input shaft and is clamped by a diaphragm spring between the flywheel and the pressure plate.
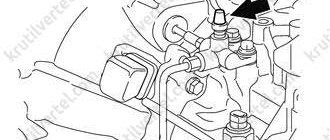
Clutch release bearing A is a closed type that does not require lubrication in operation, mounted on a guide sleeve pressed into the hole in the clutch housing. The guide bushing is a non-separable unit that includes an oil seal and a front bearing of the input shaft. The bearing is mixed by clutch release fork B, mounted on a ball joint screwed into the clutch housing. The fork is inserted into the grooves of the bearing coupling without additional fastening.
Toyota Corolla Clutch
and its release drive: 1 — clutch release fork; 2 — clutch release bearing; 3 — clutch housing with pressure plate; 4 — working cylinder of the hydraulic clutch; 5 — driven disk The free arm of the clutch release fork, sealed 8 with a rubber boot on the clutch housing, is acted upon by the working cylinder of the hydraulic clutch release drive.
Toyota Corolla clutch replacement
If the clutch fails, we recommend replacing all its elements at the same time (driven and driven discs, clutch release bearing), since replacing the clutch is labor-intensive, and the service life of undamaged clutch elements has already been reduced, therefore, if they are installed again, the clutch may need to be replaced again after a relatively short mileage.
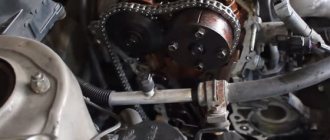
You will need: an 11" wrench (a socket head is more convenient), a screwdriver, and a mandrel for centering the driven disk. 1. Remove the gearbox If you are installing the old pressure plate, mark in any way (for example, paint) the relative position of the disc housing and the flywheel in order to install the pressure plate in its original position (to maintain balance). 2. While holding the flywheel from turning with a screwdriver (or mounting blade), remove the six bolts securing the clutch pressure plate housing to the flywheel. Loosen the tightening of the bolts evenly: each bolt one turn of the key, moving from bolt to bolt along the diameter. This is where the bolts securing the clutch housing to the engine flywheel are located 3. Remove the clutch pressure and driven discs from the flywheel, holding the driven disc. 4. Inspect the clutch driven disc. Cracks on the parts of the driven disk are not allowed. Check the degree of wear of the friction linings. If the rivet heads are recessed by less than 0.2 mm, the surface of the friction linings is oily or the rivet joints are loose, then the driven disk must be replaced. 5. Check the reliability of the dampers in the driven disk hub sockets by trying to move them by hand in the hub sockets. If the dampers move easily in their seats or are broken, replace the disc. 6. Check the axial runout of the driven disk if warping is detected during visual inspection. If runout exceeds 0.5 mm, replace the disc. 7. Inspect the working friction surfaces of the flywheel and pressure plate, paying attention to the absence of deep marks, burrs, nicks, obvious signs of wear and overheating. Replace defective components. 8. If the rivet connections A of the casing parts and the pressure plate are loosened, replace the pressure plate assembly. Using an external inspection, evaluate the condition of the diaphragm spring B of the pressure plate. Cracks on the diaphragm spring are not allowed. Places B of contact between the spring blades and the clutch release bearing must be in the same plane and have no obvious signs of wear (wear should not exceed 0.8 mm). Otherwise, replace the pressure plate assembly. 9. Inspect the connecting links of the casing and disk. If the links are deformed or broken, replace the pressure plate assembly. Using an external inspection, evaluate the condition of the pressure spring support rings. The rings should not have cracks or signs of wear. Otherwise, replace the pressure plate assembly. 10. Before installing the clutch, check that the driven disk moves easily along the splines of the transmission input shaft. If necessary, eliminate the causes of jamming or replace defective parts. 11. Apply refractory grease to the drive hub splines. 12. When installing the clutch, first install the driven disk using a mandrel, and then install the pressure plate housing on the three centering pins and screw in the bolts securing the housing to the flywheel. Screw in the bolts evenly, one turn of the key each, alternately moving from bolt to bolt in diameter. The tightening torque of the bolts is 19 Nm (1.95 kgfm). Install the driven disk so that the protruding part of the disk hub (shown by the arrow) is directed towards the clutch housing diaphragm spring. 13. Remove the mandrel and install the gearbox. 14. Install the clutch release cylinder to the gearbox.
REPLACING THE CLUTCH RELEASE BEARING AND FORK When replacing the clutch release bearing due to noise, check the condition of the drive disc pressure spring lobes. If the ends of the petals are severely worn where they contact the bearing, replace the drive disc assembly. The clutch release bearing, assembled with the clutch, is mounted on a guide sleeve and connected to the clutch release fork. The fork is inserted all the way into the blind grooves of the bearing clutch and rests on a ball joint screwed into the clutch housing. The fork is fixed in a certain position by its corrugated rubber cover inserted into the clutch housing window. 1. Remove the gearbox 2. Disengage the spring clip and remove it.
3. Moving the clutch release bearing forward along the guide sleeve, remove the fork from the grooves of its clutch and remove the bearing. 4. If it is necessary to replace the clutch release fork, remove its dirt cover from the hole in the clutch housing and remove the clutch release fork from the ball joint. 5. Lubricate with a thin layer of refractory grease the outer surface of the guide bushing, the gearbox input shaft splines, the clutch release fork ball joint... 6. ...the surfaces of the fork in contact with the ball joint... 7. ...and with the clutch release bearing clutch. 8. Install the clutch release fork and the new bearing assembly with the clutch (making sure that its rotation is smooth and quiet and that there are no backlashes) in the reverse order of removal. Additional fixation of the release fork on the bearing clutch and ball joint is not provided, therefore, after installing the fork and bearing (and especially after installing the gearbox), do not turn the fork in a vertical plane, as it may disengage with the grooves of the clutch.
REPLACING THE CLUTCH RELEASE DRIVE FOR A ROBOTIC TRANSMISSION 1. Remove the battery 2. Unscrew the two bolts securing the bracket for the cooling system pipes and move the bracket to the side. 3. Remove two bolts on the left and right sides of the battery plate mounting and remove it.
4. Disconnect the wiring harness connectors from the clutch travel sensor... 5. ... and the clutch drive motor. 6 Remove the three bolts and remove the clutch drive. 7 Install the clutch drive in the reverse order of removal, taking into account the following: — move the clutch drive assembly to the left side of the car so that the protrusion on the rod nut fits into the recess on the clutch release fork; — tighten the three fastening bolts to a torque of 17 Nm in the sequence shown in the photo.
REPLACING THE CLUTCH RELEASE DRIVE FOR A MANUAL TRANSMISSION You will need: “10”, “12” wrenches, a special “10” wrench for loosening the brake pipe nuts. 1. Remove the battery 2 Remove the two bolts securing the bracket for the cooling system pipes and move the bracket to the side. 3. Remove two bolts on the left and right sides of the battery plate mounting and remove it. 4. Remove the bolt and disconnect the clutch drive pipe clamp. 5. Unscrew the nut securing the clutch tube to the clutch slave cylinder, using a special wrench for brake pipe nuts. 6. Disconnect the tube from the cylinder by plugging the hose hole, for example, with a bleeder valve cap.
7. Remove the two bolts and clutch slave cylinder. 8. Install all parts in the reverse order of removal. After this, bleed the clutch slave cylinder
REPAIR OF THE PEDAL ASSEMBLY If the pedals squeak or jam on the axle, disassemble and repair the pedal assembly.
Toyota Corolla pedal assembly
: 1, 5 — clutch pedal pads; 2 — bushing for the clutch master cylinder rod; 3, 6 — clutch pedal bushings; 4 — clutch pedal spring; 7 — clutch pedal; 8 — clutch pedal switch; 9 — clamp; 10 — clutch master cylinder rod fork; 11 — clutch master cylinder rod fork pin; 12 - bolt; 13 — plate with nut; 14 — clutch switch; 15 — clutch pedal pin; 16 — clutch pedal limit bolt; 17 — nut securing the clutch pedal bracket; 18 — nut securing the clutch pedal limit bolt; 19 — fastening nut; 20 — clutch pedal bracket; 21 — nut securing the clutch pedal pin; 22 — clutch pedal pad
1. Remove the lower decorative panel of the instrument panel 2. Disconnect the wiring harness connectors from switch 8 (Fig. 6.2) of the clutch pedal and clutch switch 14. 3. Remove the clamp 9 and pin 11 of the clutch master cylinder rod fork. 4. Unscrew two nuts 17 (only one is visible in the figure), unscrew bolt 13 and remove the clutch pedal bracket as an assembly with the pedal. 5. Remove the clutch pedal limit bolt 16 from the clutch pedal bracket assembly. 6. Remove spring 4 of the clutch pedal. 7. Unscrew nut 21, remove pin 15 and remove the pedal from the bracket. 8. Remove bushings 3 and 6 from the clutch pedal. 9. Remove cushions 1 and 5 from the clutch pedal. 10. Using an 8mm hex socket and a hammer, remove fork bushing 2 from the clutch pedal assembly. 11. Unscrew nut 19 and remove clutch pedal switch 8 from the clutch pedal bracket. 12. Reassemble the pedal assembly in the reverse order of disassembly. Lubricate the pedal axle and their bushings with a thin layer of grease. If necessary, install a new clutch pedal return spring. REPLACING THE MASTER CYLINDER OF THE CLUTCH RELEASE DRIVE You will need: a “10” wrench, a “13” socket head, a special “10” wrench for pipeline nuts, an extension cord, a wrench, and pliers. 1. Unscrew the reservoir cap and pump out (for example, using a large medical syringe) the brake fluid from the section of the master cylinder reservoir that supplies the hydraulic clutch release actuator. The reservoir, common to the brake and clutch master cylinders, is divided into three separate sections: two for separate brake hydraulic circuits and one for the clutch hydraulic drive. 2. Using pliers, compress the ears of clamp 2 (Fig. 6.3), slide the clamp along the pipe of the clutch master cylinder and disconnect the pipe from the master cylinder. 3. Unscrew the nut securing the clutch pipeline tube to the master cylinder and move the tube to the side. 4. Under the instrument panel 8 inside the car, disconnect the master cylinder pusher 5 from the clutch pedal. Unscrew the two nuts 6 securing the clutch master cylinder to the body and remove the master cylinder. 6. Install the parts in the reverse order of removal and remove air from the hydraulic drive 7. Check the operation of the drive and, if necessary, adjust the clutch pedal travel BLEEDING THE HYDRAULIC DRIVE OF THE CLUTCH
Clutch master cylinder
: 1 — clutch master cylinder pipe;
2 - clamp; 3 - clamp; 4- clutch master cylinder rod fork; 5 — bracket; 6 - nut; 7 — clutch master cylinder rod fork pin; 8 — clutch drive pipeline; 9 — clutch master cylinder If, when the pedal is pressed all the way, the clutch does not disengage completely (“drives”), which is accompanied by a characteristic grinding of gears when shifting gears, air may have entered the clutch release hydraulic drive.
Remove it by bleeding the hydraulic drive. In addition, pumping is performed when filling the hydraulic drive with liquid after replacing it or repairing system components associated with its depressurization. You will need: brake fluid, bleeding hose, 10mm wrench, container for drained fluid. 1. Check the level of working fluid in the master brake cylinder reservoir (the reservoir is common to both master cylinders) and, if necessary, bring it to normal. 2. Remove the protective cap from the clutch slave cylinder bleed valve. 3. Place a hose on the valve and lower its end into a container with a small amount of brake fluid. Have an assistant press the clutch pedal four to five times at 2 to 3 second intervals and then hold it down. Turn the valve 3/4 turn. Liquid with air bubbles will flow out of the hose into the container. 4. Close the valve and ask an assistant to release the clutch pedal. 5. Repeat operations 3 and 4 several times until liquid begins to emerge from the hose without air bubbles. While bleeding the hydraulic drive, periodically check the fluid level in the clutch master cylinder reservoir. Do not allow the fluid level in the reservoir to drop below the “MIN” mark on the wall of the reservoir. Add fluid in a timely manner, otherwise when the bottom of the tank is drained, air will enter the system and pumping will have to be repeated again. 6. Close the valve, put on the protective cap and, if necessary, add fluid to the clutch master cylinder reservoir. CHECKING AND ADJUSTING THE CLUTCH RELEASE DRIVE
You will need: keys “7”, “12”, “13” (two), a screwdriver, a ruler. 1. To measure the full travel of the clutch pedal, measure the distance from the pedal pad to the floor without pressing the pedal. 2. Press the pedal all the way and repeat the measurement. The difference between the two measurements is the full travel of the clutch pedal, the nominal value of which is 143-145 mm. If the pedal stroke differs from the nominal value, it must be adjusted 3. Loosen the lock nut of the adjusting bolt on the pedal assembly, rotate the bolt to achieve the required value of the full pedal stroke and tighten the lock nut 4. In order to determine the free play of the clutch pedal, measure the distance from the initial position of the pedal to a position in which an increase in resistance is felt when you press the pedal with your hand. The nominal free play of the clutch pedal is 5-15 mm. If the free play is different from the nominal value, adjust the length of the clutch master cylinder pusher. 5. . Loosen the lock nut... 6. ... by rotating the pusher by the flat, adjust the free play of the pedal and tighten the lock nut
Tags clutch, Toyota Corolla
How to change the clutch on a robot
The replacement is the same for all manual transmissions (2180, 2190 and 2181) after removing the box.
Equipment and tools
The clutch is replaced after removing the box, which requires the following:
- inspection pit or lift;
- wheel chocks (when working on a pit or overpass);
- a set of wrenches (open-end wrenches, socket wrenches, socket wrenches, balloon wrenches, as well as special bits), a mounting blade or long chisel, a hammer, pliers;
- jack;
- safety stands for securing a car with removed wheels and telescopic stands for supporting a dismantled gearbox and engine with partially removed mounts when working on a pit, overpass or lift;
- container for used oil.
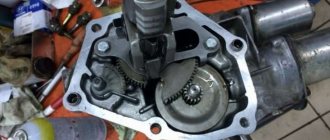
Clutch Actuator
Before dismantling the box, it is necessary to remove both actuators, which is carried out according to the same principle.
How to disable and remove the clutch actuator
To remove the clutch actuator, you will need to unscrew the mounting screws holding it to the gearbox using a Torx30 L-shaped wrench (asterisk) or an appropriate bit. To do this you need:
- De-energize the car's electrical system by opening the ground.
- Remove the air filter, remove the mudguards and the engine crankcase protection from below to provide access to the mounting screws.
- Pressing the connector latches with your fingers, disconnect it from the actuator.
- Unscrew the 3 mounting screws and pull out the actuator.
If necessary, lubrication will need to additionally unscrew the 9 screws securing the cover.
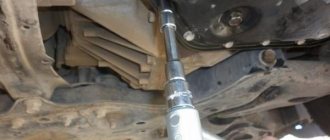
How to remove the gearbox
After removing the actuator, work continues under the bottom of the car:
- The front wheels are removed and the hub nuts are unscrewed.
- The U-shaped arm extension bracket is unscrewed from the front beam.
- The nut is twisted off the steering tip pin and, using a puller, it is pressed out of the socket, disconnecting from the stabilizer link.
- The ball joint and the wheel knuckle assembly are separated, the entire structure is pulled off the splines of the outer CV joint and moved to the side.
- The oil is drained from the gearbox.
- A chisel or mounting blade is inserted into the recess between the housings of the inner CV joint and the box, then several taps are made with a hammer to shift and remove the CV joint from the splined engagement in the box.
- After dismantling the CV joint, a plug or a piece of plastic pipe with a diameter of 30-35 mm is inserted into the hole. If this is not done, then after dismantling the second CV joint, the axle gears will turn and fall into the gearbox housing.
- The second CV joint is removed.
- The protective boot is unscrewed.
- Separate safety stops are placed under the engine and gearbox to prevent movement during removal.
- The starter bolts are unscrewed and it is removed.
- The 2 upper gearbox mounting bolts are loosened, then the lower bolts are unscrewed.
- The box is undocked from the cylinder block by moving it backwards and carefully removed.
Removing the gearbox on a Lada Grant
In this case, it is necessary to exclude the impact of the driven shaft on the clutch basket springs if it does not change.
How to replace and align the clutch
Before installing a new clutch or disc, alignment is required, i.e., aligning the centers of the clutch disc and the hole formed by the sharp ends of the diaphragm spring petals.
To do this, you will need a special mandrel, which is a section of the input shaft, or a specially machined part that exactly copies the shape and dimensions of the input shaft end. By inserting the mandrel into the hole in the center of the basket, achieve alignment between the disc and the spring and attach the clutch basket to the flywheel, gradually tightening the bolts on it with a star. After tightening is completed, the mandrel is removed.
How to train actuators after replacing a clutch
Adapting the Granta clutch to the robot gearbox is not difficult and is carried out according to the following scheme: