The Corolla 150 model line of the Japanese concern Toyota Corolla has become one of the most popular, despite the presence of more modern new products. Reliability and durability became the hallmark of this model, which helped win people's love. But many motorists want to see their favorite car as fashionable and sophisticated as the concern’s cars that have rolled off the assembly line in recent years. Tuning the Toyota Corolla 150 2007 will help you modernize your car. Don’t be afraid of this word and think that the update will cost a hefty sum, because the procedure may not be very expensive compared to the cost of modern models.
"Toy" Corolla 150
Toyota Corolla 150: tuning
Corolla 150 is one of the popular Japanese sedans from 2007-2013. The Toyota company releases a new model of this line every year, but outdated bodies still remain “favorite” and in demand. But how can you make your old car modern? Tuning a Toyota Corolla 150 will give your car an aesthetic and stylish look, and also improve its technical characteristics. Of course, we will talk about the types of tuning available.
Car tuning can be divided into three types: body, interior and chassis. If you want to “pump up” your Corolla 150 at low cost, then make minimal changes: the radiator grille, simple lamps with LED ones, mud flaps and other little things. More expensive improvements include: the chassis, interior and large elements of the outer body.
Read also:
- Toyota Camry 2015 – body and interior tuning
Of course, any tuning entails the expenditure of money and time. But you will be pleasantly surprised by the result of any improvements in your car.
Engine improvement
You can upgrade the dynamic characteristics of the Corolla 150 by changing the settings in the electronic control unit. Otherwise, this procedure is called chip tuning or flashing. Such engine modification helps the 10th generation Corolla:
- increase the power of the unit;
- improve dynamics, since torque, maximum speed and acceleration are higher;
- save fuel;
- get smooth operation of the automatic transmission;
- speed up accelerator response;
- at the start, minimize failures or get rid of them altogether;
- get smooth and dynamic acceleration.
We worked on the technology in the Corolla 150.
But not every motorist can independently update the ECU, since such a procedure requires special knowledge and skills. It is recommended to perform tuning of the Corolla engine in the E150 body at a specialized service, so as not to provoke the occurrence of malfunctions due to your own incompetence.
You can't say anything, it's bright
However, there is a mechanical option for upgrading the Corolla 2008 engine. This is replacing the standard filter with a part from the sports version. The result is a change to a straight-through exhaust, which leads to an increase in power.
Aerodynamic body kits for Toyota Corolla 150
“They greet you by their clothes, and see you off by…”, so it is with our car. First of all, the appearance of your Corolla must meet the best modern standards. Of course, well-chosen body kits will give a sophisticated look, thereby attracting the attention of most car enthusiasts. The details of the body elements emphasize the modern style and relevance of this model range in our time.
Body kits
This is a whole “package”, which consists of four parts: front bumper, rear bumper, spoiler and door sills. The most popular and aesthetic kit today is “RS”.
RS front bumper . The restyled model, which included a number of changes, received smoothed corners, enlarged air intakes, and additional intakes for cooling the brake pads and radiator. In the upper space of the bumper there is a Toyota logo, from which two lines diverge, repeating the arc of the hood. In the center there is a seat allocated for the state. number. The central part is supplemented with intermediate air intakes. There are two holes at the bottom for daytime running lights. A massive skirt located below (serves as a stiffening rib) to protect the body from various impacts.
Tuning the front bumper of Corolla 150
Spoiler RS . A cute and at the same time useful addition to the roof of your car. The spoiler is made in the RS style and fits perfectly into the kit. Attaches to the trunk roof using self-tapping screws or special sealant. In addition to adjusting the upper design, this element contributes to good aerodynamics while riding.
Tuning: spoiler Corolla 150
Door sills RS . The set of side trims fits perfectly and complements the design. Components that add aggressiveness and sporty appearance to the car. In addition, they protect the lower part of the body from contamination. They are installed on standard mounts (no additional changes to the body are required). The thresholds are made of high-quality ABS plastic.
Tuning: door sills for Corolla 150
RS rear bumper . The rear bumper trim is an integral element of tuning in the style of Toyota Corolla RS. Gives an aggressive look to the rear of the body and visually reduces ground clearance. Attached with a special adhesive sealant.
Tuning the rear bumper of Toyota Corolla 150
Body parts
For tuning with your own hands and in your own style, you can select individual body parts. Today the market offers a wide selection of body accessories:
- front (rear) bumper and front (rear) bumper covers,
- sills and fender arches,
- radiator grilles,
- cilia,
- linings on the hood, mirrors, front fenders and roof,
- deflectors/fairings of body elements,
- spoilers and visors on the rear window,
- meshes in body parts,
- door seals, noise and vibration insulation,
- body protection elements.
And this list goes on and on. The main thing in tuning is not to go too far, but to do everything with taste.
Installation of protective fender liners (lockers)
Another example regarding tuning the body of the Toyota Corolla 150 is the installation of plastic fender liners. These components are required to extend the life of the car body. Note that corrosive wear always appears where damage occurs from sand or gravel while driving.
This tuning helps absorb the noise in the cabin that is generated when water, snow, and gravel are thrown off the wheels.
- First, the front part of the car is raised using a jack, where the first fender liner is installed. In this case, it is better to use a regular jack, but with an enlarged, soft washer. It is advisable to insure yourself with another additional item for safety in the event of a jack failure. For example, a wooden beam of appropriate height with an emphasis on a heavy object.
Next, the mounting screws for the mudguard are unscrewed. A 10mm wrench will do. Using a regular screwdriver, remove the locker clips on the outer edge of the arch. To remove them, you need to turn them at an angle of 90° and pull them out using pliers.
Plastic dowels are removed using self-tapping screws of suitable size, then they are pulled out with pliers. They should not be left, as this may result in parts falling out inside the body.
Using the wrench used to remove the mudguard mounting screws, you now need to turn the locker away from the front panel. The clips loosen and remove the front door and engine compartment recess covers.
All surfaces under the wing, including the arch above the wheel, are treated with soundproofing mastic. But before this, the surface is degreased with paint solvent or acetone. At the same time, the locker is also treated with mastic.
Interior tuning of Toyota Corolla 150
The next stage is creating convenient and comfortable movement. Internal tuning is like renovating an apartment. Isn’t it nice to live in a nice and well-kept room, where every element is well chosen and functions for your benefit? Simple and low-cost accessories that will serve in your car include: an addition to the trunk, floor mats, seats, a steering wheel cover (or braid) and much more.
Interior tuning of Toyota Corolla 150
Additions to the trunk
Trunk mat for Corolla 150
More on the topic:
- Spare parts for trucks
Polyurethane mat - for a neater appearance and convenient cleaning of the trunk. Made from quality materials. Made to match the trunk relief.
The trunk net is one of the additional elements of the trunk, which in different situations provides convenient operation of the cargo. The mesh is stretched over the entire volume of the trunk, thereby creating additional sides. It is made of nylon material. Has four fastenings.
Floor mats
Interior mats for Toyota Corolla 150 will make the interior more elegant. The choice of design and quality of rugs depends only on you. Rugs have different shapes. A well-chosen accessory will help you quickly clean the interior. When choosing, pay attention to the height of the “sides” and the shape of the patterns. The higher the “side” and the more regular the pattern (it should “reflect” the lower surface of the seats), the better your floor will be protected from dirt.
Wool or fabric rugs are perfect for the summer. But they have a big problem with water resistance. Therefore, it is still recommended to use polyurethane.
Seats
Bucket seats for Corolla 150
"Buckets." For those who love a sporty lifestyle behind the wheel, it is proposed to replace the driver and passenger seats with “buckets”. “Bucket” is a sports seat made in “anatomical” shapes. It allows you not only to feel comfortable behind the wheel, but also with the help of special belts increases safety while driving.
Seat covers and jerseys. If you want to not only keep the appearance of the seat in “new” condition, but also make the interior fresher and more interesting, you should purchase covers or T-shirts.
Pricing policies are very different. As practice shows, the price for T-shirts is much lower than for covers. But no one will say that T-shirts are worse than covers. It is best to choose according to your budget and taste.
Installation of high pressure washers
Why are washers a necessity? In inclement weather or when snow melts, the headlights sometimes become so splashed that the driver has to stop to clear them, otherwise the road simply cannot be seen. As follows from the description, washers increase driving safety at night.
READ MORE: Tuning a Toyota Corolla 120 body In an auto shop, you can order a similar mechanism in several options:
The first mechanism on the Toyota Korola 150 brand repeats the work of wipers and glass washers. The second device is more effective: a stream of water is directed onto the entire surface of the “lights” using a special nozzle. The high pressure washer device consists of the following components:
- Pump to create the required pressure.
- Water tank.
- Connecting hoses.
- Injectors.
- Control block.
The tank is a small reservoir for water needed to clean the headlights. The main washer reservoir and an additional part are used, which is fixed immediately under the hood or bumper of the Toyota Corolla body. This part is not included in the kit and will have to be purchased separately.
Pump - creates the required fluid pressure. The operating principle is similar to the pump that works to clean the windshield. To drive the pump, control signals are sent to it.
Connecting hoses - ensure the operation of all connecting units. The only thing is that the owner of the Corolla 150 needs to select the minimum hose length for this part of the body.
Nozzles - the reliability of the headlight washer depends on this component, since the main function of the nozzle is to determine the direction of the jet. In this case, nozzles for a spherical bumper are selected, since this is the type that the Corolla 150 model has. Using the latest technology, a telescopic version of the injectors is made; they are hidden under the car bumper, so only their cover is visible. When they are installed, the overall appearance of the 150 model’s body remains virtually unchanged.
Telescopic nozzles extend according to a signal transmitted by the control unit using a hydraulic piston. Water is sprayed onto the headlights, after which the mechanism removes them again under the bumper.
Control unit - you can use various methods, but the most effective choice is a button on the steering wheel that sends a signal through a relay to the pump. This is how arbitrary control is carried out, working autonomously from the headlights. READ MORE:
Tuning a 2014 Toyota Corolla car You can install injectors on a Toyota Corolla 150 with your own hands, following the manufacturer’s instructions. However, remember that you need to look for a water tank in advance and determine a place to mount it. Otherwise, installation of an additional pump will be required. Sometimes for tuning you have to temporarily remove the plastic bumper of the 150 model for correct installation.
Using a headlight washer itself is almost no different from using a windshield washer. Follow these rules if you want the mechanism to work as long as possible:
- Clean water or a special liquid is added to the reservoir. If debris or dirt gets in, the water outlet holes become clogged and instead of the required amount, a weak stream is released, which does not provide much of a cleaning effect.
- For better cleaning, a special agent is added to the water.
- In winter, it is advisable to add antifreeze.
- Turn on the washer periodically even in dry weather. This will extend its service life.
- Sometimes you should check the fastening of the components.
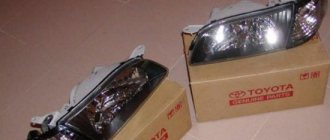
Toyota Corolla 150: optics
Good road lighting is the key to safe driving. Tuning headlights or replacing front optics will provide excellent visibility at night. Such improvements include: xenon lamps, protective film and complete replacement of optics.
Installation of xenon headlights
Xenon headlights Corolla 150
Before purchasing a set of xenon lamps, you need to make sure of their quality. Good xenon lamps cost from 8000-1000 thousand rubles. You can do the installation yourself, but it is better to trust the professionals. It is recommended to install IPF hid XD41 xenon on the Corolla 150 body. The kit includes wiring and a 15A fuse. This model is perfect for the Toyota Corolla 150 in all respects.
Installing modules
Headlight modules for Corolla 150
The module is an alternative optics that is installed regardless of the factory headlight. To be more precise, the factory optics are completely removed, and a module is attached in its place. In total, 3 types of modules are offered for the Corolla 150: high beam, low beam and side light module. As in the photo of Toyota Corolla tuning, you can see that the module is a separate lamp, which is mounted at a distance from each other. When installing alternative optics, pay attention to the fact that the module comes complete with a lens. A popular manufacturer of this type of optics is Hella.
Film for optics
Film for headlights Corolla 150
Headlight film is one of the inexpensive ways to add individuality to your car. It performs both aesthetic and protective functions. The film can be purchased in any color and format. According to the characteristics, great preference is given to light colors. Because the loss of lighting is no more than five percent. Accordingly, dark colors absorb light. The film can be applied at home or at any service.
Salon
When tuning the interior of a Toyota Corolla, the standard sound insulation is improved by treating the body with soundproofing materials and mastics. In the same way, the soundproofing layer of the hood, trunk, and walls separating the engine compartment and luggage compartment from the car interior is improved. The car's acoustic system is also being modernized: instead of the standard audio system, a more functional multimedia is installed, a multi-option touch screen appears on the dashboard, the speakers are changed to more powerful ones and equipped with a car subwoofer for deep and clear bass sound.
When reupholstering the cladding, they strive to achieve a harmonious and stylish design. To achieve this, the upholstery materials are changed to more expensive ones, and the elements of the dashboard, seats, and interior body lining are made in two or three colors.
Inside the Corolla, the standard lighting is tuned: interior lamps are replaced with LEDs, LED lighting is installed in the glove compartment and on the doorways.
Installation process of xenon headlights
The cost of one set of xenon lamps for tuning starts from about 8,000 rubles. You can find more expensive options. The set contains a special block suitable for the polarity of Toyota vehicles. It is not recommended to buy xenon lamps of a different polarity for tuning, since a different set may not last long.
For convenience, the car is driven into a pit. Then the boot is unscrewed. You should carefully examine the plane of the body, where there are holes with a diameter of approximately 8 millimeters; two of them need to be used. Through these holes, the low light units and fog lamps are fastened. The work requires a delicate approach, since there is a high probability of dropping the bolt for attaching the bracket with blocks.
Tuning of xenon lamps is carried out according to these instructions:
- According to the diagram, you should make brackets for the side members, taking into account that the top point of the bracket should be under the headlight with a gap of 2-3 mm, but not lower or higher, since it will not fit into its place.
After the brackets are made, they are fixed to the blocks. Next, the wires are connected to the sides, which is not difficult. Choose xenon on a website or in a store selling car parts carefully. The IPF hid XD41 model is suitable for the Corolla 150. It is advisable to buy two sets, for use and for stock. Xenon wires are long. The wiring is equipped with a 15 amp fuse, which is perfect for cars. If we talk about the blocks, we note that they are housed in a good casing made of high-quality plastic. The wiring is well insulated and ready for immediate assembly.
The blocks are connected to the system. Then the lamps installed instead of halogen are replaced. For those who are doing xenon tuning with their own hands for the first time, it is not easy to do such work, but it is possible using the instructions for use. To begin with, the bumper is unscrewed and removed, then the headlights are removed and the xenon is carefully inserted. After the headlights are installed in the optics, the fog lights should be inserted. And everything is assembled in reverse order. There is nothing complicated, but you will have to tinker.
Changing brake discs
When making modifications to the design of the Toyota Corolla, the brakes are tuned. This is due to the fact that the standard braking system may not withstand the increased load on it after increasing engine power and replacing the suspension. To change brake discs on a Toyota Corolla, use the following set of tools:
- Spanners.
- Compression bottle.
- Jack.
- “Shoes” necessary to secure the wheels in a stable position.
- Solid oil and machine oils.
To replace brake discs on a Toyota Corolla, the following measures are taken:
- Brake fluid is pumped out of the cylinder. A syringe is used for these purposes. When tuning a Toyota Corolla, you can save a little on buying new brake fluid. However, the old one can only be used if it has not lost its transparency. The technical liquid is poured into a clean and dry container and covered with a lid.
- Stops are placed under the rear wheels of the Toyota Corolla. The “boots” secure the raised car body. Next, proceed to dismantling the front wheel. To increase the stability of the car, the front part of the Toyota Corolla e120 or e150 is fixed with bars. This is necessary to comply with safety regulations: if you do not use additional stops, there is a risk that a car falling off the jack will crush the driver during work on replacing brake discs.
- After completing the preparation, they proceed directly to tuning the car brakes. The caliper bolt is unscrewed from below, it is lifted and turned on the upper bolt, and then fixed with wire. In some cases, it is difficult to turn the caliper: to do this, slightly unscrew the bolt located on top.
- The linings are removed and the lower bolt is finally dismantled, the caliper is disconnected from the fastening element. As a result, the part remains hanging on the cord.
- The steering wheel is turned towards the removed wheel, then the fasteners (bracket) are unscrewed.
- The freed mounting holes are cleaned of dirt and dust, degreased, and bolts of the M8 modification are screwed into them.
- A new brake disc is put on the wheel hub, then the mounting bracket is screwed on.
- The bolts are lubricated.
- The brake piston is lowered into the cylinder.
- Return the steering wheel to its original position.
- Screw the wheel and lower the jack. Remove the front bars.
When tuning a car's brake system, the factory calipers are replaced with parts made of ceramics. They are not cheap, however, their use increases the braking ability of the car in critical situations on the road, and the wear of the brake disc is reduced by 80%.
Installation of protective fender liners (lockers)
Another example regarding tuning the body of the Toyota Corolla 150 is the installation of plastic fender liners. These components are required to extend the life of the car body. Note that corrosive wear always appears where damage occurs from sand or gravel while driving.
This tuning helps absorb the noise in the cabin that is generated when water, snow, and gravel are thrown off the wheels.
- First, the front part of the car is raised using a jack, where the first fender liner is installed. In this case, it is better to use a regular jack, but with an enlarged, soft washer. It is advisable to insure yourself with another additional item for safety in the event of a jack failure. For example, a wooden beam of appropriate height with an emphasis on a heavy object.
- Next, the mounting screws for the mudguard are unscrewed. A 10mm wrench will do. Using a regular screwdriver, remove the locker clips on the outer edge of the arch. To remove them, you need to turn them at an angle of 90° and pull them out using pliers.
It is much easier to install the rear fender liners on the body of the Corolla E150, since the protection is attached in production using plastic screws. In addition to the tuning described above, you can also change rims, install other body kits and much more.
Source