After purchasing the car, I started reading articles on Drive about who improved and upgraded their favorites and how. The next step towards beauty, I decided to bleed the tidy. Since I had everything I needed...
Hello everyone! A week ago I started installing signals from the Volga, headlights, as well as installing nets in the bumper. In general, the main task was to install headlights and signals, but along the way thoughts about installation appeared...
Removed daytime running lights. Over time, contact began to disappear and it was decided to remove them altogether.
Everything fell into place. But I had to stretch the wiring from the left rear light to the central lights, because... The standard has only a reverse gear and a fog lamp on the roof of the trunk, which had to….
Hi all! Once I drove into the parking lot of a shopping center: And then I realized that my SUV is too high for the city... We run to the VK technospring group, order -50 springs there, and message them for a week...
Having driven past our beloved traffic police officers a couple of times, I realized, glancing at the dashboard, that I was driving without light. They never stopped me, they just followed me with their eyes. A habit from the previous car, there were d….
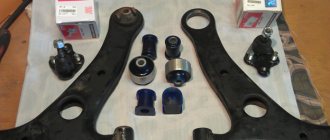
I have already made spacers for the rear calipers a long time ago and bought discs and pads, but I just couldn’t find the time to finish them. And so, a couple of days ago I decided to tackle this issue. And this morning I saw Dan...
Hello. About a week ago I started working on the car, because in the winter cold there was no desire to do anything, as soon as warm days arrived I began my tuning. At the beginning of the journey, I didn’t even think that there would be so much….
My first entry. You have to try it like this. There was a small accident and that’s where the whole tuning began.
When maybe just a meter was not enough. two. And the car would be intact... It’s not true that everyone lacks t....
I set the cruise. I thought for a long time whether I needed it or not. But I took it anyway.
I took it a month ago. And I tried it out right away. My wife and I went to visit our parents in the Rostov region.
Well, let's put it this way. A section from Asters….
Hi all! So gas equipment (propane) has been installed. The Corolla will be my third propane car.
I have a lot of experience in this matter. 4th generation equipment from OMVL. For installation...
I’m slowly moving towards turning 4zz into 1zz, I found people who had already done the conversion, talked, even took one for a ride))) I liked it... To begin with, I decided to do something small: change the throttle, intake pin... Hello dear forum members))). I want to put together a circuit to turn on the low beam when the engine is running. There is an auto mode light switch and a start stop button.
I've been wanting a set like this for a long time. I read a lot, watched commercials. And in one of the articles about the 160th Corolla, I saw a phrase something like this: “.
The torsional body has become 20% stiffer. “. And I did it for myself...
Hello everyone who is reading. I decided to replace the front windshield a long time ago and came across a fully heated windshield. Bought.
While there are still seals, both 1400 top and bottom have come out. Lobovukha from kmk thickness….
While waiting for bi-ice lenses, Luma X thought about replacing the rear lights, because they have been frustrating me for a long time, especially after I saw the diode versions. I climbed onto Avito and came across an incomplete flashlight....
“Please do not shoot the pianist. “He is doing his best.” (C) “Following up” on the entry about the brightest reverse lamp, I am publishing a photo “how it really shines.” — I took photographs from one point, standing at the right... FirstPreviousNextLast
The Corolla 150 model line of the Japanese concern Toyota Corolla has become one of the most popular, despite the presence of more modern new products. Reliability and durability became the hallmark of this model, which helped win people's love. But many motorists want to see their favorite car as fashionable and sophisticated as the concern’s cars that have rolled off the assembly line in recent years. Tuning the Toyota Corolla 150 2007 will help you modernize your car. Don’t be afraid of this word and think that the update will cost a hefty sum, because the procedure may not be very expensive compared to the cost of modern models.
Exterior tuning
Conventionally, the modification of the car is divided into 3 parts:
- exterior – modification of the body, updating of optics;
- interior – making comfortable changes in the interior and using innovative technologies;
- a technical part, updating of which allows you to increase the power and dynamics of the car without excessive consumption of fuel.
Most owners of the 2008 Corolla 150 do not go further than body tuning. Having installed aerodynamic body kits, which are usually sold as a whole package, and also updated the optics, they prefer to leave everything that way. However, the presence of a fairing on the Corolla 2009, door sills, a bumper with smoothed corners or a spoiler on the trunk will already change the appearance of the car. But you can add a few more highlights.
How do you like this Corolla 150?
Masters from professional tuning studios rarely ignore the rims of the 2010 10th generation Corolla. It’s difficult to compete with them when it comes to modifying a car, but you can take some points into account. The original wheels are replaced with 16- or 17-inch products made of lithium or titanium alloy. Additional lighting under the bottom in the dark will give the car a mysterious and mystical look. There is a simpler option - these are paintable discs, onto which a marbled texture, rainbow stains or any other pattern are applied.
Unusual wheels for Corolla 150. Do you like them?
When using various accessories to tune the body of the Corolla 150 2011, you should know when to stop so that instead of modernizing the car, it does not turn into a laughing stock. Therefore, it is advisable to purchase ready-made kits to modify the exterior.
Conclusion
How do you like this Corolla 150?
Tuning the 2010 Corolla 150 will help improve dynamic performance and make its appearance more modern. After all, given the reliability, high maintainability and unpretentiousness of the model, it can serve for a long time. Therefore, by spending a small amount on car tuning, you can become the owner of a modern, powerful and unique car.
We improve headlights, safe movement on the roads
The life and safety of all road users depends on high-quality road lighting.
Experts recommend periodically replacing Corolla headlights if they become scratched or scuffed, as their presence will interfere with the clarity of the illumination. You can install exactly the same light sources as they were, but it is better to tune the optics on the 10th generation Corolla 2013.
Really beautiful opticsUpdating optics can be divided into several stages:
- Replacing light bulbs is the simplest and most affordable tuning option. Instead of conventional light sources, you should choose xenon or LED ones. For example, Led star is an excellent solution for replacing standard lamps with more modern lighting devices.
- Installing modules instead of the factory headlight. Modular optics consists of 3 types of sections: side lights, high beam and low beam. When choosing, you should pay attention to the manufacturer and equipment. The most popular modular headlights are eagle eyes, which come with a lens included.
- Protective decor that is attached to the lamp itself - a colored film that protects parallel glass from minor damage - or next to it, like eyelashes on headlights.
As you can see, tuning optics is both a full-fledged replacement with a better one, and an update of individual elements. After all, decorating brake lights and installing fog lights is only a small part of the changes that are suitable for “optimizing” the lighting fixtures on the 2012 Corolla 150. You can also use not transparent glass, but black sonar headlights, complemented by strips of daytime running lights.
Which optics do you like better, this one or the top one? Don’t forget about the rear lights of the 2011 Corolla 150, because traffic safety also depends on their condition. You can update your turn signals, headlights and brake lights with the help of depo LED headlights, made in a restyling style.
Interior tuning
Luxurious interior for Corolla 150 Refinement of the interior and interior decoration is aimed more at achieving travel comfort. Therefore, owners of the Corolla E 150 2012 seek to improve with the help of tuning:
- driver and passenger seats by replacing them with bucket seats;
- overview of the roadway due to the installation of modern design mirrors and a rear view camera;
- microclimate by updating the air conditioning or even climate control;
- information systems through the use of easy-to-read displays and displaying the display where it is convenient for the driver.
Interior modernization - the simplest solutions
Replacing the owners of the Toyota Corolla in the back of the E 150 2013 with modern materials used by manufacturers is also tuning. When modifying the interior, motorists use:
- updating the casing to a more expensive and high-quality one;
- improvement of sound and noise insulation;
- installation of LED lighting in the doors, glove compartment, under the seats;
- use of a more informative dashboard.
Don't forget about the floor mats in the Corolla 150 car, as they provide comfort for your feet, especially in wet weather. But the design and their quality already depend on the choice of the owner. Rugs with high sides and a special pattern for the seats better protect the floor from dirt.
You should also pay attention to the material of the products. Rugs made of wool or thick fabric retain heat well in winter and cool in summer. But in wet weather they quickly get wet. The best option for those who do not have access to 2 sets of floor mats is polyurethane products.
Chassis and engine
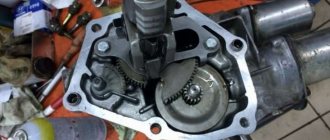
DIY Toyota Corolla actuator repair
Tuning the chassis of Toyota Corolla 150
If your task is to drive quickly and maneuverably on city roads, then start your tuning with the suspension. The first step is to replace the standard shock absorbers with stiffer ones. For confident handling and stability of the car on the road, you need to change the springs. Don't forget about the wheels. For an attractive appearance and good grip on asphalt, you can install alloy wheels with low-profile tires. For a more unique look, steel hub and disc spacers are installed. This increases the wheel offset by 6 mm. After such an upgrade, the car gets an aggressive look.
To improve the fuel system, you can buy an RTD for just 1000 rubles. The fuel pressure regulator for Toyota Corolla 2015 raises the pressure to 380-480 kPa. Thereby increasing the productivity in the fuel rail, which contributes to the performance of the injectors.
If you want to change your car for the better, make it elegant, unique and at the same time with minimal investment, then analyze the prices and buy only high-quality products. Do-it-yourself tuning will save you money. If you are planning a grand replacement of any complex elements, then it is better to trust the professionals. See Toyota Corolla tuning photos and try to get as close as possible to the intended result.
Video: Tuning the headlights of a Toyota Corolla 150
Engine improvement
You can upgrade the dynamic characteristics of the Corolla 150 by changing the settings in the electronic control unit. Otherwise, this procedure is called chip tuning or flashing. Such engine modification helps the 10th generation Corolla:
- increase the power of the unit;
- improve dynamics, since torque, maximum speed and acceleration are higher;
- save fuel;
- get smooth operation of the automatic transmission;
- speed up accelerator response;
- at the start, minimize failures or get rid of them altogether;
- get smooth and dynamic acceleration.
We worked on the technology in the Corolla 150. But not every motorist can independently flash the ECU, since such a procedure requires special knowledge and skills. It is recommended to perform tuning of the Corolla engine in the E150 body at a specialized service, so as not to provoke the occurrence of malfunctions due to your own incompetence.
However, there is a mechanical option for upgrading the Corolla 2008 engine. This is replacing the standard filter with a part from the sports version. The result is a change to a straight-through exhaust, which leads to an increase in power.
Weaknesses of Toyota Corolla 2006-2013 release
• "Robot"; • Problem areas in the suspension; • Steering rack; • Water pump (pump); • Bendix starter.
Now more details...
It is the “robot” in Corollas of this body that causes many problems. Therefore, before purchasing, it is imperative to weigh the pros and cons when choosing a car of this model with a robotic gearbox. “Kicking” and jerking when switching give a signal that the operation of this unit is disrupted
If you do not pay attention to this, then one of the following situations is possible - the neutral gear will engage and the gear icon will light up on the instrument panel. And accordingly, this means the “end” of the “robot’s” life
And it is important to remember that if the “robot”, like another box, fails, you will have to pay a decent amount of money. If the choice fell on a car with a “robot”, then it is very necessary to seriously assess the condition of the box
In general, we can say that the suspension of this Toyota model is difficult to reduce to a deplorable state. But there are weaknesses here too. First of all, these are stabilizer struts and bushings
These are not critical faults that appear in the region of 78-80 thousand km, but it is worth paying attention to them
One of the common problems with Toyota Corolla is the steering rack bushing. The bushing itself is plastic and wears out quickly, as can be evidenced by knocking on the steering wheel when driving even over minor road unevenness. However, the steering rack itself does not pose any problems and can serve for a long time.
One of the troubles can be caused by the starter bendix.
But it is important to remember the peculiarity that this happens en masse only when the mileage approaches one hundred thousand, but there have been cases at 50-60 thousand km. Signs of a bendex malfunction are: the car starts every once in a while or a whirring sound without cranking with the flywheel catching
This breakdown occurs within 100 thousand km. vehicle mileage. Considering that, according to statistics, the 10th generation Corolla, even the latest years of production, should already “run” in the region of 80-100 thousand km
You need to pay attention to this when purchasing. A characteristic sign that the pump is approaching the end of its life is an unpleasant noise coming from under the hood.
Disadvantages of the 10th generation Toyota Corolla
• Crickets in the glove compartment area; • Gentle paintwork; • Weak standard speakers; • Poor sound insulation of the front wheel arches.
Conclusion.
In general, we can say that the Toyota Corolla has more positive aspects than weak points and shortcomings. The main thing before purchasing is to decide which engine and gearbox to buy the car with and to take the check and inspection of the car upon purchase with full responsibility. Remember that better diagnostics of the car you are buying can be done at specialized car services, which in the future will help you save a decent amount of money to eliminate breakdowns and malfunctions caused by the previous owner.
Body tuning
What makes a car stand out the most in traffic is its body tuning. It is always visible to other road users. The aerodynamic body kit is widely popular. It gives the Toyota Corolla 150 a sophisticated look and emphasizes the modernity of the car.
A spoiler, if installed correctly, will not only improve the appearance, but also improve handling when driving at high speed. It is attached to the trunk lid. Self-tapping screws or sealant can be used to secure it. The price for a wing starts from 1,500 rubles.
There are stock elements for the rear bumper. The trim and deflector add an aggressive look to the rear end. The body visually becomes lower, and the sedan takes on a sporty style.
The cost of such modification is from 3000 rubles. The photo below shows an option for upgrading the rear of the car.
Another body styling option is the installation of side trims. They protect the lower part of the car from dirt and add aggressiveness to the appearance of the Corolla 150. Installation is carried out using standard mounts, so modifications are not difficult to do yourself. The cost of such tuning is from 1800 rubles.
Airbrushing makes a car stand out among similar models. The cost of applying a drawing depends on its size and level of the artist. Usually the price starts from 500 rubles and can reach 100 thousand rubles.
The installation of parts from restyled versions of the Corolla 150 is very popular. These spare parts can be purchased at many auto stores. The radiator grille is also subject to tuning.
Very often, in addition to it, a mesh is installed. Window visors are no less popular. The cost of installing new elements starts from 350 rubles.
Suspension tuning
The Corolla 150's suspension is renowned for its reliability. It has characteristics that satisfy the average owner. Still, some drivers subject the suspension to tuning in order to adjust it to their needs.
The use of spacers will cost the owner from 350 rubles. At the same time, installation of air suspension can exceed 120 thousand rubles.
Table - Corolla 150 suspension tuning.
| Suspension tuning option | The main advantages of modernization | Negative sides of suspension tuning |
| Increased clearance | Increased cross-country ability and reduced risk of bottom impact | Reduced controllability, which is especially noticeable at high speeds |
| Reducing ground clearance | Create a sporty, stylish look | Frequent bottom impacts |
| Increased rigidity | Reduced roll and improved handling | Reduced “swallowing” of uneven road surfaces by the suspension |
| Adding softness | Increased comfort | Rolling of the car and clinging of the wheel arches |
| Air suspension | Ability to customize suspension characteristics depending on road conditions | Reduced suspension reliability |
Interior tuning
Tuning the interior allows you to increase the comfort and convenience of driving a car. The cheapest option is to cover the windows with film. The cost of such modernization starts from 800 rubles. Sound insulation will cost the owner 10-25 thousand rubles. But alterations to the interior “to look like leather” or “to look like wood” can cost up to 600-800 thousand rubles.
Interior tuning
Alteration under the skin
Modernization of optics and installation of backlights
Most often, optics tuning affects headlights and taillights. The installation of xenon and LEDs is widely popular. The cost of such alterations ranges from 5 to 20 thousand rubles.
The use of LEDs in opticsThe film sticker on the headlights gives the car exclusivity. At the same time, there is a practical side to such tuning. The surface of the optics is less exposed to external influences, which avoids scratches and other damage.
The lights look impressive at night. LEDs and neon lamps are mounted in the underbody, hood and trunk lids, and wheel arches. It is also possible to illuminate not only from the outside of the car, but also from inside the cabin.
Using backlights for tuning.
Toyota Corolla e150 is a sedan model of this series produced in 2008. Considering the fact that Japanese manufacturers produce new Corolla cars every year, modifications released years earlier quickly become outdated. Maybe for some it is a solution to the issue of a new purchase. But is it worth it when it’s enough to tune an old car? This is a cheaper option that will not only make the appearance more aesthetically pleasing, but also improve the technical characteristics.
Conventionally, any passenger car can be divided into three main parts: engine, body and chassis. The body includes such parts as doors, hood, trunk lid, radiator trim, mud flaps and other additional elements of the car's appearance.
What can we change in our car ourselves? Let's consider only tuning, which is needed not so much for the aesthetics of the body, but to solve the issue of necessity:
- Replacing simple headlights with higher quality xenon ones as a more durable, economical option.
- Installation of high pressure headlight washers to protect against contamination.
- Installation of protective fender liners to improve the aerodynamics of the car and increase the service life of the body.
Installation process of xenon headlights
The cost of one set of xenon lamps for tuning starts from about 8,000 rubles. You can find more expensive options. The set contains a special block suitable for the polarity of Toyota vehicles. It is not recommended to buy xenon lamps of a different polarity for tuning, since a different set may not last long.
For convenience, the car is driven into a pit. Then the boot is unscrewed. You should carefully examine the plane of the body, where there are holes with a diameter of approximately 8 millimeters; two of them need to be used. Through these holes, the low light units and fog lamps are fastened. The work requires a delicate approach, since there is a high probability of dropping the bolt for attaching the bracket with blocks.
Tuning of xenon lamps is carried out according to these instructions:
- According to the diagram, you should make brackets for the side members, taking into account that the top point of the bracket should be under the headlight with a gap of 2-3 mm, but not lower or higher, since it will not fit into its place.
- After the brackets are made, they are fixed to the blocks.
- Next, the wires are connected to the sides, which is not difficult.
- Choose xenon on a website or in a store selling car parts carefully. The IPF hid XD41 model is suitable for the Corolla 150. It is advisable to buy two sets, for use and for stock. Xenon wires are long. The wiring is equipped with a 15 amp fuse, which is perfect for cars. If we talk about the blocks, we note that they are housed in a good casing made of high-quality plastic. The wiring is well insulated and ready for immediate assembly.
- The blocks are connected to the system. Then the lamps installed instead of halogen are replaced. For those who are doing xenon tuning with their own hands for the first time, it is not easy to do such work, but it is possible using the instructions for use. To begin with, the bumper is unscrewed and removed, then the headlights are removed and the xenon is carefully inserted. After the headlights are installed in the optics, the fog lights should be inserted. And everything is assembled in reverse order. There is nothing complicated, but you will have to tinker.
The installation of lamps is done with extreme care, leaving no traces of grease or lint on their surface. If there are such marks, they are wiped with a soft cloth. Thus, you will get white light, which is much nicer than yellow, and its power is stronger.
Installation of high pressure washers
Why are washers a necessity? In inclement weather or when snow melts, the headlights sometimes become so splashed that the driver has to stop to clear them, otherwise the road simply cannot be seen. As follows from the description, washers increase driving safety at night.
READ MORE: Tuning a Toyota Corolla 120 body In an auto shop, you can order a similar mechanism in several options:
- low pressure washers with headlight wipers;
- High pressure washers for cleaning headlights with a jet of liquid.
The first mechanism on the Toyota Korola 150 brand repeats the work of wipers and glass washers. The second device is more effective: a stream of water is directed onto the entire surface of the “lights” using a special nozzle. The high pressure washer device consists of the following components:
- Pump to create the required pressure.
- Water tank.
- Connecting hoses.
- Injectors.
- Control block.
The tank is a small reservoir for water needed to clean the headlights. The main washer reservoir and an additional part are used, which is fixed immediately under the hood or bumper of the Toyota Corolla body. This part is not included in the kit and will have to be purchased separately.
Pump - creates the required fluid pressure. The operating principle is similar to the pump that works to clean the windshield. To drive the pump, control signals are sent to it.
Connecting hoses - ensure the operation of all connecting units. The only thing is that the owner of the Corolla 150 needs to select the minimum hose length for this part of the body.
Nozzles - the reliability of the headlight washer depends on this component, since the main function of the nozzle is to determine the direction of the jet. In this case, nozzles for a spherical bumper are selected, since this is the type that the Corolla 150 model has. Using the latest technology, a telescopic version of the injectors is made; they are hidden under the car bumper, so only their cover is visible. When they are installed, the overall appearance of the 150 model’s body remains virtually unchanged.
Telescopic nozzles extend according to a signal transmitted by the control unit using a hydraulic piston. Water is sprayed onto the headlights, after which the mechanism removes them again under the bumper.
Control unit - you can use various methods, but the most effective choice is a button on the steering wheel that sends a signal through a relay to the pump. This is how arbitrary control is carried out, working autonomously from the headlights. READ MORE:
Tuning a 2014 Toyota Corolla car You can install injectors on a Toyota Corolla 150 with your own hands, following the manufacturer’s instructions. However, remember that you need to look for a water tank in advance and determine a place to mount it. Otherwise, installation of an additional pump will be required. Sometimes for tuning you have to temporarily remove the plastic bumper of the 150 model for correct installation.
Using a headlight washer itself is almost no different from using a windshield washer. Follow these rules if you want the mechanism to work as long as possible:
- Clean water or a special liquid is added to the reservoir. If debris or dirt gets in, the water outlet holes become clogged and instead of the required amount, a weak stream is released, which does not provide much of a cleaning effect.
- For better cleaning, a special agent is added to the water.
- In winter, it is advisable to add antifreeze.
- Turn on the washer periodically even in dry weather. This will extend its service life.
- Sometimes you should check the fastening of the components.
Changing brake discs
When making modifications to the design of the Toyota Corolla, the brakes are tuned. This is due to the fact that the standard braking system may not withstand the increased load on it after increasing engine power and replacing the suspension. To change brake discs on a Toyota Corolla, use the following set of tools:
- Spanners.
- Compression bottle.
- Jack.
- “Shoes” necessary to secure the wheels in a stable position.
- Solid oil and machine oils.
To replace brake discs on a Toyota Corolla, the following measures are taken:
- Brake fluid is pumped out of the cylinder. A syringe is used for these purposes. When tuning a Toyota Corolla, you can save a little on buying new brake fluid. However, the old one can only be used if it has not lost its transparency. The technical liquid is poured into a clean and dry container and covered with a lid.
- Stops are placed under the rear wheels of the Toyota Corolla. The “boots” secure the raised car body. Next, proceed to dismantling the front wheel. To increase the stability of the car, the front part of the Toyota Corolla e120 or e150 is fixed with bars. This is necessary to comply with safety regulations: if you do not use additional stops, there is a risk that a car falling off the jack will crush the driver during work on replacing brake discs.
- After completing the preparation, they proceed directly to tuning the car brakes. The caliper bolt is unscrewed from below, it is lifted and turned on the upper bolt, and then fixed with wire. In some cases, it is difficult to turn the caliper: to do this, slightly unscrew the bolt located on top.
- The linings are removed and the lower bolt is finally dismantled, the caliper is disconnected from the fastening element. As a result, the part remains hanging on the cord.
- The steering wheel is turned towards the removed wheel, then the fasteners (bracket) are unscrewed.
- The freed mounting holes are cleaned of dirt and dust, degreased, and bolts of the M8 modification are screwed into them.
- A new brake disc is put on the wheel hub, then the mounting bracket is screwed on.
- The bolts are lubricated.
- The brake piston is lowered into the cylinder.
- Return the steering wheel to its original position.
- Screw the wheel and lower the jack. Remove the front bars.
Subsequent brake discs are replaced in a similar manner. After tuning is completed, the container is filled with brake fluid and air is pumped into it to create compression.
When tuning a car's brake system, the factory calipers are replaced with parts made of ceramics. They are not cheap, however, their use increases the braking ability of the car in critical situations on the road, and the wear of the brake disc is reduced by 80%.