Toyota Corolla is the leader in sales among cars all over the world. It is for this reason that she was included in the Guinness Book of Records. Its fundamental nature, ease of operation, and impressive characteristics brought it such demand.
Corolla 120 sedan
Cars of this brand are considered among the most durable in the world and rightfully top numerous reliability ratings. But despite all these aspects, this car requires timely maintenance. In our article we will conduct a detailed analysis of an important part of this process - replacing the fuel filter for Toyota Corolla 120 and 150 bodies.
Step-by-step instructions for replacing the filter element and pump
Hatch leading to the fuel tank
Changing gas filters is important to maintain engine power, avoid problems when starting it, and to extend the life of pistons, piston rings, connecting rods and pins.
Replacing the gas filter in a Toyota Corolla in the 120 body is carried out independently, if the owner of the car has an understanding of working with tools of medium complexity.
Spare parts and tools
Before you change the fuel filter on your Corolla, you need to prepare. To do this, you should prepare the necessary tools and materials in advance. We will need:
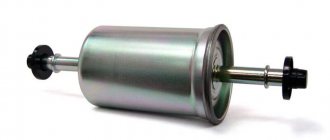
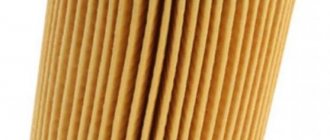
- coarse gas filter;
- fine fuel filter;
- narrow slotted screwdriver for fasteners;
- Phillips head screwdriver.
- 8 wrench,
- hairdryer
Also prepare a large amount of rags and a container of water.
Execution of work
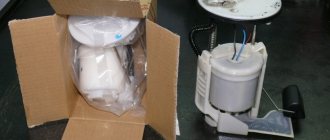
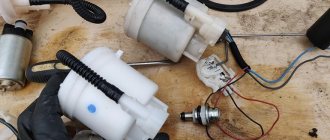
The Corolla fuel filter is located in the tank and is part of the fuel pump module, consisting of:
- fuel pump;
- primary gas filter - a component that cleans fuel from excess moisture and various impurities;
- final filter - a component that carefully filters fuel from smaller particles;
- float indicating the amount of fuel.
Fuel pump cover
Before starting work, you should drain the fuel from the system so as not to flood the car interior with it later. To do this, you need to pull the fuse out of the fuse box and leave the engine idling until the fuel pump and line are empty and the engine stalls. Next, open the gas tank cap to release the pressure. It is also recommended to replace filters on the Toyota Corolla e120 with a small amount of fuel remaining in the tank.
Fuel pump and filters assembly
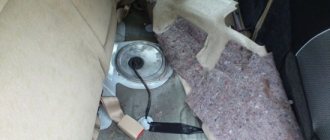
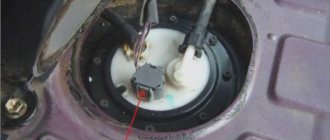
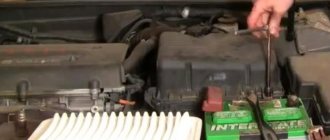
First you need to disconnect the negative terminal of the battery. Then remove the rear seat, secured with two latches and a guide. This must be done with sudden movements. Under the seat there is a gas tank cavity cover with wires connected to it. The cover is secured with sealant and lifted using a flat-head screwdriver. This frees up the entrance to the small space above the tank where the fuel system unit is installed. To prevent dirt from getting into the tank, you need to clean with a vacuum cleaner under the place where the seat was, and then above the tank itself.
Next, unscrew the 8 bolts and remove the fuel pump. This should be done at an angle due to the float, which is attached to the wire at a sufficient distance.
Now you can assess the degree of contamination of the tank and coarse mesh. The degree of contamination of the fine gas filter cannot be seen.
The next task is to disassemble the fuel module. To do this, remove the float by bending the plastic latch. Then the mesh is removed and the fine filter, which is secured with a rubber gasket, is disconnected.
One latch
When disassembling an old gas filter, it is important not to lose the rubber bands, in case new ones were not purchased. The most difficult thing to remove is the rubber band from the top of the gas tank.
We insert the rubber bands into the new filter element, similar to the location in the old one, and complete the structure. It is problematic to replace the coarse filter and the retaining retaining ring.
Two more latches
Now we return all the parts to their place in the sequence in which they were removed. We tighten the nuts again and connect the tubes. But before you put the seat back in place, it’s worth checking how the system works. To do this, insert the key into the ignition and turn it to the “ON” position, but without starting the car. The operation of the fuel pump should be audible. The sound should be familiar. The metal tank cap is installed using the same sealant, after which the rear seat can be replaced.
Possible troubles and difficulties
After replacing and placing the fuel pump in the fuel tank, the car may not start the first time. The reason for this may be poor sealing of the fuel pipes, as a result of which the fuel pump does not create sufficient pressure in the line.
Leaky fuel pump tubes
When disconnecting the hoses from the body, you should be careful. The system retains pressure and fuel may spray into the passenger compartment or eyes. It is worth stocking up on enough rags for cleaning.
You should also be careful about fire and sparks near the work site, because... After removing the cap, gasoline vapors from the tank quickly fill the interior.
Checking for leaks before installation
Replacing the unit
Replacing the Toyota Corolla fuel filter is a procedure that is quite feasible for any owner of this model. It does not have any special subtleties or difficulties, but to carry it out competently, it is useful to know the essence of the whole event.
First you need to prepare properly. Preparatory activities include:
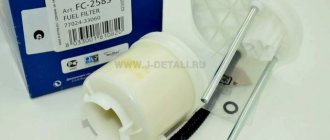
- Purchasing a new part. It is advisable to take original fuel filters for the Corolla. Their articles are as follows:
- coarse filter element - LFB6-13-ZE1;
- fine filter - 77024-12050;
- gaskets and rings - 77169-0D030, 9030108020, 9030104013;
- fuel module assembly - 23221-11050.
- Preparing the necessary tools. You will need the following tools:
- flat and Phillips screwdrivers;
- broom or vacuum cleaner;
- rags;
- container for gasoline;
- directly replacement parts.
- Ensuring fire safety. Before starting repairs, be sure to make sure that there are no sources of open fire near the repair site and that there is a working fire extinguisher nearby.
Having carried out a basic list of preparatory measures, you can begin the repair. Directly replacing the fuel filter of Toyota Corolla 120 and 150 bodies is carried out using the same algorithm of actions, which looks like this:
- First of all, park your car in a spacious and well-transparent place that satisfies the previously mentioned safety precautions. Having done this, secure the car with the handbrake and open the rear doors wide.
In general, replacing the Toyota Corolla fuel filter in 150 and 120 bodies is quite simple. The main thing in the repair process is to know the basic nuances and have some skills in carrying out this procedure. In today’s material, all the features of replacing the fuel filter on a Toyota Corolla have been discussed, so we strongly recommend that you adhere to them when carrying out repairs of this kind. We hope the article was useful to you. Good luck on the roads and in repairs!
Video about replacing the fuel filter in Toyota Corolla 120 and 150:
Watch an interesting video on this topic
The fuel filter in imported cars differs significantly from the filters in domestic VAZ. For a driver who has just switched to this foreign car, you need to know that the Toyota Corolla has two fuel filters. The main one is located in the gas tank and is attached together with the fuel pump. It is he who plays the main role in cleaning the fuel and its further supply to the pump.
However, when the fuel filter ceases to perform its functions, this will certainly begin to affect the performance of the car. It may not pull well, does not start the first time, and accelerates poorly. This significantly increases fuel consumption. If the filter is not replaced on time, the fuel pump may fail. This happens because it constantly pumps the required amount of fuel for the car to operate, and a clogged filter will prevent it from doing so.
How often to change
According to the manufacturer's recommendation, it is necessary to replace the fuel filter on a Toyota Corolla 120 with a TO-8, which corresponds to the 80,000-kilometer mark. The frequency of inspection is not regulated by the manufacturer.
Signs of a clogged filter element
Corolla 120 station wagon
The need to change the fuel filter in a Toyota Corolla with a 120 body may be indicated by the performance of the vehicle. Some of its features may indicate problems with the fuel pump. And so that you don’t have to disassemble the fuel pump every time to check its serviceability, you need to pay attention to the following operating irregularities:
- It is difficult or impossible to start a cold engine;
- at idle speed the power unit is unstable;
- the car jerks when driving and slows down on its own;
- there is a feeling of “triple”;
- the dynamic properties of the vehicle deteriorate.
Conclusion
Changing the fuel filter on a Toyota Corolla E120 is not so easy, since the product is located in the fuel tank. Not every car enthusiast is able to change this spare part on their own, and therefore many turn to a car service center.
Toyota Corolla is a real bestseller in the global auto industry. At the moment, this Japanese-made model is included in the Guinness Book of Records as the best-selling car on our planet. In many ways, such success came to the Corolla thanks to its reliability, unpretentiousness and good characteristics. However, even taking these theses into account, one cannot be ruled out - the model, like any other, requires periodic maintenance. In today's material, our resource decided to take a closer look at one of the types of maintenance for Toyota Corolla in 120 and 150 bodies, concerning the replacement of the fuel filter.
Selecting a filter for Corolla
To replace the filter element in a Toyota Corolla, it is better to purchase original parts with the following manufacturer codes:
- coarse filter element - 23217-23010;
- fine filter - 23300-23040;
- gaskets and rings - 77169-0D030, 9030108020, 9030104013;
- fuel pump assembly - 77020-02170.
Replacing the main filter - follow the instructions
Replacing the fuel filter in a Toyota Corolla is a completely feasible task for every driver. Automotive stores generally only have an additional filter, which is located under the hood, so worry about ordering the main device in advance. There is no need to save money on your purchase and it is better to purchase only the original. It will serve you much longer than the Chinese fakes that are now saturated in the auto parts market.
Before replacing, you will need not only the part itself, but also additional tools: a pair of screwdrivers and sealant, as well as open-end wrenches to replace the second filter. The main fuel filter in a Toyota Corolla is located under the rear seat in the fuel tank. This type of filter is commonly called submersible. To replace it, you need to lift the rear seat, or even unscrew it for a while. Under the seat you will see a metal cover, the so-called hatch. Using a screwdriver, carefully pry it out, as it is attached to the sealant. When doing this, be careful not to damage the electrical wires.
Opening the lid, you will see a fuel pipe and a chip with wires. First of all, turn off the power supply. The next step is to disconnect the fuel pipe. There is an arrow on its plastic lock that indicates the direction in which you need to turn it - do this carefully so as not to break it. After disconnecting, gasoline may spill out, so use a cloth or bottle. To prevent gasoline from spilling, before starting all work, you must remove the pump fuse from the mounting block.
The engine must be turned on. You need to wait until it stalls. These actions will cause all the fuel in the tube to burn. Before removing the pump and filter, pay attention to its correct location in the tank - you will also need to put the new part back in the same way.
Unscrew and remove the clamping ring, then carefully remove the pump with the filter - it is important not to damage or move the level float with the fuel grid.
The next step is to remove the part itself. To do this, turn the entire body over and carefully move a few rivets, then remove the cover. There will be a rubber gasket under the cover, which also needs to be removed. Then remove the metal corkscrew ring that holds the fuel grid in place. If possible, replace it with a new one or, at a minimum, rinse it well in water and let it dry.
Then disconnect the pressure regulator - this will be quite difficult, since it is located in the sealing rubber. After this, disconnect the fuel pump and o-rings. Now take a new filter and assemble everything in reverse order. Before assembly, you can lubricate all rubber sealing joints with oil, this will greatly simplify the assembly process. Clean the hatch cover from the old sealant and apply a new one. You will need to hold it under a load for 10-15 minutes for the sealant to harden.
Advantages of contacting an authorized Toyota service center
A faulty Toyota fuel system requires careful inspection, professional repair and prevention to prevent further failures. Contacting an official technical center will be the key to economical consumption of gasoline or diesel and stable operation of the internal combustion engine.
At our disposal:
- Specialists who have completed the training program and know everything about the fuel systems of different Toyota models.
- Stands and installations for complete diagnostics, adjustment, effective washing of deposits and testing.
- Original spare parts - injection pump, fuel level sensors, hoses, pressure regulators, injectors.
Maintenance and repair in a certified center is a guarantee of quality work. Technologies and key points are regulated by the manufacturer. Technical documentation and modern equipment allow you to correctly perform troubleshooting and quickly find solutions to problems.
Use the feedback form and coordinate a time of arrival at the service area. Our specialist will call you back and make an appointment for repairs.
Checking for faults (causes of faults)
The reasons why fuel injectors begin to operate unstably are directly or indirectly related to the quality of the fuel.
The photo shows how fuel injectors on a Toyota Corolla become clogged: dirt and various impurities that are contained in the car’s tank and fuel.
The main signs of clogged injectors on a Corolla are:
- difficulty starting the engine;
- interruptions in engine operation at idle and transient mode;
- failures when the gas pedal is pressed too sharply; engine power is lost and acceleration dynamics deteriorate;
- fuel consumption increases;
- the toxicity of exhaust gases increases;
- detonation that occurs when the engine accelerates due to an increase in temperature in the combustion chamber;
- misfire;
- exhaust system pops;
- breakdown of the sensor that determines the oxygen level,
- as well as failure of the catalytic converter.
- When the frosty season sets in, problems with injectors are especially noticeable - a cold engine rarely starts normally.
Owners of Toyota Corolla can independently check the performance of the injectors on their car. The procedure is quite simple and does not require special training or expensive equipment. In garage conditions, diagnostics can be performed with a set of open-end wrenches, screwdrivers and a tester with a resistance measurement mode.