05.11.2021 4,585 Fuel system
Author: Victor
High-quality fuel cleaning and uninterrupted engine operation under any operating conditions depend on the cleanliness of the filter. Therefore, replacing the Toyota Corolla fuel filter is one of the most important operations when servicing a car. The design of the machine allows you to change it yourself.
[Hide]
Replacement frequency
The manufacturer does not stipulate filter replacement as routine maintenance, and this equally applies to Toyota Corolla in 120 and 150 series bodies. Many services, based on the realities of car operation in Russia, recommend preventive replacement every 70–80 thousand kilometers. Replacement can be done earlier if signs of contamination of the filter element appear. Since 2012, the Russian-language service literature for Toyota Corolla indicates a filter replacement interval every 80 thousand km.
Safety regulations
Gasoline vapors are a strong poison for the human body. Chemical poisoning may cause headache, weakness, nausea, and dizziness. In the long term, with constant contact with gasoline, it can act as a carcinogen. Gasoline is also explosive and flammable.
Therefore, the following safety rules must be observed when replacing the fuel pump:
- Do not work in a closed or poorly ventilated area;
- Eliminate any possibility of contact with open flames (do not smoke, do not illuminate the work area with fire);
- To minimize gasoline leaks, before disassembling the flask, drain all the gasoline that is possible into an airtight container;
- If a leak occurs, use cleaning material immediately. After use, to avoid the spread of toxic fumes, place in a sealable container;
- If signs of poisoning occur, immediately leave the work area and go into the open air. If the condition worsens, seek medical help.
Selecting a filter
The fuel intake module has a coarse mesh filter at the inlet and a fine fuel filter inside the module itself. For replacement, you can use original parts and their analogues. Before purchasing a filter, it is advisable to check the model installed on the machine.
When choosing original fine cleaning parts, it should be taken into account that the Corolla in the 120th body was equipped with two types of filters. In the first releases from 2002 to June 2004, a part with catalog number 77024–12010 was used. On machines from June 2004 until the end of production in 2007, a filter with a modified design was used (article 77024–02040). The 150th body was equipped with a single filter option (number 77024–12030 or a larger assembly option 77024–12050).
In addition, Corolla 120 cars were produced for the Japanese domestic market under the designation Toyota Fielder. These machines use a fine filter with the original number 23217–23010.
Analogs
The coarse fuel filter usually does not change, but if damaged, it can be replaced with a non-original Masuma MPU-020 part.
Due to the high cost of original filters, many owners begin to look for more affordable parts with a similar design. However, for cars in the 120th body, such parts simply do not exist.
For the 150th body there are a number of cheaper analogues, from manufacturers JS Asakashi (part number FS21001) or Masuma (part number MFF-T138). For those who want to save money, there is a very cheap filter option made by Shinko (SHN633).
For Fielder there are similar filters Asakashi (JN6300) or Masuma (MFF-T103).
Fuel filter for Toyota Corolla 150
On the tenth generation Toyota Corolla with gasoline engines 1.33, 1.4, 1.6, 1.8, the main fuel filter, just like on the previous one, is located in the tank, in the fuel unit. It differs depending on engine size. The Toyota Auris, which is, in fact, a Corolla 150 in a hatchback body, is equipped with the same fuel filters, with the same part numbers.
| vendor code | Engine capacity | Height, mm | Case diameter, mm |
| 7702412120 | 1.33 | 300 | 150 |
| 7702412050 | Other | 300 | 150 |
7702412120
7702412050
The most commonly used substitutes are presented below.
| Manufacturer | vendor code | price, rub. |
| For engine 1.33 | ||
| LEDO | 80201LFFB | 2500 |
| For all other engines | ||
| Masuma | MFF-T138 | 3000 |
| JS Asakashi | FS21001 | 3100 |
The pump filter mesh does not have a separate article number, since it comes complete with the pump, and it does not need to be changed, but simply washed. If a replacement is necessary, then most often they take a non-original one, LEDO 80010LFFB, price - 290 rubles.
Fuel filter for Corolla 150 diesel
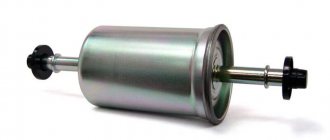
On diesel Toyota Corolla 150 with engine sizes 1.4 and 2.0, the fuel filter, like on its predecessor, is located under the hood, located next to the engine. It does not differ in any way depending on the configuration of the car or engine size. It has a metal body and is connected using a thread. The article number of the original spare part is 2339026160.
| Fuel filter dimensions 2339026160 | ||
| Thread | Height, mm | Diameter, mm |
| 3/4″-16UNF-2B | 120 | 86 |
Analogues that are most often installed instead of the original can be found below.
| Manufacturer | vendor code | price, rub. |
| MANN-FILTER | WK828X | 900 |
| BOSCH | F026402110 | 1300 |
| JS Asakashi | FC158J | 350 |
Replacement for Corolla 120 body
Before starting work, it is necessary to empty the tank as much as possible, preferably before the reserve fuel light turns on. This is necessary to minimize the risk of gasoline spilling on the interior trim.
Tools
Before replacing the filter, you need to prepare the following materials and tools:
- screwdriver with a thin flat blade;
- Phillips screwdriver;
- pliers for dismantling the spring clamp;
- rags for wiping;
- a flat container over which the pump is disassembled.
Step-by-step instruction
Algorithm of actions:
- Lift the left rear seat cushion and bend the sound insulation mat to gain access to the fuel intake module hatch.
- Clean the installation site of the hatch and the hatch itself from dirt.
- Unfasten the hatch mounted on a special thick mastic using a screwdriver. The mastic is reusable; it should not be removed from the mating surfaces of the hatch and body.
- Wipe the fuel module cover from accumulated dirt.
- Disconnect the power connector from the fuel pump block.
- Start the engine to produce fuel under pressure in the line. If you neglect this point, gasoline will flood the car interior when you remove the tube.
- Disconnect two pipes from the module: fuel supply to the engine and return fuel supply from the adsorber. The pressure tube is clamped to the module with a clamp that slides to the side. The second tube is fixed with a conventional ring spring clamp.
- Unscrew the eight screws with a Phillips screwdriver and carefully remove the module from the tank cavity. When removing the module, it is important not to damage the side-mounted fuel level sensor and the float mounted on the long lever. It is better to carry out further work over a prepared container to prevent gasoline residues from the module from getting onto the elements of the car interior.
- Release the lever latch and remove the float.
- Separate the halves of the module housing. The plastic connector clips are located closer to the top of the module. The clips are quite fragile and it is important to carry out this operation carefully.
- Remove the fuel pump from the module and disconnect the filter from it. The fuel pump will come out with force due to the presence of rubber o-rings. It is important not to lose or damage the rings that maintain pressure when supplying fuel.
- Now you can change the fine filter. We blow out the module housing and the coarse filter with compressed air.
- Assemble and install the module in reverse order.
Replacing the filter on a Corolla 120 hatchback
On a 2006 hatchback car, the fuel filter is installed differently, so the replacement procedure has a number of nuances. Also, this scheme was used on all 120 Corollas assembled in England.
Replacement sequence:
- The module hatch is secured with four bolts using a Phillips screwdriver.
- The module itself is tightly inserted into the tank body; a special puller is used to remove it.
- The module has a completely different appearance. To disassemble it, you must first disconnect the hose at the base of the module. The hose can only be removed after pre-heating with a hairdryer.
- The filter itself with the pump is located inside the module glass and is secured with three latches.
- To access the filter, you must remove the fuel sensor.
- The filter can only be removed from the module cover when heated with a hairdryer. The fuel pipes will have to be cut. It is important to remember which of the filter tubes is incoming and which is outgoing, since there are no markings on the body.
- Use a 17 mm bolt to press the pump out of the filter.
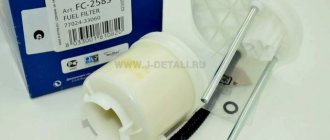
- Install a new Toyota filter 23300–0D020 (or equivalent Masuma MFF-T116) and mount new tubes between the filter and the pump. The tubes should be easily bendable, since the pump halves are in a pre-tensioned state in the tank.
- The coarse filter is located in a glass and is simply washed with carburetor cleaner.
- We carry out further assembly and installation in the reverse order.
An important point in the work is to ensure that the new tubes fit tightly onto the fittings. It is better to check the quality of work before installing the module in the tank using a pump and soap solution. According to a number of reviews, the MFF-T116 filter does not fit tightly onto the pump. Below are a number of photos explaining the replacement procedure.
Bolt-on module cover
Sample puller diagram
Disconnecting the down tube
Clip for fixing the filter in the module glass
Module ready to remove the cover
Removing the module from the tank
Filter with a pump installed in it
Extruding the pump with a bolt
Installation of new tubes
Washed coarse filter
Assembled module with tubes
Leak test with soap solution failed
Instructions for replacing the fuel filter
Before replacing the fuel filter, you need to drain the tank as much as possible, without, of course, bringing the level to critical - otherwise, along with the filter, you will have to change the fuel pump. If you do not empty the tank, then when removing the fuel module there is too great a risk of gasoline spilling into the cabin.
In the future, we will write about cars in the 150 body, since replacing the fuel filter with your own hands on both models is similar in principle, but here it is somewhat more complicated. Let's start by accessing the gas tank flap, which is located under the rear seat of the car.
On the 120 body the hatch is round, glued to non-drying mastic.
At 150 – egg-shaped, attached in exactly the same way.
Now you need to start the engine and at the same time disconnect the connector from the fuel pump - the engine will generate almost all the pressure in the line, and when disconnecting the fuel supply pipe there will be no risk of getting a jet of fuel under pressure.
Disconnect the fuel supply pipes, fan and adsorber. Before doing this, you should wash the fuel pump cover - it is better to work with the fuel system with clean hands.
The fuel pump is held in place by a shaped nut. You can unscrew it without the original puller by giving a few tangential blows to the edge - after that you can tighten it with your hands.
We remove the fuel pump, being careful not to spill fuel into the cabin.
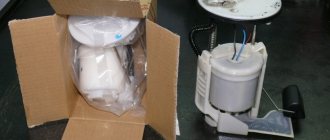
Now you need to separate the filter assembly from it - the order of operations is easy to understand by placing a new part next to it. Having removed the pump itself from the assembly, we change the sealing ring and the fuel inlet mesh on it.
We fix the new fine filter in place and connect the pressure pipe to it.
Now you can install the assembly in place, paying attention to the fact that it sits evenly before tightening the nut - otherwise the sealing ring of the cover will not fit tightly.
Replacing the TF in the 150th body
Replacing the fuel filter on a 2008 Toyota Corolla (or any other) in the 150 body has some differences from a similar procedure on the 120 body. When replacing, it is important to ensure that the O-rings are positioned correctly as they maintain pressure in the fuel system. Since 2010, a safety system has been used, the essence of which is that the fuel pump operates only when the engine crankshaft rotates. In the absence of residual pressure in the system, the starter has to turn the engine much longer until the pump builds up pressure in the gasoline supply pipe.
Preparation
Since the design of the modules is similar, there are no special requirements for tools and workplace equipment. You will need the same tools and materials as when replacing the filter on cars with a 120 body.
Stages of work
When replacing the filter on a 150 body, there are a number of points that you should pay attention to:
- The fuel module is fixed to the tank with a plastic threaded ring equipped with a rubber seal. The ring turns counterclockwise. To remove the ring, you can use a wooden rod, one end of which is placed against the edges of the ring, and the other end is lightly struck with a hammer. The second option could be to use the handles of a gas wrench, which are used to clamp the ring by the ribs.
- The module has additional fuel pipes for ventilation of the tank cavity. Disconnecting the tubes occurs in the same way.
- The module design has two seals. Rubber O-ring 90301–08020 is placed on the fuel pump where it is installed in the filter housing. The second ring 90301–04013 is smaller and is placed in the non-return valve fitting at the bottom of the filter.
- When reinstalling, you must carefully install the nut gasket. Before tightening the nut back, you need to install it until the marks on the nut itself and on the body (near the fuel hose to the engine) align, and only then tighten it.
The main points of the process are explained in photographs.
Module hatch on sealant
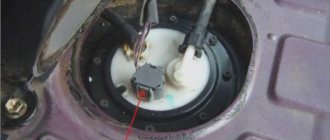
Tubes on the module cover, in the red ring - fuel supply tube to the engine
Module removed
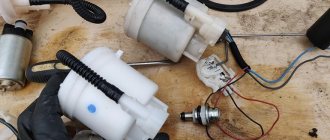
Clogged coarse filter
New filter
Washed filter
The video shows the process of replacing the fuel filter on a 2011 Toyota Corolla.
About changing the filter element on the 120th Toyota Corolla body
I would like to immediately warn you about the strictest compliance with fire safety rules when performing this operation. Before starting work you need to prepare:
- Empty container for remaining fuel.
- Rags or rags.
- New filter element.
- Sealing gaskets.
- Flathead and Phillips screwdrivers, as well as a vacuum cleaner.
To begin removal, you need to lift the rear passenger seat of the car, and then remove the underbody upholstery. It is secured with two screws and a piston. To release them, you will need a “10” key and a screwdriver.
READ MORE: Toyota Corolla diagnostics
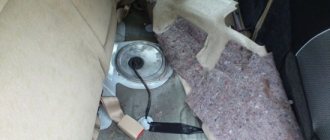
The mat is lifted onto the seats and secured with seat belts so that it does not interfere with further operations. It is necessary to remove the foam layer under the mat. After this, the fuel pump cover will become visible, which can be easily removed if you pry it off with something sharp. Do not begin replacement until all debris accumulated there has been removed with a vacuum cleaner.
The pipes are removed from the fuel pump and the remaining gasoline is drained into an empty canister. After this, you should start the Toyota Corolla engine to completely exhaust the available fuel in the power system. After stopping the engine, turn it over with the starter several more times and remove the terminals from the battery.
After this, you can begin to remove the block with the pump. You will need the help of a Phillips screwdriver and an “8” wrench, as well as a rag or rag for spilling gasoline. When the block with the pump is removed, you can begin to dismantle the filter element.
It is necessary to release two latches on the body and several clips. Then you can easily remove it from the case with little effort. Having taken out the old one, insert a new fine cleaning element into the fuel pump housing. At the final stage, the fuel intake mesh is washed and purged, and assembly is performed in the reverse order.
Filter on other Corollas
On a Corolla with a 100 body, the filter is located in the engine compartment. To replace it, you need to remove the rubber air supply pipe from the filter to the throttle module. The pipe is fixed with conventional screw clamps with a 10 mm nut. The filter is connected to a fuel pipe secured with a 17 mm nut, the filter itself is secured to the body with two 10 mm bolts. The lower fuel supply hose can be unscrewed through the tie rod hole in the left arch. There is no pressure in the system, so gasoline leakage will be insignificant. After this, you can install a new filter (the cheapest SCT ST 780 is often used). A similar filtration system is used on the Corolla model 110.
Another option is the right-hand drive model 121 Corolla Fielder, which can be with front-wheel drive or all-wheel drive. The location of the module on it is similar to the 120 model, but only on vehicles with all-wheel drive. On such configurations, an additional fuel sensor is installed on the right. Moreover, the module itself has only one tube. On cars with front-wheel drive, the module is installed in the center of the body and two tubes go to it.
When removing the module from the tank, it is necessary to remove the additional fuel intake tube from the second section of the tank. This tube is only available on all-wheel drive Fielders. On a front-wheel drive car there is a regular pressure regulator valve.
The sensor for the second half of the tank on the right is clearly visible
One fuel supply pipe
Module mount removed
The module shows fuel supply tubes from another section of the tank
Disassembled module
Pump with new filters assembly
Cost of work
The price of original filters for the 120th model is quite high and ranges from 1800 to 2100 rubles for the early part 77024–12010 and from 3200 (long waiting period, about two months) to 4700 for the late version 77024–02040. For a more modern 150th body, filter 77024–12030 (or 77024–12050) is estimated to cost from 4,500 to 6 thousand rubles. At the same time, the cost of analogues Asakashi or Masuma is about 3,200 rubles. The cheapest analogue of Shinko will cost 700 rubles. Since there is a risk of damage or loss of the O-rings when replacing, two original parts should be purchased with numbers 90301-08020 and 90301-04013. These rings are inexpensive; purchasing them will cost only 200 rubles.
Filter
O-ring No. 1
O-ring No. 2
An analogue of a coarse filter will cost about 300 rubles. For “English” cars, an original filter costs about 2 thousand rubles, and a non-original filter costs about 1 thousand rubles. You will also need new tubes and o-rings, for which you will have to pay about 350 rubles. The SCT ST780 filter for Corolla 100 and 110 costs between 300–350 rubles.
Parts for Fielder are much cheaper. Thus, the original filter costs 1,600 rubles, and analogs Asakashi and Masuma cost about 600 rubles.
Consequences of untimely replacement
Neglecting to change the fuel filter can result in various damage to fuel system elements that will require expensive repairs. If the filter is slightly dirty, fuel supply deteriorates at high speeds, which is reflected in a decrease in the overall dynamics of the Toyota Corolla and increased fuel consumption. Increased fuel consumption causes the catalytic converter to overheat and fail.
Dirt particles can get into the fuel hoses and cylinder injectors. Cleaning clogged injectors is a rather expensive procedure, and in addition, such an operation does not always help. If damaged or severely clogged, the injectors must be replaced.
How often should the fuel filter be changed?
The manufacturer claims that it is recommended to replace this element every 80,000 kilometers under normal vehicle operation. Some Toyota owners delay replacement, almost twice the interval specified in the instructions, as a result of which they have to repair the engine much earlier. In addition, in difficult conditions, it is advisable to change the fuel filter more often, especially in regions with unstable fuel quality. Workshop and service station specialists recommend carrying out the procedure every 50,000 kilometers or more often. In addition, replacement may be required if foreign particles enter the fuel, which severely clog the mesh and contribute to accelerated wear.
Photo gallery
Below is a brief photo explanation of the process of replacing the filter on a Corolla in the 120th body.
Module hatch under the seat cushion
Disconnecting the motor power supply tube
General view of the pump with a coarse filter and a fuel level float
A clear representation of the quality of gasoline is a sawn filter.
Video
A series of videos from the author Dmitry Zlatgarag74 clearly demonstrates the process of replacing the filter on a Toyota Corolla E120.
Do you have any questions? Specialists and readers of the AUTODVIG website will help you ask a question
Was this article helpful?
Thank you for your opinion!
The article was useful. Please share the information with your friends.
Yes (100.00%)
No
X
Please write what is wrong and leave recommendations on the article
Cancel reply
Rate this article: ( 5 votes, average: 4.20 out of 5)
Discuss the article: