The latest generation cars and new premium models have tire pressure sensors as standard, which monitor the inflation parameter and transmit data to the dashboard. The equipment belongs to passive and active safety systems; tire pressure sensors can be installed and registered on almost any car model.
For cars in the Russian Federation, a good option is to use the ERA GLONAS satellite monitoring system, through the base of which you can check the performance of all car systems on your smartphone.
How to register tire pressure sensors in Toyota rav4
The sensors are paired automatically during the test drive. For other car models, binding is carried out through the OBD connector of the car (see point 5) 1. Install the sensor on the car. 2. Inflate all tires to the pressure recommended by the vehicle manufacturer. 3a. For Toyota Camry, you need to start the binding (select the item change wheels) through the menu of the car’s on-board computer. 3b. For Toyota Prado, with the ignition on or the car running, briefly press the Set button under the steering wheel three times. 4. To bind the sensors to the car, it is necessary to carry out a test drive at a speed of at least 40 km/h for up to 40 minutes.
When is the programming procedure carried out?
It will be necessary to reprogram or register control elements in several cases:
- when replacing faulty controllers with new ones;
- changing wheels according to the season;
- when installing sensors with connection to external devices.
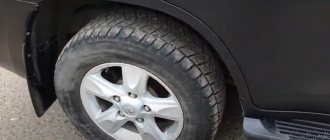
If tires are changed, the sensors will not be initialized without reinstalling the disc.
Automated binding
The sensors are paired automatically during the test drive. 1. Install the sensor on the car. 2. Inflate all tires to the pressure recommended by the vehicle manufacturer. 3. To bind the sensors to the car, it is necessary to carry out a test drive at a speed of at least 40 km/h for up to 20 minutes. If the sensor in the spare wheel has been replaced, then its binding to the car is carried out using diagnostic equipment, by entering the sensor identifier into the vehicle's on-board complex (on some cars, the spare wheel sensor is linked automatically). For some cars, before a test drive, the manufacturer recommends leaving the car with the ignition on for 15-20 minutes without moving to recognize the new sensors. This requirement is desirable, but not required.
Automatic binding
The sensors are paired automatically during the test drive. To enter the vehicle into the binding mode for new sensors, it is necessary to reset the system in the vehicle's on-board computer. (In later years of production, the binding procedure works automatically) 1. Install the sensor on the car. 2. Inflate all tires to the pressure recommended by the vehicle manufacturer. 3. Reset the system in the vehicle's on-board computer menu or press the tire pressure monitoring system reset button (if equipped) on the dashboard. (In later years of production, the binding procedure may work automatically). 4. To bind the sensors to the car, it is necessary to carry out a test drive at a speed of at least 40 km/h for up to 20 minutes. If the sensor in the spare wheel has been replaced, then its binding to the car is carried out using diagnostic equipment, by entering the sensor identifier into the vehicle's on-board complex (on some cars, the spare wheel sensor is linked automatically).
Replacing devices
After a technical inspection or repair of a car, sometimes a signal about imbalance is given. You should find out the reason. If the pressure control does not work on the Land Cruiser 200, the question is about replacing the system. The procedure is easy to do yourself. External sensors are attached to the wheel valves, internal ones are inserted into the disk manually. Tire fitting and professional services come to the rescue when it comes to internal meters. The craftsman removes the old or unsuitable external valve and replaces it with an internal device, taking into account the weight of the system parts for balancing.
Please note that if there is a uniform loss of pressure, no alarm will be generated.
And the point here is not a breakdown of the indicator or meter: this is a feature of the calculation, which gives a reaction to inconsistencies and imbalances. In this case, there is no need to change devices; mileage and diagnostics will show the correct result. During sport driving, on the contrary, the light will be on constantly, but this does not mean that the equipment is faulty; slippery or unpaved roads give critical indicators.
Linking tire pressure sensors to the Retro Display receiver
Linking tire pressure sensors to the Retro Display receiver is done in two ways.
1. Automated binding.
To bind tire pressure sensors, it is necessary to inflate the tire pressure in increments of 0.2 atmospheres in the following order:
– Front left wheel – standard pressure – Front right wheel – standard pressure + 0.2 atmospheres – Rear right wheel – standard pressure + 0.4 atmospheres – Rear left wheel – standard pressure + 0.6 atmospheres
After this, you need to start the procedure for automated binding of sensors to the car in the device menu and take a test drive at a speed of more than 30 km/h for about 20 minutes until the device recognizes the sensors and informs you that the sensor binding procedure has been successfully completed. Retro Display is ready to go.
To link the sensors, you will need any specialized device for activating tire pressure sensors, for example Ateq DT41.
It is necessary to start the procedure for manually linking sensors to the car in the device menu, then activate the sensors with the device in the following sequence:
– Front left wheel – Front right wheel – Rear right wheel – Rear left wheel
When the device recognizes sensors, the identifier of the activated sensor will appear on the screen; sometimes the sensor needs to be polled several times. After completing the procedure, the device will inform you that all sensors have been recognized. Retro Display is ready to go.
Source
How to register a new sensor
The original pressure sensor comes with technical documentation that describes the procedure for activating the element. To save battery power, all sensors, which are a multi-protocol programmable device, are in sleep mode. Registration takes place step by step.
- Activation of the sensor via the TPMS Tool control system.
- Through the Consult II-III system, transition to the initialization mode.
- Registration in the ID registration section, ID of each element.
The initialization or registration process will vary for each model. For example, for Volvo models, sensors can be registered using the AutoCom Delphi DS150E dealer scanner. For Infinity models, the controllers are activated by the on-board network independently, provided that the IDs for each wheel are correctly filled out: front, left - 36 psi; right - 34 psi; rear wheels: left - 28 psi, right - 31 psi.
The cost of registering sensors in a car service starts from 500 rubles. If there are difficulties with choosing a sensor, you need to install the controller on a model that does not have a standard monitoring system with data transfer to external devices; it is recommended to consult with specialists. The correctness of registration depends on the year of manufacture of the car, ECU parameters and region of use.
Why are tire pressure sensors needed?
The tire pressure recommended by the manufacturer should be maintained at normal levels so that the car can be controlled at any speed and can perform any maneuver without interference. The indicator is influenced by the condition of the tire, as well as environmental conditions - weather, temperature, humidity, atmospheric pressure. Therefore, before each trip, the driver is recommended to check the condition of the tires with a pump or, more conveniently, check the sensor readings.
In addition, by maintaining optimal tire pressure, the driver saves a lot on gasoline. It has been noticed that if the indicator is 0.5 atmospheres less than the required value, then over 100 km the engine “drinks” 1-1.5 liters more than usual.
How they work
Toyota by default equips the Rav 4 with TPMS, a system that monitors the pressure in all 4 tires. The sensors read the pressure and, at the slightest deviation, transmit data to the control unit via an antenna. In addition to meters, the TPMS structure includes:
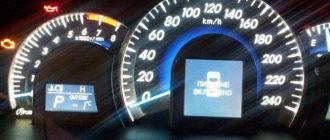
If the tire pressure is different from the norm, the light turns on and a certain sound is heard.
The driver should know that most often the Toyota Rav 4 tire pressure gauge is triggered for the following reasons:
Failures in the system are often caused by strong sources of radio signals, such as power lines. If you move some distance away from the source, the problem goes away on its own.
This system is designed to notify the driver of low tire pressure. If, while driving, a drop in pressure is detected in one of the wheels, the corresponding indicator lights up on the instrument cluster, indicating the need to immediately adjust the pressure.
1. Operating principle.
The tire pressure monitoring system (TPMS - Tire Pressure Monitoring System), used on Toyotas, belongs to the "indirect" action schemes and operates as part of ABS, which is able to perceive a constant difference in wheel speed (a flat tire has a smaller rolling radius and so it rotates a little faster).
But such a TPMS cannot simply compare the speed of one individual wheel with the others, since the car does not move in an absolute straight line very often, and in any corners, the outer wheels will always travel further than the inner ones, and the front wheels will always travel further than the rear ones. Therefore, a traditional control system sums the speeds of each two diagonally located wheels, calculates the difference between these sums and divides it by the average speed of all four wheels. If the resulting ratio differs from the set one, the system diagnoses a change in pressure, but cannot identify a specific tire.
The disadvantages of this scheme are:
— inability to detect a sharp drop in pressure; — the impossibility of simultaneously determining the pressure drop even in two wheels located on the same side or on the same axle, not to mention all four wheels; — dependence of system performance on the degree of wheel slip, tire condition and vehicle load; — triggering when the pressure drops by no less than 25-30%; — the need for lengthy calibration (pre-tuning). In this regard, Toyota used in parallel a second method of pressure control using ABS. The fact is that the tire and wheel rim actually represent an oscillatory circuit, the characteristics of which directly depend on the elasticity of the tire, and therefore the pressure in it (meaning the circular vibrations of the tire in the direction of rotation). It turned out to be possible to isolate the frequency of these oscillations from the signal of the wheel speed sensor, and by its change to judge the pressure drop.
However, TPMS is characterized by noticeable inertia - in order to detect a flat tire, you need to drive a considerable distance (sometimes up to 20-30 km), and a considerable distance will have to be covered even after the pressure has normalized for the indicator to go out.
2. Development.
Toyota began introducing this system in the second half of the 90s. As you can see, it was used mainly on models of the Corolla family and large rear-wheel drive cars, ranging from class E and above. But it seems that the Japanese quickly lost interest in this scheme, so today they have abandoned its use on most models, including the Corolla 120 of later years.
| Model | Series | Release |
| Corolla | #E10# | 04.1997-04.1998 |
| Corolla/Sprinter | #E11# | 04.1997-04.1998 |
| Corolla | AE100, AE104, CE101 | 04.1998-08.2000 |
| Corolla/Sprinter | AE110, AE114, CE11#, EE111 | 04.1998-08.2000 |
| Sprinter Carib | AE11# | 04.1998-07.2002 |
| Corolla Levin/Sprinter Trueno | AE11# | 04.1998-08.2000 |
| Corolla Spacio | AE11# | 04.1998-05.2001 |
| Corolla/Corolla Fielder | CE121, NZE12#, ZZE122, ZZZE124 | 08.2000- |
| Corolla Runx/Corolla Allex | NZE12#, ZZE122, ZZE124 | 01.2001- |
| Corolla Spacio | NZE121, ZZE12# | 05.2001- |
| Mark II | JZX101 | 09.1996-08.1998 |
| Mark II | JZX100, JZX101 | 08.1998-10.2000 |
| Mark II / Mark II Blit | JZX110 | 10.2000- |
| Chaser/Cresta | JZX101 | 09.1996-08.1998 |
| Chaser/Cresta | JZX100, JZX101 | 08.1998-06.2001 |
| Crown/Crown Majesta | JKS175, JZS171, JZS175, JZS177, UZS171, UZS175 | 09.1999-2005 |
| Century | GZG50 | 04.1997- |
| Celsior | UCF3# | 08.2000- |
3. Indicator.
There are at least two options for indicators on the instrument cluster - ISO K11 and K10. The most famous of them, of course, is the first one - “horseshoe with arrows”. By the way, in the Western world there is a similar problem with these indicators - “what kind of light bulb is this?” - According to surveys, the majority of drivers there do not understand their meaning.
A working indicator should light up when the ignition is turned on and go out after 3 seconds. If the system has detected a drop in tire pressure, then in order for the indicator to go out, after the pressure has normalized, you must drive a certain distance at a speed of at least 30 km/h. The indicator is powered directly from the output of the ABS control unit.
The principles embedded in the system allow for the possibility of its incorrect operation (the indicator does not light up when the tire pressure is low or, conversely, lights up when the tire pressure is normal) in the following conditions: - tires of a non-recommended size are used, - tires of different sizes or models are installed on different wheels, - wheels have different grip on the road, - a spare tire is used, - wheels with snow chains are used, - the tire pressure is significantly higher than the nominal one, - the tire pressure has dropped sharply due to a puncture, - the system has not been pre-set, - the car is moving along uneven or icy roads, - the vehicle is moving at a speed below 30 km/h, - for short trips (lasting up to 5 minutes). If the indicator remains illuminated at normal pressure and in the absence of the specified conditions, this may indicate a problem with the TPMS itself.
4. Pre-setting.
The adjustment must be made after performing any work related to replacing wheels and tires (discs), otherwise the system will not be able to function normally. The adjustment procedure is given below (the pressure in all four wheels must first be correctly adjusted).
Type 1 - models without installation button and with DLC1 connector (early version)
1) Turn on the ignition. 2) Jumper the “TS” and “E1” terminals of the DLC1 diagnostic connector under the hood. 3) After 30 seconds, press and hold the brake pedal until the system indicator flashes 3 times at 2 second intervals.
Type 2 - models with an installation button and with a DLC1 connector (transitional version) Note. The installation buttons have several design options - with a pictogram, with an inscription or without anything at all, but they differ in their characteristic shape and location - at the bottom of the instrument panel on the driver's side. 1) Turn on the ignition (the car must be stationary). 2) Jumper the “TS” and “E1” terminals of the DLC1 diagnostic connector under the hood. 3) Press and hold the installation button until the system indicator flashes 3 times. 4) After this, for the system to save the correct settings, you need to drive a certain distance.
Type 3 - models with an installation button and without a DLC1 connector (late version)
1) Turn on the ignition (the car must be stationary). 2) Press and hold the installation button until the system indicator flashes 3 times. 3) After this, for the system to save the correct settings, you need to drive a certain distance.
5. Self-diagnosis.
The pressure control system, although it operates as part of ABS, also provides its own small self-diagnosis. Codes on those models where the DLC1 connector was still used are read in the standard Toyota way by the number of indicator flashes when the ignition is on and the “TC” and “E1” terminals are closed. Removing codes is similar to deleting ABS system codes.
21 - Intake air temperature sensor (open/short circuit) 31 - Speed sensor (faulty) 42 - Brake light switch (faulty) 49 - Brake light switch (open circuit or short circuit)
It would seem, what does the temperature sensor and brake lights have to do with it? In fact, the ABS control unit uses ambient temperature data to calculate its effect on tire pressure, and as for the brake lights, when the brake is pressed, the system stops monitoring pressure. Evgeniy, Moscow © Legion-Avtodata
Comments and questions
can be sent to [email protected] Toyota Service Repair Manual
What to do if the tire pressure light is on on a Toyota Rav 4
Sometimes the TPMS system malfunctions and the dashboard light comes on for no reason. But there are cases when the Rav 4 tire pressure sensor is on, and the problem cannot always be determined by eye.
TPMS turns on with the engine and immediately checks the pressure level in each tire. If everything is normal, the indicator goes out. If not, the light on the dashboard lights up and a beep sounds.
Often, sensors “lie” due to poor-quality road surfaces or sudden changes in temperature. But, even if the driver is sure of an erroneous operation, the signal still cannot be ignored. Just in case, it’s worth inspecting the wheels and making sure they are intact. Manually check the condition of the tires, not forgetting the spare wheel. If necessary, pump up.
Often the pressure indicator lights up due to mechanical failure of the sensor housing or failure of its fastening. To identify the problem, you do not need to remove the tire; a visual inspection is enough. You just need to spin the wheel and listen to the sound of the movement.
In the error log you can find complete information about why the tire pressure sensors on the Rav 4 do not work correctly. And take any action depending on the situation.
TPMS Maintenance Tips
After replacing the sensors of the air pressure monitoring system in car wheels with new ones, it makes sense to follow a few simple recommendations that will help extend the life of the newly installed parts. These recommendations include:
- Replace the valve stem core with a similar one, but made of stainless steel. Copper rods quickly corrode as a result of exposure to mechanical shocks and chemical reagents. The core costs a penny, but the price of the sensor installed on it will be significant. In this way, it is possible to protect the sensor housing from the formation of corrosion spots on it.
- The TPMS sensor should always be kept screwed to the nipple valve stem. This will protect it from the harmful effects of water, dirt, dust, chemicals, and molten bitumen.
- The sensor must not be exposed to aerosol fixative, tire conditioner, silicone grease or other similar compounds intended, among other things, to protect the rubber of the tire. There is a high probability that the thickened composition will get into the hole of the sensor and block its operation; accordingly, the sensor will issue an error message to its control unit or ECU.
Proper operation of the system will not only extend its service life, but also protect the driver and passengers in the event of an emergency with the wheels.
Conclusion
If the tire pressure light is constantly on, you should not rush to forcefully turn it off, but check whether everything is in order with the car wheels. In particular, check the pressure, integrity and general condition of the tires, tread depth, wear, and it is advisable to also check the wheel alignment. It also makes sense to check the tire pressure monitoring system and ABS sensors. Often the cause is a dead battery or a malfunction of the ABS sensor. If problems are found, first fix them, and then reset the TPMS error.
Where to buy a tire pressure sensor for Rav 4
From the factory, cars are supplied with original Toyota sensors. In the event of a breakdown, the driver can buy a tire pressure sensor for the Toyota Rav 4 either from an official representative or from third-party companies. Among the original spare parts for Rav 4, pressure gauges No. 4260730040, No. 42607-30071, No. 4260742021, No. 42607-02031, No. 4260750011, No. 4260750010 are suitable.
A high-quality analogue can be obtained from General Motors - No. 13348393, VDO - No. S180211003Z, Mobiletron - No. TXS066.
How much do tire sensors cost on a Toyota RAV4?
The cost of sensors for the RAV 4 varies greatly, depending on the region and brand:
- For example, original Toyotas cost from 2 to 5 thousand rubles each, that is, 8-20 thousand per set;
- Universal, suitable for almost any car - from 10 thousand rubles per set;
If we take leading brands, then the approximate price is:
- General Motors – 2400–3600 rubles
- Mobiletron – 1200-2000 rubles
- VDO – 1700-2000 rubles
How to disable pressure sensors on Rav 4
If the car owner does not want to constantly use TMPS or there is a need to disable it for a while, then there are 3 options to disconnect from it. Standard: you can go to an official auto center or to a private electrician, where professionals with the necessary equipment will quickly solve the problem.
Or, at your own peril and risk, do the entire procedure yourself.
To turn off the indicator on the control panel, the driver will need a guillotine-type connector. This item is sold at any auto electrical store. Such connectors are convenient because they allow you to connect wires without cutting or receive branches from them.
There is a black plastic housing under the glove compartment. You need to get it. Then remove the connector from the orange box, remove the black and then the yellow electrical tape. Now from the bundle of wires you need to select 2 with black stripes: white is “ground”, pink is TMPS. Then fasten them with a guillotine-type connector. Then secure with a piece of yellow electrical tape and put all the parts in order in place. The system is turned off.