Most often, the reason for replacing oil seals on a Toyota is a sharp increase in oil consumption by the car. Signs of the need to replace valve stem seals include the following factors:
- A large amount of smoke from the exhaust pipe of the car, especially after long-term parking or idling;
- A large amount of oil consumed - up to 700 g/per 1 thousand kilometers;
- The idle air valve becomes constantly contaminated with oil.
Piston rings and valve stem seals for Toyota Corolla
To ensure the tightness of the above-piston space or combustion chamber in the engine, the presence of piston rings is necessary.
They prevent gases from entering the engine crankcase. In addition, their function includes heat removal and effective cooling of the pistons. IMPORTANT! Due to increased temperature and physical stress, increased demands are placed on the materials used to manufacture piston rings. They must be made of cast iron or steel, and also have a certain elasticity.
Repair work
You can change the valve stem seals and rings yourself.
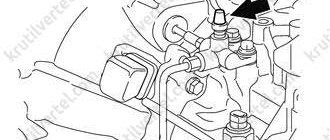
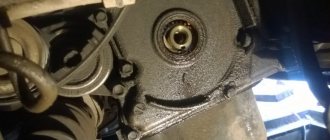
Replacing valve stem seals
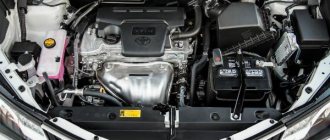
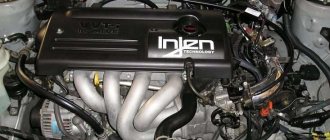
The oil seals were replaced on one of the most common engines produced by Toyota Corolla - 4A-FE (1.6 l, 4 cyl., 16 cl., 115 hp)
The reason for replacing the caps was several factors:
- the car smokes a lot, especially after a long period of parking or long work at idle
- high oil consumption (up to 700 g/1 thousand km)
- The idle valve is constantly clogged with oil
1 First, you will need to purchase a valve cover gasket (1 pc.), sealing rings for spark plug wells (4 pcs.) 2 Camshaft oil seal (1 pc.) 3 Washers for the nuts that hold the valve cover (4 pcs.) 4 MSK (18 pcs.) .) I took the original Hyundai / Kia caps. 5 Desiccant from VAZ-2112, fits like a original one, as well as a remover for old caps. 6 Toyota Corolla Ceres 4E-FE engine 7 Remove the valve cover, which is held on by 4 studs, tightened with nuts. 8 You can unscrew the spark plugs right away, or you can later, it’s not important, but it’s better to cover the spark plug wells so that God forbid something falls in there. I covered them with rags. Next I unscrewed the braid. wiring from the generator and put it aside, but it was necessary to do this right away, before removing the valve cover. 9 Next, turn the wheels to the right and through the hole in the right wheel arch, turn the crankshaft so that the mark on the crankshaft pulley coincides with the number zero (look under the hood from the generator side) (in the photo is the right wheel arch, and the bolt that holds the crankshaft pulley) . Then we make sure that the mark is visible through the hole on the camshaft pulley. 10 Then we make sure that the marks on the camshaft gears match, are opposite each other, in places as in the photo. If all the marks match, then the piston of the first cylinder is at TDC and you can move on. 11 Before removing the intake camshaft, it is necessary to secure the split gear with a bolt (M8) by screwing it through the hole in the gear. If this is not done, you will have to cock the gear later, otherwise the engine will “diesel”. 12 Remove the camshaft covers and lay them out so that nothing gets mixed up during assembly. 13 The outer covers (one near the distributor, and two on the opposite side) can stick, like mine, I had to tinker. Then we remove the distributor, having previously marked its initial position! 14 Remove the camshafts and place them so that they do not interfere. 15 This gives access to the pushers with shims and everything else. 16 We take out the pushers, and here you can pull out and measure the thickness of the reg. washers, because There were no dimensions indicated on them. 17 The washers are picked out by something sharp. 18 Next, desiccate the valve, but during desiccation it is better to cover the valve with a rag, otherwise when you press the desiccant, the crackers will fly all over the engine compartment. 19 Remove the spring and see the cap itself. We get it out with the device discussed above. 20 If the cap is old enough, then after you managed to get it, it looks something like this. After you take out the cap, be sure to make sure that there are no pieces of the old cap left there. 21 Next, we put on a new cap, having previously bathed it in oil, first we press it with our hands, and then we select the head according to the diameter and tap it very lightly, as soon as we heard a characteristic sound, as if it was stuck, then that’s it, the cap is seated, 3-5 very light ones are enough hit with a hammer. 22 The new cap is in place. Next, you need to dry the valve back, put the spring in place, having previously smeared the top of the valve with lithol. We take the desiccant, press on the spring and stick crackers onto the lubricant, carefully release the desiccant and make sure that the crackers sit as they should, and that’s it, the valve is ready. 23 Valve components:
Causes and signs of failure
The need to replace piston rings can be indicated by both obvious and indirect signs. In addition, replacing Corolla rings in most cases entails the need to replace other components of the internal combustion engine.
The owner can understand that it’s time to change the piston rings and diagnose the engine by the following changes in the car’s operation:
- Loss of power from the power unit;
- When cold, the car became difficult to start;
- In some situations and when hot, starting the engine became difficult;
- Engine oil consumption has increased significantly;
- The appearance of gray or blue smoke from the exhaust pipe;
- Increased fuel consumption.
ATTENTION! The condition of the piston rings directly affects the compression performance, which characterizes the condition of the engine. The symptoms described above lead to a decrease in compression, which means an increase in crankcase gas pressure is inevitable. In such a situation, if you do not contact specialists in a timely manner, complete failure of the motor, as well as its subsequent major repair, is possible. The main causes of piston ring failure can be:
- Natural wear and tear of elements;
- Engine overheating;
- Incorrect installation of rings, violating the required tightness parameters.
If you install new piston rings in worn cylinders, then their ineffective operation is guaranteed. The first signs of a malfunction of the piston elements are a reason to contact a car service, where specialists will carry out high-quality diagnostics and offer options for solving the problem. To do this, only specialized equipment and tools should be used, which are not always found in the car owner’s garage.
Question about replacing oil seals.
I found detailed materials on how to replace valve stem seals by dismantling the cylinder head.
How can I replace the MC caps without removing the head? Are there any pitfalls? And one more thing - what is an MSC puller (so as not to use screwdrivers or pliers.)? Thank you in advance. Links (and photos) are welcome. (There aren’t a lot of coins, but it eats a fair amount of oil, and mostly at idle (when warming up) - presumably the caps. I’m thinking of replacing the caps + (probably) decarbonization, we’ll see.) PS: 1ZZ engine.
This topic has 50 replies
Re: Question about replacing valve stem seals.
So is it really necessary to remove the head to change the MSK?
I think it's just the valve cover. I'm not sure though. The topic is interesting, the same process awaits. The oil also eats up, and probably also more at idle, smokes heavily in the morning when warming up. There is no need to remove the head. The timing cover, timing belt and camshafts are removed. in turn, each piston at TDC - replacing the MSK. I bought this desiccant. The MSK itself was removed with a collet wrench.
Demid, thank you. The only thing is - is THIS desiccant suitable for 1ZZ?
Here's the ambush, I didn't immediately see that you have a 1ZZ engine, but I think that you can change it without removing the head. look for information on the Internet, on a drome, for example, because such an engine was installed not only on spasio https://www.spac. mon/3381/. As for the desiccant, I bought it as a universal one - the part that presses on the washer with crackers turns over, on one side the diameter is smaller, on the other it is larger. this is how I changed it:
and even larger, I lubricated the valve stems with lithol carefully with breadcrumbs - they are very quick, it is better to place a good magnet nearby.
Great piece of iron. How much does this cost?
Regarding replacing the MSC without removing the head, there is an opinion that this can be done, you just need to make sure that the valve does not fall.
You set the piston to TDC, using, for example, a feeler gauge or an electrode (a stick is inserted into the spark plug hole, this is how we control the rise of the piston). And the valve can be held with a bent electrode or wire.
I warn you, everything written above is a theory gleaned from forums. I just need some capital, so I was interested in this issue.
This is not only theory but also practice. Tag's father changed the caps on his Lada 3 times. I remember well, because I held the valve, why the hell do we need children?
I bought a desiccant last summer for 850 rubles. on the VAZ classic, the valves can be supported with a screwdriver through the spark plug hole. on the 4A-Fe the wells are vertical and locking the valve with a bent hook is not an option. I raised the piston to TDC, but I didn’t try to lower the valve onto the piston - why tempt fate. the valve stayed in place even without the cap. The desiccant was set evenly so that it pressed without distortion and did not touch the valve stem.
Damn, how much does it cost to have it replaced at the service center?
If you are not satisfied with such a desiccant, then you can buy some VAZ one and convert it to fit your engine, but then welding will be necessary. I did this on 3S-FE. Regarding the valves - when the piston is at TDC, then, in my opinion, the valve only falls down a little and rests against the piston. When I changed it on the basin, I held the valve, when on 3S-FE I didn’t, and nothing bad happened. The only point, as Demid says, is that the crackers only fly along the way. Before removing, I recommend covering the entire engine compartment with rags so that they don’t fly down somewhere, and drying them out as carefully as possible.
online now
- Moroz
based on activity data for the last 5 minutes.
Happy Birthday!
- Magistral
Turned: 40 Age: 40
Turned: 43 Age: 43
Turned: 49 Age: 49
There are 36 people with birthdays in total. The list includes the most active ones.
When to change
Like any consumable item, caps require regular replacement. Experts advise changing the MSK every 50-70 thousand kilometers. This will avoid serious problems with the motor.
How to check the status? To the touch. If the oil seal is hard, it's time to change it.
Obvious signs of MSC wear:
- increased oil consumption;
- blue smoke from the exhaust pipe after starting the engine. Indicates that oil has entered the cylinder and is burning;
- the appearance of oil on the candle threads.
The first symptoms of wear indicate the need for urgent replacement of MSCs.
Replacing valve stem seals on 2AZ
Where does it come from at some car services? The work involved in repairing a Toyota engine is often made cheaper due to the low wages of the auto mechanic, or, in other words, his low qualifications.
Take, for example, machining a cylinder block. The generally accepted engine repair technology today is flat-top honing of cylinders: a network of marks of a certain roughness is first created on the surface, and then their peaks are smoothed with a special finishing operation.
In some engine repair shops, honing is performed using a simplified technology, without giving the cylinder surface the required profile. The situation is similar with crankshafts. Have you seen many workshops where crankshaft journals are polished after grinding?
Usually they are limited to grinding. And this goes against the generally accepted engine repair technologies in world practice.
Replacing the timing chain of Toyota Corolla 1.4, 1.6, 1zr-fe
Although this is a labor-intensive process that requires a lot of attention, it is still within the power of a car enthusiast. On the fuel injection pump pulley with a mark on the coolant pump housing. Installing Toyota Corolla timing marks If the marks are worn out for some reason, they must be restored for proper installation of the chain or belt.
This can be done using improvised means. Timing marks are present on all cars, including those with 3zz and 1zr E engines. Using SST, tighten the crankshaft pulley bolts.
Position of the crankshaft when removing the plunger Turn the crankshaft counterclockwise, then remove the hook from the locking pin and release the plunger fig. Checking the operation of the plunger Turn the crankshaft clockwise and make sure that the plunger presses the chain tensioner shoe Fig.
If the plunger does not extend, use a screwdriver to push the shoe toward the tensioner until the hook disengages from the locking pin so that the plunger can extend. Installing the Crankshaft Position Sensor Apply a thin layer of engine oil to the crankshaft position sensor O-ring.
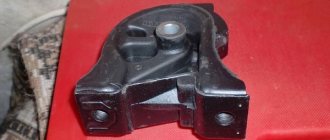
Secure the crankshaft position sensor with 2 bolts. Install the coolant pump assembly. Install the right engine mount bracket.
Toyota Corolla: timing chain marks
Install the serpentine belt tensioner assembly. Installing the cylinder head cover Remove any remaining old sealant from the mating surface.
Places for applying sealant Apply sealant at 2 points, as shown in Figure 2. Install the cylinder head cover within 3 minutes after applying the sealant.
Fill the engine with oil no earlier than 2 hours after installing the cylinder head cover. At the same time, I wanted to inspect the condition of the engine for oil deposits. The mileage at the time of repair was not several kilometers.
The chain was original, almost sure it was still factory.
The process of removing and installing the timing chain
Before the repair, I consulted with a friend who has been doing repairs for many years, including Toyota. He was very surprised at my impulse to replace the chain, since from my professional experience I am sure that the chain on our cars, with proper care, lasts for kilometers.
On Prado, the chain is generally designed for the entire service life of the car.
Maintenance Correct installation of marks on camshafts. Marks on the stars that are not visible in the photo are marked in red. Fixing the camshaft with a chrome vanadium assistant: I will not describe the entire replacement process, this has been done before me more than once.
Description
Valve seals (valve seals) are one of the most heavily loaded elements of the gas distribution mechanism, operating in an aggressive environment and at extreme temperatures. As a result, they are subject to increased wear. Therefore, if you notice an abnormally melting oil level on your oil dipstick and you have to add engine oil repeatedly over 10 thousand miles and, moreover, bluish smoke from the exhaust pipe of your car with a pungent odor has become visible, then most likely it’s time to change the seals valves, because oil from the engine began to flow into the exhaust manifold. However, often the reason for engine oil getting into the intake (and exhaust) manifold is not only bad valve stem seals, but also worn valve guides . In this case, replacing the valve stem seals may not provide a noticeable reduction in oil consumption (or may provide a short-term positive effect). In this case, you should remove the block head and replace the guide bushings. Also, incorrectly replacing the caps will not give a positive result. For example, if a craftsman puts on caps with a hammer, he can very easily push the cap further than normal and thereby tear it. We are no longer talking about fake caps, the rubber of which turns into “jelly” after a couple of months.