Hi all. In general, I decided to change the chain after buying the car; there was a slightly rustling sound at idle. Removing the alternator belt reduced the sound a little, but it was still there. When it was cold, after parking for the night, after starting it there was a rattling sound for about a second, then everything was ok.
The mileage is about 140 thousand km, the previous owner bought the car new, it was serviced only by officials, the service marks are all there. The mileage doesn't seem to be great, but the condition of the chain is questionable. There is a lot of information about this on the Internet. Some people have problems at this mileage, and others even at 300 thousand km. no problem. Many people start with the simplest thing: replacing the chain tensioner. It’s 50/50, it helped some, some didn’t. In general, I decided to take the difficult path, replace everything with a kit and forget about this problem. I did all the work myself, for the first time. Everything took 12 hours. All spare parts are original, except for the timing chain (DID) and the oil pump chain (DID).
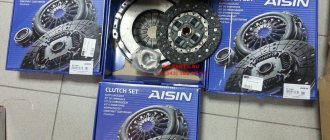
Also, along the way, I replaced the pump (AISIN) with a modernized one, although this one was already installed (changed under warranty at 45 thousand km, along with bolts) and was a little noisy.
Alternator pulley (INA), oil, antifreeze and filter.
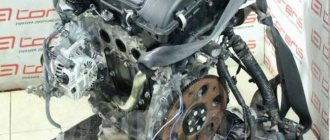
And so, let's go. Briefly about the replacement process, I won’t go into more detail, it’s in the manual. We remove the valve cover, unscrew the spark plugs, the generator, the right engine mount, drain the antifreeze (there is a drain valve on the radiator), oil, remove the pump, the crankshaft pulley (unscrew it with a wrench), unscrew and remove the chain tensioner, the oil filter housing, disconnect the two pipes from the thermostat (not at all convenient, but I didn’t remove the intake manifold)
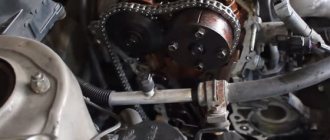
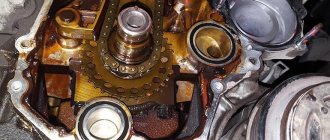
Unscrew the side timing chain cover.
Now the fun part, we remove the chain and compare it with the new one. Here I was a little surprised, the length of the new and old chains is the same, i.e. The old one is not stretched at all. I didn't take a photo. BUT, the side sag was greater than the new one. I think that replacing just one tensioner could solve the problem with the rattling noise at startup and noise at idle. The old tensioner was pushed out just a little bit.
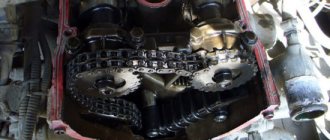
But since everything has been disassembled and all the spare parts are there, I decide to change everything. I'm installing new sprockets (crankshaft and oil pump), I haven't changed the phase regulators, I'm installing new dampers, chains, everything is as marked.
I hooked the chain tensioner damper with a wire to keep it tight. Next, we clean the side cover of the old sealant (we also clean it on the engine), apply new sealant (we used gray Victor Reinz), install and tighten the cover. There are 3 o-rings in the lid, I bought them, but for some reason they didn’t fit, so I didn’t change them. We install a new tensioner with a new gasket (in the cocked state with the hook engaged). Now you need the tensioner to work and tighten the chain. The manual says to turn the crankshaft counterclockwise until the hook comes off. I didn’t do that, I immediately took a long screwdriver and manually moved the hook. We remove the wire that was attached to the damper. Next, turn the crankshaft clockwise, listen for clicks (this is the tensioner rod extending and tensioning the chain). I didn’t hear the tensioner click, but there was a loud click for one revolution of the crankshaft, no matter how much I turned it, it didn’t go away, although the chain was already tensioned. Next, we collect everything in the reverse sequence.
Signs of worn parts
There are several symptoms that determine whether the chain needs to be replaced:
- It rattles when the engine is running.
- It scrapes against the sides of the lid.
- It looks like it's sagging a lot.
It is recommended not to skimp on this spare part and choose only the original one, because it affects the integrity of the engine and is changed once every 200 thousand kilometers. It’s better to spend five years’ money once and be sure that the engine valves will be in order.
The chain is much more reliable than the timing belt and lasts many times longer, but every coin has another side: changing it is much more difficult and expensive. For those who want to replace it themselves, detailed instructions are provided below.
Replacing the chain tensioner for Toyota Corolla E120
If excess oil begins to leak out of your Toyota Corolla car, extraneous sounds appear in the chain, or a rumble begins to be observed when the engine is running, it’s time to replace the hydraulic tensioner. You can change the hydraulic tensioner yourself; there is nothing complicated in this procedure. Any car owner can do this task; for the job you will need to purchase a new device and prepare the tools.
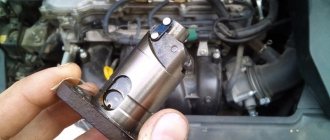
Preparation for work Before starting the repair, you should prepare the following materials and tools: a new hydraulic tensioner, number 13540 - 0D010 is suitable for Toyota; silicone sealant (RTV); wrenches for 10 and 20, you can use heads. Having prepared everything you need, you can proceed to repair work. Replacing a tensioner on a car First of all, the rod on the purchased hydraulic tensioner is retracted; it will need to be secured in a compressed position using a special hook. The old tensioner, which has become unusable, is located on the left side, where the passenger seat is located, in the rear area of the cylinder block. The first bolt is placed in the upper area. When unscrewing the second bolt, special care should be taken, since the hydraulic tensioner is in a spring-loaded state, and when unscrewing all the bolts, it may jump off. Each bolt must be unscrewed very carefully. When all the boots are unscrewed, and the hydraulic tensioner does not want to be easily removed, you will need to carefully pry it off with a screwdriver. Before installing a new hydraulic tensioner, the O-ring of the installed tensioner should be well lubricated with engine oil and then with silicone sealant. It is very important that the sealant does not come into contact with the tensioner. The main thing is not to overdo it with lubrication. Do not apply excessive amounts of sealant. When the bolts are tightened, excess fluid will come out, most of the product will be wasted. The tensioner should be immediately placed in the correct position, otherwise installation will be complicated; it simply cannot be put in place otherwise. The device is installed in the engine, the hook points upward, then the fixing bolts are tightened. The tightening is 20 Nm. Taking the head or key, you should turn the generator pulley, turning the engine counterclockwise. The fixing hook is released, the tensioner rod is brought into working position. If everything is done correctly, you can hear a clear click. After replacing the hydraulic tensioner, the sound when starting the engine and at rpm will disappear, and the car will start more smoothly.
How to change the timing chain on a Corolla 150
To replace the timing chain in the Corolla 1ZR FE engine, you need to change: sprockets, tensioners, dampers. You can immediately purchase a repair kit that contains all this.
It is important to know! If you do not change the entire set, the new chain can very quickly fail.
On a Toyota, to replace it, you need to remove the attachments from the engine:
- Top cover.
- Side cover.
- Belt (behind side cover).
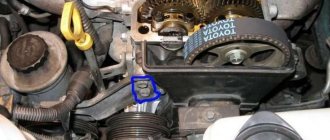
The first step to replacing the timing chain on a Toyota Corolla 1.6 2008 and other years of production is to remove the front right wheel; behind it there will be a rubber protection that can be moved aside, as in the photo:
After the protection is pulled back, a cover will be visible on the motor, from which you need to unscrew the bolts and then remove it. After dismantling it, the chain will be visible:
Important! The timing chain must be placed according to the marks, as in the photo below. It itself has links whose color is different from the rest. These colors are different in different sets; in our case, two links are simply darker. The mark, indicated by a red arrow, must stand strictly between two links that differ in color.
In 1 ZR FE there will be a mark on the left sprocket of the gas distribution mechanism, which should fall into the middle of the link, which will differ in color, as in the photo.
Now we put the chain on from below, through the window from which we removed the protection. It will be visually clear that she is relaxed, but that’s how it should be. Then the tensioner will cock it into the desired position, which we will replace in the following step.
The hydraulic tensioner is located in the side cover, which we removed. We unscrew it from there and screw in a new one. It must be in the cocked position.
The next step is to rotate the crankshaft clockwise a couple of turns. After this, the hydraulic tensioner will work and tighten the chain sagging from below.
Chain replacement 1NZ-FE, 2NZ-FE, Toyota engine, Timing marks
Replacing the timing chain 1NZ-FE 2NZ-FE
open the photo in a separate window
Removing and installing the 1NZ-FE timing chain
. 1 — radiator expansion tank, 2 — shock absorber of the right engine mount, 3 — drive belt for mounted units (generator), 4 — decorative cylinder head cover, 5 — ignition coils, 6 — hose No. 1 of the crankcase ventilation system, 7 — hose No. 2 crankcase ventilation system, 8 • cylinder head cover, 9 — cylinder head cover gasket, 10 * WT system valve, 11 — o-ring seal, 12 — generator, 13 — generator drive belt adjusting bracket, 14 — oil pump o-ring seal, 15 — chain guide, 16 — timing chain, 17 — chain tensioner, 18 • chain tensioner shoe, 19 — coolant pump gasket, 20 — coolant pump, 21 — coolant pump pulley, 22 — oil pump seal, 23 • crankshaft position sensor, 24 — oil pump assembly, 25 — right engine mount bracket, 26 * accessory drive belt (power steering pump), 27 “crankshaft pulley.
Removing the timing chain 1NZ-FE
1. Drain the coolant and engine oil 2. Remove the right front wheel. 3. Remove the lower right engine guard and fender liner seal. 4. Remove the accessory drive belts and the generator. 5. Remove the pump pulley and coolant pump. 6. Remove the cylinder head cover. a) Unscrew the four nuts and remove the decorative cylinder head cover. • b) Remove the ignition coils (see chapter “Ignition System”). c) Disconnect the two hoses of the positive crankcase ventilation system from the cylinder head. d) Unscrew the bolt and remove the wiring bracket. e) Remove seven bolts and two nuts, two washers, the cylinder head cover and the gasket.
7. Remove the shock absorber of the right support, a) Install a jack under the engine.
Place a block of wood between the jack foot and the engine. b) Remove the bolt securing the tube to the shock absorber of the right engine mount. c) Remove four bolts and two nuts, remove the shock absorber of the right support.
8. Remove the right engine mount bracket by removing the four bolts. 9. Set the piston of the first cylinder to TDC of the compression stroke, a) Turn the crankshaft pulley and align it with the “O” mark on the timing chain cover.
b) Make sure that the mark on the camshaft sprocket and the mark on the WT sprocket are at the top as shown in the figure. If the marks do not match, rotate the crankshaft 360° and set the marks as indicated above. 10. Remove the crankshaft pulley, a) Using a special tool, remove the pulley mounting bolt. b) Remove the crankshaft pulley and pin. If necessary, use a special tool when removing the pulley.
11. Remove the crankshaft position sensor. 12. Remove the WT system valve 13. Remove the timing chain cover (oil pump), a) Remove 15 bolts and a nut.
b) Insert a screwdriver between the cover and the cylinder head or cylinder block, remove the timing chain cover. c) Remove the two O-rings from the cylinder block and crankcase. 14. Remove the timing chain tensioner by unscrewing the two bolts. a) Using a screwdriver, while rotating the exhaust camshaft slightly to the right, turn the tensioner lock plate down and press the tensioner plunger as shown in the figure. If the locking plate is difficult to lower, repeat the operation, slightly turning the exhaust camshaft left and right. b) Install a rod with a diameter of 2-3 mm through the hole into the locking plate and tensioner, thereby fixing the plunger. — To make it easier to fix the rod, turn the camshaft slightly left and right. — Secure the rod with electrical tape so that it does not fall out.
c) Unscrew the two bolts and remove the chain tensioner. 15. Remove the timing chain tensioner guide. 16. Remove the timing chain guide by unscrewing the two bolts. 17. Remove the timing chain
Checking the 1NZ-FE circuit
and timing chain tensioning mechanism
1. Check the timing chain and sprockets, a) Using a caliper, measure the length of 16 chain links when tensioned. Maximum chain length...123.2 mm Note: Take three or more measurements on random sections of the chain. If the 16-link section of chain is longer than the maximum, replace the chain. b) Wrap the chain around the sprocket.
c) Using a caliper, measure the diameter of the sprocket along the rollers, as shown in the figure. Minimum sprocket diameter: camshaft… 96.2 mm crankshaft……………..50.5 mm If the diameter is not as specified, replace the sprockets with chain. 2. Check the timing chain tensioner guide and timing chain guide for wear. Maximum wear………………..1 mm
3. Check the timing chain tensioner. a) Make sure the plunger moves freely when the ratchet is raised. b) Release the ratchet and make sure the plunger is locked.
Replacing the front crankshaft oil seal 1NZ-FE
Replace the crankshaft front oil seal, a) Cut off the oil seal lip with a blade and remove it using a screwdriver. Note: Do not damage the crankshaft.
b) Using a mandrel and a hammer, press the new oil seal flush with the timing chain cover.
Installation of chain 1NZ-FE
1. Install the timing chain and crankshaft sprocket. a) Set the crankshaft 40-140° after TDC, and the sprocket teeth of the intake and exhaust shafts with installation marks at 20° after TDC. Then return the crankshaft to the 20° position after TDC. b) Install the timing chain guide and tighten the two bolts securing it. Tightening torque……………………….9 N m c) Align the chain marks (yellow links) with the timing marks of the camshaft sprockets and the crankshaft sprocket mark. Install the chain (see picture).
1 — installation mark, 2 — link with a mark. Note: To prevent the exhaust camshaft from turning backward, hold it with a wrench. d) Install the timing chain tensioner guide. 2. Install the tensioner, a) Press the tensioner plunger as shown in the figure.
b) When the locking plate is lowered, install a 2.5 mm diameter rod into its hole. c) Install the tensioner and tighten the two bolts. Tightening torque………………………..9 Nm d) Remove the rod from the tensioner. e) Make sure there is tension between the intake and exhaust camshaft drive sprockets. 3. Install the timing chain cover and coolant pump. a) Remove the old sealant. Be careful not to drop oil onto the contact surface of the chain cover, cylinder head and cylinder block. — Using a blade and scraper, remove old sealant from the contact surfaces and from the sealant grooves. — Using a non-residue solvent, clean the contact surfaces. b) Apply sealant to the timing chain cover as shown in the figure.
Parts must be assembled within the time specified in the instructions. application of sealant. Otherwise, the sealant must be removed and reapplied. c) Apply sealant to the four locations shown in the illustration. Note: Parts must be assembled within the time specified in the instructions for use of the sealant. Otherwise, the sealant must be removed and reapplied.
d) Install two new O-rings to the cylinder block and crankcase. e) Install the timing chain cover, new O-ring and coolant pump with 16 bolts and three nuts. Tighten the bolts and nuts evenly in several steps. Tightening torque: bolt “A” (30 mm)………………….24 Nm bolt “H” (35 mm)……………………….11 Nm bolt “C” (20 mm)… ……………..11 Nm nut “D”…………………………….24 Nm bolt “E”……………………………..24 N- m
The engine mount bracket and coolant pump must be installed within 15 minutes after installing the chain cover. 4. Install the VVT valve. Tightening torque………………….8 Nm 5. Install the crankshaft position sensor. Tightening torque………………….7.5 Nm 6. Install the crankshaft pulley. a) Clean the inside of the crankshaft pulley. b) Install the pin on the crankshaft. c) Align the hole on the pulley with the pin and install the pulley. d) Using a special tool, tighten the pulley bolt.
7. Install the right engine mount bracket. a) Apply sealant to the bolt threads. Note: Do not apply sealant to the 2-3 threads on the end of the bolt. b) Install the right engine mount bracket and tighten the four bolts securing it. Tightening torque…………………..55 N m
8. Install the shock absorber of the right support. Install the shock absorber of the right support and tighten the five bots and the nut securing it. Tightening torque…………………..52 N m
9. Install the cylinder head cover. a) Remove the old sealant. b) Apply sealant to the areas shown in the figure.
c) Install the gasket on the cylinder head cover. parts must be assembled within the time specified in the instructions for use of the sealant. Otherwise, the sealant must be removed and reapplied. d) Install the cylinder head cover, cable bracket and two washers. Tighten the nine bolts and two nuts evenly, in several passes, in the order shown in the figure. Tightening torque………………………10 Nm
e) Connect two hoses of the positive crankcase ventilation system. e) Install the ignition coils 10. Install the pump pulley and coolant pump. 11. Install the generator. 12. Install the accessory drive belts and check their tension. 13. Install the lower right engine protection casing and fender liner seal. 14. Install the right front wheel. 15. Fill the cooling system with coolant. 16. Start the engine and check for coolant leaks.
How to replace timing chain and tensioner on Corolla 120
Chain
In order to have access to the rear of the motor, it is better to remove the entire wiper system: the drive and the brushes themselves. After this, we dismantle the engine cover, under which there are shafts responsible for gas distribution.
Just like in the Corolla 150, it is worth removing the front right wheel, behind which there will be a plastic protection. After dismantling it, a so-called window will appear through which the crankshaft pulley will be visible.
Removing the belt is simple: remove the tensioner spring, after which it will begin to sag more.