Let's start with the fact that the main oil seal of the engine is the crankshaft oil seal. The crankshaft oil seal is considered an important element in the internal combustion engine. The fact is that the engine needs effective and constant lubrication. To solve the problem, power units have an oil system in which engine oil circulates under pressure and is supplied to various loaded components.
In this case, it is worth highlighting the parts that, in simple words, come out of the engine. These include the crankshaft, part of which is structurally connected to the flywheel. It turns out that when part of the crankshaft is brought out, the hole where it rotates must be sealed to prevent engine oil from leaking from the engine.
The crankshaft oil seal or the main engine oil seal acts as such a seal. Next, we will look in detail at the purpose and features of this element, and also talk about what malfunctions and breakdowns arise if problems begin with the specified oil seal.
Purpose and principle of operation of the engine main oil seal
As already mentioned, lubricant is supplied to various friction pairs under pressure, and individual elements inside the engine are lubricated by splashing or gravity. One way or another, the main task is to minimize friction, remove wear products, and protect against mechanical damage and overheating.
In this case, the transmission of torque from the engine to other components is realized by removing the crankshaft from the internal combustion engine to connect to the flywheel. At the same time, there is a need to seal the hole under the shaft. For these purposes, a crankshaft oil seal is used.
This element is made of fluorine rubber or silicone, actually serving as an O-ring. The diameter of the main oil seal is equal to the diameter of the crankshaft. The oil seal material is heat-resistant and also resistant to engine oil. This avoids the risk of damage to the seal from excess heat that occurs as a result of friction.
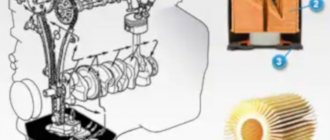
So, the oil seal is installed in the area on the cylinder block where the crankshaft exits the engine to the outside. This location may differ on different engines. For example, on a rear-wheel drive “classic” with a longitudinally mounted engine and a timing chain drive, the main oil seal in some cases is located in the crankshaft shield in front of the support bearing.
Front-wheel drive cars, where the internal combustion engine has a transverse arrangement, and the gas distribution mechanism is often driven by a timing belt, the crankshaft oil seal is located in the BC due to the fact that shields on such power units are structurally absent. One way or another, in all cases, the purpose of the element is to prevent oil leakage from the engine cylinder block.
While the engine is running, the oil inside the crankcase is under a certain pressure. Thanks to this pressure, the seal is pressed against the parts and sealing surfaces. This allows you to reliably seal the engine against oil leakage at the installation site of the engine main oil seal.
Main faults: main oil seal is leaking
Even taking into account the fact that the main oil seal is resistant to wear, this part still has a limited service life. To understand when it is necessary to change the crankshaft oil seal, it is worth considering that even a high-quality original product usually lasts no more than 150-200 thousand km. It is worth noting that the oil seal can fail much earlier for a number of reasons.
Among the main experts are the following:
- untimely replacement of engine oil and oil filter;
- car engine overheating;
If the engine oil is changed after a certain period, then it is important to understand that a large amount of dust, dirt, wear products of the internal combustion engine, etc. accumulate in the “working off”. Since the oil seal is also in contact with the engine oil, dirty lubricant with mechanical particles causes scratches on the oil seal surface. Subsequently, small scratches become larger, the edge of the oil seal is damaged at the point of rotation of the crankshaft, and the oil seal begins to leak oil.
It should also be noted that errors that may be made when installing the oil seal as part of an engine repair may not immediately damage the part, but the service life is naturally reduced (in some cases by 50-70%).
As for engine overheating, this phenomenon leads to the fact that the temperature of the internal combustion engine rises above the norm for which the oil seal was originally designed and its manufacturing material is able to withstand. Naturally, severe overheating will lead to the fact that the oil seal is deformed, the seal simply loses its elasticity and is not able to provide the necessary tightness at the installation site.
Replacing the main engine oil seal: features
It is quite obvious that the reason for replacing the crankshaft oil seal is an engine oil leak. In this case, the oil seal can flow either intensely or leak or sweat. In any case, it is highly not recommended to operate the vehicle with such a malfunction.
In order to diagnose a malfunction, you need to carefully examine the places where the crankshaft enters from the cylinder block. The presence of traces of engine oil under the car, a decrease in the level of lubricant in the sump, oiling of the engine and a number of other signs will indicate that problems with the crankshaft seals are very likely.
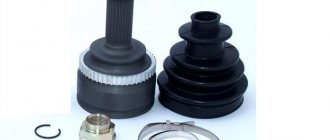
Note that there are two indicated oil seals: front and rear. It is advisable to change the front crankshaft oil seal (PSKV) and the rear oil seal (RSKV) together. As for the PSKV, this oil seal is located on the side where the timing drive is implemented.
The danger of this oil seal leaking is that lubricant can get on the timing belt, as a result of which the oil corrodes the belt drive, and the belt can break or slip. As you know, a broken timing belt can lead to serious engine damage and bent valves.
If we talk about the seal, this oil seal is located next to the gearbox, more precisely, at the junction of the engine and gearbox. Leaks in this area not only lead to low oil levels and contamination of the lower part of the engine, but also to the fact that lubricant can get on clutch parts in cars with manual transmissions, etc.
One way or another, if leaks occur, it is necessary to replace the crankshaft oil seal (both front and rear). Let's look at how the ICE manufacturers themselves recommend performing this procedure according to the manual. Let's start with replacing the PSKV.
- First of all, the car needs to be driven into a viewing hole, overpass, or raised on a lift. Next, you will need to remove the engine protection, as well as the timing belt protective cover.
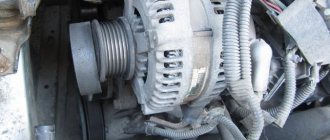
- After this, the oil from the internal combustion engine must be drained. Now you can proceed to dismantling the alternator belt. After this, the front right wheel is removed and a lower gear is engaged. Then you will need to unscrew the crankshaft pulley bolt, the crankshaft pulley itself is removed.
- Afterwards, you should engage an overdrive and then set the piston in the first cylinder to TDC (for setting, follow the marks in the flywheel hatch and the marks on the timing shaft).
- Then the tension roller is loosened, after which the timing belt is removed.
- The bolts securing the lower clutch housing cover are also unscrewed, and the cover is removed along with the gasket. Please note that it is advisable to replace the gasket as part of the reassembly.
- Now you need to disconnect the oil receiver from the oil pump and the main bearing. Next, use two screwdrivers to remove the toothed pulley from the shaft, and also unscrew the oil pump mounting bolts in parallel.
- As a result, the oil pump can be removed along with the oil seal. Subsequently, the old oil seal is dismantled, after which the pre-lubricated new crankshaft oil seal is put in place. Further pressing is carried out using a special extension.
We also recommend reading the article about why the engine is in oil. In this article, you will learn about the most common causes of engine oil leaks, as well as methods for diagnosing and repairing faults to restore the tightness of the oil system.
When it comes to replacing the rear crankshaft oil seal, the general procedure is as follows:
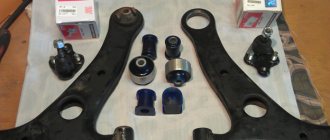
- At the initial stage, you need to remove the gearbox along with the clutch. Before removing the box, it is necessary to drain the transmission oil from it and disconnect the CV joints.
- Then you need to unscrew the bolts securing the flywheel to the internal combustion engine. After removing the flywheel, you also need to dismantle the rear clutch shield and unscrew the bolts that secure the rear engine cover.
- The rear oil seal itself is installed in this cover, so it can be removed with screwdrivers. Then the new oil seal is pre-lubricated with engine oil and pressed in using a special mandrel.
Finally, let’s add that there are special markings on the outside of the main oil seals. These markings help to install the sealing element correctly, as they contain information about which direction the crankshaft rotates.
Front crankshaft oil seal Toyota Corolla
- Repair manuals
- Repair manual for Toyota Corolla 1992-1998.
- Front crankshaft oil seal
3.1.1.7. Front crankshaft oil seal
Replacement
| EXECUTION ORDER |
↓ Comments ↓1. Introduction 1.0 Introduction 1.2 Model codes 1.3 Control panel 1.4. Instrument cluster 1.5. Controls and instrumentation 1.6. Starting the engine and driving the car 1.7 Technical data 1.8 Adjustment data, filling containers and liquids 1.9. Possible faults 2. Maintenance 2.0 Maintenance 2.1 Technical data 2.2 Location of components and parts 2.3 Checking fluid levels 2.4 Checking the condition of tires and tire pressure 2.5. Maintenance every 5000 km or 3 months 2.6. Maintenance every 12,000 km or 6 months 2.7. Maintenance every 24,000 km or 12 months 2.8. Maintenance every 50,000 km or 2 years 2.9 Maintenance every 100,000 km or 4 years 3. Engines 3.0 Engines 3.1. Technical data 3.2. Diesel engine 3.3. Engine electrical equipment 4. Cooling and heating systems 4.0 Cooling and heating systems 4.1 Technical data 4.2 Antifreeze 4.3 Thermostat 4.4 Fan and fan relay 4.5 Radiator and expansion tank 4.6 Coolant pump 4.7 Coolant temperature sensor 4.8 Fan unit 4.9 Heater radiator 4.10. Heater and air conditioning control panel 4.11 Air conditioner dehumidifier 4.12 Compressor 4.13 Condenser 4.14 Evaporator and expansion valve 5. Fuel and exhaust systems 5.0 Fuel and exhaust systems 5.1 Technical data 5.2 Procedure for decompressing the fuel system 5.3 Fuel pump and fuel pressure 5.4 Removing and installing the fuel pump 5.5 Fuel level sensor 5.6 Fuel lines and joints 5.7 Fuel tank 5.8 Cleaning and repairing the fuel tank 5.9 Air filter 5.10 Throttle cable dampers 5.11 Electronic fuel injection system (EFI system) 5.12 Checking and replacing EFI system units 5.13 Exhaust system maintenance 6. Toxicity reduction system 6.0 Toxicity reduction system 6.1 Technical data 6.2 Electronic control system 6.3 Electronic control unit 6.4. On-board diagnostic system 6.5. Sensors of the automatic engine control system 6.6 Gasoline vapor recovery system 6.7 Recirculation system (EGR system) 6.8 Forced crankcase ventilation system (PCV system) 6.9 Catalytic converter 7. Gearboxes 7.0 Gearboxes 7.1. Technical data 7.2. Automatic transmission 8. Clutch and axle shafts 8.0 Clutch and axle shafts 8.1 Technical data 8.2. Clutch 8.3. Half shaft 9. Brake system 9.0 Brake system 9.1 Technical data 9.2 Anti-lock brake system (ABS) 9.3 Front brake pads 9.4 Front brake caliper 9.5 Rear disc brake pads 9.6 Rear disc brake caliper 9.7 Brake disc 9.8 Rear drum brake pads 9.9 Slave cylinder 9.1 0 Brake master cylinder 9.11 Brake hoses and pipes 9.12 Hydraulic brake system 9.13 Vacuum booster 9.14 Handbrake 9.15 Handbrake cables 9.16 Brake pedal 9.17 Brake light switch 9.18 Vehicle load-sensing pressure limiting valve 10. Suspension and steering 10.0 Suspension and steering 10.1 Technical data 10.2 Suspension strut (front) 10.3 Suspension strut 10.4 Anti-roll bar (front) and bushings 10.5 Control arm 10.6 Ball joints 10.7 Steering knuckle and hub 10.8 Hub and wheel bearing (front) 10 .9 Anti-roll bar stability (rear suspension) and bushings 10.10 Suspension strut (rear) 10.11 Longitudinal link 10.12 Transverse suspension links 10.13 Hub and bearing (rear wheel) 10.14 Rear wheel hub bracket 10.15 Steering 10.16 Steering wheel 10.17 Tie rod ends 10.1 8 Steering gear 10.19 Power steering pump steering 10.20 Power steering system 10.21 Wheels and tires 10.22 Wheel alignment 11. Body 11.0 Body 11.1 Maintenance and Repair 11.2 Vinyl Trim 11.3 Upholstery and Carpets 11.4 Minor Body Damage Repair 11.5 Major Body Damage Repair 11.6 Hinges and Locks 11.7 Windshield and Fixed Windows 11.8 Hood 11.9 Trunk Lid 11.10 Rear Door (Stagon Models) ") 11.11 Rear door support pillar 11.12 Door decorative panel 11.13 Door 11.14 Door latch, lock cylinder and handles 11.15 Door window glass 11.16 Bumpers 11.17 Outside mirror 11.18 Seats 11.19 Instrument cluster frame 11.20 Glove compartment 11.21 Central decor ive panel 11.22 Steering column cover 11.23 Lower steering column trim panel 11.24 Console 11.25 Instrument panel 11.26 Radiator grille 11.27 Hood ventilation grille 11.28 Seat belts 12. Electrical equipment 12.0 Electrical equipment 12.1 Fuses 12.2 Fuseable jumpers 12.3 Circuit breakers 12.4 Relays 12.5 Turn signal/hazard light switches 12.6 Combination switch 12.7 Steering column switches 12.8 Ignition switch and lock drum 12.9 Rear window defroster switch 12. 10 Heated rear window 12.11 Radio and speakers 12.12 Antenna 12.13 Headlight bulbs 12.14 Headlights 12.15 Replacing bulbs 12.16 Daytime running lights system 12.17 Windshield wiper motor 12.18 Instrument panel 12.19 Horn 12.20 Cruise control system 12.21 Central locking system 12.22 Window lift system 12.23 Rear view mirrors with electric drive 12.24 Airbag 12.25. Electrical circuits |