Replacement of Toyota Corolla engine mounts, Replacement of engine mounts
Replacing engine mounts for Toyota Corolla
Replacing the right Engine mount
The procedure for replacing the right power unit suspension mount is shown using the example of a 1ZR-FE engine
. Replace the right suspension mount for engines 1NR-FE and 4ZZ-FE in the same way.
1. Remove engine mudguards
2. Install the support on the engine
3. Unscrew bolt A and unscrew nut B securing the right suspension mount of the power unit to the engine.
4. Remove the mounting bolt from below.
5. Remove the engine
6. Remove the two bolts securing the right power unit suspension mount to the body.
7. Remove the bolt securing the air conditioner refrigerant pipe bracket on the right.
9. Remove the expansion tank of the cooling system and unscrew the right bolt securing the right suspension mount of the power unit to the body.
11. Install the right power unit suspension mount in the reverse order of removal.
1. Remove engine mudguards
2. Install the support on the engine
3. Remove the air filter housing
4. Holding the bolt securing the left engine mount to the gearbox bracket with one wrench from turning, use a second wrench to unscrew the bolt nut and remove the bolt
5. Remove four bolts.
7. Install the left whitefish unit suspension support and all removed parts in the reverse order of removal.
1. Remove the subframe
2. From the bottom side of the subframe, remove two bolts and, through the technological holes, unscrew the two nuts securing the rear engine mount to the subframe
3. Remove the rear engine mount from the subframe.
4. Install the rear power unit suspension mount in the reverse order of removal.
1. Remove engine mudguards
2. Remove the eight bolts securing the side reinforcements
3. Remove the side reinforcements.
4. Remove the two bolts securing the central amplifier.
6. Holding the bolt securing the left engine mount to the gearbox bracket with one wrench, use a second wrench to unscrew the bolt nut
8. Remove two bolts securing the transverse body reinforcement on the right and left.
9. Remove the transverse body reinforcement.
10. Remove the two bolts securing the front support to the transverse body reinforcement.
Toyota Corolla 1.8 engine repair price. From 4,150 rub.
- Toyota Corolla timing belt replacement. From 1,800 rub.
- Toyota Corolla timing chain replacement. From 3800 rub.
- Replacing the crankshaft oil seal in Toyota Corolla. From 1000 rub.
- Toyota Corolla cylinder head gasket replacement. From 4500 rub.
- Replacement of Toyota COROLLA engine mount. From 400 rub.
| Toyota Corolla Engine Mount Replacement | Toyota Corolla engine block repair |
| Replacing the front crankshaft oil seal in Toyota Corolla | Toyota Corolla engine valve repair |
| Toyota Corolla Rear Crankshaft Seal Replacement | Toyota COROLL cylinder block repair |
| Replacing the main crankshaft seal | Repair of Toyota COROLLA engine connecting rods |
| Toyota Corolla Camshaft Seal Replacement | Repairing cracks in the Toyota Corolla engine block |
| Toyota Corolla chain tensioner replacement | Repairing an overheated Toyota Corolla engine |
| Toyota Corolla gasket replacement | Toyota Corolla Explosion Engine Repair |
| Toyota Corolla drive belt replacement | Engine repair with replacement of piston rings Toyota Corolla |
| Toyota Corolla engine gasket replacement | Polishing the crankshaft of Toyota Corolla |
| ORDER YOUR FAVORITE TOYOTA COROLL ORDER | Toyota Corolla repressed pistons |
| Toyota Corolla Camshaft Replacement | Toyota COROLL cylinder head repair |
| Replacing crankshaft pulley TOYOTA CORoll | Engine repair after water hammer TOYOTA COROLL |
| Toyota Corolla oil pump replacement | Engine repair after wedge Toyota Corolla |
| Fill in Toyota Corolla | TOYOTA COROLLA engine oil consumption repair |
| Tighten Toyota Corolla cylinder block | Toyota COROLLA cylinder engine |
| Toyota Corolla piston replacement | Toyota COROLL engine liner |
| Replacing piston rings for Toyota Corolla | TOYOTA COROLL SCAFFOLDING |
| Replacing the piston group of Toyota Corolla | Connect TOYOTA COROLL engine |
| Toyota Corolla engine crankshaft replacement | Connect the Toyota Corolla motor |
| Replacing connecting rod bearing TOYOTA COROLLA | Cylinder liner Toyota Corolla |
| Replacing the root liner TOYOTA COROLL | Calling the TOYOTA COROLL layout |
| Replacing the crankshaft liner TOYOTA CORoll | Toyota Corolla crankshaft liner replacement |
Replacing the front engine mount 5A-FE in Toyota Corolla 110
This problem has been hanging over the car since the moment of purchase. At the first inspection, cracks were revealed on the surface and, as I remember, there was even a desire to change it. But harsh reality dictated its conditions and I had to forget about replacing the pillow. More precisely, simply come to terms with the increasing vibrations. For a while... A week ago the vibrations became so intense that the massage chair, compared to my car, became just useless nonsense! There is no choice - I ordered the original from my beloved Exist (there were no duplicates at all), which was in a warehouse in Moscow and in 5 days was supposed to be in my hands. Along the way, I also took the original valve stem seals, but I’ll tell you about them in a couple of weeks.
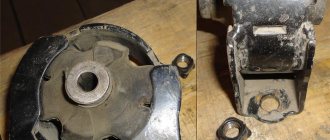
Here it is, a new pillow
I did everything my way. To begin with, I will say that, strictly following the manual, I enthusiastically unscrewed the front “ski” mount and all the parts attached to it from the front. Namely: -Central towing eye
-Plastic mudguard and air conditioner tube bracket
This photo shows where it is located: 1. Mounting the ski to the body 2. Pin of the air conditioner bracket 3. The actual lower mounting of the cushion 4. Towing eye
Then I looked at the rear mount and the enthusiasm evaporated, as if it had never existed. I decided to pull out the old pillow without removing the beam. Unscrewed the bolt holding the pillow to the bracket
Somehow I managed to pull the pillow up. The rigidity on the Carlson casing was very annoying, but the plastic there is quite flexible and I managed to bend it to the side. Reassembled in reverse order. First, I stuffed a new pillow with mats, tightened the central bolt, then tightened the bottom two and heartily tightened the central one again. I put everything back in place and here is the result
Find out how much it costs to repair a Toyota Corolla engine
Inquire by phone now. 7 (383) 335-85-50 It's free and optional.
Source
The appearance of extraneous sounds from the suspension when driving along cones very often indicates problems with the grilles or anti-roll spacers.
The first signs of wear and tear cannot be ignored as the vehicle's stability deteriorates. Bushings and struts cannot be repaired and will require replacement if worn or damaged.
Replacing Corolla engine mounts video
This problem has been hanging over the car since the moment of purchase. At the first inspection, cracks were revealed on the surface and, as I remember, there was even a desire to change it. But harsh reality dictated its conditions and I had to forget about replacing the pillow. More precisely, simply come to terms with the increasing vibrations. For a while... A week ago the vibrations became so intense that the massage chair, compared to my car, became just useless nonsense! There is no choice - I ordered the original from my beloved Exist (there were no duplicates at all), which was in a warehouse in Moscow and in 5 days was supposed to be in my hands. Along the way, I also took the original valve stem seals, but I’ll tell you about them in a couple of weeks.
Here it is, a new pillow
Having read this article on the drome as a manual, I went into the garage in a sad mood... But as always, I did everything my way. So... To begin with, I will say that, strictly following the manual, I enthusiastically unscrewed the front “ski” mount and all the parts attached to it from the front. Namely: -Central towing eye
-Plastic mudguard and air conditioner tube bracket
In this photo you can see what is located where: 1. Mounting the ski to the body 2. Pin of the air conditioner bracket 3. The actual lower mounting of the cushion 4. Towing eye
Then I looked at the rear mount and the enthusiasm evaporated, as if it had never existed =) I decided to pull out the old pillow without removing the beam. Unscrewed the bolt holding the pillow to the bracket
Somehow I managed to pull the pillow up. The rigidity on the Carlson casing was very annoying, but the plastic there is quite flexible and I managed to bend it to the side. Reassembled in reverse order. First, I stuffed a new pillow with mats, tightened the central bolt, then tightened the bottom two and tightened the central one again. I put everything back in place and here is the result
Article number and cost of original suspension stabilizers for Toyota Corolla 150 and their analogues
Table. The best alternative to the original Corolla 150 car stabilizer stand
| Manufacturing company | Article number | Estimated cost, rub. |
| Profit | 23050389 | 380-320 |
| Blue stamp | ADT38580 | 600-800 |
| nipple | N4962054 | 300-350 |
| Star line | 9090735 | 350-500 |
| Click through rate | CLT62 | 650-1000 |
Good day everyone!
I bring to your attention a photo report on the work done to eliminate the ugly oil waste in a Toyota Corolla in the 120th body, produced in 2001. Engine 1NZ-FE, engine capacity 1.5 liters.
The car was purchased in 2007, I bought it from resellers on the car market, so I can’t say with complete confidence whether the mileage was calculated or the actual mileage. The readings at that time were 86,400 kilometers. At the moment (June 2014) the mileage is 158,800 km.
During the entire period of use, the machine generally worked flawlessly and never failed. During the time I used the car I used oils (synthetics only) of ZIC, Shell, Toyota brands. For the last two years I have been pouring Liqui Moli Synthoil High Tech 5W-40 (synthetics item number 1925). Lately I've been using Mann W 68/3 oil filter. I change the oil approximately every 8-10 thousand km.
I also made it a rule to change the spark plugs and air filter twice a year in spring and autumn. Denso spark plugs, air filter using Kolbenschmidt (number 50 014 024).
I buy consumables on Exist.ru (candles, filters) for the variety of manufacturers’ models.
So, let's get to the point. Over the past year and a half, the “glutton” of oil has simply crossed the threshold of decency. I have never measured how much oil is consumed per 1000 km, but the volume was decent. I always buy a 5-liter canister of oil for constant topping up. I don’t drive much in the city/highway, so the driving pace is quite calm.
In general, I was tormented by the oil burn and I clearly decided to “tamper” the engine a little. I immediately decided to do it myself. I don’t want to say anything about car services, but to put it mildly, I don’t trust them. I don’t have any good car mechanic/motor mechanic acquaintances whom I would trust 100%.
I didn't have any concerns about the repair. I read information about repairs on the Internet and leafed through a book on repairs.
I didn’t buy the spare parts online, it turned out to be cheaper in the store than in Exist, there is a good discount.
About 14,000 rubles were spent on spare parts, along with all the liquids, carb cleaners and other intricacies, I didn’t adjust the exact numbers, but approximately in this area.
Were purchased:
- Set of rings.
- Complete set of gaskets (includes valve stem seals).
- Chain.
- Chain tensioner.
- Chain guide.
- VVT-i valve (I wasn’t going to change it, but I had to change it - more on that later).
- Oil filter.
- Air filter.
- Motor oil.
- Antifreeze.
- Candles.
I made an agreement with a good friend to rent a garage with a pit and away we go...
The entire repair took 2 weeks. I was on vacation. It could have been done faster, because... I worked only a few hours a day. Only in the last 2-3 days I worked almost all day, because... I had to go to work and a car was simply necessary.
Do you need good and really high-quality service? Then you should come straight to us, because our technical center accepts Hyundai Elantra automatic transmissions from 1992-2016 for repair, which are carried out in strict accordance with the technical regulations of the automaker. I advise you to!
First, about the general:
1. A good tool saves a lot of time. I realized this a long time ago. I used to have a Chinese toolbox that had almost everything. Almost every repair ended with nuts/bolts “licked” and never unscrewed, wounds, and abrasions on the hands. As a result, I bought myself a set of Ombra tools (ratchets, a bunch of sockets) - I’m very pleased. Also during the repair, Force torque wrenches, open-end wrenches, and all sorts of devices like ring pliers, etc. were used.
2. Proper organization of the workplace saves no less time - I had a hard time with this. Everything was disassembled/assembled in the garage, cleaned at the sink, and then cleaned up at home in the bathroom. Something was constantly forgotten... sometimes you would forget some spare part, then there... you had to look for it, drive twice. In general, it took a lot of time.
3. In general, about 70% of the total time for the repair was spent on cleaning/washing. By the way, after my repair, I 100% do not believe in any “decoking” or other chemicals to remove carbon deposits and coke. Although if this is done periodically and in a timely manner, then chemistry may give a good result, but if the car has “good” mileage, then chemistry is definitely not a panacea. I personally scraped off this carbon deposit with all my might for hours, using a knife and fragments of rings to “pick out” completely “buried” oil scraper rings and coke in the grooves on the pistons. I think that no amount of chemistry could definitely cope with this.
4. What I used to clean and wash it. I decided to immediately take the main dirt to the car wash. There, with the help of some kind of chemical (containing alkali) and a Karcher sink, I washed off the main contamination. And then I washed soap in the bathroom in a basin. I read a lot of information about who used what to clean the parts. I present my tested results.
a) Schumanit stove cleaner - I would give 100 points. Any deposits in a few seconds, washed off with water. But the stuff is very concentrated and contains alkali. Accordingly, you need to work very carefully and always wear gloves (I used latex gloves KShchS-1 from Manipula Specialist, I really liked them, really high-quality products, they are practically not felt on the hand, at the same time they are very durable and did not let me down when working with all the chemicals used) . So “Shumanit” - applied and quickly washed off with a light brush. A reaction occurs in the aluminum, white foam begins to appear, and parts may darken. I didn’t clean the cylinder head with it - I was afraid. I washed the oil pan, valve cover and chain cover with it.
b) Profam 1000 is also a good thing, but as I understand it, it’s less conclusive. Cleans not bad.
c) I bought Body paint remover in a can. The bottle says that the thing is very poisonous, toxic and, in short, a nightmare. I didn’t like how it worked in terms of cleaning – I practically didn’t use it.
d) Johnsen's carburetor cleaner - I really liked it, the bottle lasts a long time, good pressure, cleans carbon deposits well.
e) Well, and, accordingly, toothbrushes and just brushes, metal brushes, a bunch of rags.
5. So that there are no “extra spare parts” left. As the engine was disassembled, I put all the bolts in ordinary plastic bags, putting in each bag the bolts/nuts and a piece of paper with the inscription what kind of fastener it was and what part it was from. In the end, everything was assembled without any remaining fasteners.
6. The most crucial moments in my opinion. These are the cylinder head mounting bolts - I was afraid that they would break off when unscrewing/tightening them. They fit very well. To dismantle them, I bought a 12-sided bit, in the end I unscrewed/tightened everything without breaking anything. I also tried not to scratch anything (I mean the cylinders, cylinder heads, landing spots of the connecting rod bearings, etc.) Well, the chain - the main thing is to align everything to the marks.
7. Extras. Clothes - I had a good suit (jacket + overalls) - I made it all up. You will also need cotton gloves with PVC coating - they are simply more convenient to work in. An LED headlamp is also very helpful. I also used a book on the operation and repair of Toyota Corolla for information.
8. Don Deal used sealant and valve lapping paste. One tube of sealant was enough, it costs 250 rubles. Paste 220 rubles, two tubes included - medium-grained and fine-grained. Nothing leaked. The main thing is to do everything according to the instructions for the sealant. I spread it, waited 15 minutes, secured the part, the part was completely ready after applying the sealant - 24 hours.
9. Measurements in the engine. I didn’t do it because... firstly, there was no appropriate tool, and secondly, no visual, even subtle wear or jambs were noticed.
10. All the work was done alone. No one helped, and in fact there was no need to do much.
So:
1. It is necessary to drain the engine oil and antifreeze. Black oil. The valve for draining antifreeze from the engine is located in a rather inconvenient place, at the back of the engine, under the exhaust manifold. I unscrewed it using a mirror so that I could see it, feel it, and unscrew it.
2. Unscrew the plastic cover and the coil mounting bolts. Just in case, I put electrical tape on the coils and numbered each one.
3. Unscrew the spark plugs.
4. It is also necessary to remove the right wheel and the plastic protection on the right, respectively.
5. Unscrew the valve cover bolts. Sea of mud. The gasket is wooden, I had to pick it out.
6. Next, I removed the fuel rail. Some gasoline leaked out. I did not disconnect the tubes; after removal, the tube can be moved to the side quite easily.
7. There are a lot of different tubes attached to the cylinder head, unscrew everything that gets in the way.
8. Disconnect all pipes, disconnect all connectors (on sensors, throttle valve). My pipes were quite difficult to remove. They feel very hard to the touch, time and temperature changes have taken their toll. When I removed one of the pipes, it simply fell apart in my hand. After the assembly was completed, a temporary bandage was installed; I will be replacing it with a new one in the near future.
9. Remove the belt.
10. Next you need to unscrew the crankshaft pulley. I thought it would take a lot of time, they write it is screwed tightly. And I was basically ready for this. A piece of profiled pipe and an old bolt that fits into the hole on the crankshaft came to the rescue. You just need to be careful with the bolt so that it is not too long. In general, be careful not to accidentally break the chain cover. So, having substituted a pipe with a bolt head with a large extension, the pulley spun the first time. With a noticeable effort, but quite simply. My oil seal was leaking, so there was a huge deposit of oil and dirt - terrible.
11. Remove the throttle valve. Having previously removed the hoses and connectors. Subsequently, before assembly, I cleaned it with carb cleaner. Cleaned up well.
12. Removed the intake manifold.
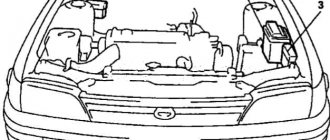
13. Next you need to remove the right engine mount. You will need to jack up the engine (be sure to use a spacer, for example, a wooden stick/block). In principle, nothing complicated. The only thing is the nut on the bottom of the support. You need to crawl up to the bottom using a head with an extension cord.
14. Remove the generator by disconnecting the connectors and wires.
15. Next, I decided to remove the VVT-i valve. This is where I got it. Personal complaint to Toyota engineers. Was it really impossible to come up with a fastener or a valve so that it could be removed more easily? It’s clear that coke and carbon deposits did their job there. In short, it sits very tightly. Whatever and however I tried to unscrew it. As a result, the outer part of the valve remained in my hands. I spent another 10-15 minutes picking out the inside. Everything is dirty. I decided to buy a new one. After cleaning the valve seat and lubricating it well, the new valve went in easily during assembly, without noise or dust.
16. Remove the crankshaft position sensor from the chain cover.
17. Remove the pump.
18. Unscrew the air conditioning compressor (it sits on 4 bolts). I hung it up and, in principle, it did not interfere with work.
19. Remove the chain cover. You need to unscrew the bolts accordingly. You also need to remember about the bolt in the center of the cover, it is in the recess. I scratched my turnip for a long time and wondered why the lid never came off. It’s not very visible + a camouflage layer of dirt... Having removed the cover, I found a lot of dirt, which in principle was not surprising. I recommend at this stage (I didn’t do this, then I regretted it) to take a good photograph of the chain, how the marks are positioned, etc., I think the photographs will later be able to help when installing the chain, so that you can check it just in case.
20. Next, remove the tensioner, guides and the chain itself.
21. Remove the camshafts. I unscrewed the bolts according to the book, observing the order.
22. Carefully remove the valve pushers. We lay them out so as not to confuse them.
23. Next, I removed the oil pan. I cut the sealant. A lot of dirt.
24. Next, I unscrewed the exhaust manifold. Not very comfortable. I aimed at the bolts using a mirror.
25. Next is the crucial moment of unscrewing the cylinder head bolts. Screwed very tightly. The key is in the photo accordingly.
26. Next I removed the cylinder head. Not heavy. There is a lot of soot. And on the valves and in the intake and exhaust channels of the cylinder head.
27. After this, the cylinder head and covers were taken to the car wash, where the main dirt was washed off for 150 rubles.
28. Next, I unscrewed the starter. It is held on by 2 bolts. It comes off quite easily.
29. Next, I unscrewed the beam. Unscrew 2 bolts (attachment to the “TV”). Two more bolts secure the beam and the front engine mount. I also unscrewed 2 bolts and 1 nut securing the beam near the rear engine mount. The beam cannot be removed and the bolt holds it in place. But it is easily retracted towards the gearbox and does not interfere with the removal of the crankcase.
30. Then he began to unscrew the crankcase. Unscrew the oil receiver. We unscrew the bolts around the perimeter of the crankcase and the mount to the gearbox. 3 bolts are located in the space under the removed pan. One bolt is hidden under the oil filter. You must first unscrew the oil filter mount (unscrew it with a hexagon). We will see a bolt under it - we unscrew it too. Next, I tried as best I could to trim the sealant around the perimeter of the crankcase with a good utility knife, prying it off with a screwdriver (the book indicates places for a screwdriver). It was quite easy to move/tear off the crankcase by inserting a screwdriver between the crankcase and the gearbox. Actually, the crankcase clicked into my hands. We see a lot of dirt - where would we be without it?
31. Unscrew the connecting rod caps. Again, lay them out in the order they were removed. I didn’t find any visible wear or scuffing anywhere. I did not change the inserts.
32. Removed the pistons. Dirt, carbon deposits, everything... There are hone lines in the cylinders. I put a patch on the pistons and numbered each one so as not to mix them up. The compression rings on all cylinders were not seated. But oil scrapers are just the opposite. All four cylinders are flush with the piston.
33. Next, I washed the parts, so to speak, in the cleaning room at home in a basin with the chemicals described above. It took a lot of time and effort.
34. Next, I cleaned the pistons in the garage. Including about - the dirt was washed away, but somehow slowly. The compression rings came off easily. I removed the oil scraper rings long and hard. The channels under all the rings were clogged. I cleaned it for a long time, literally “scraping it off” with a piece of a specially broken compression ring and a knife. I cleaned the holes-channels under the oil scraper rings.
35. Next is the process of putting new rings on the pistons. Used the appropriate tool to apply the rings. Compression ring No. 2 is put on with the notch/groove down.
36. Next, install the pistons (according to the numbering, do not confuse them). It is also important not to confuse how to orient the piston - there is a “dot” mark on each piston. When installing the pistons, you need to lubricate them well with fresh oil.
37. Using this frame from FORCE (by the way, very comfortable) I squeezed the rings for installation in the cylinders. Before compression, you need to correctly position the locks on the rings (there is a picture in the book).
38. Pistons are installed. We fasten the connecting rods to the crankshaft with the appropriate caps. The main thing is not to mix up the places (they have marks on the side if they are mixed up). There are also locks on the lids.
39. Install the crankcase. We remove old sealant, if any, and degrease the surfaces. Apply sealant (there is a drawing of sealant application in the book). Before installing the crankcase, replace the two round gaskets in the area of the oil filter with new ones. According to the instructions for the sealant, I waited 15 minutes, after which I connected the crankcase to the block. Tightened all the bolts.
40. Installed an oil receiver. Pre-cleaned with carb cleaner. Installed a new gasket.
41. Next, I dried out the valves at home. I used a universal desiccant set. Using the appropriate nozzle, I compressed the spring and pulled out the “crackers” and the washer. Then he pulled out the valves. To avoid scratching the walls during work, I used a strip cut from a plastic bottle. Before the manipulations, I first inserted this strip, twisted into a cylinder.
42. I pulled out all the valves and laid everything out in order as they were in the cylinder head.
43. Next, remove the valve stem seals (MSC). I used MSC removal pliers from FORCE. It's convenient to work. The intake MSCs were sitting very tightly. I took them off for a long time. They were practically wooden and I think they performed their function far from fully. The exhaust caps were easier to remove. Their condition is the same “wooden”. There's just a lot more carbon on them.
44. The valves are all covered in soot. I cleaned long and hard. A metal sponge for washing dishes, and everything in between. As a result, almost all the carbon deposits were removed.
45. Cleaned the cylinder head. Again, very long. The carbon deposits in the channels are very difficult to remove. I tried to clean it with a toothbrush - it was no use. The only way to clean it was with this homemade brush inserted into a drill. This tool made the cleaning process much faster. The main thing is not to rush and not to scratch something that you don’t want to scratch.
46. Grinding in valves. I cleaned it with a drill at very low speeds. I also cleaned it through the device. And gluing the two valves together with double-sided tape. While slightly pressing the valve into the drill, I additionally wrapped the valve with adhesive tape so as not to scratch it. Everything went well. The valves are ground in. The main thing is to be careful and not to rush.
47. The process of putting on the valve stem seals was not complicated at all. The main thing is not to confuse the intake and exhaust. Intake ones are brown with the inscription “NOK”. Graduation days are grey. I helped put it on with a 12-sided 10-sided head and a little help with a hammer.
48. Next is the process of putting the valves in place. I used the same tools. Not difficult.
49. Next, in the garage, I reattached the oil pan. Sits on the sealant. Then the bolts are tightened.
50. We put on a new cylinder head gasket.
51. Installed the cylinder head. I cleaned the bolts and lubricated them a little with new oil. And according to the instructions, I tightened it to the required torque with subsequent “additional twists” in the order described in the book.
52. Installed valve tappets. When installing, it must be well lubricated with oil.
53. Installed camshafts. Oriented the cams of the first cylinder. I installed and tightened the caps on the camshafts to the required torque.
54. Next, install the chain. I put on the chain according to the picture in the book. Everything is according to the marks. The marks on the camshafts are vertical in accordance with the marks on the chain. The third mark corresponds to the mark on the crankshaft sprocket. The chain guides and tensioner are installed.
55. Next I installed the chain cover. Accordingly, on the sealant. Drawing of sealant application in the book. Before installation, I replaced the crankshaft oil seal. I also installed two new gaskets.
56. Next, I installed a new VVT-i valve.
57. Next, install the pump, intake manifold, starter, throttle valve.
58. When installing the fuel rail, I replaced the gaskets on the injectors. O-ring seals are lubricated with gasoline before installation. I didn’t clean the injectors, I didn’t have time, I had to go to work the next day, I urgently needed the car. Visually they were clean.
59. Connected all the pipes, the crankshaft position sensor, and all the disconnected connectors.
60. I replaced the right support, the generator, the crankshaft pulley, the belt, and screwed on the exhaust manifold.
61. Before installing the valve cover, I cleaned the gas ventilation valve with carb cleaner and installed a new gasket.
62. In general, everything is assembled, there are no extra bolts left - this is pleasing. I installed the oil filter, air filter, and spark plugs.
63. Filled with oil and antifreeze.
First plant. It started up almost immediately, maybe a couple of seconds longer than before. This made me happy. It was a bit of a hassle, but quickly made quite a decent profit. No knocks/clunks were detected. I ran it at idle for 10 minutes. There were no oil/antifreeze leaks. While I drive very calmly, I don’t exceed 2 thousand revolutions.
I feel like the engine is running much quieter and smoother. Previously, when pressing the gas, there was some kind of incomprehensible tapping, clanging - not much, but it was audible. Now there is complete silence. The engine is almost inaudible inside the cabin. In general, positive dynamics are evident.
I've driven about 100-120 km so far. Let's see how the situation with oil will be in 2-3 thousand.
I hope the information will be useful for someone. If you have any questions, I will be happy to answer.
Thank you for your attention!