Cars of this kind, meaning crossovers, are most often purchased for out-of-town trips, for example, going to the country, forest or sea. Such places, frankly speaking, do not have a good asphalt surface, so their dustiness greatly affects the cleanliness of the car interior.
For maximum and effective cleaning of the air entering the car, a special cabin filter is used.
This element cannot last forever and requires replacement. For a Toyota RAV 4 car, the approximate service life is 12 - 15 thousand kilometers. However, depending on the degree of use (dirt roads, frequently turned on air conditioning or heating stove), this figure may decrease to 8 - 9 thousand.
Why is the filter so important?
Replacing the old Rav 4 cabin filter from 2014 with a new one must be done in accordance with the regulations, since this is an important element.
When operating in rural areas or in the city, polluted air, dust, and exhaust gases enter the vehicle interior. This is harmful to the health of passengers and the driver.
The cabin filter in a 2015 Toyota Rav 4 consists of three or four layers:
- The first holds large pieces of debris and dirt.
- The second prevents the entry of microorganisms and fine dust.
- The third stabilizes air filtration.
High-quality components are equipped with an additional carbon layer that protects against harmful impurities. The filter also prevents exhaust gases from entering the car.
Replacing the fuel filter in RAV4 2nd generation
The fuel filter cleans the fuel from mechanical particles that enter the combustion chambers. During the operation of the car, it becomes clogged and needs to be changed, including in the 2nd generation Toyota RAV4.
A faulty filter element in a car manifests itself in the following way: when trying to accelerate, the driver spontaneously has the feeling that the car is being held back by something. In addition, with a sharp increase in load on the internal combustion engine, power failures occur.
The recommended period for replacing the fuel filter is 50,000-80,000 km. However, it depends on the quality of the fuel being poured. Some people drive up to 200,000 km without replacement, while others show symptoms of a faulty filter element even at 40,000 km.
To replace a faulty filter, you need to know where it is located and how to carry out the repair process. Unlike many cars, the fuel filter is located directly in the gas tank. To access it, you need to fold down the rear left seat and peel back the floor mats. Then proceed to dismantling the unit and then replacing the filter element (spare part number 23300-28040).
Tools needed to replace the fuel filter
To replace the fuel filter, you will need the following tools:
- flat screwdriver;
— a figured screwdriver (phillips);
— socket wrench 8 with extension.
Work order
Repair work is carried out in the following sequence:
- We release the pressure in the gas tank by opening the gas tank cap.
- Fold and recline the left rear seat.
- We bend the floor mats and find a round cover with a black wire in the middle. Replacing the fuel filter RAV4 2nd generation
- We pry the cover up along the edge with a flat screwdriver and unfasten it from the seat.
- Carefully disconnect the wires and put them aside. Replacing the fuel filter RAV4 2nd generation
- Remove the orange fuel hose clamp and remove it.
- Unscrew the 8 bolts arranged in a circle.
- Carefully remove the entire structure from the tank, not forgetting to disconnect the fuel hose. Replacing the fuel filter RAV4 2nd generation
- Using a screwdriver, remove the cover from below, then remove the black seal there. Replacing the fuel filter RAV4 2nd generation
- We disconnect the float and its power supply, and remove the assembly itself from the structure body. Replacing the fuel filter RAV4 2nd generation
- Carefully separate the structure into two parts and disconnect the wires. Replacing the fuel filter RAV4 2nd generation
- Next, remove the hose through which the filtered fuel enters the line. Replacing the fuel filter RAV4 2nd generation Replacing the fuel filter RAV4 2nd generation
- By pressing at the top, remove the fuel filter, and then use a screwdriver to remove the sealing rubber from the bottom.
- Putting the rubber seal on the new filter, we install it in place.
- After this, install the sealing rubber and the bottom cover (see point 9).
- Next, we assemble everything in reverse order and install it in the fuel tank.
Some nuances of performing work to replace the fuel filter
- Before unscrewing the clamping bolts, it is necessary to clear everything of debris and dirt, thereby preventing them from getting inside the tank.
2.. When installing, tighten the clamping bolts gradually, using the diagonal-cross method. This is necessary so that the rubber sealing ring “seats” evenly.
After reading the article, you can carry out all the work on replacing the fuel filter with your own hands, thereby saving your home budget. However, it is worth understanding that the symptoms indicated at the beginning of the article can “speak” not only of a faulty fuel filter, but also of other problems in the car, so it is necessary to carry out a comprehensive diagnosis.
Read news about RAV4 on our portal
Component Replacement Frequency
According to the regulations, the cabin filter on a Toyota Rav4 needs to be changed every 10-12 thousand kilometers. If you frequently use the car on sandy and dusty roads or in areas with heavily polluted ecology, it is recommended to replace it every 7-9 thousand kilometers.
Some experienced car enthusiasts, when changing the oil, air, fuel, oil protective element or lubricant in an automatic transmission, combine this with installing a new cabin filter.
It is also recommended to change the component after the summer period, when there is a lot of poplar fluff.
Signs of a clogged filter
Signs that will help determine that it is time to change the cabin filter on a 2021 Toyota Rav 4:
- an unpleasant odor appeared in the cabin;
- poorly functioning air conditioner;
- insufficiently heating stove;
- high humidity in the cabin and sweaty windows indicate that water has gotten inside and the system has stopped functioning.
If you do not replace the element in a timely manner in a car equipped with climate control, the evaporator radiator may freeze. Repairs in this case will be expensive.
Replacing the cabin filter in Toyota Rav 4
:
When it comes to installing additional equipment for the interior, many people think of covers, armrests and other accessories. Don't forget about such an important detail as the car's cabin filter. Many car owners underestimate its importance. Replacing the Rav-4 cabin filter is a mandatory procedure for every car of this model.
The environmental situation (especially in large cities) leaves much to be desired. The maximum permissible concentration (MPC) of harmful substances in the air exceeds the norm several times. The most dangerous substances include:
- oxides of nitrogen, sulfur, carbon;
- aldehydes;
- soot, heavy metal compounds;
- asbestos, tire dust, pieces of old rubber.
All this, without a filter, ends up in the car interior. This is especially felt when you are stuck in a traffic jam in front of another car for several hours. All the exhaust goes inside, and the driver and passengers breathe it.
In the long term, neglecting to install a filter can lead to the development of allergies (or their worsening), as well as lung problems. For these reasons, it is naturally recommended to change the Rav 4 cabin filter in a timely manner.
This relatively inexpensive element is capable of stopping up to 99.5 percent of small particles, and the most modern products can even absorb unpleasant odors.
Replacement frequency
Many drivers do not know when to change the filter. This is a fairly common question, the answer to which you will find in the manual for your SUV. The manufacturer offers a clear mileage number after which replacement must be made. Many experienced motorists recommend replacing them every 20-30 thousand kilometers.
It is better not to rely on conventional numbers, but to conduct a visual inspection yourself. This will make it possible to verify whether it is necessary to replace the cabin filter in the Toyota Rav-4.
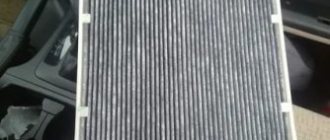
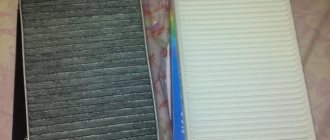
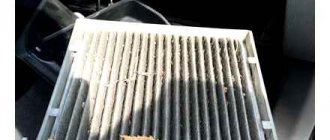
A new or slightly worn part has a lighter color. The old filter will be dark, covered in dust, and filled with various debris.
There are also a number of indirect signs that indicate that the cabin filter needs to be inspected. This includes:
- the appearance of an unpleasant odor in the cabin;
- increased glass fogging;
- The air flow is too weak when the fan is turned on.
All this may indicate that the filter has used up its resource.
Selecting a new filter
The car owner has two choices: order an original model or a compatible one from another manufacturer. As the experience of car owners of this SUV shows, there is no fundamental difference in products if both options are of high quality. The filter is a fairly simple product, so you shouldn’t get too hung up on choosing a brand, since all products of the same type have relatively the same resource.
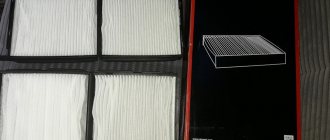
The market offers two main types of cabin filters: dust and carbon. The first models are the most accessible and cheap. In such products, synthetic or cellulose fibers act as a filter element.
They are presented in the form of several layers of corrugated paper, while neatly folded into a rectangular structure. Dust filters do an excellent job of removing soot, dust, small and large particles of sand, and small insects.
They can even stop plant pollen.
Carbon filters are more advanced. In their design, they have a layer of activated carbon, so it becomes possible to retain oxides, benzene and phenolic elements. The service life of the activated carbon layer is limited. As a result, when it cannot absorb harmful substances, such a filter turns into a regular dust filter.
Replacing the cabin filter in Toyota Rav 4: features of the procedure
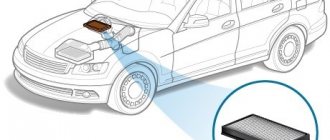
First you need to find out where the Toyota Rav-4 cabin filter is located. It is located in a special slot behind the glove compartment in the cabin. This way, you don't need a special tool to change it. The entire procedure is completed in just a few minutes. To do this you need to follow these steps:
- Open the glove compartment and then remove all items from it.
- There is a limiter on the bottom right side. Unfasten it.
- The glove compartment is secured on the sides with special clips. You need to press on the sides of the glove compartment to pull it out.
- You will see a filter container. On the right side, unfasten the latch and open the protective cover.
- Remove the old filter and then install the new one. Please note that the arrows on the wall of the product should point upward.
- Close the lid.
- Reinstall the glove compartment.
Now you know that replacing the cabin filter is not difficult. This knowledge will allow you to carry out this procedure yourself, without spending money on car service services. Never neglect the quality of the cabin filter, since in many ways it is this simple detail that takes care of your health.
Source: https://jrepair.ru/to-toyota/zamena-filtra-salona-v-toyota-rav-4
Choosing a cabin filter
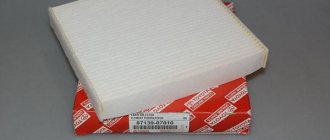
On the first generation Toyota Rav4 (1995-2000), created on the basis of the Celica GT-Four (1994), as well as on the second (2001-2005), the following part numbers are used:
- 88568-52010;
- 87139-12010.
The third generation Toyota Rav4 (2006 – 2010) uses components with part numbers – 87139-52020.
For models released in the fourth generation (2012-2018) and the new body (2019), the following article number is relevant - 87139-52040
Ravchik owners believe that the filter for a 2007 car will fit a 2011 and even a 2021 model.
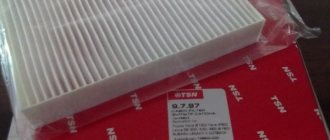
The price for old models, for samples from 2009 or 2013, is within 700 rubles; for a new car you can buy a filter for 1,500 rubles. Therefore, Ravo owners buy analogues:
- Denso DCF357P.
- TSN 9.7.37.
- MANN CU 1919.
- Sakura CA-1114.
- MANN CU 1828.
- Denso DCF357P.
- TSN 9.7.97.
- Sakura CA-3301.
- Filtron K 1210.
The main thing is to choose a suitable new cabin filter; the manufacturer is not so important.
What parts should I take?
The article number of the original cabin filter for the third generation Toyota RAV4 is 8713902020 , the fourth is 87139-50100 . The first element can be replaced with analogues from the following manufacturers:
- Denso (catalog number – DCF356P).
- MAHLE (article – LA395).
- Sacura (ID – CAC1114).
For the second, there are, for example, the following similar options:
- Denso (number 453-1019).
- Fram (ID CF10285).
- TYC (item 800025P).
- Wix (catalog number 24483).
As for the air filter, the original for the third generation with a 2-liter engine has article number 1780128010 , for cars of the same series with a 2.4-liter engine - 1780138011 17801-0V020 is installed . More inexpensive analogues are produced by TSN (article number 9.1.168PU , suitable for Toyota of the third generation), Sacura ( A-1123 - for the third, A-33960 - for the fourth generation) and K&N (number 33-2381 , compatible with RAV 4 of the fourth series ).
In any case, ask the store where you will choose filters; they will probably tell you which filters are best for a particular car at the time of ordering.
Post Views: 2,825
Do-it-yourself component replacement
There are many videos on the Internet that tell you how to correctly change the cabin filter element on a Rav 4 model 1996 or 2011 with your own hands. First you need to empty the glove compartment where the part is located.
Instructions:
- press the edges onto the clamps;
- remove the glove compartment lid;
- open the filter cover;
- take out the old one and put in the new element.
For proper installation, you need to pay attention to the arrows indicated on the part.
Extending the life of the cabin filter
You can extend the life of the filter component by avoiding dusty and sandy roads, as well as periodically cleaning the element.
Expert Tips:
- The paper filter element can be cleaned with a strong air stream using a vacuum cleaner with a brush.
- A synthetic-based element is of higher quality. The top layer needs to be “passed” with a vacuum cleaner, then soaked in 2 liters of warm water for 10 minutes and, using powder or laundry soap, washed well.
- The carbon filter component can only be cleaned using compressed air.
- There are foam rubber gaskets around the perimeter of the element; you need to be careful not to damage them during installation.
- When installing the hatch, near the holes for the screws there are two guide elements for proper installation of the structure.
Replacing the filter yourself will save the car owner’s time and budget.
Replacing the cabin filter Toyota Rav 4 Leave a comment
Hi all! It's time to have your car serviced! Today we will tell you how to replace the cabin filter of a Toyota Rav 4. In general, the procedure is very, very simple, so I’m unlikely to open America for “experienced” car owners. But this manual is intended primarily for beginners, so it will be useful for them to first read our article before going to the garage and making a replacement. So, let's go.
By the way, if you have not yet changed the oil in the Toyota RAV 4 automatic transmission, then you simply must read our article. In it you will find not only how to change the oil in a machine, but also how to save a lot on consumables and work.
Replacing the Toyota RAV 4 cabin filter according to regulations
If you adhere to the maintenance regulations, then the Toyota Rav 4 cabin filter should be replaced every 20 thousand kilometers. And after 10 thousand kilometers, the cabin filter should be inspected and blown out with compressed air, if necessary. But if you take into account the condition of the roads in Russia and the general dustiness, it won’t hurt to change the cabin filter a little earlier, for example after 15 thousand km.
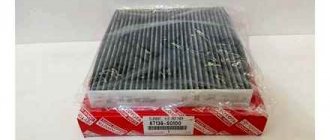
For replacement, official dealers use only original filter elements. In my opinion, such filters are unreasonably expensive. For example, in our case, an original cabin filter with article number 87139-07020 on Exist costs from 1328.00 rubles (this is with a delivery time of 32 days and a price level of Wholesale 5 (the maximum possible discount on Exist). If we take a period of 4 days, then the price of the filter immediately increases to 2570.00 rubles.
Namely, this is the filter that officials install when undergoing maintenance. Of course, it's not worth that kind of money. Especially if takes start at 115 rubles apiece:
And this is the Nevsky filter, which is considered to be of quite high quality. In fact, for the cost of the original filter of 2570 rubles, you can buy 22 takes (115 rubles x 22 = 2530 rubles). Considering that the Toyota Rav 4 cabin filter is replaced after 20 thousand kilometers, then these 22 filters can be changed every thousand kilometers and 2 more filters will remain in stock! This is the arithmetic. Okay, I’ve kind of moved away from our topic... So, let’s go back.
Replacing the Toyota Rav 4 cabin filter - step-by-step instructions
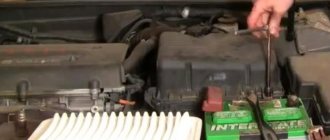
1. The filter element is located behind the glove box. To get to it, you need to remove the glove compartment. To do this, first remove everything unnecessary from the glove compartment and get to work. The entire replacement takes a maximum of 10 minutes and requires absolutely no tools.
2. Push the side clamps of the glove compartment inward, as shown in the photo below.
3. Disconnect the smooth ride lock eye and remove the entire glove box.
4. Behind it we see a plastic cabin filter cover. Press the latch:
... and take out this cover. Behind it is the cabin filter. Let's take it out. Try to do this carefully, as a large amount of dust and other debris accumulates on the top of the filter.
5. If possible, remove all debris from the cabin filter niche and install a new cabin filter in place.
6. Installation is the most important step in replacing the Toyota Rav 4 cabin filter, as it requires installing the filter in the correct position. This is done as follows. Each filter has an arrow that indicates either the direction of air flow (AIR FLOW) or the top of the filter (UP). If next to the arrow there is the inscription “AIR FLOW”, then the filter is placed with the arrow down, and if there is the inscription “UP”, then the filter is placed with the arrow up.
7. Put everything back together in reverse order and enjoy the cleanliness of the air entering the cabin! That's all! We also recommend watching a video in which everything is explained and shown in detail.
Replacing the cabin filter Toyota Rav 4 video