Such a complex technical mechanism as a car requires constant maintenance for stable operation. All components in a car are important. And the breakdown of one or another unit will, at best, lead to discomfort during operation, and at worst, to expensive repairs. Failure of the control system in Toyota cars falls into the category of expensive repairs. Therefore, it is important to avoid breakdowns and prevent potential problems that could lead to system failure. But if the control is out of order, you can still try to repair it yourself.
What is a steering rack
If you imagine the wheels and steering wheel as planes, then they will lie perpendicular to each other. And to make them interact, a system is needed to connect the nodes. This is what the steering rack serves for, which not only forces the wheels to turn along a vertical axis by transmitting force from the steering wheel, but also softens its movement.
The system forces the front wheels to synchronously deflect from the zero point (that is, the position when the wheels are strictly parallel to the car body).
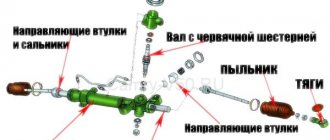
Steering rack components
Under the influence of the steering force, the wheels are deflected due to a system of gears and a notched beam. Since all modern Toyota vehicles are equipped with power steering (hydraulic or electric), a system with technology-appropriate parts is being considered. Thus, the steering rack consists of the following parts:
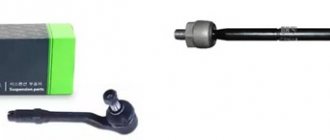
- drive shaft;
- gear;
- distributor;
- gear beam;
- housing with hydraulic cylinders;
- pressure pipelines;
- protective anthers;
- internal traction.
In the unit, all the above parts are interconnected. Failure of one or more parts will result in serious operating difficulties. First of all, this concerns rubber boots and cuffs, which protect the mechanism from moisture, sand and dirt flying from the road.
However, all rubber parts are consumables. They, as a rule, change during routine repairs of rods and tips. However, things are much more complicated if the main shaft gear or rack wears out. In this case, you cannot do without a complete overhaul of the unit or even replacement with a new one.
Operating principle of the steering rack
A force comes from the rotating mechanism in the cabin, which causes the intermediate steering shaft to rotate. It directly ends with a notch, which is connected to the teeth of the gear beam.
When a force is applied to the gear, the potential is also transmitted to a gear beam located perpendicular to the intermediate shaft. Then the force is transferred to the rods, which in turn force the wheel to move in the vertical axis.
Possible steering rack malfunctions
The connection between the intermediate shaft and the gear beam is the most loaded link. It accounts for the most effort and also more often than other nodes, movement occurs in it. Therefore, from a technical point of view, this is a solid unit, made of thick high-quality steel with a large margin of strength and wear resistance.
The gear connections are calibrated by engineers with such precision that the force is distributed as evenly as possible when the plane of the gear tooth comes into contact with the plane of the rack notch. In modern cars, this allows the mechanism to remain mobile even after a million rotations.
Nevertheless, metal wear still occurs, and sooner or later you may encounter the following outcomes:
- abrasion of gear teeth;
- deformation of rubbing parts;
- cracks, chips, breaks of rotation elements.
If such faults are identified at the initial stage, you can try to correct the gap between the planes of the teeth in the connection. A special adjustment screw is provided for this.
IMPORTANT! It is best to entrust the adjustment of the distance between the teeth in the steering rack to experienced specialists. Without certain knowledge, tools and working conditions, it will not be possible to set the correct value. It’s impossible to determine the degree of wear.
However, wear on a rotating link is quite rare. Especially under conditions of normal vehicle operation, regular maintenance and technical inspection.
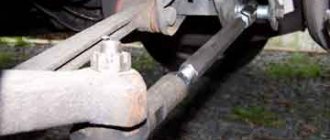
Steering rods and their ends fail much more often. This is due to the constant stress caused by uneven roads. These parts also have a shock-absorbing function. However, their replacement is planned and does not pose any particular difficulties during repairs.
Article: Power steering hydraulic system - pumping. Wheel studs removal and installation
More about lubrication
For this type of service of the Toyota Corolla 120 steering rack, the recommended lubricant is AZMOL FIOL-1. If we compare it with Lithols, then it wins greatly, since it belongs to NLGI class 1 and is characterized by low viscosity even at low temperatures. In addition, this lubricant does not contain molybdenum disulfides, which can adversely affect the polymer elements of the steering rack.
Any component and mechanism in a car has a certain service life, which can be significantly reduced under constant loads and improper use. One of the elements that is most subject to wear and tear is the steering column, which is constantly in use due to the turns of the steering wheel. On a Toyota Corolla, a knock in the steering column indicates a malfunction in the control system and requires an early search for the causes of its occurrence and, if possible, elimination.
Removing the steering rack
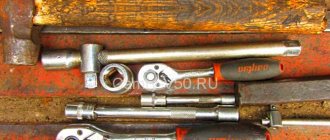
To repair this system in Toyota cars with your own hands, first of all you should take care of the necessary set of tools and working conditions. Lying under a car in the yard, this is very difficult, if not impossible. What to do:
- A special fluid is drained from the power steering reservoir.
- The nuts securing the rods are unscrewed.
- The rod ends are pressed out. To do this, you will need a special tool that allows you to quickly and effortlessly remove this control unit.
- The front axle is detached from the body. In common Toyota models, for example, Vanguard, Imi, Premio and Vish, these are ten bolts with a head size of “19” and five nuts with a head size of “17”.
- To completely dismantle the rack, it is necessary to disconnect the collector. To do this, unscrew two bolts at “12”.
- The steering protective shield is dismantled, which protects the device from mechanical damage while driving.
- The steering cross is disconnected from the steering rack.
- The power steering lines are disconnected. It is important to mark which one is the input and which is the output, so as not to get confused during reassembly. It is best to first unscrew the top fastening of these hoses.
- The rack has been released and must now be removed. To do this, it first moves to the left, which allows you to move the steering rod down. Then the entire assembly is shifted to the right and removed from its seat. For complete dismantling, the mechanism is lowered down.
Choice of 120 and 150 body
Before purchasing, make sure that the old rack cannot be repaired. After all, the cause of the breakdown may be in the repair kit or boots, but the main part may not be damaged. If a purchase is still necessary, here are a few rules:
- Pay attention to the VIN code so as not to run into a fake.
- You can use the old rack code to purchase an identical part.
- Of course, take into account the technical characteristics of the car: dimensions, location of the steering wheel, transmission unit, type of amplifier and other features.
- It is worth mentioning separately about used steering racks. This may be a completely justified purchase, given the high cost of the new part and the “survivability” of this design.
- Do not forget to purchase new anthers at the same time , in case they are not included in the package.
- Regarding brands, of course, it is better to use original parts. Although there are many manufacturers close to the original, such as Bosch, TRW, General Ricambi and JP Group.
Steering rack repair
After the assembly has been removed from the car, you can begin to reassemble it. This no longer requires any special working conditions. Enough free space on the table and a set of wrenches and pullers. Procedure:
- We remove the clamps that hold the anthers and remove the rubber protective corrugations.
- We bend the lock washers at the base of the steering rod. Holding the rod with the key at “22”, unscrew it from the rack. We repeat the same on the other side.
- We unscrew the pipelines, having previously marked their location.
- In the area where the rods are attached, remove the retaining ring.
- After a slight shift to the right, remove the restrictive sleeve.
- We unscrew the fixing nut and remove the spring, washer, valve bushing, guide and gasket.
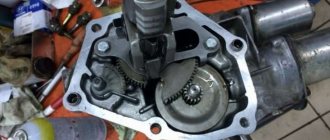
- We remove the retaining ring and knock out the control valve.
- We fix the entire detail. It is best to clamp it in a vice. This will allow you to easily remove the rack, and using a spacer you can knock the seal out of the pipe.
- We turn the entire mechanism 90 degrees to remove the sliding bearing and lower oil seal, as well as the control valve.
- All parts that are still suitable for reuse are cleaned and washed.
- We install a new oil seal and sliding bearing in their places. They need to be pressed in. To do this, it would be useful to use a special press. However, if such a device is not at hand, the parts can be carefully installed by tapping with a hammer.
- To prevent the upper gearbox seal from leaking, it is necessary to install Teflon rings. To repair steering racks, auto parts stores sell specialized repair kits.
- We put a rubber gasket on the gear beam. It is important not to damage this oil seal, so we put a protective plastic cap on the toothed part, along which the gasket will slide beyond the teeth. After this, we insert the beam into the body and press it into place by tapping. This is how the internal oil seal is installed.
ADDITIONAL INFORMATION! It is best to change all rubber and Teflon rings. Before installation, you must first lubricate them with hydraulic fluid.
- When the beam is inside the housing, a second oil seal is installed.
- The bushing is installed and the retaining ring is hammered in. It must be new.
- The control valve and lower bearing are pressed in. The nut is tightened, generously lubricated with sealant, and the rack housing is installed.
- A new oil seal, bearing and retaining ring are installed at the place where the rod is attached.
- Apply a sufficient amount of thick lubricant to the guide rack seat. The mechanism is inserted into the housing, and a few drops of sealant are applied to the threads of the guide rack cover. After this, the spring is mounted and the lid is screwed until it stops. Next, you need to begin to loosen the fasteners until the control valve begins to rotate by hand with slight force. After this, you can tighten the locknut.
- The steering rods are installed in their places and tightened with the specified tightening torque. The parts are lubricated, protective corrugations are put on and the clamps are tightened.
- The pipelines are attached and installed on the vehicle in the reverse order.
After installing the mechanism on the machine, the steering system must be pumped and filled with the required amount of hydraulic fluid. After this, the wheels must be adjusted for camber and toe.
About the versatility of repair and related issues
This repair can be considered universal for most cars, both for the Toyota Corolla 120 and for models of the Toyota family that are later and belong to a higher class of models.
And yet, before you decide to drill the rack housing, you need to check for play two more crosspieces of the steering mechanism, which are located in the cabin under the steering wheel. Another source of knocking may be the telescopic pipe that regulates the reach of the steering wheel. Quite often, the knocking comes from these parts, and it will be very disappointing when, even after all the work of filling the rack with lubricant, the knocking does not stop.
Sometimes crosspieces with large gaps are installed directly at the manufacturer, and they begin to knock after a short mileage. Despite the brand name of the car, sometimes the cause of knocking can be the bolts for fixing the crosspieces on the shaft. They are often not straightened, they turn away and knocking noises arise in these joints.
It is the Toyota Corolla steering racks that begin to make knocking noises and usually require repairs only after a mileage of more than 100 thousand kilometers. First of all, the knock begins to be heard when the wheels hit uneven roads - potholes and potholes. This sound is quite loud, but has a dull tint and does not radiate to the steering wheel; vibration shocks are not felt by your hands.