Repairing Toyota Prado 120 steering racks cannot be performed without knowledge and experience. Moreover, this approach is fraught with failure of the entire mechanism and a significant increase in the danger when moving on a vehicle, due to the fact that the unit is responsible for maneuverability and control. AUTO HYDROCENTER strongly recommends not to make any interventions, but to contact competent craftsmen who are ready to carry out repairs and provide a guarantee.
Replacement of Toyota Prado 120 steering racks and repairs for the masters of AUTO HYDROCENTER is the main specialization. All specialists have appropriate qualifications and sufficient work experience. Land Cruiser Prado 120 steering racks require a professional approach, as they have their own characteristic features. AUTO HYDROCENTER has the ability to solve any problems with mechanisms, using original parts that are always in stock. Before handing over the car, the slats are tested on a stand, and after installation, directly in action while driving.
| Models / modifications | steering rack repair, rub. | removal and installation, rub. |
| Toyota Prado 120 | 11000 | 6500 |
Diagnostics and repair of Prado 120 steering wheel
Repair of the steering rack of Toyota Prado 120 and other models is carried out after a thorough check at a service station.
Service station workers check the car for leaks, corrosion, and breakdowns of mechanical parts. Mechanical problems are checked visually, and problems with hydraulic fluid are checked by applying high pressure to the system. Repair and adjustment of the Prado 120 steering rack is a complex undertaking, including restoration and maintenance of mechanism parts. The complexity of the work and its price depend on the level of damage.
Oil seals and O-rings are replaced, even if there is no breakdown as such. The car mechanic cleans the rack shaft from corrosion, checks the shaft balance and power steering flushing. If the rack cannot be repaired, it is replaced. Afterwards, the technician bleeds the hydraulic system, repeats the diagnostics of the entire mechanism, and, if necessary, adjusts it. If necessary, the steering rod for the Prado 120 is replaced. The final stage is checking the wheel alignment of the car.
You can repair the Prado 95, 120, 150 steering rack yourself. The necessary spare parts are sold in specialized stores in the form of repair kits. The sequence of actions depends on the specific problem.
If the driver notices that there is no proper resistance when turning the steering wheel, most likely the reason is the following:
- lack of fluid in the tank;
- low belt tension;
- worn parts.
Such a breakdown can be easily eliminated: replace the pump, adjust the belt, and add fluid to the tank.
If the level of wheel rotation does not correspond to the rotation of the steering wheel, the driver needs to replace the crosspiece and distributor, the wear of which is the cause of the malfunction.
If the steering wheel rotates too easily in its normal position, you will most likely have to replace the entire assembly, since the reason, as is correct, is the wear of the rack and rings in the power cylinder. The same solution if the steering wheel does not turn.
Sometimes the driver cannot return the steering wheel to the center position. This is explained by incorrect adjustment, worn distributor gears, and an over-tightened shaft. The solution to the problem is to adjust the entire assembly.
Extraneous noise when the car is moving - a clogged tank filter, low fluid level, deformed hoses, or air trapped in the mechanism. The solution is to replace the hose, tank, gradually add fluid, and install new seals.
Difficulty turning the steering wheel indicates air trapped in the rack, as well as low pump power. To fix the problem, it is recommended to replace the seals, pump, and tighten the belts.
Noticed oil stains on the asphalt along the way of the car indicate a leak of hydraulic fluid and its insufficient level. When two adjacent oil lines are depressurized and the seals are worn out, this type of malfunction occurs. The solution is to replace seals, seals or the entire assembly.
It must be borne in mind that independent work requires knowledge and certain experience, so you should be extremely careful and attentive when making repairs.
Steering rack Toyota Land Cruiser Prado 120
5 out of 5 (5 ratings)
* Calculated based on Yandex Directory reviews
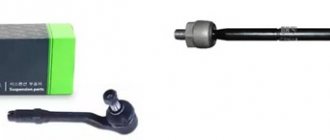
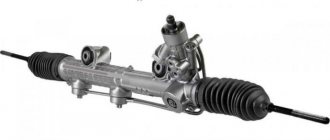
Steering racks on the Toyota Land Cruiser Prado 120 are mechanical, hydraulic and electric. The Toyota Land Cruiser Prado 120 steering rack can be sold separately or assembled with tie rods and tie rod ends. One manufacturer may produce several versions of different steering racks.
Mechanical steering rack -
installed on vehicles without power steering.
Hydraulic steering rack -
installed on most models.
Installed on all models equipped with power steering. Electric rack
- also uses power steering, the fluid in which is controlled by electric power steering.
You can buy a steering rack used, refurbished or new. Remanufactured steering racks are used original steering racks that have been factory rebuilt using original components. Used steering rack, purchased and installed at your own risk. The warranty period for a used rail is 5 days, only for testing its functionality.
Cost of steering rack Toyota Land Cruiser Prado 120:
| Steering rack options | Rake price | Buy |
| Steering rack Toyota Land Cruiser Prado 120, mechanical | from 5250 rub. | |
| Steering rack Toyota Land Cruiser Prado 120, hydraulic | from 10200 rub. | |
| Steering rack Toyota Land Cruiser Prado 120, electric | from 17500 rub. | |
| Steering rack Toyota Land Cruiser Prado 120, restored | from 9700 rub. |
Buy a steering rack for Toyota Land Cruiser Prado 120
Phone: 8 (812) 409-46-75
Write to us on Whatsapp
The cost of the steering rack depends on whether it is new or used, the condition of the used one (degree of wear, mileage, deformation, leakage, etc.), the manufacturer, completeness, as well as on availability in our warehouse or delivery time before our store.
The same model can have different steering racks. We recommend contacting our managers, who will select the steering rack using the vehicle's VIN number.
Which steering rack to choose:
1. Original rack 2. ZF (Germany) 3. CF Srl (Italy) 4. Fenox (Belarus) 5. General Ricambi (Italy)
When to buy a steering rack:
— Steering rack leaking; — knocking on the steering rack; — the steering wheel has become tight; — hum in the power steering.
When purchasing a steering rack from us, we will give a discount on replacing the steering rack at our car services.
For engine
- 2.7 AT 4WD (163 hp)
- 3.0 D AT 4WD (173 hp)
- 3.0 D MT 4WD (173 hp)
- 2.7 MT 4WD (163 hp)
- 4.0 AT 4WD (282 hp)
- 2.7 AT (150 hp)
- 3.0 D AT (170 hp)
- 3.0 D MT (170 hp)
- 3.4 AT (185 hp)
- 2.7 AT (163 hp)
- 2.7 MT (163 hp)
- 3.0 TD AT (173 hp)
- 3.0 TD MT (173 hp)
- 4.0 AT (249 hp)
- 2.7 MT (150 hp)
- 3.0 TD AT (130 hp)
- 2.7 AT (160 hp)
- 3.0 TD MT (130 hp)
- 2.7 MT (160 hp)
- 3.4 AT (190 hp)
- 3.4 MT (190 hp)
- 3.0 TD AT (140 hp)
- 3.0 TD MT (140 hp)
- 3.4 MT (185 hp)
- 3.0 DT AT (130 hp)
- 3.0 DT MT (130 hp)
- 2.4 DT AT (97 hp)
- 2.4 DT MT (97 hp)
- 3.0 D AT 4WD (7 seats) (173 hp)
- 3.0 D AT 4WD (5 seats) (173 hp)
- 3.0 D MT 4WD (5 seats) (173 hp)
- 2.8 D AT 4WD (5 seats) (177 hp)
- 2.8 D AT 4WD (7 seats) (177 hp)
- 4.0 AT 4WD (5 seats) (282 hp)
- 4.0 AT 4WD (7 seats) (282 hp)
- 2.7 AT AWD (163 hp)
- 2.7 MT AWD (163 hp)
- 4.0 AT AWD (249 hp)
- 2.8 D AT AWD (177 hp)
- 2.8 D MT AWD (177 hp)
- 2.8 TD AT 4WD (177 hp)
- 3.0 TD AT 4WD (190 hp)
- 3.0 TD AT 4WD (173 hp)
- 3.0 TD MT 4WD (173 hp)
- 3.0 TD MT 4WD (190 hp)
Modifications
- Toyota Land Cruiser Prado 120 J120
How to fix the problem
Knocking in the Prado 150 steering column can be eliminated by carefully tightening all bolted connections of the mechanism. If this is the problem, the sound will go away.
However, if you seriously experience a knocking noise in the steering wheel of your Toyota Prado 150, then you will have to undergo a major repair, although not very expensive.
Most often, the Toyota Land Cruiser 150 steering column knocks due to wear on the ball joints. There is nothing wrong with this, these are consumables for any car, and they are relatively cheap. Once you change them, the knocking will stop.
When the support bearings fail, in this case the Prado 150 steering column is repaired by replacing them.
But the rack, unlike the previous parts, on the contrary, can be repaired, and it needs to be changed only in the most extreme, advanced case. Anyone who has restored the steering column on a Prado 150 knows that today there are specialized workshops, many of which will repair this mechanism at the highest level, and it will be no worse than new.
The only thing you need to remember is that there are different workshops and you should only use the services of trusted mechanics so as not to do the job twice.
Well, in conclusion, about the repair of bearings and silent blocks: these parts cannot be restored and only need to be replaced.
Repair features
Every car has vulnerabilities. Toyota Prado is no exception. Speaking about the steering rack and repairs, a car mechanic pays attention to silent blocks - rubber-metal hinges that serve as fastening of the steering rack to the body or subframe of the car. The fact is that the Prado's factory silent blocks are weak and thin for such a large car. The thickness of the rubber layer is 2 millimeters, so they do not last long.
To prevent serious problems, car mechanics advise owners to replace factory parts with more reinforced ones.
Removing the steering rack
The control system includes a number of mechanical units. Problems that occur in them are corrected with skillful hands. The safest thing to do is to turn to service station specialists for help.
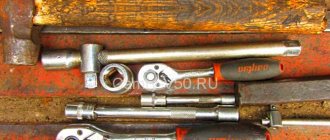
To dismantle the rack you must have the following tools:
- repair kit;
- corrugated pipe;
- bearing for gear shaft in the form of a ball;
- Litol lubricant in a tube;
- 8-sided wrench 17 for unscrewing the stop nut;
- installation pliers;
- open fixing ring;
- removal device.
The home master has his own set of necessary tools.
Work is being carried out in an inspection pit.
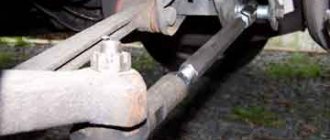
Removing the steering rack on Land Cruiser 100 and 200 is carried out step by step:
- First you need to remove the metal fastener (cotter pin) from the hinge, which transmits forces to the wheel arms.
- Then, using technological tools for pressing out, release the ball joint pins from the steering knuckles that regulate the deflection of the suspension struts.
- Unscrew the securing bolt in connection with the rotating gear element of the machine located next to the pedal.
- Remove the plastic casing covering the column that provides direction of movement.
- Using a 13mm socket, you need to unscrew 2 nuts holding the assembly to the car body.
- Carefully remove the clips holding the steering mechanism together.
- Disconnect the drive pulley and the motion guide column.
- Use the lever to lift the right side of the car.
- Remove the steering mechanism through the wheel well (window).
- After dismantling the rack, use a 22mm socket to unscrew the bolts on the steering rods.
- A hammer and chisel are used to bend the edge of the stopper plate.
- Disconnect the tie rods.
- On the right side of the rail, remove the rubber support at the same time as the ring that has spacer functions.
- Cut off the straps holding the corrugation together.
- Remove the protective cap.
- Remove the cover and rubber support located to the left of the rack housing.
To unscrew the Land Cruiser nut, use a 17-point 8-sided socket. Procedure:
- The spring is removed from the middle of the nut.
- The stopper ring is taken out.
- The stop is removed using a piece of wood secured in a vice.
- Using a flat-head screwdriver, remove the seal from the front shield.
- Use a 24 mm wrench to dismount the lock washer.
- Dismantling is carried out, the support shaft is pulled out from the reinforcing grooves.
- Using special scissors, the gear shaft is released from the stop ring.
For further work, a two- or three-fingered wrench is used. They release the bearing from the press. You can use a drill with a 1.2 - 1.5 mm drill. You need to drill to get into the end of the bearing, and then remove it through the resulting hole.
Next, the hollow part of the housing, where the moving elements of the engine operate, is washed.
At the end of the work, a spare part from the repair kit is inserted.
You can press a drilled hole in different ways:
- cover with a mixture of superglue and metal filings (done with a match);
- use commercial cold welding.
All elements are lubricated with special products “Fiol” or “Litol”.
Checking the steering rack
We carry out a visual inspection of the steering rack for leaks of working fluid and the integrity of the steering rod boots, and also check the condition of the steering rods and steering tips.
To check the steering rods, it is enough to lift the racks and see if the rod lowers under its own weight; if this happens, it is advisable to change the rod.
The condition of the steering tips is checked by the condition of the rubber boots (their integrity) and the elasticity of their fingers. The finger should move with good effort; if it rotates easily, then the tip needs to be changed.
My right linkage and tip require replacement, and I changed the tip itself last year when I was rebuilding the steering rack. A LYNXauto C4059R tip was installed; I do not recommend installing spare parts from this company.
Replacement of protective covers and maintenance of CV joints of Toyota Land Cruiser
Replacement of protective covers and maintenance of CV joints
| If defects in the protective cover are detected, the condition of the corresponding CV joint must be carefully examined. Often, on an exchange basis, you can purchase completely restored drive shaft assemblies, which greatly simplifies the situation and reduces time costs. Before you begin dismantling components, do some marketing by finding out the prices of the parts you need. Compare them with the costs of purchasing refurbished assemblies. Remember that the outer CV joint cannot be disassembled and must be replaced together with the shaft. |
| Execution order |
| Remove the drive shaft (see Section Removing and installing drive shafts). |
Disassembly
Drive Shaft Assembly Components
| 1 — Boot 2 — Inner CV joint housing with axle 3 — Retaining ring 4 — Protective cover 5 — Bandage tapes | 6 — Protective cover 7 — Retaining ring 8 — Tripod assembly 9 — Outer CV joint assembly with drive shaft 10 — Boot |
| Execution order | ||||
| 1. Clamp the shaft in a vice with soft jaws. Check the hinge for radial play, indicating wear on the internal components. Check the smooth movement of both hinges in all directions provided for by their design. If the protective boot is damaged, disassemble the CV joint, thoroughly wipe its components and assess their condition. 2. Using a small screwdriver, bend the locking tabs and remove the protective cover securing straps. 3. Using a screwdriver, pry up the edge of the cover and remove it from the hinge assembly (old and damaged covers can simply be cut off) (refer to the illustration above). Remove the hinge housing from the tripod assembly. 4. Mark the position of the tripod assembly on the shaft journal. 5. Remove the retaining ring. 6. Using a brass drift, knock the tripod assembly off the shaft journal. 7. If you have not cut them off yet, remove the protective covers of both hinges. Wrap the splined inner shaft journal with a protective layer of insulating tape to protect the new boots from damage when they are placed on the shaft. Examination
Assembly
Video about “Replacing protective covers and servicing CV joints” for Toyota Land CruiserReplacing the caliper boot Replacing the boot on the caliper https://youtube.com/watch?v=sRuaxu7NYkk Replacing steering gear boots |
Adjusting the rack Toyota Land Cruiser 100
With prolonged use, mechanical components require adjustment. Various problems may appear here: extraneous sounds, noise, tightness in mechanisms. They may indicate the presence of malfunctions that could lead to an accident.
The Land Cruiser rack is adjusted by tightening the screw located in the steering mechanism. It is better to carry out work on an overpass or inspection hole. An alternative option is to jack up the car.
The algorithm of actions is as follows:
- The front wheels are set straight.
- Using a backlash meter, the angle of deflection of the steering wheel is measured.
- The screw is carefully tightened. Periodically you need to check the movement of the steering wheel and the presence of knocking or play in the column.
- Sea trials are being carried out.
Adjustments are made in a similar way when preparing to repair the Toyota Land Cruiser 200 steering rack.
Diagnostics and repair of Prado 120 steering wheel
Repair of the steering rack of Toyota Prado 120 and other models is carried out after a thorough check at a service station. Service station workers check the car for leaks, corrosion, and breakdowns of mechanical parts. Mechanical problems are checked visually, and problems with hydraulic fluid are checked by applying high pressure to the system.
Repair and adjustment of the Prado 120 steering rack is a complex undertaking, including restoration and maintenance of mechanism parts. The complexity of the work and its price depend on the level of damage.
Oil seals and O-rings are replaced, even if there is no breakdown as such. The car mechanic cleans the rack shaft from corrosion, checks the shaft balance and power steering flushing. If the rack cannot be repaired, it is replaced. Afterwards, the technician bleeds the hydraulic system, repeats the diagnostics of the entire mechanism, and, if necessary, adjusts it. If necessary, the steering rod for the Prado 120 is replaced. The final stage is checking the wheel alignment of the car.
You can repair the Prado 95, 120, 150 steering rack yourself. The necessary spare parts are sold in specialized stores in the form of repair kits. The sequence of actions depends on the specific problem.
If the driver notices that there is no proper resistance when turning the steering wheel, most likely the reason is the following:
- lack of fluid in the tank;
- low belt tension;
- worn parts.
Such a breakdown can be easily eliminated: replace the pump, adjust the belt, and add fluid to the tank.
If the level of wheel rotation does not correspond to the rotation of the steering wheel, the driver needs to replace the crosspiece and distributor, the wear of which is the cause of the malfunction.
If the steering wheel rotates too easily in its normal position, you will most likely have to replace the entire assembly, since the reason, as is correct, is the wear of the rack and rings in the power cylinder. The same solution if the steering wheel does not turn.
Sometimes the driver cannot return the steering wheel to the center position. This is explained by incorrect adjustment, worn distributor gears, and an over-tightened shaft. The solution to the problem is to adjust the entire assembly.
Extraneous noise when the car is moving - a clogged tank filter, low fluid level, deformed hoses, or air trapped in the mechanism. The solution is to replace the hose, tank, gradually add fluid, and install new seals.
Difficulty turning the steering wheel indicates air trapped in the rack, as well as low pump power. To fix the problem, it is recommended to replace the seals, pump, and tighten the belts.
Noticed oil stains on the asphalt along the way of the car indicate a leak of hydraulic fluid and its insufficient level. When two adjacent oil lines are depressurized and the seals are worn out, this type of malfunction occurs. The solution is to replace seals, seals or the entire assembly.
It must be borne in mind that independent work requires knowledge and certain experience, so you should be extremely careful and attentive when making repairs.
Knocking in the steering column: causes
The performance of controls in a car is one of the main points of safety on the road.
The rack in the TLK 200 is of high quality and episodes related to the repair or replacement of the Land Cruiser 200 steering shaft are extremely rare. This knocking noise occurs when driving on rough roads. There are many reasons for knocking, but more often it is due to high mileage, corrosion of the crosspiece, and deformation of the driveshaft.
Let's highlight the most common causes of column failure:
- The support sleeve, which is located on the reverse side of the unit, broke. If the knocking noise comes from under the hood, it means it is simply worn out. To find out what the problem is, place the machine on a lift and, grabbing the shaft, move it in a vertical direction. If there is play, then the bushing is worn out. You can replace it at a service station.
- Over time, the bearing may wear out.
- The tie rod ends could break.
- The problem may be with the steering shaft bearing. It needs to be lubricated and adjusted.
- The bolts have come loose from the steering control. To fix this problem, you need to tighten the bolts.
- The appearance of an annular excavation inside the housing wall directly in the power cylinder of the rack. Replacing or sanding should solve the problem.
- Power steering pump. The bearing in it wears out more often, and knocking begins. You need to either change the bearing, or disassemble the pump, or go to a service station.
- The cause of play in the steering wheel may be a defect, a column cross or a broken rack.
Don’t forget the state of our roads, foreign cars are simply not designed for them, so a situation arises in which the mechanisms wear out faster and the steering column of your Toyota Land Cruiser 200 knocks.
Steering rack Prado 120 - signs of malfunction
Let's look at the symptoms indicating problems with the Prado steering rack.
The most common breakdown is power steering fluid leaking from the rack. Indicates that the integrity of the O-rings or seals has been compromised. You can check this by looking under the hood.
When driving on a flat road, the car “floats”, you have to steer so that it goes straight. This may indicate a failure of the silent blocks on which the rail is attached.
If the car is standing still, and when you turn the steering wheel you hear a knocking sound, this indicates wear on the internal mechanisms of the rack. But such a conclusion can only be made if the tie rods and tie rods are in good condition and the car engine is running.
When driving on uneven roads, the steering wheel vibrates and a knock is heard from under the hood.
Play in the steering wheel. Also, when turning the steering wheel, it does not return to its original position in normal mode.
Reasons why steering gearbox repair is required
Possible gearbox malfunctions:
- Device leaking. A malfunction can be detected by the presence of oil under the machine. The cause of the breakdown may be a leaking oil seal or corrosion in the material of the input shaft. This can be corrected by changing the seals, gaskets and cuffs. Grinding the shaft will help eliminate corrosion, then a gas-thermal spraying procedure is carried out so that the shaft takes on standard dimensions.
- “Tightness” of the steering wheel. Due to the increased effort required to turn the steering wheel, you may experience a feeling of “stiffness” in the steering wheel. To diagnose, you need to use a torque wrench to determine the degree of force with which the steering wheel turns.
- It is required to compare the information with the result provided by the manufacturer. If the indicators are different, it is necessary to conduct a diagnosis. You don't need to fix the problem yourself. It is recommended to send the regulator for service.
- The appearance of play on the steering wheel. In this case, complete disassembly, analysis of the condition of the device components, and replacement of loose parts is required. Next, setup is carried out at the stand.
- Knock in the mechanism. This breakdown can be determined by the “kickback” in the steering wheel. Damage to the part is due to worn bearings. To fix the problem, you need to replace the loose elements and adjust the gearbox on the stand.
- Repeated movements cause the steering wheel to become heavier. This is due to the jamming of the car's governor driveshaft. Looping occurs due to corrosion on the mechanism. The problem can be fixed by repairing or replacing the cardan.
- Biting the steering wheel in both directions. Failure occurs due to failure of the cylinder in the middle position, or due to wear of the crankcase. The damage can be eliminated by completely rebuilding the mechanism. Damaged elements also need to be replaced.
Signs of a faulty steering rack
Malfunctions in the operation of the mechanism are immediately noticeable:
- the knocking of the suspension from the front is at first noticeable only on uneven, broken roads, and after that it is constant;
- puddles in the garage under the car are a common sign of breakdown in modern cars with power steering (power steering);
- hydraulic fluid leaks due to old seals and gaskets;
- difficult turning with a whistle or hum - a malfunction of the distributor, drive belt or pump;
- tight steering wheel in winter cold;
- deterioration in car control - the steering wheel does not return to its original position, the car does not respond to its turns;
- vibrations felt in the steering wheel.
If the driver notices at least one of these problems, you need to immediately diagnose the car in order to find and fix the problem.
Tips for Toyota Land Cruiser Prado owners
To summarize, it is worth noting that replacing or repairing the Prado 120 steering wheel is not a cheap pleasure! But if there are the slightest signs of a malfunction of this unit, you should not postpone your visit to the car service center. Firstly, this is fraught with even more large-scale repairs of the unit with high financial investments. Secondly, the serviceability of the steering mechanisms is the safety of you and those around you, and this is not the case when risk is a noble cause!
And in order for the rail to serve you faithfully for many years, you must follow a number of rules:
- Deep holes and high curbs should be driven at minimum speed.
- Try to twist the steering wheel to the extreme position as little as possible - this harms the rack and power steering pump.
- Before starting to drive on a frosty day, shake the steering wheel from side to side to warm up the fluid in the system. This must be done with the engine running.
- Regularly check the condition of the boots on the steering rods; if damaged, do not delay replacement.
Finally, we wish you good luck on the roads and hope that these simple tips will protect your car from breakdowns!
Source
Toyota Land Cruiser Prado 120 Steering rack replacement
Technical welcomes its readers. Today our guest is the Toyota Land Cruiser Prado 120. Yes, that same legendary SUV that, like expensive cognac, does not lose value over the years. Over the years, our technical center has passed through hundreds of such cars, of different years of production and configurations.
There are cars with 2.7-liter gasoline engines, which were massively imported by “gray dealers” from the UAE, as well as diesel options with D4D, which were imported from European countries. Most of the cars, of course, were sold in Russia by official dealers with a single 4-liter gasoline power unit.
Of course, every year there are fewer and fewer such cars on Moscow roads. The end of production of the SUV is in 2009. But there are still owners who are in no hurry to sell such a car. Indeed, this SUV was developed in the late 90s and thought out to the smallest detail. Fender flares and door trim protect body elements from damage. It is enough to simply replace the overlay, rather than straightening or painting the entire element. Now they don't do that anymore.
Before buying a used Japanese SUV, be sure to start checking the legal purity: title and markings of the frame and body. It is also recommended that the vehicle be inspected by a forensic expert. If the car does not have legal problems, you can go for a comprehensive diagnosis, but again to a specialized technical center.
They know where to look and what to do. Many malfunctions in other places may simply not be noticed - after all, when moving the car, nothing knocks or rattles... This is deceptive.
Today a Toyota Land Cruiser Prado 120 arrived to us. Purchased new from an official dealer in Russia. One owner. Actual mileage 350,000 km. For a long time, this car has been looked after by master inspector Oleg Pudlo. When an SUV's mileage approaches the 400,000 km mark, it will inevitably require investment in suspension and steering.
The steering rack on this car will be replaced with a new one - original. The owner did not save money and carry out restoration repairs.
Replacing the steering rack on a Toyota Land Cruiser Prado 120 takes more than one hour of a mechanic’s working time. Easy to say - not so easy to do. It is necessary to disconnect the front gearbox from the frame....
Along the way, we perform brake system repairs. Rebuilding the front axle brake calipers on the Toyota Land Cruiser Prado is a common occurrence for owners. When operating a car in the Moscow region, you have to perform this work every few years. With rear axle calipers it is simpler - it is enough to carry out preventive cleaning and lubrication of the guide pins and brake pad seats every 20,000 km.
The front suspension arms of the Toyota Land Cruiser Prado 120 last 150,000 - 200,000 km. Of course, the owner’s thrift plays a strong role here. If the car is often used off-road and has larger tires installed on it, then this parameter will be reduced. Often on the Internet on forums you can find discussions on replacing only the silent blocks of the lower arms - since the manufacturer produces these parts in the “original”. But the harsh climate and anti-ice reagents cause corrosion of the seats in the levers and it is simply impossible to install a new silent block - some craftsmen weld it spot-welded.
In addition to replacing the front lower control arms on this car, we replaced the front upper control arm and wheel bearing.
Of course, we performed maintenance according to the mileage - we replaced the engine oil, air and cabin filters, and also injected the driveshaft crosspieces.
After all the work, we adjust the wheel alignment angles. Now the car has been fully serviced and is ready to cover hundreds of thousands of kilometers again.
See you again, dear friends!
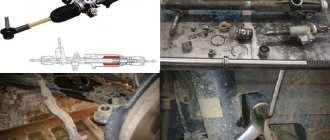
Toyota Land Cruiser Prado › Logbook › Toyota Land Cruiser Prado 150 steering rack repair
Elimination of play in the steering rack distributor shaft.
1. Remove the steering rods.2. Unscrew the fastening of the hydraulic pipes from the frame (2 bolts). 3. Unscrew the metal supply tube from the rack. Next, remove the clamp from the return hose and pull the hose off the fitting. Back when you assemble, put this hose first, otherwise it will be inconvenient to install the clamp.4. Unscrew the left stabilizer mount and pull the stabilizer forward.5. Unscrew the 2 bolts securing the rack to the frame. The moment is wild. Prepare a meter pipe.6. We pull the rail out to the left (I tried to pull it out in different ways, but it only came out that way.
The lower and upper roller bearings have VERY large play without visible wear (I think this has been the case since new. Watch the video). I only had the lower bushing prepared (made of bronze-graphite), I took the dimensions from the river from 120 Prado. The only thing that didn’t match was the outer diameter of 21mm, but here we needed 20mm. I had to sand it down. The old bearing was knocked out by drilling the rack. In general, it would be advisable to prepare a metal anchor with a screw so that you don’t have to knock out the bearing or drill anything. The middle bearing DG254708 is a regular ball bearing. There was no play in it at all. The lower bearing has the number 13BTM2012J (KOYO). The upper bearing 12y224vh koyo also has decent play. The bushing for the upper bearing was made from the bushing AS SBU9020 (available in the existent). It is advisable to also buy a key for tightening the rack - a 42 mm square. For the lower bushing, bronze-graphite can be found in a car store, the bushing is from the starter. I couldn’t find the solid blank I needed, so I had to sharpen the outer sleeve from steel and press bronze-graphite into it. I suspect that the uppermost oil seal has the number F-00366 19x32x7 or HA0238 19.00/32.00*6.00/7.00 type 1PM
Removing the steering rack Prado 150
similar to shooting with 120, the video is normal, so I won’t shoot it, everything is there. We have everything 1 to 1.
Here is the play that was in the lower bearing. Tough.
Upper bearing play. Fuck the horror.
Source
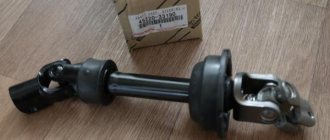
Toyota Land Cruiser Prado Dark gray handsome! › Logbook › Steering column repair
When I bought the car, I could clearly hear a knock in the steering rack and column and felt play. I took it to a good service station, where the guys professionally repair racks and speakers. The rail is still running (pah-pah-pah), but the column started knocking after 1.5 years.
After removing and disassembling the column, I began troubleshooting. In general, in the entire structure (not counting the steering rack) I counted 6 points where there could be knocking and play: 1. the lower crosspiece near the rack itself 2. a rubber damper (the shaft in it knocks on the bushing into which it fits, and over time it wears out there rubber seal) 3. crosspiece near the damper itself 4. splined (in the configuration where the steering wheel moves up and down) 5. splined shaft in the bearing, the seat breaks, it is easy to diagnose: you need to put your hand under the column and pull the shaft perpendicular to the axis and if the seat the place is broken, you will hear a knock and feel the play. 6. and finally, the apple ball itself! It became clear that the knocking and play was coming from the shaft in the bearing and the ball.
The photo of the ball is not mine, as luck would have it, the phone died and did not capture the entire repair process. I bought a new apple ball from Autotrade, the repair kit includes a spring and the ball itself, here is its number: ST-SL5001. But during the initial installation the play became even greater. Upon inspection, I saw work on the aluminum claws in which the ball sits. That’s why the Japanese didn’t put a simple cross there, no, damn it, it was necessary to trick up such a not entirely reliable design. I read that they cut out spacers from a Ryaba mayonnaise jar and insert them between the halves 3-4 balls. But I couldn’t do that, because we don’t sell Ryaba mayonnaise, just kidding))))) I decided to keep my old ball. At first I also cut out 4 spacers and installed them, but I didn’t like the way it sat there. I started looking for suitable materials instead of a mayonnaise jar. I don’t argue, the method works, but these gaskets from a jar do not have elasticity and you need something harder than rubber and softer than plastic, like a conveyor belt. Having searched in my garage, I didn’t find anything sensible, I went to the neighboring garage to my dad, he has a lot of things to find, he’s thrifty, and the echo of the USSR makes itself felt. I found a tape that just fit “my requirements”, harder than rubber and softer than plastic. Something resembling the hardness of a conveyor belt. I cut out half of the ball, sanded off the excess thickness, here the thickness of the gasket needs to be selected experimentally, I got 4 mm. Assembly. I took a spring from the new repair kit, it was longer, and added a washer just in case. I lubricated everything and assembled it, somehow stuffed the ball in, it was not at all convenient for one, I helped with a screwdriver. Now everything fits tightly and soundly. The spline shaft was hanging in the bearing and came out easily. I placed it on a Loctite 638 sleeve clamp. It grabbed tightly. I didn’t find any play in the spline part, but just in case I filled it with vacuum grease, again found in my dad’s garage, it’s written “Vacuum grease”, if anyone knows what it was used for, then write) It’s very thick, like boiled condensed milk and stretches like tar. I think I removed all the micro-play with a bang)))) I didn’t find any play in the crosspieces either, although I bought them before just in case, here is their number: ST1638 In the damper, I put 2 tubes (heat shrink) on the shaft and lubricated everything.
How to protect your steering rack from damage
Sooner or later, the driver has to repair or completely replace the units. But this moment can be postponed, ensuring the car a long life. To prevent damage to the steering rack, it is recommended to follow some rules for operating a car:
- periodically check the unit and replace the Toyota Prado 120 steering rack boots as necessary;
- in winter, before driving, turn the steering wheel so that the oil reaches all spare parts;
- keep the steering wheel in the extreme position for only 5 seconds and no more;
- avoid deep potholes on the roads, reduce speed when crossing rails, speed bumps.
Only careful responsible driving and timely diagnostics will allow the car to last longer, and driving will be safer and easier.
Source
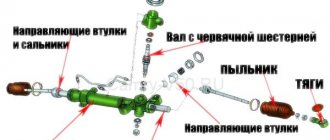
Toyota Prado steering rack - design
The design of the Prado 120 rack differs little from the racks of other cars equipped with hydraulic power steering.
- The Prado 120 rake consists of several parts, namely:
- The crankcase is made of light alloy, it is hollow inside and covered with a cover.
- Drive gear - installed in the crankcase.
- Bearings are necessary for the smooth running of the gear.
- Toothed bar - interacts with the gear, ensuring the shaft moves in one direction or another.
- Springs - ensure a snug fit of the bar to the gear, preventing any backlash.
- Restrictive ring - ensures the shaft moves in the desired range.
Payment via PayPal
After selecting payment via PayPal, the PayPal payment system will launch, where you need to select the payment method: bank card or PayPal account.
If you already have a PayPal account, then you need to log into it and make a payment.
If you do not have a PayPal account and you want to pay using a bank card via PayPal, you need to click on the “Create an Account” button - shown with an arrow in the picture.
PayPal will then prompt you to select your country and provide your credit card information.
After specifying the information required to make the payment, you must click on the “Pay Now” button.
Causes of malfunction
There are no spontaneous problems with the operation of the steering rack of Kruzaks. Malfunctions appear at a later date - with a mileage of 120 thousand km. But if the driver operates the car incorrectly, the mechanism fails much earlier and more often. There are a number of reasons for the malfunction of this spare part:
- driving fast over potholes, bad roads, over speed bumps, railway tracks, curbs;
- parking with the wheels turned out in winter;
- moisture inside the case;
- dust, sand particles clogging the rail.
These factors increase the level of wear and tear on individual device components. Repairing the Toyota Prado 150 steering rack is an expensive proposition, so it’s easier to prevent the problem by taking care of the car than to solve it later.
Toyota Prado steering rack - causes of malfunction
There are cases when this unit “crumbles” earlier, but this is more the exception than the rule and is directly related to extreme operating conditions.
Repairing the Prado 120 steering rack is a costly undertaking, both in time and money. To prevent this from happening prematurely, you need to know what factors influence the wear of parts:
- Regular collisions with high curbs, stones and other obstacles, driving the front wheels into holes and potholes at high speed.
- Sharp acceleration when the wheels are turned to the extreme position.
- The torn oil seals were not replaced in time, which caused water and dirt to get inside the rack housing.
Toyota Land Cruiser steering linkages
General information
Steering gear parts for FJ60, 62 cars
| 1. Vibration damper 2. Cotter pin 3. Bipod 4, 19. Lead rod tip 5. Cover 6. Plug 7. Spring 8. Rod end ball pin 9. Cotter pin | 10. Drive rod end 11. Seat 12. Ball pin bushings 13. Oiler 14. Bipod side 15, 18. Drive rod end 16. Drive rod side 17. Drive rod 20. Steering knuckle lever |
FJ80 steering gear parts
| 1, 4, 6, 10. Lead rod end 2. Rod 3. Clamp 5. Bipod | 7. Vibration damper 8. Bracket 9. Drive rod 11. Cotter pin |
Examination
| General information |
| 1. The rotation of the wheels is ensured by the transmission of force from the steering gearbox through the bipod, steering rods and rod ends. A steering wheel vibration damper is attached parallel to the steering wheel bipod. |
| 2. Place the wheels in a straight driving position and lock the steering wheel. |
| 3. Raise the car so that the wheel is approximately 2.5 cm off the ground. |
| 4. Check the play in the tie rod ends. To do this, install the indicator so that its leg rests against the edge of the wheel. Rock the wheel slightly in a horizontal plane. If the indicator reading exceeds 6 mm, then it is necessary to check the condition of all rod ends and replace worn parts. |
| 5. Raise the front of the car and check the condition of the tie rod end boots and tie rods, as well as sticking joints. |
Removal and installation
DRIVE ROD ENDS
| General information |
| 1. Remove the wheel. |
| 2. Unscrew and loosen the castle nut of the ball joint; do not unscrew the nut completely. |
| 3. Using a puller, press the hinge pin out of the steering knuckle arm eye. |
| 4. When replacing the tip, count the number of threads (indicated by the arrow) onto which the tip is screwed. Release the clamp and unscrew the tip. |
| 5. Lubricate the threaded part of the tip with grease and screw it into the rod so that the end of the tip is spaced from the rod by the number of threads determined before removal. Do not tighten the clamp. |
| 6. Insert your finger into the eye of the lever and tighten the nut. The finger should fit tightly into the eyelet. If the pin rotates in the lever eye when tightening the nut, press it into the tapered hole. |
| 7. Replace the cotter pin and, if necessary, tighten the nut until the groove of the nut coincides with the hole for the cotter pin in the threaded part of the pin. |
| Warning Do not unscrew the nut to ensure free passage of the cotter pin. |
| 8. Tighten the clamp nuts. |
| 9. Install the wheel and lower the car. |
DRIVE ROD
| General information |
| 1. Raise one side of the car. |
| 2. Disconnect the vibration damper from the drive rod (see paragraphs 2 and 3). |
| 3. Disconnect the rod from the bipod of the gearbox shaft, steering knuckle (or driven rod on FJ 60.62 vehicles) by following steps 2 and 3. |
| 4. If necessary, replace the ends by following the appropriate steps for changing the driven rod ends. |
| 5. Assembly is performed in reverse order. Tighten all fasteners to the specified torque. |
bipod
| General information |
| 1. Disconnect the drive rod. |
| 2. Loosen the bipod nut. Mark the position of the bipod relative to the gearbox shaft. |
| 3. Remove the bipod. |
| 4. Unscrew the nut and remove the bipod. |
| 5. Assembly is performed in reverse order. Align the marks made during disassembly. |
VIBRATION DAMPER
| General information |
| 1. Disconnect the vibration damper by following steps in step 2. |
| 2. Unscrew the nut (indicated by the arrow) securing it to the frame and remove the vibration damper. |
| 3. Installation is performed in reverse order. Tighten the nuts to the specified torque. |
Replacing silent blocks
We press out the old silent blocks, clean the places where they are planted, and, if necessary, sand them so that there are no burrs, etc.
We press in new silent blocks after lubricating them with soapy water. You can read how to press in silent blocks here.