Published:
06.12.2016
Despite the fact that Japanese Toyota Corolla cars are distinguished by good quality and performance characteristics, they sometimes have problems with the generator. This is influenced by the quality of parts, fuels and lubricants and operating conditions of vehicles in Russia.
Despite the fact that the Toyota Corolla is a fairly reliable car, owners of this car still encounter problems with the generator
A generator for a car is one of its main components. Its tasks include converting mechanical energy into electrical energy. This energy powers all the on-board electrical appliances of the car and recharges the battery. If the generator fails, the car will literally stop and all systems will stop working.
Let's look at how to check the performance and repair a generator in a home garage.
What is a generator and why is it needed?
The operation of the generator on the Toyota Corolla is necessary to ensure an uninterrupted and timely supply of current with a certain power. In addition, during operation it must also charge the battery.
This unit must have sufficiently high strength, the necessary power reserve (for E120 models it ranges from 60 A/h to 82 A/h, depending on the engine size, and is selected for a specific model taking into account the year of manufacture), small dimensions and weight, and Tot - have a low noise level and generated radio interference.
Malfunctions in the operation of the Toyota Corolla 120 body generator and all other models can be eliminated either with your own hands or with the help of the experience of service station specialists. Usually, with low mileage on models starting with version E11, which is about 50 thousand km, you will have to replace the alternator belt or tighten it, and carry out other repair work to ensure normal and efficient operation of the unit.
When the alternator belt needs replacing:
- if unusual sounds are heard from under the hood, the belt needs to be tightened or replaced;
- There is also a scheduled replacement of the alternator belt on the Toyota Corolla.
- It is carried out after the car has driven for about sixty or eighty kilometers;
- A broken alternator belt definitely requires replacement.
After making sure that the belt requires replacement, you need to decide how to actually change it. The easiest way is to go to a service station and a specialist will make a replacement. Or you can try to do it yourself.
The first time you need to take this seriously and understand how to change the alternator belt on a Toyota Corolla
.
Principle of operation
The operation of the Toyota Corolla E150 generator, like other units of this brand, begins immediately after starting the engine, and during operation it constantly recharges the engine battery, preventing it from being completely discharged. Its action is based on the well-known principle of electromagnetic induction, according to which a magnetic flux passing through the winding of a copper coil provokes the formation of a voltage at its terminals, the magnitude of which is directly proportional to the speed of rotation.
The generator unit of the Corolla 120, as well as models with a different body (for example, Fielder 14, Corolla 121 models) is located in the front of the engine and is activated by the crankshaft. The closed-type bearings on which the shaft is mounted are designed for the entire period of operation of the vehicle, without additional lubrication.
With a high mileage of the Toyota Corolla E150, as well as older versions of the car, it is recommended to check and, if necessary, repair or replace the unit. The following may indicate that the generator has a malfunction:
- Battery discharge light that does not go out after starting the engine. This indicates that the belt has become loose (it needs to be tightened) or the reason is in the unit itself (worn brushes need to be replaced, there is a break in the winding, the diode kit needs to be changed).
- Power is not supplied to the battery, the cause may be an oxidized terminal, a loose belt, or a non-working battery.
- The battery is being recharged - the cause could be any of the faulty elements of the mechanism.
- The appearance of a characteristic whistle in the area where the generator is located most often occurs due to a high degree of belt tension and a high load on the bearing.
Any repairs or replacements must be carried out only after the vehicle has been completely de-energized and all terminals from the battery have been disconnected.
Toyota repair
If the bearing remains in the cover, it is difficult to get it out, but it is possible. We drill two holes with a diameter of mm opposite the bearing race and knock it out. The front bearing is removed as follows: Next, using a press, squeeze the rotor out of the bearing, having previously installed the front cover on the stop. First, we press the bearing into the rear cover using a mandrel, then install the front bearing in the same way. They must be pressed in all the way.
We clamp the rotor in a vice and place the covers on the shaft. It is advisable to replace the plastic clip in the back cover. The bearings in the generator are sealed and therefore do not require lubrication. After the repair of the Toyota Corolla generator is completed, we begin assembly in the reverse order. Checking the voltage regulator relay Fig.
Checking the voltage regulator relay Using an ohmmeter, check the continuity between diodes F and B fig. If there is continuity in both directions, one of the diodes may be broken. In this case, replace the voltage regulator. Using an ohmmeter, check the continuity between diodes F and E. Checking the rotor Check for an open circuit in the field winding. Checking the resistance between the slip rings Using an ohmmeter, measure the resistance between the slip rings Fig.
If the resistance tends to infinity, that is, the circuit is open, then replace the rotor.
Using an ohmmeter, measure the resistance between the rotor pole and the slip ring. If the resistance is 0, the circuit is closed, then replace the rotor. Checking the slip rings Fig. Measuring the diameter of the slip rings Using a caliper, measure the diameter of the slip rings Fig.
If the diameter of the slip rings is less than the minimum permissible, the rotor must be replaced. Checking the rectifier unit Check the positive valve.
Scheme for checking the conductivity of the rectifier block contacts. Connect the negative probe of the ohmmeter to the positive terminal of the rectifier block, and connect the positive probe in series to each of the other three terminals. Verify that there is continuity in the closed circuit in all three dimensions of Fig. Change the polarity of connecting the tester probes and repeat the first procedure.
ELECTRICAL EQUIPMENT
Make sure that in all three dimensions the circuit is open and the resistance approaches infinity. Connect the positive ohmmeter probe to the negative terminal of the rectifier unit, and connect the negative probe in series to each of the other three terminals.
How to completely rebuild a Toyota alternator. Garage No.6
Verify that the closed circuit has continuity in all three dimensions. If the test conditions are not met, replace the rectifier unit.
The brushes could be worn out or loose, the excitation winding could burn out, the voltage regulator or diode bridge could be faulty. In this case, the generator must be repaired or replaced.
The generator does not charge the battery - the diode bridge generator or voltage regulator is faulty and needs to be repaired or how to remove the Toyota Corolla generator. But if the generator itself is broken, it will need to be repaired or replaced with a new one. This is a very annoying breakdown, but it is easy to fix.
The battery simply does not receive a charge.
Most likely, it's all about the generator here too. It is broken and needs to be repaired or even replaced. It is possible that the voltage in the network has dropped, and repairs require connecting the contacts. You can also handle this on your own. It is impossible to list all the cases of wear and damage to individual parts - there are a lot of them, and they all lead to unstable operation of the generator. More can be said when examining the generator itself.
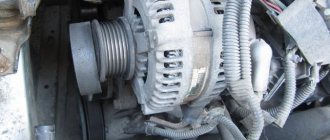
How to remove a Toyota Corolla generator If for some reason you don’t want to contact a specialized company, you can easily do the repair yourself. If you are not sure that you can repair the starter generator yourself, it makes sense to contact a company where the repair of these components will be carried out quickly, efficiently and, as a rule, at an affordable price. However, on cars with high mileage, it is often more profitable to replace the assembly with a new one than to replace failed parts.
Replacing a Toyota Corolla generator You will need: The generator unit of the Corolla, as well as models that have a different body, for example, the Fielder 14, Corolla models, is located in the front part of the engine and is activated by the crankshaft.
Toyota Corolla alternator replacement
The closed-type bearings on which the shaft is mounted are designed for the entire period of operation of the vehicle, without additional lubrication. With high mileage of Toyota Corolla E, as well as older versions of the car, it is recommended to check and, if necessary, repair or replace the unit.
The fact that there is a malfunction on the generator may be indicated by: The battery discharge light that does not go out after starting the engine. This indicates that the belt has become loose and needs to be tightened, or the reason is in the unit itself, worn brushes need to be replaced, there is a breakdown in the winding, the diode kit needs to be replaced.
No power is supplied to the battery, the cause may be an oxidized terminal, a loose belt, or a non-working Toyota Corolla generator: how to remove it.
The battery is being recharged - the cause could be any of the faulty elements of the mechanism. The appearance of a characteristic whistle in the area where the generator is located most often occurs due to a high degree of belt tension and a high load on the bearing.
Any repairs or replacements must be carried out only after the vehicle has been completely de-energized and all terminals from the battery have been disconnected. Its tasks include converting mechanical energy into electrical energy.
This energy powers all the on-board electrical appliances of the car and recharges the battery. If the Toyota Corolla generator fails, how to remove the generator, the car will literally stop and all systems will stop working. Discounts on new cars! Generator repair and diagnostics At the first sign of trouble in the electrical system, the fuses and wiring are checked.
And if everything is fine with them, then the generator belt is checked for wear and tension. If the problem is in the belt, it is loose, then tightening it will be enough.
Features of repair and replacement
In situations where it is not possible to repair the device, it is replaced.
If performance monitoring shows the need for replacement, then in order to do this, the old generator must be removed. To do this, you will need tools such as a flat-head screwdriver, 10 and 12 wrenches, as well as special tools to remove the engine mudguards. For Corollas after 2007, it is necessary to first remove the front wheel on the right, as well as the mudguards (lower and right). Then you should remove the decorative cover from the engine along with the front trim. The wire with the negative terminal is disconnected from the battery. The block is disconnected from the harness. Next, you need to tighten the latches on the cap and remove its cover. Unscrew the power cord clamp and disconnect it. Loosen the belt to the required level by removing it from the pulley. Unscrew the lower and upper bolts that secure the unit and remove it.
After removal and repair work, install the parts in the reverse order, tighten the device belt to the required tension level and adjust the remaining components.
Repair features
Repair of the Toyota Corolla generator is carried out after its dismantling, and to carry out any repair work, tools such as a 12 wrench and a 10 socket, a Phillips screwdriver, a screw puller, a hammer, as well as a caliper and a tester for checking parameters are required.
First, an audit of the rotor's performance is performed. It is checked for the integrity of the windings using a tester. If there is a break, then the rotor itself must be replaced. The markings on the tester when checking should be from 2.3 Ohm to 2.7 Ohm, and the presence of an infinity value indicates damage to the winding. To take measurements, unscrew three nuts on the removed generator, remove the back cover and insulation sleeve.
Next, the operation of the rectifier unit diodes is checked. To do this, their ability to pass current in only one direction is controlled. If the chain works in both directions, replace the block.
Sometimes it may also be necessary to replace the Toyota generator brushes; this is true when their protrusion in a free state exceeds 4.5 mm. Then the brush holder is replaced.
Due to natural wear and long-term use, it may be necessary to replace the alternator belt, which is also required when it breaks.
You should buy an alternator belt specifically for a specific Toyota Corolla model, taking into account its year of manufacture, engine and body, since the characteristics of the belts - density, length and width - change depending on these parameters.
Before replacing anything, all protective elements are removed to get to the engine pivot bolt. The bolt is pressed out and the old belt is removed. The new one is put on the pulley almost by touch, since there is very little free space here. In order for it to fall exactly on its correct site, it is necessary to strictly install it in place. To do this, be sure to remember when removing the old belt how it was put on. After installation, the belt should be tensioned to the required tension, checking this parameter with special devices.
Toyota Camry xv40
The Toyota Camry model was produced from 2006 to 2011. Bearings are found in the generator, air conditioning compressor, power steering roller, gearbox, strut support, differential, and hub. You can replace the bearings yourself; this requires the availability of tools and step-by-step instructions.
Wheel bearing
You can find a spare part using article number 90369-45003. It is suitable for installation in other models: MCV3, ACV3, XV3, XV5, ASV50, XV4, V40.
Replacement of the wheel bearing is carried out in the following sequence:
- Using a jack or lift, you need to unload the rear axle and remove the wheel.
- Using a “14” key, remove the caliper, which is held on by two bolts.
- The caliper bracket can also be removed with a key set to “14”.
- Once the brake disc is freed, it must be removed from the hub. In this case, it may be difficult to remove it.
- Using bolts at “6”, you can create the necessary force by screwing them into the holes on the outer part of the brake disc. But even in this case, difficulties may arise due to the pads being in the extreme “inhibited” position.
- In this case, you need to bring the pads together using a screwdriver.
- Using the “14” key, you need to unscrew the hub bolts and remove it.
- To remove the boot from the hub, it is necessary to warm up the place where they are connected and apply physical force.
- A new bearing and hub are installed in the reverse order.
Generator bearing
The part can be found by catalog number 9009910192. Installed on other Toyota Camry models: CV30, CV43, MCV10, V20, MCV30, SV32, SV33, , SV40, SV41, SV42, SV43, SXV10, SXV20, , VCV10, VZV32 ACV30.
To replace the bearing of the Camry xv40 electric generator, you will need a Phillips and flat-head screwdriver, a socket wrench for “8”, “22”, a ratchet, sockets for “8” and “10” and a small screwdriver. The first step is to loosen the pulley. Using a socket set to “22” and a ratchet socket set to “8”, you need to grab and tear off the nut without removing it.
The second step is to remove the back cover. To do this, the generator must be turned over. The insulator is removed using the “10” head. Next, unscrew the generator cover nuts and the adapter screw. The part cover is removed.
In the following sequence, the elements under the cover are removed: brushes, regulator and diode bridge. Thus, the nuts on the studs that hold the generator are accessible. They need to be removed. There remain 4 contact terminals that secure the diode bridge to the starter winding. To remove them, you need to unscrew 4 screws on each of their elements.
The diode bridge is freed and can be removed. After this, with the four contacts of the winding and a few simple movements, you can unscrew the nut from the shaft and the pulley, which was written about at the beginning. After this, you can separate the housing into two halves. The bearing is completely accessible.
Generator Toyota Corolla, Generator repair
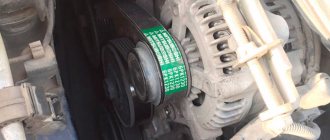
Toyota Corolla cars are equipped with three-phase alternating current generators with electromagnetic excitation, with a built-in rectifier unit and an electronic voltage regulator. The generator shaft is mounted on closed bearings that do not require additional lubrication throughout its service life. The generator shaft is driven into rotation from the crankshaft pulley by a poly V-belt. To reduce belt wear in cases where sudden
When the engine crankshaft speed decreases, the generator rotor rotates by inertia; the generator pulley is equipped with a freewheel that transmits rotation in only one direction.
Recently, many companies have appeared that specialize in the repair of imported generators and starters. There you can diagnose a faulty unit, purchase spare parts for any generator (starter) model, and receive qualified advice. If you are not sure that you can repair the generator (starter) yourself, it makes sense to contact a company where the repair of these components will be carried out quickly, efficiently and, as a rule, at an affordable price. However, on cars with high mileage, it is often more profitable to replace the assembly with a new one than to replace failed parts.
Toyota Corolla alternator replacement
You will need: all the tools for removing the engine mudguards, as well as 10" and 12" wrenches, and a flat-blade screwdriver.
1. Remove the right front wheel
2. Remove the lower and right side engine mudguards
3. Remove the decorative engine cover
4. Remove the front trim of the engine compartment
5. Disconnect the wire from the negative terminal of the battery.
6. Press out the clamp of the prozode harness block.
7. . and disconnect the block from the generator.
8. Press out the fasteners securing the protective cap.
9. . and remove the protective cap of the generator output.
10. Unscrew the nut securing the power cable lug.
eleven. . and disconnect the power cable from the generator.
12. Loosen the tension on the accessory drive belt and remove the belt from the generator pulley.
13. Turn out the top one.
14. . and the lower generator mounting bolts (shown by the arrow) and remove the generator from the car.
15. Install the generator in the reverse order of removal and adjust the tension of the accessory drive belt
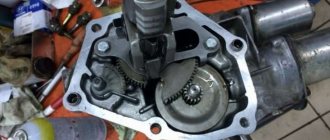
Toyota Corolla generator repair
Complete disassembly of the generator is not recommended, so it is better to contact a workshop that specializes in repairing generators. This subsection shows only the replacement of the brush assembly and rectifier unit.
You will need: 10" and 22" wrenches, 10" socket head, Phillips screwdriver, screw puller, hammer, caliper, tester.
1. Remove the generator from the car
2. Remove three nuts.
3. . and remove the back cover of the generator.
4. Remove the insulating sleeve of the generator power contact.
5. Check the resistance of the rotor winding by connecting the tester to the slip rings. The resistance should be approximately 2.3-2.7 ohms. If the tester shows infinity, it means there is a break in the windings and the rotor needs to be replaced.
6. Check the diodes of the rectifier unit. Connect one wire to the ground of the rectifier unit, the second to the diode terminal.
7. . and then swap the wires. The diode must pass current only in one direction. If the diode passes current in both directions, it means it is faulty.
8. Check the remaining diodes in the same way.
9. To replace the rectifier unit, remove the five screws and remove the rectifier unit.
10. Remove the two screws securing the brush holder.
eleven. . and remove it.
12. Check the ease of movement of the brushes in the brush holder and their protrusion when free. If the brushes protrude less than 4.5 mm, replace the brush holder assembly.
13. Check the rotor winding for short to ground. To do this, connect the tester probes to the rotor pole and alternately to the slip rings. The measured resistance must be infinitely large, otherwise replace the rotor.
14. Measure the diameter of the rotor slip rings. If any ring diameter is less than 14 mm, replace the rotor.
15. Reassemble the generator in the reverse order of removal.
Malfunctions, repair and replacement of the Corolla 120, 150, 170 generator
The Toyota Corolla generator structurally consists of an outer aluminum casing, inside of which there is a coil, a stator, and a rotor on roller-type bearings. During operation, alternating current is converted into direct current using a diode rectifier (bridge). The generator brushes transmit voltage from the regulator to the rotor. Thanks to such coordinated work, the unit constantly produces voltage in the range from 13.8 to 14.7 Volts. The final indicator directly depends on the actual engine speed. The higher they are, the greater the voltage and vice versa. The generated current is consumed by the on-board network of the technical device, and is partially used to charge the battery.
Article number and cost of the original Toyota Corolla 120 generator and its analogues
The article number of the original Corolla 120 generator is 2706022030, 270602706084, 2706027090, 2706064080, 270606408084, 2706064200. Its cost is from 8 to 16 thousand rubles. Experienced car owners recommend that if it is impossible to buy the original, purchase analogues from third-party manufacturers. A list of the best of them is located below.
Table - Recommended analogues of the original Corolla 120 generator
| Manufacturer | vendor code | Approximate cost, ruble |
| Bosch | 986040461 | 6500-6900 |
| As-pl | A6009 | 4900-5300 |
| Cargo | 111518 | 11700-12900 |
| Starline | AX1225 | 6500-7100 |
| Delta Autotechnik | L40460 | 12300-13200 |
Malfunctions and diagnostics
The symptoms are typical for most generators, including the Japanese brand Toyota Corolla. Faults are classified into two main groups: with a mechanical or electrical component. Among other breakdowns, the following should be highlighted:
Difficulty starting the engine
The first sign of unstable work. The algorithm for supplying current from the source to the battery is broken. A “depleted” battery is unable to fully crank the starter for a long period. The opposite effect cannot be ruled out when the battery receives excess charge, which also has a detrimental effect on the unit as a whole. The electrolyte boils away in the “jars”, the plates fall off, and a short circuit occurs. On Japanese Toyota cars, a relay is preinstalled that scans the voltage online. As soon as the indicator drops below o, the engine will not start, despite the full operation of the battery and starter. Ignorance of this subtlety leads to the fact that an inexperienced master initially follows the wrong path. Ultimately, the repair cannot be completed due to an error at the beginning of the algorithm.
A faulty alternator is the cause of battery drain
Flickering light, dim lighting fixtures
The second “obvious” symptom of a malfunction in the power supply system. True, it is noticeable only at night. There are two reasons for unstable operation: the generator or the drive belt. To a lesser extent, the reason is insufficient fixation of the instrument panel and contact connectors.
A yellow indicator on the center console indicates a breakdown.
The battery is not fully charged; it is impossible to determine the exact resource. In practice, the duration does not exceed several tens of kilometers. As soon as the battery stops supplying current and a spark to the spark plugs, the car will stop. To extend the “trip” as much as possible, turn off all third-party consumers of electrical energy. Standard Toyota Corolla batteries become unsuitable for further use after the first, deep discharge.
Characteristic whistling of the drive belt
In most cases, the reason lies in a weakening of the tension, a broken belt, deformation of the tensioner, or mounting of the generator. Ignoring the malfunction leads to incomplete charging of the battery due to the lower rotation speed. At the same time, we expect problems with the air conditioning system supercharger, crankshaft and camshaft. A total of four mechanisms are driven, not counting the deflection rollers.
Burning smell from under the hood
Light smoke from the engine compartment is a sign of a short circuit in the electrical wiring or a jammed drive belt on the generator.
Ringing metallic sound from under the hood
Due to systematic loads and elevated temperatures, rolling bearings fail prematurely. The lubricant is pushed out of the cavity, the rollers jam, and the bearing is destroyed. The cause of the squeak can also be a faulty damper coupling. It is necessary to carry out diagnostics to identify the breakdown.
Noise is produced by electrical appliances that operate unstably. The hum is identical to the sound of high-voltage wires when they are energized.
Replacing drive belts Toyota Corolla 2007-2010
How long can you drive with constant whistling and squealing coming from the engine compartment. This is especially felt when starting the car. When the car has warmed up and is in motion, the whistle is not heard.
But as soon as you start to wind it up, it becomes somehow uncomfortable. It feels like everyone is looking at you. And the car started up, ran and whistled, as if it was happy about something.
Enough is enough, we need to replace the drive belts
of Toyota Corolla 2007-2010
, which, by the way, affect safety.
Symptoms
As mentioned above, the car starts to whistle when starting. Okay, everyone knows this reason. There are times when suddenly the engine of your car starts knocking. Well, you think that’s it, a major overhaul is inevitable. How to get to the service.
Upon a quick inspection by the service center specialists, it turns out that the drive belt of the generator or power steering is worn out. That is, only one thread of cord peeled off from it. When rotating, this thread, which is tough and hard, begins to hit the car body.
This is where a terrible knock comes from, sending your thoughts not home, but to the workshop. Once you tear off this piece, everything falls into place. The machine whispers, and you are again in a good mood.
But by tearing off a piece of thread, you did not repair the car, but only temporarily eliminated the unpleasant sound, and
the Toyota Corolla 2007-2010
drive belts is already extremely urgent.
What are the dangers of a worn belt?
The failure of one of the drive belts is fraught with more serious consequences than replacing it. If the belt goes to the power steering, then if it breaks, the steering wheel will be like on a penny. For those who don’t remember, this is a Zhiguli of the first model. That is - heavy.
Having gotten used to the fact that the steering wheel turns easily when going into a turn, you simply won’t have time to turn it. Draw your own conclusions. The point is that in order for the steering wheel to rotate more easily, you need to drain all the fluid from the power steering system. But no one will do this.
Selecting a generator for Corolla 120, 150, 170
You can purchase a new power supply for your car yourself; you don’t have to go to a workshop for help. Using the original markings below, you can select the part. Difficulties will arise when trying to install a non-standard generator for the purpose of tuning or local upgrade. However, such cases are exceptions rather than the rule.
Generator for Toyota Corolla E170
To select the correct spare parts, we recommend that you always check the vehicle’s compliance with the VIN number; this is the only way to virtually eliminate the possibility of error, since even on cars of the same modification and the same year of manufacture, sometimes spare parts from different series are used that are not always the same in parameters and fastenings.
Toyota Corolla 120
- DENSO DAN1079;
- HC-PARTS CA1965IR, JA976IR, JA142IR, CA2027IR;
- Corolla alternator brushes FCC JNDX34, 27370-35060, FCC JNDX37;
- WAIglobal 13482N, 13486N, 13649N;
- NIPPARTS J5112050, J5112088.
- Generator coupling HELLA 10PT 368 069-084, 9XU 358 039-071;
- generator HC-PARTS KB1928KL (Denmark, 14V, 100A, PL78 connector);
- Krauf WAN1926, ALN2027;
- generator brushes 27370-31220, JNDX-34, 27370-75060, JNDSX-41 FCC, 27370-35060, LONG LN2737035060, SAT PREMIUM 2737035060, 2737031220, 27370-54450, 2737 0-02010;
- TRW LRA03353;
- DENSO DAN1019, DAN1057, DAN1011, DAN1061.
Based on the given article numbers of original spare parts, the owner can independently purchase the part he needs. All you need to know is the year of manufacture of the car and the series.
What to do if your belt whistles
The whistling of the drive belt is the first sign of wear and damage. Sometimes installing a new drive does not bring results, since the reason lies in damage to the pulley or idler roller. It is important to accurately identify the source to prevent similar breakdowns in the future.
What needs to be done: check the Corolla generator belt, its integrity, degree of tension, troubleshoot the shaft, inspect the pulleys, check for mechanical damage. You can replace the belt yourself, if you have experience and repair skills. There is no time for independent maintenance - entrust the work to service station professionals.
Corolla generator repair and replacement
The decision to repair or replace with a new generator is made by the technician after dismantling the unit from its original location. Once assembled, it is impossible to inspect the condition of the internal parts.
Preparatory stage: a set of automotive tools, sockets, ratchet, flat-tip screwdriver, screw puller, hammer, caliper, multimeter.
We dismantle the generator, unscrew the three nuts on the back side, and remove the cover. Disconnect the insulating sleeve of the power contact. Using a multimeter, we check the resistance of the rotor winding on the rings. The data range is 2.3 - 2.7 Ohms, if the arrow goes to infinity, we replace the rotor, since the winding is damaged.
Second stage: checking the condition of the diode bridge: one wire to ground, the other to the rectifier. We change places one by one. In good condition, the bridge should only allow current to flow in one direction. If in both, replace it, since the fault is obvious.
To replace the rectifier bridge, unscrew the five mounting bolts from the rear side, remove the brush holders and the generator bearing. It is mandatory to diagnose the generator brushes and their protrusion size. If the indicator exceeds 4.5 mm, replacement with new ones is required.
The final stage: shorting the rotor winding to ground. We connect the multimeter probes to the rotor and slip rings. Resistance is maximum. The diameter of the rotor slip rings is not less than 14 mm. This is the minimum acceptable size. Based on the data received and the results of the analysis, the technician makes a decision on repair or replacement. Sometimes it is cheaper to install a new generator than to restore an old one.
Toyota Corolla Fielder. The procedure for removing and installing the generator on the 1ZZ-FE engine
1. Remove the right side of the engine protection
2. Remove the accessory drive belt. Slowly turn the tensioner clockwise and remove the belt
3. Remove the generator, a) Disconnect the wiring clamp.
b) Remove the “+B” terminal c) Disconnect the connector. d) Unscrew the 2 bolts and remove the generator
4. Install the generator. Tightening torque: M8 29 Nm; M10 58 Nm
Toyota Corolla Fielder. The procedure for removing and installing the generator on the 2ZZ-GE engine
1. Remove the right side of the engine protection
2. Remove the accessory drive belt.
a) Remove the clamp of the air conditioning system tube. b) Slowly turn the tensioner clockwise and remove the belt
3, Remove bracket No. 1 of the generator.
4. Remove the generator. a) Disconnect the wiring clamp
b) Remove the “+B” terminal c) Disconnect the connector. d) Unscrew the 2 bolts and remove the generator.
5. Install the generator. Tightening torque: M8 29 Nm; M10 58 Nm
Toyota Corolla Fielder. Generator disassembly procedure
1. Remove the generator pulley a) Hold special tool “A” with a torque wrench and tighten special tool “B”. Tightening torque 39 Nm
b) Clamp the special tool “C”, as indicated in the figure, and install the generator on it.
c) To unscrew the pulley fastening nut, turn special tool “A” in the direction shown in the figure.
Warning: to avoid damage to the rotor shaft, unscrew the pulley mounting nut no more than half a turn.
d) Remove the generator from the special device “C”
e) Unscrew special device “B” and remove special devices “A” and “B”
e) Unscrew the pulley mounting nut and the generator pulley.
2. Remove the brush holder. a) Remove the rear cover of the generator. b) Remove the brush holder cover. c) Remove the brush holder.
3. Remove the voltage regulator.
4. Remove the straightening highlight.
5. Remove the generator rotor.
a) Unscrew the terminal securing nut. b) Remove the housing of the rectifier unit.
c) Remove the rotor from the front cover of the generator
Toyota Corolla Levin BlackBzrStrut › Logbook › Removing and installing generator 4AGE AE110111
Removal and installation of generator 4AGE AE110111
I’ll start with the pre-story, I already wrote somewhere above that they told me the number of the KOYO roller for the generator from the 1SZ engine.
My video was already squeaking like a bat when warming up, and we decided that there was clearly no place for such a creature under the hood! And the belt left much to be desired! I decided to remove the roller, broke off the bolt and it all ended with removing the generator bracket. Not the most fun job!) I installed this miracle roller and a new belt. I drove for 3-4 days and again heard a terrible squeak! “How I already dream that she would stop squealing.” This is not a machine, but a bitchy hysterical woman! I can’t remember a week without hysterics and squeals! Well, then I thought that it was clearly the bearing in the generator that was squealing. The belt was new, the tension roller was new, and the steering wheel had everything new too. Well, let’s remove the generator; I’m already doing this with my eyes closed!
1) Open the hood without this it won’t work, you don’t even have to try the information weaving!
2) Unscrew the inlet with a regular Phillips screwdriver, loosen the clamp and pull the pipe to the side!
3) Unscrew 5 bolts from the throttle body using a hexagon or star. 3 go on top and one on each side on the left and right. It’s nothing complicated, the main thing is to get the hang of it and not lose the hexagon, I’m a handyman and at first they fell in there like seeds!
Toyota Corolla Fielder. Generator assembly procedure
Generator assembly
1. Install the generator rotor, a) Install the drive generator cover onto the rotor.
b) Install the rectifier block housing.
c) Secure the housing and output terminal with four nuts. Tightening torque: A 4.5 Nm; V 5.5 Nm
2. Install the rectifier unit. Tightening torque 3 Nm
3. Install the voltage regulator. Tightening torque 2 Nm
4. Install the brush holder.
a) Install the brush holder. Tightening torque 2 Nm b) Tighten 3 nuts and a bolt securing the rear cover. Tightening torque: nut 4.4 Nm; bolt 3.9 Nm
5. Install the alternator pulley
a) Install special tool (A). b) Hold the special tool (A) with a torque wrench and tighten the special tool (B). Tightening torque 39 Nm
c) Clamp the special tool (C) in a vice and install the generator on it.
d) To tighten the pulley nut, turn the special tool (A) in the direction shown in the figure. Tightening torque 110 Nm
e) Remove the generator from the special device (C)
e) Unscrew the special tool (B) and remove the special tools (A) and (B).
g) Make sure that the rotor rotates smoothly without jamming.