Replacing the Camry 50 fog light can be done either by specialists (which is still recommended) or by the car enthusiast. It is not required to have specialized knowledge, skills and experience, or to use a large number of tools and equipment. There is also no need to spend a lot of time performing such a process.
A driver who decides to independently replace the fog lights on a Toyota Camry 50 needs to understand that the easiest way to get to them is through the arch in which the wheel is located. This method is the most convenient. But besides this, there are other options for gaining access to a structural element that requires replacement.
When replacing, you must initially turn the steering wheel to the left all the way. This must be done if the right lamp needs to be replaced. The next step is to unclip the fastener holding the protective device and unscrew it to provide access to the fog lamp.
You must understand that the new Toyota Camry 50 lamp should not be touched with your fingers: traces left behind can most likely cause rapid burnout and additional costs associated with the purchase of new consumables.
To hold the lamp when replacing, you must use a napkin. But if this condition has already been violated, then it is best to wipe the dirty light bulb with an alcohol-containing solution. The mounted lamp must be rotated and the connector connected.
Headlight Removal Procedure
It is worth noting that the procedure for removing optics is almost the same on all models of the Camry family. The differences are only in a few small details. This should also be taken into account when replacing light bulbs by size. for example, to perform this operation you will have to remove the headlight on the Toyota Camry v40 restyled version, while on other car models it is easy to change without such large-scale actions.
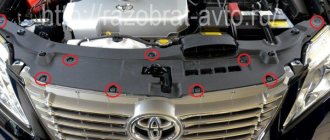
To remove the main lighting device, you need to release part of the bumper:
- Open the hood of the car and unscrew the 2 bolts on the radiator grille. These are body kit mounts.
- Then 2 caps are removed. To do this, they “mute” their central part. Before assembling, be sure to carry them into the office by pressing the center of the caps.
- In the same way, it is necessary to remove
the clips located in front of the plastic wing cover. - The liner is then carefully removed, after which the mounting screws are tightened using a 10-head socket.
- We unscrew the lower protection of the engine compartment, secured with 6 bolts.
- Then lock the mounts located directly next to the headlights.
- Part of the bumper has been removed in the headlight area.
Each element is secured with 3 bolts. When the headlight
unscrews, it should be slightly extended towards you, then you can already disconnect the wires leading to the lamps. Assembly is carried out in reverse order.
Only by removing all fasteners can you disassemble the kit and gain access to the optics.
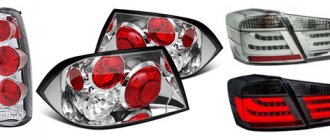
Considering that the glass in the headlights is made of plastic, the need to replace them arises every 2-3 years of intensive use of the car. It is also worth noting that most Camry models offer a wide selection of alternative optics, which differ from the standard ones in both cost and lighting quality.
How to adjust headlights on a Camry
One of the disadvantages of the Camry car in later versions of the body is the poor quality of the headlights. This is partly manifested in the downward luminous flux, which does not allow one to see the road surface at a great distance at dusk. The methods for adjusting headlights on a Camry v40 or other body versions are not complicated, and this work can easily be carried out by car owners themselves.
Incorrectly adjusted car headlights serve as a serious hindrance both for the driver himself and for other road users. Unadjusted headlights cause the following problems:
- blind oncoming drivers. Moreover, this happens even when the high beam headlights are turned off;
- They poorly illuminate the road surface and roadsides, which in the dark can provoke a collision with other cars or pedestrians.
In what cases is it necessary to adjust the headlights on a Camry?
In order to avoid an emergency situation on the road and increase comfort when driving a car in the dark, correct adjustment of the direction of the luminous flux of the headlights is required. It can be done in a garage yourself. The main thing for the car owner is to understand the main points of how to adjust the headlights on a Camry 40 in order to perform this procedure himself. Manual adjustment of headlights should be performed in the following cases:
- When replacing springs with lower/higher ones.
- When replacing standard light bulbs with halogen, LED or xenon lamps.
- When replacing lenses, installing new headlights.
The built-in auto-corrector is not able to effectively set the required luminous flux height for low beam headlights, which forces car owners to do this manually.
Preparing for setup
Before adjusting the headlights on the Toyota Camry 40 , you need to carry out a number of preparatory work.
It is worth noting that this procedure is similar for cars in 40, 30 and 40 bodies, due to the similarity of the design of the head light unit.
Before starting work, it is necessary to check the serviceability of the automatic corrector. It is an electric drive that adjusts the headlights depending on the tilt of the car. On relatively new cars (younger than 5–6 years), there are usually no problems with its operation. On older models, its performance usually causes many complaints, and before starting manual correction, it is necessary to install a new auto-corrector drive.
Preparing for setup
Then you should select a relatively flat area with the following characteristics:
- there should be no holes or bumps on it that would make it difficult to install the car in a level horizontal position;
- the length of the platform must be at least 10 meters, which is necessary for proper adjustment of the beam in height;
- in the far part of the site, a vertical surface (a shield or a wall) should be equipped, with the help of which the headlight settings will be assessed.
Before adjusting the headlights of a Toyota Camry , you need to arm yourself with a tool. The list of required tools is small and consists of one wrench for 8. For ease of work, you can also take several heads of different lengths and wrenches of different configurations.
How to remove tail lights
If most car owners do not see the difficulty of how to remove a headlight on a Toyota Camry in 40 , 50 or 30 cases, then problems often arise with removing the rear light unit. The thing is that there are only 3 mounting bolts in sight, while disassembling the light also requires partial removal of the housing kit. A similar configuration is used on Camry car lines starting with 40 bodies.
To remove the rear lights, you need to remove the bumper
Before this, how to remove the tail light on a Toyota Camry, you need to unscrew the bumper. To disassemble it, follow these steps:
- Unscrew the 3 nuts securing the flashlight.
- Remove the plugs from the upper aerodynamic body mounting kit, then remove the bolts hidden underneath them.
- Remove the mudguard and unscrew the screw underneath it.
- Then you need to carefully bend the liner and unscrew the screw located on top. Climbing it is quite problematic because it is deep in the arch.
- The bumper is then pulled together, after which the taillights can be removed
.
READ How to Remove Nissan Qashqai Wipers
After replacing the flashlight, assembly is performed in the reverse order.
Source
Headlights on Camry 40 and 50 can sometimes be removed. This is done not only in cases where the optic is damaged and needs to be replaced or repaired, but also in cases where you need to clean it, replace the reflector, replace the lamp and adjust it.
How to remove a headlight from a Toyota
To remove
Toyota Camry headlights, you will first need to
remove the bumper from the car, then find the bolts located on the radiator grille under the hood and unscrew them, then you need to carefully remove
the pistons that control the central part. It should be noted that during installation they are “built”. To remove the piston, you need to turn it 90 degrees and pull it towards you.
Under the liner there is a bolt that needs to be unscrewed. Please note that there are 6 more bolts attached to the bumper protection, these also need to be unscrewed. You can then remove the clips that secure the headlight to the bumper. The optics can then be easily removed.
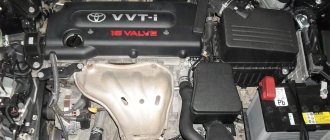
Self-replacement procedure
Not all owners of the Toyota Camry V50 are satisfied with the quality of the factory low beam. Solve the problem by adjusting the lights or replacing the lamps. Before carrying out the procedure, purchase new elements, check them for integrity and compliance with the markings specified in the manufacturer’s manual.
Required Tools
There is no need to remove the headlight; no special tools are needed. You can do the above work yourself on both sides of the car. First turn off the engine and battery, open the hood, and go to the headlight in which the lamp has burned out. It is wiped with a napkin and checked for any visible damage.
Instructions for replacing a halogen lamp (H11)
One element will take no more than 5-10 minutes of time. The procedure consists of several simple steps:
- Open the hood and find an element installed in the lens marked H11 at the rear of the part (on a blue background).
- Press the lock of the wire block and carefully remove it.
- Turn the halogen lamp 90° counterclockwise and remove it from the base.
- The new element is mounted in the same position in which the old one was taken out, only to the right.
- After installing the pad, the procedure is considered complete.
In a car repair shop, such a service would cost at least 400-500 rubles. Just 10 minutes can save you this amount.
Replacement of standard xenon D4S
Follow this sequence:
- Turn the low beam cover 0.5 turns and remove it.
- Remove the metal block on the element being replaced by turning it a quarter counterclockwise.
- Unclench the fixing tendrils and take out the lamp.
- Install a new part of type D4S into the socket. It will fit into place in only one position.
- Fasten the mustache clamps, mount the block, and turn it back.
- Put the lid on. The process is complete.
Halogen bulbs can be changed one at a time, but xenon bulbs are better replaced in pairs, since the color and brightness of the light flux will differ.
Which lenses are suitable?
There are several types of lenses that fit the V40: In addition to the standard Koito lens, Hella 3R lenses fit the V40. They produce quite bright light with excellent edging, the module meets high quality standards and the brightness level exceeds factory brightness.
Manufacturers offer a large selection of halogen headlights; if necessary, you can find bi-xenon lenses or luminous rings. The effect is similar to Eagle Eyes, but technically similar to Sonar.
Replacing and cleaning lenses on the V40 is no problem: simply remove the headlight, remove the lens, replace it without disturbing the mount. The optics can be cleaned using a dryer, a soft cloth that does not leave scratches. Take a close look at the reflector; you may need to replace it if it has become dull and is not scattering light well enough.
Headlight adjustment on a Toyota Camry 50, 30 or V40 is approximately the same. This is necessary after any intervention in the design, regardless of whether only the light bulb, the optics as a whole, or its individual elements have changed. In any case, the factory settings will be reset. When set correctly, the light should fall onto the road, making it well illuminated, while with low beam the headlight
should not come into the eyes of oncoming drivers.
You can adjust the optics yourself; to do this, you will need to turn a special adjustment screw. It is located on the headlight unit in the engine compartment. When you turn on the screw headlight on a Camry 40 or 30, the housing will move up or down, and you can also adjust it horizontally. The best setting can be achieved using mobile optical devices, you can use the screen. If you don't have the necessary equipment.
READ How to Remove a Bearing Without a Puller
In order for the adjustment to take place correctly, the car must be refueled and placed on a flat surface. A driver weighing at least 75 kg must sit in his seat. The car must be parked in front of the screen at least 5 meters away and the wall will do this.
Before adjusting the headlights and marking the screen, make sure the tire pressure is correct. Every little detail influences the correct settings. When driving a car, you will definitely notice if it is not configured correctly. Before starting work, it is recommended to turn the car to the side so that the suspension is in the correct position.
You will need to draw some vertical lines on the screen or wall. Label them with numbers or letters. As for the line of the machine, they should be symmetrical. The first line must be located at a certain height, it must correspond to the distance from the ground to the center of the headlights. The second stripe should be located 75 mm below the first. Aim it from the center of the patch.
The headlight range control for Camry V50, 40, 30 and other models is located on the dashboard. This device will help adjust the light to the desired position depending on the load that the car must withstand at the moment, that is, with one driver, a full tank and no passengers. If there are more passengers in the cabin, you will need to adjust the light again. You won't need to leave the cab to do this, as you will no longer need to adjust the headlight housing.
Some cars do not have a hydraulic corrector; to adjust the optics, you will need to install screws located under the hood of the car. This method is not so convenient, it is often found in Toyota 30 series because they are older copies.
Begin the adjustment by turning on only the low beams. The Camry's headlights are adjusted one by one, so the non-adjustable headlights are covered with cardboard. It is recommended to start by adjusting the right headlight, then move on to adjusting the left one, after closing the right one. You can use multiple screws for adjustment. After adjustment, remove the cardboard from the optics and compare the upper illumination limit of both headlights. The intersection points of horizontal and inclined lines must also coincide.
Preparatory steps for replacement
To make sure that you need to replace the Camry v50 fog light, you need to check the electrical corrector. If there are problems with it, then you should not perform any actions until they are eliminated, as they lose all meaning. But if the Toyota Camry 50 corrector is working properly, then you can proceed to the preparatory measures carried out before replacing fog lighting sources. As part of the preparation, the following is required:
- Find a site without uneven surfaces. The wheels of the Toyota Camry 50 should be at the same level. In this case, the length of the found area from the location of the headlights to the wall must exceed 10 meters.
- Select a wall without unevenness. Car enthusiasts who want to calibrate headlights after replacing foglights need to understand that such a process means examining the rear dimensions. You need to know that the correct functioning of the fog lights is directly determined by the correct location. They should be placed at a height of within 25 cm above the ground. In this case, it is necessary to prevent it from going beyond other optical devices included in the machine. To perform calibration, the car is placed with its headlights on a vertical surface at a distance of 7 meters.
- Turn on the light and mark the central part of the spot. Then place the Toyota Camry 50 10 meters away and draw a horizontal line. Then you need to drive the vehicle 7 meters away, activate the headlights, and then carefully examine the marks left on the wall and evaluate the location of the light spots.
If the calibration is performed correctly, then the boundary located on top of the light beam will follow the line drawn in advance. This is one of the most important points that you need to understand if you have to make adjustments for the first time.
When calibrating Toyota Camry 50 headlights, you need to perform several steps in the following sequence:
- Measure the distance at which the Toyota Camry 50 corrector makes adjustments.
- Indicate the magnification level at twice the highest value.
- Open the hood of the vehicle, and then find the plastic plug intended for use when adjusting the headlights. It is located behind the headlight and is easy to spot.
- Mark the wall. It is required to place the vehicle 5 meters from it. The machine is installed horizontally, the headlights are activated. The primary vertical stripes are located in the central part of the light beam leading to each headlight. The third one needs to be drawn between them. The first line drawn along the horizon is equal to the distance from the central part of the sphere to the ground. Measurements must be performed on the vehicle. The second strip is drawn 5 centimeters below the first.
To directly adjust the Toyota Camry 50 foglights, you need to close each headlight and check the equivalence of the set parameters. The light coming from the source should be placed along the bottom line drawn along the horizon. If a discrepancy is detected during calibration, adjustment can be made using a horizontal or vertical projection using the appropriate bolt. The raising of the Toyota Camry 50 light beam is carried out after checking the direction. To raise the light, you need to set the regulator to the optimal position.
Output
Factory optics of Toyota Camry V 50, 40, 30 can be modified independently. It is easy to maintain, tuning takes no more than half an hour, and you can feel a significant difference in the car’s optics.
Source
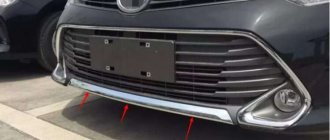
The Camry 40's rear lights are designed by highly professional engineers, so they look pretty perfect. Brake lights, dimensions, and car turns are visible from a great distance day and night.
Despite this, many car owners decide to adjust the rear stops. This is because drivers want to give their car a personal, stylish look.
You can make your car stand out in traffic by installing neon segment frames, using LEDs or tinted rear lights. At night this makes the car more beautiful and visible. The neon frame glows along with the side lights, so you can see the car at night from a much greater distance.
Required Tools
To install a flashlight on a Camry 40, the car owner will need the tools listed in the table below.
READ How to Remove the Ignition Switch on a Hyundai Accent
| Tool | The note |
| screwdriver | cross and plane |
| ratchet | with heads “8 mm” and “10 mm” |
| key "10" | for hairpins |
| no plastic card required | disconnect the bumper and fender joints |
Removing the rear light on Camry 40
To remove the light on a Toyota Camry 40, you need to remove the bumper. This process can cause a lot of problems for the car owner, so you must do all the work very carefully. It is recommended to remove the bumper only on the side where it is necessary to replace the rear optics.
To disassemble the taillights yourself, you must refer to the instructions below.
- Open the boot and remove its trim. To do this, unscrew the rivets.
- Unscrew the fog lamp mount, which is held in place by three bolts.
- Unscrew the reversing light. To do this, turn it over and pull it towards you a little.
- Gradually remove the blue connector of the fog lamp, and then that’s it.
- Remove the mudguard. To do this, unscrew 4 10 mm bolts.
- Remove the bolt located on top under the wheel arch, as shown in the photo below. The "8" key is suitable for this purpose.
- Remove two plugs. We unscrew the bolts under them.
- From the arch side, carefully pull out the top edge of the bumper. It is very thin and easily deformed if mishandled. Therefore, it is recommended to disconnect the joints between the bumper and the fender using a plastic card.
- Remove your leg. To do this, unscrew the three bolts securing them. If necessary, install in reverse order.
How to adjust the lamps in the final
If, after installing the light elements, adjustment of the headlights is required, use the adjusting screws located under the hood on the inner cover. The procedures are performed using a short screwdriver or a socket with an adapter.
The car is placed on the most flat area, 5-7.5 m from the wall. Turn on the low beam, set the adjustment wheel (to the left of the steering wheel) to position 0. Move it to position 1, measure the pitch (difference in cm) with a ruler, and return it back. Fix a double step above the factory risks. If the first indicator was 4, mark 8 cm.
Draw a straight line and raise the light beam exactly along it. To do this, slowly rotate the adjusting screws, observing the change in the beam. You will get an elongated flow, which can be easily adjusted with a standard wheel. This will be required if the beam is above the required level.
Experts recommend adjusting the fog lights at the same time. At a distance of 5 m from the wall, raise the light line by about 25 cm. The second option is when the low beam is on, the headlights are adjusted so that the dead lighting zone is completely covered.
Adjusting lamps on Camry 40
One way to update the taillights. tint them. Darkening of the legs is possible using a special film or varnish. The big advantage of using this type of upgrade is that the car owner does not have to disassemble the car bumper.
Choosing how to tint is quite difficult. Unlike film, varnish is almost impossible to remove from glass if necessary, but its service life is much longer.
The main disadvantage of this setting is that the distance for reading information about the future maneuver of the vehicle is reduced. This could lead to an emergency. For example, if the driver behind you does not notice that the lights stop in time, the remaining distance on the road may not be enough to stop their car. The result will be an accident.
Installing LED lights provides a lot of benefits to the car owner. The rear optics can be decorated with LEDs in the form of a specific pattern. Modification of the lamp depends on the desire of the car owner and his imagination.
The main advantages of installing LED headlights are their low load on the Camry 40's on-board network. As a result, the generator experiences less wear. LED headlights are also very durable and reliable. They shake almost fearlessly when driving over bumps on the road surface. When LEDs are operating, they do not get particularly hot, so the body and glass of the headlamp are not subject to thermal stress. In addition, LED lights give the car an original and stylish look.
Source