Handbrake adjustment
In order to check the correct operation of the parking brake, you need to raise the handbrake. When lifting, the driver should hear 7 - 9 clicks. If the number of clicks does not correspond to this number, then this indicates a malfunction in the brake system.
The need for adjustment arises when the car's mileage reaches 17-25 thousand km. In order to learn how to tighten the handbrake on a Toyota Camry 40 and adjust it, it is recommended that you read the instructions below.
- Remove the rear wheel.
- Pull out the rubber plug.
- Position the inspection hole at the lowest point, as shown in the photo below.
- Using a flashlight we find the adjusting gear.
- Using a screwdriver, you need to get between the teeth and turn the gear up. During this process, the driver will hear the sound of a spring. It is important not to overtighten the gear. The rotation of the discs should be soft and smooth with a slight sound of the pads rubbing.
- Adjust the opposite wheel in the same way, maintaining symmetry. Otherwise, there may be a difference in setting. Because of this, the body will move to the side when trying to move off on a slope.
- Reinstall all parts in reverse order.
- Release the handbrake and check the rotation of the rear wheels. They must walk freely.
Types of brake pads for Toyota Camry V40
There are several types of brake systems on the Camry 40. They differ from each other in the following parameters:
- Price category;
- Manufacturer country;
- Qualitative indicators.
The car enthusiast himself makes his own conclusions about which models are worth paying attention to. Some people prefer to neglect quality for the sake of saving money, while others are adherents of original Japanese mechanisms
The price of pads is based on their quality indicators. According to the price parameter, all Camry 40 brake systems can be divided into 4 segments:
- original;
- expensive analogues;
- analogues of the middle price category;
- cheap non-original models.
It is most logical to purchase spare parts for foreign cars, especially brake pads, from well-known manufacturers. Below we will look at the main brands that the modern market offers.
Replacing hand brake pads Camry 40
In order to replace the parking brake pads, you need to use the instructions given below.
- Remove the wheel from the side where the pads need to be replaced.
- Remove the brake disc. To do this, it is recommended to use a “14” key.
- Dismantle the springs of the front and rear pads.
- Remove the front and rear pads.
- Replace the pads and install everything in reverse order.
- Install the brake disc
- Adjust the operation of the hand brake.
Stages of work
The process of raising the car's lighting line in bodies 50, 40, 30 and 55 is quite similar and consists of several stages:
- First you need to check the standard settings for the electric headlight range control and make sure it is working correctly (on newer cars this unit may work, but on cars older than 5 years it may have problems). If it fails, the first step is to replace the corrector and only after that proceed to adjusting the headlights of a car with a body size of 50 and 30.
- After this, before starting work, you need to find a place to park the car.
- All you need to adjust is the 8-key key and, for convenience, some special sockets with curved tips.
- When the corrector is working correctly, it is necessary to measure the distance at which it adjusts the light beam and outline its magnification level, which is twice the maximum (corresponding to one in the corrector setting).
- Having prepared the tool and checked the correctness of the corrector, open the hood of the Toyota 50 (or 30, 40) and find the plastic adjustment plug in the engine compartment. It is located directly behind the headlight housing.
- Then you need to mark the expected level of the light beam after adjustment with a ruler and, accordingly, begin the adjustment (before that, set the corrector to position 0).
- There is a special adjustment screw on the back plastic cover; if you rotate it, the light output will gradually increase to the desired level (rotation should be done slowly to avoid damaging the plastic parts of the screw). You also need to rotate to achieve a certain level of light output.
- Then tighten the screw and measure the headlight level.
Replacing the front hand brake cable of a Camry 40
It is recommended to change the cable in cases of severe stretching or mechanical damage. To replace it, you must use the instructions below.
- Disassemble the console, gaining access to the handbrake cable.
- Secure the threaded end with a wrench. After this, you need to disconnect the tension coupling. This operation will release the cable.
- Remove the cable clamp from the turnbuckle side.
- Unscrew the locknut and adjusting nut.
- Disconnect the front cable from the handbrake lever.
- Remove the holder mount
- Remove the cable from the car.
- Replace the cable with a new one and install the parts in the reverse order.
- Adjust the hand brake drive.
Setting the fog lights
Adjusting the Toyota Camry headlights also includes adjusting the fog lights. The key to the correct operation of these light sources is their correct installation. There are certain recommendations for installing fog lights:
- level above ground – 250 mm;
- fog lights should not protrude beyond the main optics of the car. It is advisable to fix them 400-600 mm from the headlights;
- The efficiency of fog lights will be noticeably reduced if not properly adjusted.
The steps for setting up the foglights are as follows:
- The mobile screen is moved 7 meters from the car. If you are using a wall, then simply move the car to the desired distance.
- Mark the centers of the headlights, step back 10 cm from them and draw a horizontal line.
- Drive the car another 6-7 meters away from the wall (or move the screen) and turn on the fog lights again.
- If the light is set correctly, then its upper boundary should follow the horizontal line drawn earlier. The optimal distance between the centers of the beams is 120 cm.
Replacing the rear cable Camry 40
To replace the rear cable, the car owner needs to use the instructions given below.
- Check the brake position when released.
- Unscrew the locknut and loosen the cable tensioner adjusting nut.
- Dismantle the floor tunnel lining.
- Unscrew the fastening bolts and remove the floor reinforcement.
- Pull out the end of the rear cables and remove the cable sheath clamps.
- Disconnect the cables from the rear pads.
- Remove the cables from the brake shields.
- Remove the bolts securing the front cable holders.
- Disconnect the remaining holders in the same way.
- Remove the cable.
- Replace with a new one and install everything in the reverse order.
Adjust the parking brake cable.
conclusions
Applying the parking brake on a Toyota Corolla E120 with your own hands is quite simple and easy. Therefore, the entire operation, including disassembly, takes only 20-30 minutes, if there are no inconveniences, such as “muted” threads of the parking brake cable.
The next two tabs will change the content below.
Experienced motorist. I have an automotive education, namely as an engine repair mechanic. At the beginning of her career there was a VAZ-2107, then a BMW 5 Series, a Toyota Supra and a right-hand drive MARK-2. Now the family has 2 cars: Peugeot 407 and Dodge Challenger 2021. I study each car from A to Z. I have a lot of experience, and I try to repair each one with my own hands.
Conclusion
The process of setting up optics in Camry does not take that much time (on average about 15-25 minutes). In addition, almost every motorist will be able to carry out such a procedure.
When parking with the engine off, even a heavy vehicle (especially one equipped with a manual transmission) can be easily moved, especially on an inclined road. Here comes the parking brake (handbrake) that comes with every car.
In this article, we'll talk about the Toyota Corolla 120 handbrake and, more specifically, how it can be tightened if it fails.
How to adjust the handbrake on a Toyota
Toyota handbrake adjustment is most often required after removing the brake pads, drums, cables or handbrake levers. In addition, this compensates for cable extension. Remove the rear brake drums before adjusting the handbrake. This will allow you to make sure that nothing is preventing the wheels of the left and right brake systems from rotating freely. Turn each wheel back five teeth.
The locks located on the operating arms should be located near the edges of the spacers. To check this, have a helper move the handbrake handle. If they do not rest on the edges of the pads, inspect the cables for distortion and signs of wear. Only then start adjusting the parking brake on your Toyota.
Raise the handbrake lever one to three clicks, then loosen the equalizer lock nut and tighten the adjuster nut. After this, the handbrake cable should be slightly tensioned. If there is no tension, you will have to completely replace the parking brake cable. Check cable tension. To do this, tighten the parking brake handle several clicks. If everything is in order and the cable is pulled out, you will have to make a lot of effort to turn the rear wheel of the car with your own hands.
Tighten the equalizer nut, then release the parking brake lever and turn the rear wheels. If everything is done correctly, they will rotate evenly, without jerking. Be sure to install brake system insulation before fully tightening all mounting nuts.
When the adjustment is complete, release the rear of the vehicle to the ground and make sure the handbrake is in first gear.
When checking the handbrake, have an assistant go down to the drums and listen for clicks, indicating that the mechanism is working properly.
How to remove the parking brake cable on a Toyota King?
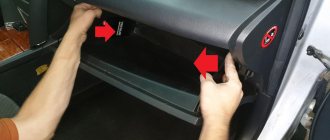
- Remove the center console by lifting up the glove box or storage compartment. We remove all the excess from the compartment, also remove the box mat, and then unscrew the two "10" bolts at the back of the box.
Screw two bolts with a 10 mm nut
- Then release the parking brake. We take out the ashtray (although it doesn't bother us much). We remove the panel near the gear shift lever and, so as not to interfere, lift the panel. Under the panel we need to unscrew two screws.
Remove the parking brake pad. Unscrew two more mounting screws of the bracket.
- Next, lift the console from the back and install it in front along the guides. You can extend the console all the way, but simply lift it up to access the parking brake adjusting nuts.
From the owner's manual: Adjusting the parking brake (if you are pulling from 196 N). from 6 to 9 clicks.
- Then unscrew the locknut and tighten the handbrake cable adjusting nut using 10 wrenches.