How to replace the side light bulb in restyled models
Before replacing a light bulb, it is advisable to place the car on a relatively flat surface so as not to tilt again, and also turn off the engine. This way you will avoid electric shock, which is supplied to the light bulb when the engine is on. To avoid a short circuit during operation, on most cars it would be a good idea to disconnect the negative terminal of the battery. It is always better to start replacing from the right side. The headlight unit is equipped with a plastic cover. It is dismantled using a socket and extension.
There may be some minor additional complications with this operation. The socket with a light bulb is sometimes more difficult to get due to the fact that it is quite small in size and is located in a hard-to-reach place. To remove this cartridge, find it and start rocking it up and down until the cartridge is completely removed. There is no need to rotate the chuck. Start installation work from the side where the washer fluid reservoir is installed. Then you should move on to the headlight installed on the battery side. The cartridge on this side is more difficult to reach due to the body. While removing, use your hand to lift the part up.
The dismantling process requires the presence of a special tool. Manufacturers place a protrusion on the lamp socket. Use a flat blade screwdriver to grab onto this tab and use a lever action to remove the cartridge.
Step-by-step replacement instructions
To replace a low beam lamp, it is necessary to study the design of the headlight in the car, as well as select the correct type and power of the emitter. Causes of problems with headlights. If the low beam is not working, you should not immediately run to a specialized store for a new halogen or xenon bulb, especially since it may have a high
In order to replace low beam lamps on a Toyota Camry, you must perform the following procedure:
- Open the hood and disconnect the terminal from the battery
- Turn the base counterclockwise and remove the light source from the headlight
- Disconnect the power by pressing the latch
- We install the new lamp and perform the assembly in reverse order.
Camry 40: light adjustment
Camry 40 is a common car, the reliability and practicality of which are legendary. But no car is perfect, so even the 6th generation Camry has its flaws. In addition to poor noise insulation by the standards of the class, there is another disadvantage that many owners encounter - the poor light of the XV40. If the issue of sound insulation concerns exclusively the comfort of use, then the quality of lighting depends on the safety of traffic in the dark.
How to independently adjust the headlights on a Camry 40
If you are faced with the problem of bad light, do not rush to buy new optics. In the case of the Camry 40, insufficient road lighting may be due to unadjusted light elements. Incorrectly adjusted optics can lead to undesirable effects: dazzling oncoming and passing traffic, in fog a wide light beam creates a curtain in front of the driver, too low a light beam poorly illuminates the road even in good weather.
Preparation
The Camry XV40 is equipped with an electric headlight leveler, but it is often not possible to adjust the light using it. The low beam is considered problematic for the Camry 40; car owners do not often complain about the high beam.
The first step is to check the settings of the standard corrector and the adequacy of its operation. If you find that this unit is out of order, replace it and then proceed to adjust the Camry 40 light.
To independently adjust the headlights on Camry 40 you will need:
- horizontally flat area at least 10 meters long (garage, parking lot, etc.),
- on one side the site must be adjacent to a perpendicular, flat plane (parking wall, garage door, etc.),
- hexagon with which adjustment will be made,
- the same tire pressure, it should be 2 - 2.2 bar,
- fill a full tank of gasoline,
- set the headlight range control to position 0.
How to set up Camry XV40 headlights
To configure the light elements of the Camry 40, you need to mark the screen or wall. To do this, drive the car five meters away from the surface on which the marking will be made. The first vertical straight line completely coincides with the longitudinal axis of the car (O in the diagram). Then the distance between the centers of the headlights is measured and marked on the marked surface with vertical lines (A and B of the right and left headlights, respectively).
Next, a horizontal line is drawn, which is drawn parallel to the floor plane at a height equal to the distance from the center of the headlights to the surface on which the car stands (the height is indicated by the letter h, and the line is located above the straight line E). The second horizontal line is drawn 5 cm below the first (line E in the diagram).
After applying these lines to a flat and smooth surface, you can begin adjusting the headlights of the Camry 40. Turn on the low beam and start adjusting one of the headlights, covering the second with some thick material (a thick rag will do, of which there are quite a few in the garage). The light from each optical element should be located along a horizontal straight line, which is closer to the floor surface (line E in the diagram) and end near the vertical line marked opposite the opposite headlight (line A for the left, straight line B for the right).
If you find that the optics of your car do not shine correctly, then adjustment is made using special bolts. Different bolts are responsible for adjustment in the horizontal and vertical planes.
Adjusting bolts Camry 40
The adjusting bolts are located on the rear walls of the Camry 40 headlight housing. When adjusting the low beam yourself, be careful, rotate the screws slowly so as not to damage the plastic part.
The raising of the near beam of light occurs only after vertical adjustment. If you need to raise the low beam line, turn the adjusting screw until you reach the required level.
The low beam of the Camry 40 can be considered adjusted when the upper lines of the light spots coincide with the horizontal straight line E (the straight line marked 5 cm below the height of the center of the optics).
If the car is equipped with an automatic corrector, then adjustment is possible by connecting special equipment. Otherwise, the autocorrector will return the original settings.
Setting up fog lights Camry 2007
When adjusting the optics of the Toyota Camry XV40, the light of the fog lights is adjusted. One of the reasons for incorrect PTF light is incorrect installation of the lamp. Before making adjustments, check that the lamp is installed correctly.
To adjust the light of the fog lights:
- install the vehicle at a distance of 7 m from a flat vertical surface,
- mark the centers of the PTF on the marked plane, move 10 cm down from these points and draw a horizontal line,
- move the car away from the marked surface another 7 m and turn on the fog lights,
- If the PTF light is set correctly, its upper border will run along a horizontal line.
The PTF light is adjustable only in height. If there is a need to raise or lower it, there is a hole in the plastic protection under each “fog light” through which the adjusting screw can be seen; rotate it with a screwdriver to adjust the light.
Checking self-tuning of Camry 45 optics
When carrying out self-adjustment of light, a check is necessary. After waiting until it gets dark, drive out onto the road and evaluate the performance of the optics. If the system only needed adjustment, you will immediately see the difference. Make sure that low beams or fog lights do not blind other road users.
If you cannot adjust the light of the optics, contact a specialized service.
How to remove the headlight to replace the bulb and wash the lens?
You can replace a Toyota Camry light bulb along with cleaning and washing the headlight. If you need to clean the optics from dirt and dust, returning the lens to its former shine, you will have to completely remove the headlight from under the bumper. This is also easy to do, but in this case access to it is only possible through the hood.
Headlight removal algorithm:
Using a screwdriver, unscrew the two bolts of the metal plate under the seal under the hood; remove the metal strip above the headlight; unscrew the three bolts securing the headlight itself; carefully bend the bumper; carefully pull the headlight towards you; disconnect the bulbs and connectors; remove the optical device.
If the light bulb burns out, you can unscrew it and remove it from the clamp, then install a new one. It is advisable to disassemble the headlight removed from the housing for subsequent washing. To remove the headlight from the car body, you will need an 8” wrench, with which you can remove the electronic corrector. After this, you need to unscrew the fastenings of the rubber seals with a screwdriver and remove the sealing rings (there are only three of them). After the headlight is disassembled, you can wash the inside of it with detergent and distilled water.
Since the 6th generation Toyota Camry has a headlight with partitions, it may be more difficult to remove accumulated dust and dirt. It is recommended to use a small sponge to thoroughly rinse the sections. Some people use a clever method: they cut an ordinary dishwashing sponge into small squares and place them inside the headlight, filling them with water and detergent. In this way, it is possible to remove any remaining dust and dirt from the diffuser as thoroughly as possible.
After all manipulations with water, the headlight must be thoroughly dried before replacing the light bulb of the Camry 40 size. Before this, the headlight must be assembled in the reverse order:
- install the corrector using an 8” wrench;
- put all the rubber seals in place, securing them with standard fasteners using a flat screwdriver;
- Turn the headlight adjusters so that the holes for the lamp are in the center.
The same method is suitable for other cars of this brand. There may be differences in the optics of different models, so it is recommended to first study the registration certificate of a foreign car.
Which lighting elements to choose?
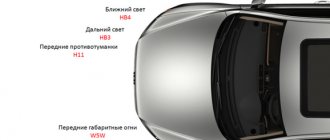
Location of Toyota Camry lamps
According to the manufacturer's recommendations, the following lamps are used on the Camry XV40: 1 – high beam lamp, type HB3; 2 – front parking lamp and license plate lamp, type W5W; 3 – low beam lamp, type H11 (halogen) or D4S (gas discharge); 4 – front and rear turn signal lamp, type WY21W*; 5 – fog lamp (FTL), type H11; 6 – rear brake light and side light lamp, type W21/5W; 7 – reverse lamp, type W16W; 8 – rear fog lamp, type W21W; 9** – side turn signal lamp (on the body), type WY5W*
*The letter “Y” in the name indicates that the color of the lamp is yellow, although in reality the color of the lamp is orange.
Rear light elements of Toyota Camry
We recommend replacing all low beam lamps in your vehicle. Otherwise, differences in brightness and other light characteristics may disturb the driver and other road users.