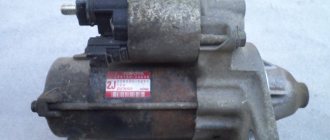
The 1ZZ starter is designed to create the required rotational torque of the crankshaft of the power unit, which helps start the engine when the required speed is reached. In this case, the set compression ratio in the cylinders is set, which is necessary for ignition of the air-fuel mixture.
The design of the device includes electrical and mechanical parts. If individual elements fail, problems with starting the engine will occur. To troubleshoot problems, you will need to remove the starter from the Toyota 1ZZ engine and determine the cause of the malfunction. This material provides a detailed description of how to eliminate various breakdowns of the 1ZZ electric starter, as well as instructions for removing it from the power unit.
Starter Toyota 1ZZ
The 1ZZ starter is designed to create the required rotational torque of the crankshaft of the power unit, which helps start the engine when the required speed is reached.
In this case, the set compression ratio in the cylinders is set, which is necessary for ignition of the air-fuel mixture. The design of the device includes electrical and mechanical parts. If individual elements fail, problems with starting the engine will occur. To troubleshoot problems, you will need to remove the starter from the Toyota 1ZZ engine and determine the cause of the malfunction. This material provides a detailed description of how to eliminate various breakdowns of the 1ZZ electric starter, as well as instructions for removing it from the power unit.
Why change the timing chain
The timing chain operates while the car's engine is running. Over time, it wears out and fails. Alternatively, one of the teeth of the chain flies off, causing it to start slipping. Because the mechanism is placed in such a way that it connects other moving parts together in a rigid coupling, then one slip will be enough to break the entire system. A break in the timing chain in almost all cars becomes a prerequisite for defects in the engine valves, which will have to be replaced. On diesel engines, the camshaft can break, and ultimately it is necessary to replace not only the timing chain itself, but also the camshaft, valves and cylinder block gasket.
Serviceable mechanism chain
The process of changing the timing chain on some car models lasts up to 5 hours. Usually, not only the chain itself is changed, but also the tensioning mechanisms. You shouldn’t skimp on parts: a low-quality chain can break very quickly. The timing chain on a second-hand car must be changed, even if the previous owner assures that it is brand new.
Step by step recommendation
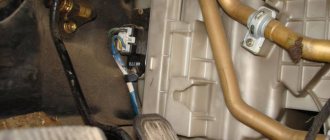
To accurately determine the location of the damage, you will need to remove the 1ZZ starter from the car. Next, we will consider in detail the procedure for dismantling the device and the process of replacing individual elements.
Dismantling the starter
Replacing the 1ZZ starter begins with disconnecting the negative terminal from the battery. In the future, you will need to follow the following sequence of actions:
We disassemble and change parts
To inspect or replace individual components of the 1ZZ-FE starter, you will need to disassemble the device. To do this, you should adhere to the following steps:
Reasons for the starter not working correctly
Malfunctions in the normal operation of the electric starter can be caused by various problems, both in the mechanical and electrical parts. Including due to problems with the launch control equipment.
Electrical
Electrical problems may cause the crankshaft to spin slowly or not move at all. In this case, you will need to check:
When, when starting the engine, there is no reaction at all from the starter, and the solenoid relay does not tighten, the causes of breakdowns lie in a short circuit to the housing or a break in the solenoid relay coil.
If there are no obvious faults, you will need to disassemble the device. Most likely, one of the elements of the brush-collector apparatus has failed.
Mechanical
Problems with starter malfunction due to mechanical wear of individual components are also quite common. In this case, extraneous noise is observed when the device is operating, it rotates, but the engine does not start. Possible reasons include:
Types of faults
Poor contact of the positive battery cable
One of the most common problems. In order to find this malfunction, you need to remove the two terminals of this wire and instead make contact between the starter and the battery with ordinary copper wire. If the starter starts working through the wire, then the entire wire needs to be replaced.
bendix gear
The starter Bendix is a moving part of the mechanism. When power is applied to it, the bendix moves forward, engaging the motor with an asterisk. This is exactly what you should pay attention to. If its teeth are worn out or some are missing, then the essence of the problem is clear.
Solenoid relay
You can diagnose a defect in this element by comparing the voltage at the input and output terminals. If the voltage difference is more than 6 V, then the retractor winding will not be able to influence the core and drive the starter. This problem occurs due to burnt contacts on the relay. To quickly solve the problem for a short period of time, you should knock on the starter a little.
Safety system
To do this, you need to remove the fuse responsible for the starting device and replace it with a new one.
Important! The new fuse must be exactly the same rating as the old one. If the rating is less, the fuse link will immediately burn out, and if it is more, then in the event of a short circuit the fuse will not provide protection.
It is worth checking the voltage on all accessible sections of the electrical circuit between the battery and the starting device.
You should also measure the voltage at all incoming and outgoing terminals of the relay relative to its ground.
Brush holders sticking or worn out
The brushes come into contact with the moving part of the mechanism, so they can wear out. It may be that 2 brushes are worn out and the rest are fine, but it is still recommended to replace all four.
In order for the brushes to make good contact with the moving part, they are spring-loaded. It often happens that the springs fail, after which the brush sticks in the brush holder and does not make contact. Lightly tapping the back of the housing will release the spring and allow the brushes to return to their working position.
It is worth noting that it will be much cheaper to repair an old one than to replace it with a new one. Since this mechanism consists of several parts, it is quite possible to repair the starter. You can easily purchase a solenoid relay, bendix, brushes, wires, etc. for the starter. But repairs are worth making if the breakdown occurred recently and has not yet had time to affect the remaining parts of the starter. If you don’t want to deal with repairs, you can simply purchase a new one, the prices of which vary greatly.
The original one will cost about 20,000 rubles, while the cost of analogues is 8–9 thousand. It is recommended to buy the original one because its reliability is 120 percent higher. The most reliable starters are produced by Bosh and Valeo. These companies supply starters for most cars from the factory.
If you still want to save money, but at the same time get good quality, then Lauber or Denso will do.
Starter brush assembly.
A malfunction of this unit often appears unexpectedly, and there is no sound of the starter cranking; on some models there may be a characteristic clicking sound of the retractor relay. When a heavy object strikes the starter body (mounting rod, short iron bar), the starter begins to work. This technique will allow you to be 100% sure that the brush assembly is faulty.
Let's look at the repair of the starter using the example of the 1ZZ-FE engine, which was installed on TOYOTA cars, in our case the TOYOTA FIELDER car.
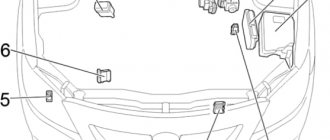
To begin , ALWAYS disconnect the positive terminal of the battery. The radiator fan diffuser must then be removed to provide better access. Unfortunately, there are no photos of the fastenings, but everything is simple there. Disconnect the fan motor connector and use a “10” key to unscrew the two bolts securing the diffuser and pull it up.
Location of diffuser mounting bolts:
Unscrew the power wire from the starter:
Since the second “switch on” wire of the starter is completely inconvenient to remove, we will leave it in place for now, and remove it when we unscrew the starter.
Unscrew the starter mounting bolts, one on one side, the other on the other side:
We remove the starter. Now freely remove the remaining wire.
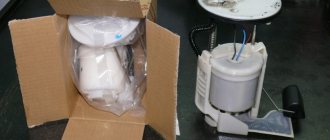
With the starter removed, unscrew the cover and power wire:
Unscrew the two nuts securing the retractor relay:
To remove the bendix, you need to remove the retaining ring, to do this:
Use a suitable head to knock down the stopper bushing:
Remove the retaining ring using a suitable screwdriver:
We remove the bendix and put a new one in its place, not forgetting to apply grease to the shaft and fork, and also lubricate the gearbox:
Don't forget to apply grease to the needle bearing of the cover and bushing:
At this point the brush assembly can be replaced. I recommend changing it completely and not resorting to replacing individual brushes without contact welding. Soldering brush wires, screwing them in, etc. will only add problems, and very soon.
Unscrew the screws securing the brush assembly:
Before installation, the armature must be inspected, cleaned, and the collector between the lamellas must be cleaned with a suitable tool (and I would classify this operation as mandatory, since dust from the brushes accumulates between the lamellas, which conducts current perfectly, and after this procedure the starter turns much more “fun”) . We clean the collector with fine sandpaper until it shines.
We assemble everything in reverse order.
We'll look at repairing the solenoid relay a little later, but we'll look at another fault with the starter (not even the starter, but the fault concerns the starting system) on this car model in the next article.
Toyota Corona 1996, 115 l. With. — self-repair
This can happen for various reasons: When this happens, the best solution is to remove the starter and read it, or to completely repair it. How to remove the starter for a Toyota Corolla will be presented in this article, taking into account all the necessary elements. And ready for immediate repair.
This is where the second and most important stage of the repair begins. We take the Corolla starter and move to the table. We need to disassemble the starter.
Other articles
To do this, we unscrew the two bolts that tighten its body. The part will split into two parts.
For a visual understanding, look at the photo. Next, unscrew the three bolts that secure the retractor and first mark all the parts. This approach will greatly facilitate the assembly of the starter. After unscrewing the nut, you can remove the metal terminal that it fixed. Below you will see an electrical connector that needs to be disconnected.
It will be difficult to perform this operation by hand, because the connection is quite strong, so you can use a screwdriver to help you pry off the case.
Now you can disconnect the part of the device located on the right. To do this we need a 14mm socket and a ratchet.
Toyota Corolla starter repair
It is worth noting that unscrewing the bolt is very inconvenient due to the fact that it is quite long and there is little space for unscrewing. There will be a second bolt nearby, which we also unscrew, after which you can dismantle the device and take it for inspection.
Below, for clarity, is a video that shows how to remove the starter on a Toyota Corolla: This is what I got. They shine like a cat. But grinding the central contact is more difficult, since it is on a spring, and you can sharpen it only by squeezing the spring and pulling it out it up, which is not entirely convenient, but possible.
The serviceability of the starter can only be checked when it is removed.
Replacing starter Toyota 1A, 3s-fe
The starter also needs to be removed to replace the brushes or check the magnetic switch. Before you disconnect the electrical connections shown in the figure 1 - main electrical wire; 2 - magnetic switch wire, disconnect the wires from the battery ground, otherwise dangerous sparking may occur when disconnecting the above cables.
How to change the starter on a 1zz engine
The starter burned out, here it is
TOYOTA 28100-22030 2I 228000-7581 12v DENSO JAPAN 0.8 Kv
| Still, 0.8 kV is not enough for 1ZZ |
You need to replace it with this one
| TOYOTA 28100-0D180 6V MS428000-4500 12v DENSO JAPAN 1.3 Kv |
| This one is one and a half times more powerful |
For this operation, I needed 2 combination wrenches (open-end/socket) for 12 and 14. And that’s it! It is advisable to remove the battery first
1. You need to remove the bar that holds the throttle.
| The bar is held in place by 2 12mm bolts. They can be easily unscrewed with a spanner. |
The starter is held on by two bolts
| The lower bolt is screwed into the block A and the upper one into the starter housing |
| Bottom bolt |
| Top bolt |
| Bolt |
2. Unscrew the positive contact with a 12 key.
3. Unscrew the starter bolts with a 14mm spanner.
Because the bolts are not in the most convenient places, the process of unscrewing (throwing the key over and turning a maximum of 15 degrees) is quite meditative. I couldn't get my head around
| First, it is logical to unscrew the bottom bolt |
| Then, holding the starter with your hand, unscrew the top |
4. Remove the old one and insert the new starter.
First, unhook the control wire connector (I just needed to press my finger on the clip, you may have to pry it off with a screwdriver). Then remove the starter and insert a new one
| Previously, I removed and inserted the starter through the hole between the guard and the bumper (green arrow). Now I have found a magical combination of movements that allows me to remove and insert the starter from above without unscrewing the throttle valve drive (yellow arrow), which I did not want to do at all. |
5. Connect and tighten everything in the reverse order.
7. Depending on the result a). Scratching turnips b). Pour Although option b is suitable for any result.
Source
How to change the starter on a 1zz engine
Sponsored links. Shown only to unregistered users
| Sponsored Links: |
Registered: March 24, 2008, 04:00 | I don’t want to open a new topic because the problem is the same HOW TO REMOVE THE STARTER? with minimal analysis Will no one respond? At least tell me where to look. | ||
Registered: May 12, 2008, 03:00 | _________________ Vista, 09.2000, 1zz, sold at 302,000 km, rebuilt JEKA480 at 194.5 thousand. Avensis 2006 Sold 10/02/2013 for 275,000 km. Engine 1zz, without oil burner. 2013 Corolla 2ZR-FE. Sold on 12/2015 with about 323,500 mileage. Camry 2015 6AR-FXE. |