Cruise control is a special function that allows you to maintain a constant vehicle speed. This option is very convenient when driving long distances. When the driver's leg gets tired, you can adjust the cruise control and it will automatically maintain the same speed - decreasing it on descents when accelerating the car and increasing it when the speed drops below the set limit.
Today, not every motorist can afford a car package that includes this option, so they install it themselves. In this article we will talk about how to properly install cruise control on a Toyota Corolla and make it work correctly. It doesn’t matter whether you have a manual or automatic transmission, this option will fit optimally into both transmission options.
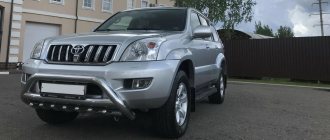
What is needed to install cruise control on a Toyota Prado 150
Cruise control (“autodrive”) is not a part without which the car will stall. This is an additional option. It helps the driver maintain a constant speed on a certain section of the road.
To install the system, purchase the following parts:
- 84632-34011 – handle, lever. It will switch the cruise control control. 1 piece, price about 2200 rub.
- 90159-50199 – two mounting screws up to 30 rubles. every.
- 45186-60070-C0 – plug with a hole for the steering wheel instead of a blank one. At the end there may be the letters EO. 1 piece, price about 200 rub.
- 84633-48020 – cruise control switch wiring harness. 1 piece, price from 300 rub.
- 82998-12860 or analogue 82998-12870 – pins for the connector (male-female connector), 3 pcs. at a price of up to 100 rubles.
- 8966160W40 – electronic engine and automatic transmission control unit. Price from 23,000 rub.
These parts are included in the kit that is needed to install the option on the Toyota Land Cruiser Prado 150. They are purchased in car accessories stores or purchased online.
What kind of system is this
Cruise control is one of the most useful functions of a modern car. Its essence is that the speed of the car is maintained automatically. In this case, the driver may not press the gas pedal.
The option records the speed developed at the time of activation and limits it to a given limit until it is turned off. On descents the system reduces the speed, and on ascents it increases.
By default, this system is supplied to Toyota Corolla only in the Prestige configuration and higher. Naturally, its cost is significantly higher than the price of a standard Comfort, and not everyone can buy such a car. For example, relative to the Corolla 150, the difference in the price of these configurations can reach 150 thousand rubles, which quite logically becomes an obstacle to purchasing a more expensive model. However, you can equip your car with the cruise control option on your own.
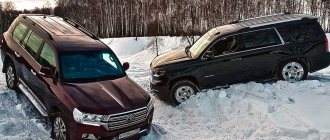
How to install cruise control on Prado 150
They install it without interfering with the car's electrical wiring. In models with different gearboxes, the installation algorithm is not the same.
Prado 150 with manual transmission
For these models there is no decoding of pins on the ECU. You need to know exactly where to connect the wire from the cruise control lever to the electronic unit. In the instructions, the connector is indicated second from the right.
When it doesn’t work, they eliminate the error (or its cause) via techstream.
Prado 150 with automatic transmission
Installation step by step:
- Disconnect the terminal from the battery to break the contact. Wait 5-7 minutes.
- Remove the plugs on the sides of the steering wheel.
- Unscrew the bolts one by one.
- Remove the airbag unit by pulling it away from the steering wheel.
- Screw on the main part - the cruise control handle - with two bolts.
- Connect the control lever of the new option and the plug (it is important not to confuse them). The connections will be under the airbag.
- Place the pillow in place.
- The plugs are snapped in place. Now they are different: the left one is old, the right one is new, with a hole for the switch.
- Screw on the battery terminal.
The installation is complete for those models that have cords from the cruise control to the electronic unit.
06/18/2008 15:57 Self-installation of cruise control.
In many trim levels, the Estima Hybrid is equipped with cruise control. This is a device that allows you to drive at a constant speed without the need to use the gas pedal. In Estima, cruise is controlled by a lever located to the right of the steering wheel and allows you to accelerate, decelerate and move at a consistently constant speed without touching the pedals. The thing is indispensable on long trips, and, fortunately, for the hybrid Estima the problem of its absence is solved very simply.
So,
how to install cruise control (cruise-control, speed control or autocruise) on our hybrid. First, everything we need from tools.
- crosshead screwdriver
- Head 19
- (marking SATA 21105)
- Knife
- Thin awl or nail scissors
In addition to the tools, we will need the cruise control lever itself, 3 self-tapping screws to secure it, and a plastic steering wheel trim with a hole for the lever. All this can be ordered from any company that sells original spare parts, or found at a disassembly site. Both the lever itself and the plastic are the same on many Toyotas, so you shouldn’t look for Estima at a car disassembly, but you can try your luck with parts from another car (it’s especially recommended to try the MARK II 110th body). True, you will have to get around the issue of matching the color of the plastic.
So, our way is to order everything new. The catalog numbers we need and approximate cost:
| Understeering's shifter | TOYOTA 84630-28071 (replaces 84630-28070 currently) | ~1900r. |
| Self-tapping screws | TOYOTA (x3 pieces). . | ~15r. |
| Plastic cover | TOYOTA 45184-28120-B0 or | ~500r. |
The steering column plastic has 2 different colors. You can determine which one you need specifically as follows: if you have the line TRIM QB14 on your engine compartment plate (or the color approximately matches what is in the photos below), then order 45184-28120-B1. Otherwise, order 45184-28120-B0. In addition, you don’t have to order self-tapping screws, but personally it seems to me that it’s easier to spend 50 rubles than to go to the market and select the size by eye.
So, now that our order has finally arrived, let's take a closer look at installing the cruise control on the steering wheel.
First, let's remove the airbag. Using a knife, carefully separate the plugs on the sides of the steering wheel and use a star screwdriver to unscrew the two screws holding the SRS airbag. There is no need to try to get them out (this is probably not possible). You can try with a regular screwdriver, but they are screwed on very tightly.
| Attention: The most urgent recommendations: disconnect the 12V battery terminal and do not touch the connectors associated with the airbag again when carrying out work. Although the connectors are made in such a way as to exclude the possible ingress of static electricity, there is no need to risk your health again. |
Disconnect the connectors located on the pillow. The blue signal wire is easy to remove, but the yellow SRS connector will have to be lifted with a knife and moved in the direction of the arrow on it. Be careful not to lose the springs, they are not secured by anything, so insert the white part back into place after disconnecting.
After that, we disconnect the white connector with the single (for now) blue wire and unscrew the steering wheel with a 19mm socket. The nut itself should move easily, but after that it still seems like the steering wheel is holding something, it’s so tightly seated. Rock it with force in different directions and it will come off easily. Before this, it would be nice to mark with some light marker how it fits on the pulley, because there is a huge chance that the steering wheel will be placed crooked during assembly.
I would recommend not touching the black circle with the yellow sticker that remains on the steering column. Place it with the connector facing up and forget about it.
Then the jewelry work begins. We need to remove the blue wire from the white connector, for which we will have to use a thin awl or nail scissors. The pictures below speak for themselves.
I’ll add that we won’t need the connector itself anymore, so you can mutilate it as you wish. I always use nail scissors to press out the clips in the last step. They have very thin metal and a sharp tip. After removing the wire, simply insert it into the connector located on the cruise control lever (no need to lift or press anything). Be careful not to mix up the side of the connector, otherwise you will have to repeat the process. As a result, this should look like this:
Next, use a Phillips screwdriver to unscrew 2, and then 2 more self-tapping screws in the steering wheel. We remove the old casing and start preparing the new one. The “cooking” process involves bending the plastic clips that hold the SRS airbag screws. Do it by analogy with old plastic.
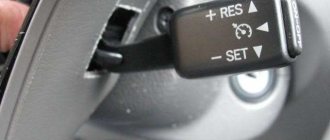
After bending the antennae, remove the pillow screws from the old plastic and insert them into the new one. Then we put the cruise control knob in place and fasten it with TWO screws as in the picture.
Let's start assembly. We fix the plastic on the steering wheel, screw the last screw through the hole in the metal of the steering wheel. We fix the blue wire to the corresponding clamps and put the steering wheel in place. We connect the connectors, put it in place and screw the pillow.
We connect the battery and enjoy the result:
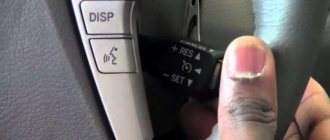
How to use cruise (cruise control) on Estim: After starting the engine, press the ON/OFF button on the control stick and turn on the cruise.
The green light on the panel will light up. Start driving as usual, the cruise is not showing itself yet. Having reached the desired speed, lower the handle down (SET) and you can release the gas pedal. Any application of the brake or gas will pause cruise action and to return to the last set speed, move the stick up (RES). Cancels speed settings and stops cruise control by moving the knob toward you (CANCEL). With active cruise, it is possible to control the speed of movement. Without touching the gas pedal, pull the handle up (+). The speed will increase until you release the handle. Down (-) - the speed will decrease.
That's it, questions and comments are welcome.
Afterword: The original plastic and the plastic with a hole for the cruise do not differ in ANYTHING except the hole. The original one even has markings for it, so those who want to save 500 rubles and have decently growing hands can cut out the hole themselves without any problems. Those who want to receive my original plastic can write in the comments.
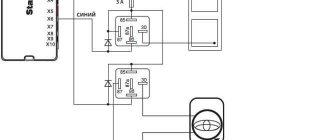
Connection
If there are no wires connecting the cruise control to the unit, it will not work. Then the connecting cords are threaded.
They are pulled under the steering wheel to the battery and ECU. First, remove the casing from the column: turn the steering wheel left and right and remove the screws. The protective elements are disassembled, removed, and access to the ignition switch is gained.
You need to connect the wires carefully: ccs - to the control unit, ecc (this is ground) - pull to the battery bolt. The negative leads to grounding.
The ECU plug is located on the right side behind the glove box (it must first be removed). Connect to the contact indicated by the mark on the standard electronic control units.
Next, attach the terminal to the battery and turn on the ignition for half a minute. This is done to register the cruise functionality in the ECU. If the engine does not stall, the process was successful.
They do the same with the two remaining keys - they alternately start the car and turn off the engine. All three buttons on the key are pressed one after another.
This automatically registers all keys in the system. Verify that registration is successful using the scanner. It is not needed if the block has not yet been tampered with.
For final adaptation of the ECU, a test drive is done. At first, the engine operation will be uneven: the speed “floats”, does not pick up, and detonation is felt.
A test drive (the indicator is not yet on) shows that the cruise control is functioning. The steering column and glove box are put in place.
If the indicator on the panel does not light up, solder in an LED lamp.
Preparing for installation
It is best to visually depict the installation process on a machine that, chronologically, was produced somewhere in the middle between 90 and 160 models.
Therefore, the installation procedure will be considered on a 2008 Toyota Corolla 120 (actually released in 2007) with a 1.3-liter 1NR-FE engine with a manual transmission. The car is something in between in technological terms between cars produced in 2004, 2011 and 2021, which is why this example was chosen.
So, the intricate assembly process begins. The first step is to buy a steering column switch, which will be responsible for turning the option on and off, as well as a wire to it. You will only need one, but it is better to take two or three in reserve (for example, a breakdown may occur when installing it). In addition, you need to purchase a spiral wire, caps and a steering column plug. You can assemble this small “collection” in almost every good auto parts store, and the costs will not hit your wallet too much. You also need to prepare your tools. For the entire procedure you will need a cross-shaped cue ball, a T30 sprocket and a 19mm socket wrench.
How does cruise control work?
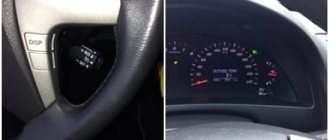
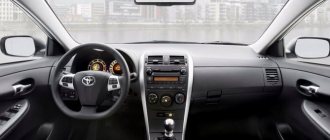
It does not work automatically - it is controlled by the driver. The cruise control option on the Toyota Prado 150 can be activated at a speed of at least 40 km/h. Then indicators appear on the dashboard: on/off and fixed speed.
The operating principle is simple. The servo is connected by a wire to a mechanism that is responsible for supplying gas to the carburetor.
If the vehicle is moving at the same speed, the angle of the accelerator pedal is constant. The driver turns on the cruise - the electronic unit remembers the position of the accelerator pedal and the speed.
When the speed decreases (the vehicle goes uphill), the ECU receives a signal and transmits a command to the servo drive. It changes the position of the gas pedal (its angle) so as to increase the fuel supply. The speed starts to increase.
The same principle works when vehicles descend from a mountain, when the speed begins to increase. Then the ECU sends a signal to reduce fuel consumption.
If the car has a manual transmission, the driver will need to change gears independently. In the case of automatic transmission, the process will take place without his participation.
Passive vs Adaptive Cruise Control: What's the Difference?
Classic cruise control (also called passive) is designed to maintain the speed of the car at a constant level. A more advanced version (or adaptive cruise control), in addition to its direct function, also maintains a safe distance between road users by reducing speed when an obstacle is recognized.
The adaptive version, in turn, is divided into laser type (uses a laser for recognition) and radar type (uses radar for recognition).
More on the topic:
- How to choose the right auto parts
The laser option is significantly cheaper, but has a serious drawback: its effectiveness decreases in adverse weather conditions. In addition, it may not respond to a dirty or simply dark car. The radar type does not have these disadvantages and, accordingly, costs an order of magnitude more.
Adaptive cruise control, of course, reduces the likelihood of human factors influencing road safety, but even the most advanced computer can fail. There is a possibility that the device may mistakenly recognize an obstacle and independently reduce the speed of the vehicle, creating a difficult traffic situation. In order to protect yourself and all road users from a possible, albeit unlikely, equipment failure, the driver should not rely entirely on electronics, but should remain constantly vigilant on the road.