Toyota East 1
generations were produced in 2002, 2003, 2004, 2005, 2006, 2007 and shipped worldwide.
In some countries it is known as Toyota Scion xA. In this article we will show a description of Toyota East fuses and relays with block diagrams and their locations. Let's highlight the fuse responsible for the cigarette lighter.
The location of the blocks and the purpose of the elements in them may differ and depend on the year of manufacture, level of equipment and region of delivery of your car. Check the information with your diagrams on the block cover.
Toyota starter brushes sizes
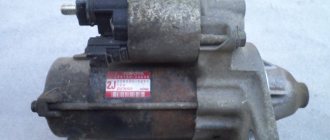
Starter brushes are a parallelepiped molded from a special conductive material based on graphite.
Copper-graphite brushes are the most widely used.
Basic starter brush sizes you need to know:
The starter uses several brushes, usually their number is 4, 6 or 8. In this case, half of the brushes are connected to ground, and the other half to the stator windings.
This connection ensures that when the starter relay is turned on, current will be simultaneously supplied to the stator and armature windings.
Important: during operation, starter brushes are subject to constant wear and significant electrical loads (at the moment the engine starts, a current from 100 (A) to 1000 (A) or more flows through the brushes), so over time they decrease in size and are destroyed.
| General view General parameters of starter brushes | L Length (L) |
Full length starter brush.
Data are presented in millimeters.
If any information is missing, there is a dash.
| Parameter Parameter name: |
| Make and model of the car Name of the make and model of the car: |
Caution: The above data are official figures from manufacturers, but please note that the information is for reference only and is not guaranteed to be completely accurate.
Comments. Have questions? We will answer everything.
Source
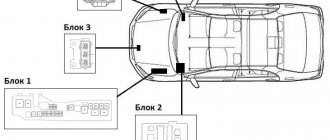
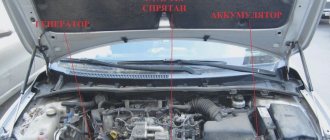
Blocks under the hood
Layout diagram
General layout of blocks under the hood
p, blockquote 35,0,0,0,0 —>
- The engine control unit
- Main fuse and relay box
- Glow plug relay
- Cooling fan control unit
- LHD: Headlight wiper relay
- Injector control unit (EDU)
- Relay block
- Gasoline: Brake control unit
- Diesel: Brake control unit
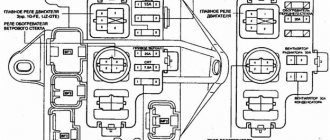
Main fuse and relay box
Installed on the left side under the smoke chamber.
Option 1
p, blockquote 39,0,0,0,0 —>
| F1 | 30A H-LP CLN - Headlight washer |
| F2 | 45A RDI FAN - Cooling system fan |
| F3 | 30A ABS NO.3 - ABS and VSC |
| F4 | 50A ABS NO.1 - ABS and VSC |
| F5 | 50A HTR – Air conditioning |
| F6 | 10A ECU-B2 - Robotic gearbox, air conditioning, Smart Entry system |
| F7 | 10A ECU-B - Instrumentation, electrical control unit, VSC, central locking, window lift drive |
| F8 | 15A RAD NO.1 - Audio system |
| F9 | 10A DOME - Interior lighting, trunk lighting, Smart Entry system |
| F10 | 20A STRG LOCK - Steering lock system |
| F11 | 30A AM2 - Engine starting system, Smart Entry system, injection system |
| F12 | 10A ETCS - Throttle Control System |
| F13 | 10A TURN-HAZ - Direction indicators and hazard warning lights |
| F14 | 7.5A ALT-S - Battery charging system |
| F15 | 7.5A AM2 NO.2 - Electrical equipment control unit |
| F16 | 50A H-LP MAIN - Headlights |
| F17 | 50A P/I - Fuel injection system |
| F18 | 80A GLOW — Engine preheating system (for diesel engines) |
| F19 | 60A EPS - Electric power steering |
| F20 | 120A ALT - Battery charging system |
| F21 | 15A IG2 - Fuel injection system, Smart Entry system |
| F22 | 10A HORN - Horn |
| F23 | 20A EFI MAIN - Fuel injection system |
| F24 | Reserve |
| F25 | Reserve |
| F26 | Reserve |
| F27 | 50A AMT - Robotic gearbox |
| F28 | 30A HTR SUB NO.3 – Air conditioning |
| F29 | 30A HTR SUB NO.2 – Air conditioning |
| F30 | 30A HTR SUB NO.1 – Air conditioning |
| F31 | 10A H-LP LH LO - Right headlight (low beam) |
| F32 | 10A H-LP RH LO - Left headlight (low beam) |
| F33 | 10A H-LP LH HI - Right headlight (high beam) |
| F34 | 10A H-LP RH HI - Left headlight (high beam) |
| F35 | 10A EFI NO.1 - Injection system |
| F36 | 10A EFI NO.2 - Injection system |
| F37 | 7.5A IG2 NO.2 - Starting system, Smart Entry system |
| 38 | FR DEICER - Cooling fan relay |
| 39 | IGT/INJ - Headlight switch relay |
| 40 | AMT - Automatic Transmission Relay |
| 41 | H-LP - Headlight relay |
Toyota Corolla III (KE) 1970 – 1981
Toyota Corolla starter brushes guarantee the reliability, controllability, mobility and safety of your car on the roads. Original and branded spare parts are always available in warehouses at reasonable prices.
However, speaking of repairs, even more important for driving safety is regular maintenance and timely repairs, subject to vehicle maintenance regulations:
- works well,
- does not lose its performance over long runs,
- more reliable and safer to operate
We make it easy to keep your car in good condition and provide great deals on our entire range of parts. Everything you need for service and repair can be found right here in our digital warehouses. Instead of endlessly searching for a retail auto parts store near you that doesn't necessarily have the parts you need, just pick up the phone and we'll deliver the auto parts you need to your door.
The main emphasis when selecting spare parts is based on the company’s experience.
It is profitable and safe to buy from us for a number of main reasons:
- Autocompas.ru is one of the leading online stores of auto parts, with daily traffic on the site of more than 30,000 people,
- Certified and reliable suppliers provide a full range of auto parts within access to their warehouses,
- The system has more than 500 suppliers and manufacturers who regulate prices with an eye on competitors and strive to make their goods more profitable to purchase.
Why look for Toyota Corolla starter brushes anywhere else, wasting time? We have competent staff, payment, delivery and support services.
It often happens that Toyota Corolla does not want to start the engine. This may be due to reasons such as battery discharge, but most often the starter is to blame.
The main causes of the malfunction: the ignition key turns, but the engine does not start. This situation can be corrected by repairing or cleaning the starter.
Removing the starter
Before you begin dismantling the starter, you must prepare all the necessary tools. And we will need: a 14mm wrench, small sockets, a ratchet wrench. Without these tools, removing the starter will be quite problematic.
You need to know the location of the starter itself, and it will be located at the rear of the engine. Therefore, this process is best carried out in an inspection hole, because it will be much more convenient.
So, the initial stage of the process:
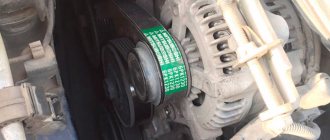
- To begin, you will need to unscrew the top starter bolt, which is located to the right of the thermostat cover. The thermostat tube will be visible from the cover, so it will not be difficult for you to identify it. Unscrewing the top bolt is quite simple, but very inconvenient.
To get to the top bolt, you need to remove the radiator tube and the air filter cover.
The next step is to unscrew the top bolt with a 14 wrench.
Next, you need to get to the very bottom bolt; this is very difficult to do, due to the fact that it is located in the very thick of all the supports and mechanisms. Disassembling this entire structure is quite problematic. It is advisable to use special equipment, since after spending a lot of time, you may not achieve the desired result.
After you unscrew all the bolts, you need to remove the nut from the power cable, and only after that the trigger.
This guide to removing the starter from a Toyota Corolla is the first correct step towards the task. After you have removed the starter, it must be disassembled and washed, preferably with gasoline.
If the starter has become completely unusable, then a reasonable solution would be to buy a new one; this will save your nerves, time, and also money. Remember, the miser pays twice. This will also protect you from unexpected breakdowns, which is also a very unpleasant situation.
Purchasing a new Toyota Corolla starter is easy and can be purchased online or at any auto parts store. In this case, the initial stage of removing the starter was given. If you strictly follow the instructions, then no deviations will arise.
Blocks in the cabin
The general principle of switching power circuits is similar to all other cars - fuses that protect circuits from overloads and short circuits, as well as relays that convert control signals into power ones, are compactly grouped into several modules.
This simplifies both wiring and troubleshooting.
Layout diagram
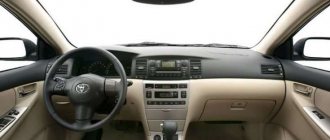
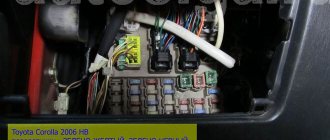
The cabin fuse box is located under the dashboard. It is closed with a lid with a plastic lock.
On the inside of the cover there is a diagram with a brief description of the specific fuses and their circuits, as well as the rated current of each.
Fuse location
Blade-type fuses in the amount of 31 pieces are placed in two rows with ratings and color coding. Depending on the vehicle version, some may not be used, but may be present as spare parts.
More powerful devices of a different design are located under a separate cover to the left, their ratings are 30 and 40 Amperes. Heated seats are not available on all cars.
Relays in the cabin are located both in clusters and separately. The ignition relay (main) is located in a block with powerful fuses on the left under the panel, along with the turn and heater switches.
Location of the upper fuse box.
Relay blocks
Two additional relay blocks are located under the console. The starter, fog lights and auxiliary circuits are controlled from here. The console panel is removed for access.
The windshield wiper relays and those built into the control modules under the front panel are installed separately.