Proper care of the starter will avoid many inconveniences. Do not allow the part to operate for more than ten seconds, otherwise it may overheat. If the engine still does not start, wait another two minutes until the starter cools completely. The part cannot be moved, since the starter is not designed for such a serious load.
An original starter for a Toyota Corolla 120 costs about twenty thousand rubles. This cost should not scare you - after all, you can buy a cheaper option that will not be inferior in its technical characteristics to the original. As a rule, the price of a used or non-original part is in the region of six to eight thousand. In short, sometimes it is easier to replace the entire starter than to repair it.
Removing the starter on a Toyota Corolla. Bendix replacement
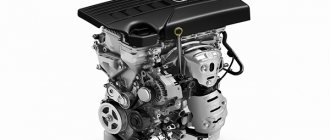
The starter on a Toyota Corolla, in principle, like on any other car, plays a fairly important role - it starts the power unit.
If not everything, then a lot depends on its performance. If this part is faulty, you will not be able to sit comfortably in the car, start it half a turn and go about your business. In our case, the starter bendix on a Toyota Coroll broke down - the starter motor does its job, but the bendix does not turn at all. Let's remove the starter step by step and replace the broken part.
It’s worth noting right away that for work you will need a garage and a table on which you can disassemble the starter. So, let's proceed to the procedure for removing the starter.
Part Features
Proper care of the starter will avoid many inconveniences. Do not allow the part to operate for more than ten seconds, otherwise it may overheat. If the engine still does not start, wait another two minutes until the starter cools completely. The part cannot be moved, since the starter is not designed for such a serious load.
An original starter for a Toyota Corolla 120 costs about twenty thousand rubles. This cost should not scare you - after all, you can buy a cheaper option that will not be inferior in its technical characteristics to the original. As a rule, the price of a used or non-original part is in the region of six to eight thousand. In short, sometimes it is easier to replace the entire starter than to repair it.
Step-by-step instructions for removing the starter from a Toyota Corolla
First of all, let's prepare the car. To do this we need to drive it into the garage. The procedure can be lengthy and so that the car is not on the street and does not disturb anyone, this preparation point is very important.
Next, you should lift the hood and, just in case, disconnect the terminal from the battery. Disconnecting the terminal is not difficult. Take pliers or a screwdriver and loosen the clamps. After the car has been completely de-energized, we proceed directly to freeing access to the broken part.
First you need to unscrew and completely remove the front plastic cover above the radiator and remove the fan. It is he who will interfere with the removal of the starter from the engine compartment. The photographs show what the car looked like before and after removing the plastic visor.
We have gained access to the cooling fan - it needs to be removed. To do this, first disconnect the terminal from the fan. This can be done by simply clicking on the fastener; the arrow in the photo shows its location. The two tubes that are located between the engine and the radiator are cooling lines that are used to cool the automatic transmission. It should be noted that they are not in the manual.
Next, you should disconnect the plastic clamps that hold the cables going to the fan. In the photo they are highlighted with yellow circles. In our version of the Corolla there are only two clamps, however, in various modifications there may be more.
After the clamps have been removed, disconnect the tube coming from the expansion tank, press out the fastenings of the fan itself on both sides at the same time and remove it together with the expansion tank. The photo shows the mounting locations for the part.
After the workplace has been freed from the parts that interfere with us, we proceed directly to removing the Toyota Corolla starter itself. It is attached to two bolts - they should be completely unscrewed, and only then can we pull out our broken device. The photo will indicate the location of the bolts we need.
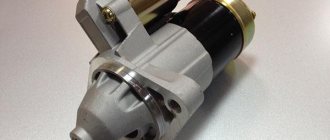
So, the starter has been removed. And ready for immediate repair. This is where the second and most important stage of the repair begins. We take the Corolla starter and move to the table.
We need to disassemble the starter. To do this, we unscrew the two bolts that tighten its body. The part will split into two parts. For a visual understanding, look at the photo.
Next, unscrew the three bolts that secure the retractor and first mark all the parts. This approach will greatly facilitate the assembly of the starter. The photo below shows a disassembled starter. If you wish, all parts can be thoroughly cleaned from dust and dirt.
So, we've almost reached the Bendix. In order to remove it, we need to pull out the retaining ring, which is located under a small cone-shaped bushing. It is very easy to remove. We place the head at 12 on the bushing and knock it down. Let's look at the photos in progress. By the way, it is best to hit with a hammer on a fixed workbench so that the part does not jump off and is not deformed due to your carelessness.
Next, we need to pick out the retaining ring and lift it up, and then remove the bushing itself and the bendix. We change the part, pre-lubricate it with heat-resistant grease and put it back. Then we put on the bushing and retaining ring, which we must place in its groove. Next, we pull the sleeve onto the ring, that is, we return everything to the position it was before. Photos of the assembly process are attached below.
At this point, the replacement of the Bendix stops and, in principle, everything can be put back into place. However, while the part was disassembled, we decided to check everything else. We disassembled the brush assembly of the electric motor. Be sure to clean everything before assembly. Our starter has no output. The rotor is intact. Particular difficulty was caused by the installation of four brushes; they are all spring-loaded and it is impossible to keep track of them. Therefore, we simply fixed them with a thin thread, which was later removed. The photo shows how the brushes are tied.
So, everything has been inspected and we begin to reassemble our starter for the Toyota Corolla. First of all, we need to assemble that part of the body that is indicated in the photo below.
And only after it is collected, we take everything else and, checking the marks, put it in its place. Reassembly and installation should not be difficult. Before installation, be sure to check the functionality of the starter. This is very easy to do, you just need to act according to the attached diagram below.
In our case, the test was successful, everything works like a clock. Everything took about 1.5 hours. The job is done, the starter is installed, the car starts perfectly.
Source
Replacing the starter bendix - logbook Toyota Corolla e120 1.6 3ZZ-FE VVT-i 2005 on DRIVE2
Hello everyone, somewhere in the summer a problem appeared: the car began to start every once in a while, and since I was far from Moscow, the thought about service disappeared, and then I completely gave up on this problem, but it starts only every once in a while.
But over the last couple of months the car has started very poorly, about the tenth time; It feels like the starter is turning, but it’s as if it’s dying, sometimes the relay even works, but doesn’t turn.
I decided to sign up for the service, I didn’t want to go to the expensive one, I had a problem with finances, but at the cheap, proven one there was a queue for the next two days, but my hands were itching, I had to do it faster))) Well, after reading the forums, I realized that the problem was with the Bendix.
I went to the existential shop, bought a Bendix Bosch (710 ₽), and at the same time consumables (filters and oil), I decided to change everything right away; I waited for the order for a couple of days and was on my way. I’ll say right away that with knowledge of the matter, the work will take a little time and in a day you will finish it calmly, but since I did it for the first time + there was a problem with bolts, it took me two days, well, a day and a half .
So, during the analysis I was guided by this corollafan.ru/obsluzhivan…arter-tojota-korolla.html BUT I did not remove the fan, I removed the engine crankcase protection, everything can be done from below.
Unfortunately there are not enough photos, but I will try to describe in more detail + the link describes it quite well.
First, remove the engine crankcase protection; remove the plastic cover on the fan from the top (it is on plugs); that's all, it's not necessary to remove anything else, of course it's not very easy to get to, but it's quite possible (for ease of removal, a ratchet with an extension and a cardan was assembled).
Next, we remove the starter itself, it is attached to two bolts (I think 14), but first we disconnect two terminals, one black, on a latch, the second I have is gray, with a lid, it is screwed with a nut to the starter).
It’s quite easy to get to the first bolt from above, you can see it, unscrew the second one from below (by the way, you can also see it from above, but it’s easier to get to it from below), it’s better to catch the starter, it may fall)) the starter itself has been removed, we can take it home to disassemble. We’ll equip the workplace , and we begin to disassemble the starter (don’t forget to buy new lubricant.
Litol or oil is recommended; I took a mixture of lithol with copper grease, because copper grease has greater heat resistance, well, maybe you could also use graphite instead of lithol).
We unscrew the two bolts connecting the starter, in theory there are no problems with them, they unscrewed easily; after this, the starter should fall apart into two parts (I had to help him do this a little); Now we disconnect the relay (it is secured with three bolts, with a Torx slot), this is where my problems started; the bolts really stuck, and I licked the slot once, for all three.
At this point I got very upset and went to bed. The next morning, full of hope and confidence in my abilities, I went to Google. Google said to drill out the bolts, my mind said no need, a friend from the forum said to take a small chisel and hammer a new slot under a flat-head screwdriver, I chose the second option. I took a hammer, a chisel and off I went (if the surface of the thing on which, God forbid, you will be hammering a new slot is important to you, then put some kind of board under it, because you may well leave a couple of pretty dents and watch the plastic terminal, you might break it by accident) . It’s better to stuff two people, one holds, the other hits. First fill the bolts with water, generously and several times at intervals of about ten minutes, so that it is saturated. Actually, I first knocked out a small rut with a chisel, and then hammered it in with a screwdriver; everything came loose.
After filling in the new splines
Next, we disconnect the relay, get to the bendix, there’s nothing complicated there. To remove the bendix itself you need to remove the retaining ring, to do this we put the head on 12 and hit it with a hammer a couple of times, then, if it doesn’t come off, we help with a screwdriver or something like that and remove it , don’t forget about the small bushing on the retaining ring, we’ll remove that too. Actually, next we remove the bendix itself.
Next, I decided to disassemble the brush assembly. We unscrew the two bolts (cross slot), remove the metal plate (by the way, for convenience, unscrew the small copper pigtail to disconnect the brush assembly) and remove the brushes (do not lose the washers and the small lock washer after removing the plate).
We take out the brushes very carefully, making sure that the springs and plastic housings of the brushes do not fly apart; Well, we take out the motor, it’s just magnetic inside. So, the starter is disassembled. We begin to clean it of old grease and sand all the terminals. We also clean the housing where the motor is and the motor itself, and brushes if necessary.
We apply new lubricant (we also lubricate the new bendix); THE BRUSH UNIT DOES NOT NEED TO BE LUBRICATE! Only where the washers are, where the metal plate is, the rest is not lubricated, we just clean it.
Now we assemble the starter. I started with the brush assembly.
Here it is almost impossible to keep track of all the brushes, because there are four of them and springs push them out (here I made a big and stupid mistake for the first time; since I had almost no idea about brushes, during assembly I actually did not understand that the graphite rectangles are brushes , and since during disassembly the brushes fell out of the housings, and I didn’t notice this, I didn’t put them in during assembly, as a result of which the starter didn’t work. In general, for suckers like me: graphite rectangles and there are brushes, they need to be put in into plastic cases, having previously inserted the springs, and they need to be inserted with their worn ends towards the center. Here, by the way, pay attention to the condition of the brushes, if they are very worn, then it’s time to replace them). You can use the advice from the link to tie the brushes with threads and then remove them, but there is a more interesting way: insert the brushes and hold them with your fingers (perhaps a friend will help you, it will be easier), now take a 22mm head and insert it between the brushes, bend them with screwdrivers one at a time brushes and put them on the head one by one, voila, the head holds the brushes;
Inserted the head
now we take the motor and carefully push it in place of the head, with some sleight of hand everything should work out))) now the brushes are on the motor, everything is fine; Now let's assemble the rest of the assembly, there shouldn't be any further problems with it, don't forget about the rubber bands and washers. We put the brushes aside and start installing the new bendix.
It was difficult for me to put it on; I had to knock it a little with a hammer (but not too much). Now we put on the bushing and clamp the sash ring (it needs to be put on the groove on which it sat). Squeezing it can be a challenge as it is quite tight. I used a small vice because it is a bit difficult to use pliers.
There is another small problem: the ring compresses easily with a vice, but when you loosen the vice, the ring unclenches again. All in all.
We squeeze the ring with a vice so that the break point is on top, we squeeze it harder, but don’t overdo it, and leave it for a while, then we knock with a hammer in the area where the ring breaks to press it, again, don’t overdo it, now we loosen the vice, the ring will still loosen, but this should be enough; Now the sleeve needs to be pulled onto the ring, using a key (possibly two), as written in the link, it should be easy to put on. Now we assemble the starter in the reverse order, there shouldn’t seem to be any problems. Make sure that the rubber bands do not fall off. Now, if possible, we check the starter for functionality, if not, go ahead and install it. The verification scheme is in the link.
When I installed the starter I made another mistake, don’t try to check it without screwing it into its proper place, because it won’t work, it takes another contact from the engine.
Here you can see what is connected to what
Actually, first we connect the terminals, and then we screw in the starter itself, or whatever is more convenient for you)) That seems to be all, everything should work)))
Price tag: 710 ₽ Mileage 109000 km
Source: https://www.drive2.com/l/9829715/
Starter overhaul and lubrication
For a long time I was concerned about a strange after-sound during the first, cold start of the engine. The sound did not always appear, and it was in those rare moments when I wanted to record it, as luck would have it, the car started normally. I read a lot, analyzed it, and I came to the conclusion that this is a jamb of the starter, namely the Bendix, and I was right. I immediately dismissed such rather strange assumptions from armchair experts, such as the sound of a supposedly sagging timing chain due to the lack of oil pressure in the hydraulic tensioner. Since the chain absolutely cannot sag because the hydraulic tensioner is fixed when the rod extends and the chain cannot weaken in any way. Well, okay, closer to our sheep. I took off the protection, looked at a piece of rusty and dirty unit, I was horrified, but my eyes are afraid, but my hands do.
It is necessary to unscrew two bolts, one is visible, the second is more difficult, it is on top, on the side of the box. While I unscrewed it, I tore all my hands, but it worked out, the patient is on the table.
I spilled all the nuts with a VD-shkoy, there was no other way. I disassembled it down to the screw, cleaned everything, and lubricated it with lithol.
The Bendix gear barely moved along the rod, but after the procedure it started working very vigorously.
Removing the Toyota Corolla starter
One fine day, when turning the ignition key, I heard the sound of a rotating starter, reminiscent of a grinding sound, but separately without the engine. The second time the car started up fine. Then this problem began to recur more and more often. Over time, I realized that the problem was in Bendix, so I drove all winter, and with the onset of summer I decided to tackle this problem.
On cars of this type, a Denso DSN946 or Toyota 28100-0N050 starter is installed.
Starter characteristics: Manufacturer: Denso; Model: DSN946; Starter power: 2kW; Voltage: 12V; Rotation direction: clockwise; Dimensions: 255x155x135 mm; Weight: 6,300 g;
Here are the original spare part numbers: CLUTCH SUB-ASSY, STARTER CENTER BEARING 28021-0N050 CLUTCH SUB-ASSY, STARTER CENTER BEARING 28021-33090 (people in the comments say it doesn’t fit)
Removing Denso DSN946 starter from Toyota Corolla 1.4TD
Oddly enough, in order to get to the starter, you need to remove half of the cooling system pipes.
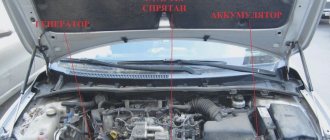
1. General view of the engine compartment
General view under the hood before removing the generator.
2. Remove the battery.
3. The photo shows part of the hidden starter.
4. Side view, the starter is located under the cooling system pipes, i.e. to get it out, you need to remove all the cooling pipes, first draining the antifreeze into a clean container and then pouring it back in. I drained 6 liters, I could have drained more, but this amount was enough to remove the pipes. There is also a wiring harness on top under the plastic; it can also be slightly loosened from the fastening to make it easier to remove the starter in the future. Conclusion: Everything that prevents you from removing the starter must be removed, disconnect the wire blocks, and remove the rubber tubes. This is not shown in the photographs. There is one long black metal tube; you don’t have to touch it; it doesn’t interfere. Only the rubber hose is disconnected from it. We do everything carefully, without rushing, remember each step, put marks, tie the holes with rags to prevent dirt from getting inside the cooling system. It took me half a day to remove the starter. Read on...
The starter is under the cooling pipes.
5. The tube to which, as I understand it, the thermal sensor is connected, must also be removed. After disconnecting the hoses from it, you need to unscrew the bolt of the bracket welded to this tube. There are also 2 more small hoses connected below, about 6 mm in diameter, we disconnect one of them from under the bottom of the machine, the second one, which goes to the side, does not interfere. The tube was found to be heavily corroded at the bottom, and when installing it back, I generously lubricated the surface with grease. Of course, in the future it is better to try to clean it and paint it or change it (I did not find the number in exist).
Metal tube of the cooling system.
6. Below in the photo is where the tube is attached, right next to the oil filter.
The mounting location of the tube is above the oil filter.
7. But the bolt, which is difficult to reach and unscrew, has to be done by touch.
A bolt that is difficult to get.
8. All cooling pipes have been removed, access to the starter is open but it is difficult to see.
The cooling system pipes have been removed.
9. General view of the engine compartment.
10. It is necessary to unscrew the power wire.
11. This photo shows the starter number as well as the connection of the traction relay, which is difficult to disconnect because it is not immediately clear what needs to be pressed. But as I understand it, you can first unscrew the starter bolts and then you will have free access to this connection.
Starter number and traction relay connection.
12. Connection of the traction relay, bottom view, the button that needs to be pressed is located at the bottom.
Bottom view of the traction relay connection.
13. Traction relay block, disconnected.
16. The second starter bolt is of a different type. The one to the left.
Source
Toyota repair
By the way, it is best to hit with a hammer on a fixed workbench so that the part does not jump off and is not deformed due to your carelessness. Next, we need to pick out the retaining ring and lift it up, and then remove the bushing itself and the bendix. Side view of the starter is located under the pipes of the cooling system, that is, to get it out you need to remove all the cooling pipes, first draining the antifreeze into a clean container and then pouring it back.
I drained 6 liters, I could have drained more, but this amount was enough to remove the pipes.
There is also a wiring harness on top under the plastic; it can also be slightly loosened from the fastening to make it easier to remove the starter in the future. Everything that prevents you from removing the starter must be removed, disconnect the wire blocks, and remove the rubber tubes.
Toyota Corolla starter: how to remove and replace bendix
- Does not rotate the crankshaft (no characteristic sound is heard).
- It spins, but the torque is not transmitted to the crankshaft.
- A strong grinding noise is heard when starting the engine.
- It spins, but very slowly.
- Does not stop working after the engine has started.
The photo below shows where the starter is located on a Toyota, using the example of a 2008 1.4-liter engine.
There will be no problems with access to it, and the part can be easily removed, but the first step in removing the starter is to remove the negative terminal from the battery.
There will be a rubber pad on the left side that should be pushed away with your finger. Behind the trim there will be a nut size 12. You need to crawl up with a wrench and unscrew it. For this operation, a slip-on type is best suited. After unscrewing the nut, you can remove the metal terminal that it fixed.
Below you will see an electrical connector that needs to be disconnected. It will be difficult to perform this operation by hand, because the connection is quite strong, so you can use a screwdriver to help you pry off the case.
Now you can disconnect the part of the device located on the right. To do this we need a 14mm socket and a ratchet. It is worth noting that unscrewing the bolt is very inconvenient due to the fact that it is quite long and there is little space for unscrewing. There will be a second bolt nearby, which we also unscrew, after which you can dismantle the device and take it for inspection.
For clarity, below is a video that shows how to remove the starter on a Toyota Corolla:
Many new car owners wonder where to find a device that starts the engine. The starter is located in the engine compartment. If you stand directly in front of the car and lift the hood, you can see it between the battery on the right and the generator on the left.
It is an elongated cylinder with wires connected to it. The starter spins the Toyota Corolla engine. The unit consists of:
- motor;
- gearbox;
- devices for coupling and disengaging with the shaft of the main engine of the vehicle;
- starting device. Since gasoline and diesel starters will not start without an additional switching device. Starting is done by the car owner using the key in the ignition switch.
At the first sign of a breakdown, you must contact the service center if the car owner cannot decide to find and fix the fault on his own.
How to remove
The photo below shows where the starter is located on a Toyota, using the example of a 2008 1.4-liter engine.
There will be no problems with access to it, and the part can be easily removed, but the first step in removing the starter is to remove the negative terminal from the battery.
There will be a rubber pad on the left side that should be pushed away with your finger. Behind the trim there will be a nut size 12. You need to crawl up with a wrench and unscrew it. For this operation, a slip-on type is best suited. After unscrewing the nut, you can remove the metal terminal that it fixed.
Removing the Toyota Corolla E120 starter
And we will need: Without these tools, removing the starter will be quite problematic. You need to know the location of the starter itself, and it will be located at the rear of the engine.
Therefore, this process is best carried out in an inspection hole, because it will be much more convenient. So, the initial stage of the process: First, you will need to unscrew the upper starter bolt, which is located to the right of the thermostat cover. The thermostat tube will be visible from the cover, so it will not be difficult for you to identify it. Unscrewing the top bolt is quite simple, but very inconvenient. To get to the top bolt, you need to remove the radiator tube and the air filter cover.
How is PU removed from a Corolla?
To begin, prepare the tools:
- wrench size 14;
- set of sockets with ratchet.
The starter on the Toyota Corolla is located at the rear of the internal combustion engine. Therefore, it is easier to carry out work from the inspection hole.
- Open the hood. Disconnect the battery - just in case, to avoid an accidental short circuit.
- Remove the plastic trim above the radiator, the radiator hose and remove the cooling fan. The latter is dismantled sequentially: first the mount is clamped, then the plastic clamps securing the cables are disconnected. Then the tube coming from the expansion tank is removed. The fasteners of the fan itself are pressed out simultaneously on both sides of the part. On some modifications of Toyota Corolla, it is enough to remove the fan shroud.
- Unscrew the top PU bolt with a wrench. The fastener is located to the right of the thermostat cover. The last one has a tube coming out and is easy to identify.
- Unscrew the lower starter bolt. You'll have to work hard here. In general, this work is carried out with special equipment, which is convenient for penetrating into the midst of all kinds of supports and mechanisms - the second fastener is hidden there. Disassembling this entire structure is quite problematic. You have to rely only on your thin and long arms.
- Next, unscrew the bolts and nut from the control cable. Remove the starting device.
The starter is placed on a level table for further work.
Types of faults
Poor contact of the positive battery cable
One of the most common problems. In order to find this malfunction, you need to remove the two terminals of this wire and instead make contact between the starter and the battery with ordinary copper wire. If the starter starts working through the wire, then the entire wire needs to be replaced.
bendix gear
The starter Bendix is a moving part of the mechanism. When power is applied to it, the bendix moves forward, engaging the motor with an asterisk. This is exactly what you should pay attention to. If its teeth are worn out or some are missing, then the essence of the problem is clear.
Solenoid relay
You can diagnose a defect in this element by comparing the voltage at the input and output terminals. If the voltage difference is more than 6 V, then the retractor winding will not be able to influence the core and drive the starter. This problem occurs due to burnt contacts on the relay. To quickly solve the problem for a short period of time, you should knock on the starter a little.
Safety system
To do this, you need to remove the fuse responsible for the starting device and replace it with a new one.
Important! The new fuse must be exactly the same rating as the old one. If the rating is less, the fuse link will immediately burn out, and if it is more, then in the event of a short circuit the fuse will not provide protection.
It is worth checking the voltage on all accessible sections of the electrical circuit between the battery and the starting device.
Possible problems and their causes
If you suspect that the part is not working correctly, it is better to immediately contact the salon. Of course, repairs and replacement of the starter can be done at home, but only if you are completely confident in your abilities. Most common inconveniences:
- The crankshaft does not rotate. The characteristic sound of rotation is not heard.
- When you start the engine, you hear a strong grinding noise.
- The starter spins without transmitting torque directly to the crankshaft.
- The starter turns too slowly.
- After starting the engine, the starter does not stop.
Let's look at the most common cases that can happen to every car owner. These are standard problems for Toyota Corolla and can be resolved in a few minutes.
Bendix gear malfunction
If there are problems with the Bendix gear, certain inconveniences may also arise. To make sure whether the part is causing the problem, remove the moving part of the mechanism and inspect it. If missing or worn teeth are found, the gear will have to be replaced. Let us remind you that the part moves forward only when power is applied.
Broken fuse
The safety system must be in perfect order. To check it, remove the fuse and inspect it. Replace if defective. Please note that the new part must be completely identical to the old one (including with an identical value). If you install a fuse with a lower rating, the part will simply burn out.
Don't forget to check how the voltage is distributed in the circuit and what voltage appears at the output and input terminals of the relay in relation to the ground of the part.
Incorrect connecting wire
The most common problem is poor contact on the positive wire. To diagnose the problem, disconnect the terminals and connect the battery to the starter using standard copper wire. If the problem disappears, it is enough to replace the connecting wire.
Solenoid relay failure
A defect in the solenoid relay is diagnosed as follows. Measure the voltage at the terminals. If the difference between the incoming and outgoing exceeds six watts, then the winding will not be able to influence the core, which means the starter drive will stop functioning. The problem may arise when the contacts burn out. By knocking on the starter, you can get rid of the inconvenience for a short time. Relevant if there is no time and money to replace the part.
Worn brushes
Sticking brushes can also cause errors. It's no secret that brushes come into contact with the moving part of the parts. That is why they are confirmed to be erased. If the brush spring fails, the part may simply stick and stop moving. Here again the standard method will help: lightly tap the body. If the problem is not solved, it is worth replacing all four brushes. Especially if traces of abrasion are visually visible on them.
In short, most problems can be solved on your own. If you still hear knocking or noises, it is best to replace the starter. This can be done either in the salon or independently by purchasing a used or similar part in advance. The interchangeability of starters allows you to quickly find a similar part in almost any auto shop.
Step by step recommendation
To accurately determine the location of the damage, you will need to remove the 1ZZ starter from the car. Next, we will consider in detail the procedure for dismantling the device and the process of replacing individual elements.
Dismantling the starter
Replacing the 1ZZ starter begins with disconnecting the negative terminal from the battery. In the future, you will need to follow the following sequence of actions:
- Initially, you will need to remove the radiator cooling casing. This is necessary to gain free access to the motor starting mechanism. To remove the casing, you will need to unscrew two bolts securing the radiator mounts and one bolt securing the air conditioner tube. Next, unscrew the two mounting bolts of the radiator fan casing;
- The power plug of the cooling fan is disconnected;
- Next, very carefully, dismantle the cooling fan casing so as not to directly damage the radiator;
- To gain access to the upper mounting bolt of the 1ZZ electric starter, you will need to remove the mounting strip;
- Now you need to disconnect the wiring. There are two wires connected to the electric starter. One is secured with a nut, and the second supplies power to the solenoid relay coil and is secured with a latch. The snap wire is inconvenient to remove while the starter is attached to the engine. Therefore, it can be disconnected after dismantling the part;
- All that remains is to unscrew the two mounting bolts and remove the device from the power unit.
We disassemble and change parts
To inspect or replace individual components of the 1ZZ-FE starter, you will need to disassemble the device. To do this, you should adhere to the following steps:
- The fasteners of the power cable and the protective cover are unscrewed, then the parts are removed;
- The solenoid relay is dismantled by unscrewing the two fastening nuts;
- To replace the bendix, you will need to remove the retaining ring. To do this, take a socket head of the required size and knock down the stopper bushing. A screwdriver is used to remove the retaining ring. All that remains is to replace the old 1ZZ bendix with a new one, lubricating the shaft, fork, gearbox, bushing and needle bearing of the cover;
We disassemble the starter
- If the brushes are worn, it is recommended to completely replace the brush assembly. It is secured with two screws. When installing a new brush assembly, keep in mind that the part is initially installed on the starter armature and only then secured with screws;
- It is imperative to clean the armature, paying special attention to the collector. During operation, it becomes clogged with graphite dust resulting from wear of the brushes. It gets clogged between the collector lamellas. It is recommended to clean the collector with a dry brush;
- The assembly procedure is performed in reverse order.
There are brush crumbs inside
Reasons for the starter not working correctly
Malfunctions in the normal operation of the electric starter can be caused by various problems, both in the mechanical and electrical parts. Including due to problems with the launch control equipment.
Electrical
Electrical problems may cause the crankshaft to spin slowly or not move at all. In this case, you will need to check:
- battery charge state;
- integrity of the wiring in the area from the battery to the starter and its contact part;
- state of contacts of mass wires;
- condition of the wires and connection points of the solenoid relay;
- functionality of the ignition switch.
When, when starting the engine, there is no reaction at all from the starter, and the solenoid relay does not tighten, the causes of breakdowns lie in a short circuit to the housing or a break in the solenoid relay coil.
If there are no obvious faults, you will need to disassemble the device. Most likely, one of the elements of the brush-collector apparatus has failed.
Mechanical
Problems with starter malfunction due to mechanical wear of individual components are also quite common. In this case, extraneous noise is observed when the device is operating, it rotates, but the engine does not start. Possible reasons include:
- wear of the flywheel ring gear or drive ring;
- damage or jumping off the axis of the trip lever;
- weakening of the freewheel buffer spring;
- the starter fixing bolts have come loose;
- wear on the rotor shaft journal or bearing bushing;
- The solenoid relay is stuck.
How to choose
It is worth noting that it will be much cheaper to repair an old one than to replace it with a new one. Since this mechanism consists of several parts, it is quite possible to repair the starter. You can easily purchase a solenoid relay, bendix, brushes, wires, etc. for the starter. But repairs are worth making if the breakdown occurred recently and has not yet had time to affect the remaining parts of the starter. If you don’t want to deal with repairs, you can simply purchase a new one, the prices of which vary greatly.
The original one will cost about 20,000 rubles, while the cost of analogues is 8–9 thousand. It is recommended to buy the original one because its reliability is 120 percent higher. The most reliable starters are produced by Bosh and Valeo. These companies supply starters for most cars from the factory.
If you still want to save money, but at the same time get good quality, then Lauber or Denso will do.
Rules for using the unit
To avoid overheating, you need to keep it running for about 10 seconds. If the engine does not start, lower the ignition key and wait 60 seconds for the unit to cool down.
Do not use the starter to start the vehicle moving. It is not designed for such loads. And in winter, the car must be parked indoors at night, where the temperature does not drop below minus five. Fill with the fuel specified in the vehicle's operating manual.
By following these rules, the driver will not have problems starting the Toyota Corolla vehicle.
Features of Toyota Corolla starter malfunctions
It often happens that Toyota Corolla does not want to start the engine. This may be due to reasons such as battery discharge, but most often the starter is to blame.
The main causes of the malfunction: the ignition key turns, but the engine does not start. This situation can be corrected by repairing or cleaning the starter.
Replacing the bendix on a VAZ starter or do-it-yourself repair
Replacing the bendix on the starter is a simple procedure. However, it also requires certain knowledge and skills. The replacement process takes about 1 hour and is no different on the VAZ-2110, 2109, VAZ-2114 and other front-wheel drive models of Togliatti cars width=»500″ height=»333″[/img]
- What is Bendix, and in what cases is it required to be replaced?
- Bendix replacement
- Performance evaluation
- VAZ 2114 with gearbox (video)
- Do-it-yourself Bendix repair (video)
What is it and why is it needed
A starter is a car mechanism that is designed to rotate the crankshaft of an internal combustion engine using electric current from the car's battery. In simple words, it is an electromechanical part that allows you to start a car engine.
At the dawn of the automotive era, in order to start a car engine, you had to manually crank the engine crankshaft at a certain frequency. Many still remember how on old Soviet cars, the driver inserted an unusual object resembling a poker into the front part of the car, namely into the bumper or under it. Then, with a sharp rotation of this handle, he started the engine of his “iron horse”. It’s good if he “grabbed it” the first time, but if not, then he had to pull this poker for a very long time, remembering all the relatives on his mother’s side who were the designers of his car. This poker was popularly called a “crooked starter” .
Over time, people got tired of “twitching” in front of the car to start it, and engineers came up with an electric version. Now the crankshaft rotated using the car's own electricity.
Recommendations
Comments 19
I have the same problem (I'm coping by tapping on the starter, apparently the brushes are sticking. I need to get rid of it, but it's boring)))
This is what I have to do, but I don’t know how to get in and unscrew the starter. I ordered the bridge itself with brushes, it’s already arrived, I’ll pick it up and decide whether to remove it myself or go to a service station.
Yes, it’s not difficult to unscrew, you can easily do it yourself. I am a person far from this, and I didn’t have normal tools, only open-end wrenches, although I needed a head, as far as I don’t remember, I got it from a friend. But you can change the brushes for a hundred, the work is about 500 rubles. But if they remove it themselves, then I don’t know how much. Probably at least 1000. You don't even need to disassemble a hole. The wheel was jacked up and unscrewed.
1500 rub. so they would remove it and change it
Hello. I have a problem after a cold start, the bendix does not come off immediately. Tsuka buzzes for about 5 seconds, it’s annoying! Can you describe in more detail the process of removing the starter? Did you reach from above or below? What needs to be removed or disassembled?
I can’t say for sure, it was a long time ago. Well, apart from the starter, there is nothing else that needs to be unscrewed. I jacked up the car a little so I could crawl under it. There the starter is held on by 2 bolts OR 3, I won’t say EXACTLY. You can see one on top under the hood, you can crawl through and unscrew the other down under the car. I couldn’t get the bolt off from below with an open-end or socket wrench; I unscrewed it with a 12mm head, it seems, with a cordan extension and a wrench, if you have enough strength, you can try to get under it with a socket wrench. Unscrew two bolts. And you take off two chips. One seems to be just on the latches, the other needs to be unscrewed with a nut. The starter itself is small, weighing about one and a half kilograms. And the problem may be due to the dimples on the retractor. He seems to be responsible for the Bendix release. Just take it apart, clean it, look, and report back later. It's not difficult to remove it there.