Hydromechanical transmissions use a special fluid that degrades during operation, becoming saturated with wear particles from friction clutches and gears. Changing the automatic transmission oil on a Camry 50 ensures normal operation of the unit and is considered routine maintenance. The owner can partially drain the used material; full maintenance is carried out under specialized service conditions.
Replacement frequency
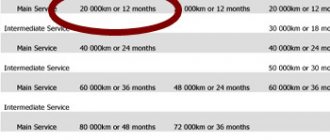
The manufacturer prescribes an inspection check of the oil in the gearbox crankcase every 2 years of operation or 40 thousand kilometers. The fluid should be replaced after 4 years (or 80 thousand kilometers) or if the technician detects cloudiness or metal shavings.
The manufacturer does not regulate the service life of the material. The condition of the oil is affected by operating conditions: in Russia it is recommended to drain the old fluid every 60 thousand km.
Signs indicating the need for early service:
- jerks or delays when switching steps up or down;
- detection of metal shavings on the probe;
- darkening of the liquid or appearance of a burnt odor.
How often does it need to be replaced?
In accordance with regulatory recommendations, mandatory oil control in the transmission system must occur at least once every two years.
The instructions for the Camry say that the oil level in the box is required to be checked at 40 and 80 thousand km.
Nothing has been written about any replacement. But this does not mean that there is no need to change the oil in the Camry automatic transmission.
Experienced technicians advise changing the lubricant in the box every 50 thousand if the replacement is partial, and every 70 - 80 thousand km if the oil is completely changed.
Also, fresh fluid is poured into the Camry gearbox if the old contents are very dirty and have a burning smell.
If you want to drive your Toyota Camry for a long time and without problems with the gearbox, then change the oil at least every 60 thousand km.
With constant aggressive (active) driving, and also if you often load the car to the maximum, it is recommended to check the lubricant level in the gearbox every 20 thousand miles.
A new oil filter element must be installed along with the oil.
Oil filter Camry 50
The chips formed as a result of friction clog the filter element, the pressure decreases. This is very dangerous because it can lead to overheating of the box even with updated transmission fluid. To get to the filter, you will have to perform manipulations to remove the Toyota Camry transmission pan.
Features of Toyota Camry 50
On Toyota Camry V50 cars with a 2.0 liter engine, assembled before restyling in 2014, a 4-speed automatic transmission was used, borrowed from the previous generation V 40. After modernization, the model code changed to V 55, and a 6-speed was installed box (similar to the unit used on 2.5 and 3.5 liter engines), which provided improved dynamic characteristics and reduced fuel consumption. All units are of the hydromechanical type and are maintained using the same methods.
When to change
How often and after what mileage is it better to pour?! At this stage it is possible to go in two ways:
- pour according to regulations. But, with frequent loads, be ready to repair the gearbox after 100,000 km, or even earlier. Of course, it is possible to sell the car before the first symptoms of future problems appear, but believe me, you will not lose if you change the oil more often, and over time the car will be sold at a higher price based on its technical condition, and as a result, both parties will get what they want;
- as has already become clear from the previous paragraph, it is better to change the oil in the Camry V50 gearbox more often, drive with a moderate frequency of loads and forget for a long time about the existence of potential problems in the Toyota transmission;
Selecting automatic transmission oil
The automatic transmission crankcase contains a special transmission fluid that provides cooling of parts and removes wear products from contacting surfaces. The material passes through a paper filter, which ensures the separation of fine impurities.
As the element becomes clogged, the throughput of the element decreases and the cleaning efficiency decreases, so the part is changed along with the fluid during maintenance.
Original manufacturer
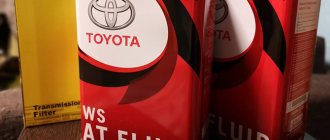
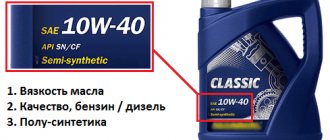
From the factory, the automatic transmission uses Toyota ATF Type WS fluid on a synthetic basis, which can withstand heating up to +130°C and does not solidify when the ambient temperature drops to -44°C. The material contains additives that reduce the wear rate of parts and ensure the removal of traces of corrosion. The oil is supplied packaged in tin cans of 4 and 1 liters (article numbers - 08886-02305 and 08886-80807, respectively), dealers purchase the material in 20-liter containers (manufacturer code - 08886-80803).
Transmission oil analogues
In addition to the original Toyota ATF Type WS material, you can use the following fluids:
- United ATF MV-66. It is characterized by increased kinematic viscosity at a temperature of +40°C. Loses fluidity when cooled to -46°C.
- Valvoline ATF. Crystallizes at -44°C and contains additional additives based on boron, phosphorus and zinc.
- Idemitsu ATF Type TLS-LV. Designed for ambient temperatures down to -57°C.
- Amsoil Signature Series Fuel-Efficient Synthetic ATF. Provides reduced gasoline consumption and does not freeze when cooled to -60°C.
Automatic transmission oil for Toyota Camry V50 2.0 U140F/U241E (4 gears)
The hydromechanical 4-speed automatic transmissions of the U140F and U241E modifications have a solid history. After all, these automatic transmissions, produced by the famous company Aisin Warner from 2000 to 2014, were installed on many Toyota cars, including the Toyota Camry V30 and V50. Specifically on the Camry 50, these machines work in tandem with a two-liter gasoline engine, and the transmission fluid for them is selected according to the Type WS specification. This is both the original Toyota Type WS oil and its substitutes Neste ATF Multi and Kroon Oil SP Matic 4036.
| Toyota Type WS | 4 liters Article: 08886-02305 Average price: 4000 rubles 1 liter Article: 08886-81210 Average price: 1300 rubles |
| Neste ATF Multi | 4 liters Article: 294045 Average price: 2400 rubles 1 liter Article: 216052 Average price: 600 rubles |
| Kroon Oil SP Matic 4036 | 1 liter Article: 32224 Average price: 950 rubles |
How to distinguish an original from a fake
The main signs of a fake:
- the barcode field and the factory label on the back wall of the container are painted white instead of gray;
- the weld seam has a gap between the sheets, on the original can the joint is smooth with an overlap;
- the letters on the front part are light in color; the original uses gray paint;
- the handle is welded with a distortion, genuine products have neat welding;
- the cork after opening does not ensure the tightness of the container;
- The color of the fake is less saturated, the original is painted in a bright pink hue.
Do-it-yourself automatic transmission oil change for Toyota Camry V50
Changing the oil will help the Toyota Camry automatic transmission last up to 250 tkm without repairs. A master will charge 12,000 - 18,000 rubles for working with materials, but the service is not always available nearby. In order to change the transmission lubricant yourself and not break the box, you need to understand the structure of the machine, purchase consumables and follow the instructions. Toyota Camry V50 series was equipped with Aisin U241, U660 and U760. Let's look at how to replace ATF with your own hands using the example of the most popular and modern 6-speed U660/U760.
Checking the oil level before changing
The algorithm for checking the fluid level depends on the number of gears:
- The 4-speed unit has a tube leading into the engine compartment. Inside the line there is a steel dipstick with a plastic handle; the working element has liquid level marks in the hot and cold state. To check, you need to remove the rod, wipe it with a clean cloth, and then insert it back until it stops and pull it out again. On a cooled box and with the engine turned off, the oil should be at the Cold mark; on a hot unit (with the engine running), the level rises to the Hot mark.
- In the 6-stage unit, the level meter is screwed into the drain hole. The check is carried out on a lift after the engine and transmission have warmed up to operating temperature. At a normal level, after unscrewing the drain plug, the liquid drips in separate drops (with the engine running). Do not test with the engine stopped, as some of the oil will leak out of the crankcase.
Oil change
Toyota states that the transmission oil is conditionally non-replaceable, i.e. filled for the entire “life” of the box. In practice, automatic transmission oil inevitably becomes contaminated with metal fragments formed during operation and loses its properties due to wear and tear over time. In Russian realities, it is advisable to change ATF every 30-40 thousand kilometers, although it is officially recommended to do this after 50 thousand.
You can verify the need for replacement by visually checking its condition. This is usually done using the automatic transmission dipstick (the location of the dipstick is indicated in the car manual).
To check, the car warms up (you can take a short trip or switch all the gearbox modes one by one), place it on an overpass or pit, after which the gearbox is switched to N, and the control hole plug is removed. A little oil should leak out from there, which determines the quality of the fluid: if nothing leaks out, the oil level in the box is low and requires topping up or replacing the whole thing. When checking with a dipstick (if there is one), you need to “drive” the transmission modes and check what level the transmission oil is at.
Next, the method of changing the oil in an automatic transmission of a Toyota Camry v50 will be discussed in detail.
Two types of shifts are possible:
- Full.
- Partial.
It is advisable to do the full one on a special device; the partial one can be done independently.
It is advisable to check the brand of gearbox oil in the car manual. So, for the U760E gearbox, Toyota ATF WS (original) oil is used:
Changing the oil in the automatic transmission of a Toyota Camry 50 version will require about 12-15 liters of fluid completely, and for a partial oil change - 6.5-8 is enough. It is advisable to use the original, or select the liquid that best suits the tolerances for the box.
It is also advisable to purchase:
- new box filter (article 35330-08010);
- pan gasket (article 35168-21020).
You can also change the drain plug gasket (90430-18008) and the box filter gasket (90301-32010).
Prepared set of parts for replacement (filter, gaskets):
Partial replacement
You will need new oil, a set of gaskets and a filter (see above), tools, and a graduated container for working out.
Algorithm of actions for changing the oil in a Toyota Camry automatic transmission:
- The vehicle is driven onto a lift, overpass or pit, the gearbox is switched to N, the engine is turned off;
- the crankcase protection, if present, is removed;
- the drain plug is unscrewed;
- The oil that has leaked from the box is collected in a prepared container.
Next, the fastenings of the box pallet are loosened:
The oil that flows out is also collected in a container. As a result, the pan needs to be removed and the remaining oil drained from it.
Box with pallet removed:
After this, you need to inspect the box filter; if necessary, it should also be replaced. During the process, some more oil will leak out, which needs to be collected in the same container.
The pan is washed from the remains of old oil and waste (chips, etc.). The gasket is inspected, if it is in good condition, it can be left; if the box pallet gasket is worn out, it is replaced.
Washed box pallet:
Further actions:
- a new filter is put in place, the box tray is also installed back. The drain hole is closed with a plug (you can change its gasket), but not screwed in - so that the oil can flow out through the bypass tube (this is necessary to control the level);
- new oil is added.
Since there is no dipstick, the filler neck is not under the hood, but in the area of the front left wheel, under the plastic body kit:
Fill the oil with a special syringe, hand pump, or other available devices.
After oil begins to flow from the bypass tube, stop filling, tighten all the bolts and plugs, “run” the transmission modes again to disperse the oil through the system, and make a control measurement, adding fluid to the box if necessary.
This completes the replacement.
What will you need for replacement?
A set of necessary parts and tools:
- working fluid (volume depends on the replacement method and type of gearbox);
- cardboard pan gasket (selected according to the automatic transmission model);
- new filter (design and part number depend on the modification of the unit);
- rubber ring of the filter element (supplied in the set or purchased separately);
- a sealing washer for the drain plug and a funnel with an extension tube (required in case of partial replacement);
- liquid for removing contaminants from pallet surfaces;
- clean rags;
- container for collecting spent solution (volume depends on the automatic transmission model);
- torque wrench with a set of interchangeable sockets for hex nuts and bolts.
2.6. Changing engine oil and filter
| GENERAL INFORMATION |
| EXECUTION ORDER |
| 1. Position the vehicle so that the drain plug is at its lowest point. |
| 2. Loosen the drain plug approximately half a turn, place a container for drained oil under the drain plug, then unscrew the plug completely. |
| 3. Allow the used motor oil to drain for a while. As the oil drains, gradually move the container towards the stream of oil. |
| 4. Clean the drain plug with a clean cloth. Remove the old O-ring from the plug and install a new one. Clean the location where the plug is installed on the pallet. Screw in the drain plug, tightening it to a torque of 25 Nm (for diesel engines 35 Nm). |
| 5. To replace the filter, place a container under the oil filter. |
| 6. Using a special oil filter wrench, unscrew the used filter. |
| 7. Clean the connection surface, lubricate the rubber gasket with fresh oil and screw in a new filter. |
| 8. Screw in the oil filter by hand until the rubber gasket touches the engine, then tighten the filter by hand 3/4 of a turn (according to the installation instructions included with the filter). |
| 9. Fill with fresh oil through the oil filler neck located in the cylinder head cover, maintaining the correct level. |
| 10. Start the engine and let it run for a few minutes, then check for leaks around the oil filter and the oil pan drain plug. Warning After starting the engine, the oil pressure warning light will remain on for some time until the pump pumps fresh oil into the line. |
| 11. Turn off the engine and wait a few minutes for the engine oil to drain into the pan, then re-measure the oil level and add oil if necessary. Warning If metal shavings are present in the used engine oil, this usually indicates wear on the crankshaft main or connecting rod bearings. |
| 12. The volume of engine oil corresponding to the difference between the “MAX” and “MIN” marks on the oil level indicator is approximately 0.5–1.0 liters. |
| Warning It is strictly forbidden to pour oil above the “MAX” mark. Overfilling the oil leads to failure of the crankshaft seals and catalyst. When changing oil, it is advisable to use motor oil of the same type and brand. It is advisable not to mix oils of different brands (when adding or replacing). When changing the type and brand of oil, it is necessary to flush the engine with a special product that is added to the oil before changing it. Oils of the same type and brand, but of different viscosity, can be mixed without restrictions. |
Engine oil volume, dm3
| Engine | With filter replacement | No filter replacement |
| OHC | 3,75 | 3,25 |
| DOHC | 4,5 | 4,0 |
| V6 2.9 | 4,5 | 4,25 |
| V6 2.4 | 4,5 | 3,8 |
| Diesel until September 1993 | 5,6 | 5,0 |
| Diesel after September 1993 | 6,6 | 6,0 |
Instructions for a complete oil change
To fully replace the fluid in the Toyota Camry V50 automatic transmission, a special pumping station is required, which pumps the material through the working channels, washing out the deposited dirt. To carry out the work, 15-16 liters of oil will be required, which is then partially recycled.
The technique is not recommended for cars with mileages of more than 120 thousand km, since the valves of the hydraulic unit may become clogged with foreign particles.
Draining old fluid
Algorithm for removing old material:
- Connect the pressure and drain hoses of the device to the transmission housing.
- Fill the supply tank with 13-14 liters of liquid, then start the engine and turn on the external pump.
- Wait for the solution to pump through, visually assessing the condition and color of the liquid at the exit from the crankcase.
- After using up the material, turn off the equipment and turn off the engine.
Clearing space
Sequencing:
- Remove the protection elements for the lower part of the engine housings and gearbox.
- Wipe the outer part of the pan from dirt with a dry cloth.
- Unscrew the mounting bolts and carefully separate the reservoir from the crankcase.
- Pour out the remaining liquid in the pan (1.5-2 l), and then rinse the part with clean gasoline or kerosene.
- Remove the remaining sealing gasket from the mating surfaces.
Replacing the oil filter
To install a new oil filter you must:
- Unscrew the mounting bolts and pull the housing out of the mounting socket.
- Place the rubber ring on the pipe of the new filter and push the unit in until it stops.
- Tighten the fastening bolts.
Filling with new transmission oil
To refill the oil you need:
- Place the gasket on the edge of the pan, and then screw the assembly to the automatic transmission housing with even tightening of the bolts.
- On vehicles with a 4-speed transmission, insert a funnel into the dipstick hole. If you use a 6-speed unit, you will need to remove the left wheel and wheel arch liner, and then unscrew the filler plug.
- Fill the oil, monitoring the level using the dipstick (on old automatic transmissions) or until a leak begins through the control tube (on 6-speed units, work is carried out with the engine running).
When is it time to change your engine oil?
The frequency of changing engine oil in a Toyota Camry should not exceed 7 thousand kilometers in domestic operating conditions, which have proven to be very difficult.
This is characterized by:
- climatic features;
- poor fuel quality;
- unprofessional service.
Therefore, the factory instructions recommend changing the oil after 14 thousand km. for the Russian market is adjusted by half - to the level of seven thousand.
If this recommendation is followed, the choice of oil manufacturer can be treated less carefully: fill in synthetic products from Mobil or Shell, which some ordinary people consider to be not inferior to the branded one from Toyota.
If you have to deal with a counterfeit version from two of these brands, then the reduced replacement interval can give you hope that the motor will not be damaged. If, nevertheless, operating conditions predispose to changing the oil at intervals of 10 to 15 thousand, then there is only one option - filling with the original product.
The process of changing the oil is not particularly difficult and provides the opportunity to do it yourself. If you perform this procedure for the first time, you may encounter some minor problems.
Partial oil change
Algorithm for partial oil change in a 4-speed automatic transmission:
Place the car in a garage block with an inspection hole or on a mechanical lift. The supporting surface must ensure a horizontal position of the body.- Remove the protective screens, and then carefully unscrew the drain bolt.
- Place the container and wait 5-10 minutes to drain the maximum volume of liquid.
- Screw the plug into place (with the old washer), and then one by one unscrew the bolts securing the pan to the box housing. Some of the fasteners are located under the elements of the front subframe. To access the heads, use an angled spanner.
- Remove the tray and wash the outer and inner surfaces and magnets with gasoline or organic solvent, and then wipe with a dry cloth or lint-free rags.
- Unscrew the 3 filter mounting bolts and remove the element using downward force. After removal, 100-150 ml of liquid will flow out of the hole.
- Place the rubber sealing ring on the new filter (it is not recommended to use the old washer), and then tighten the 3 mounting bolts.
- Wipe the mating surface of the pan with a dry cloth and install a new seal. There is no need to apply a layer of sealant.
- Carefully align the bottom cover with the automatic transmission housing, and then tighten 2-3 fastening bolts (apply a locking agent to the threads).
- Tighten the remaining bolts and tighten the threaded connections to a torque of 40 N/m. If excessive force is applied, the gasket is destroyed, leading to leakage of the working fluid.
- Remove the drain plug, install a new ring, and then tighten the threads.
- Remove the dipstick and insert the tip of the funnel into the hole.
- Fill with fresh oil (the required volume of fluid is determined by the amount of drained material).
- Check the level, which should be at the Cold level marked on the dipstick rod. If the amount of solution is not enough, then it is necessary to add liquid.
- After changing the oil, start the engine, and then sequentially move the shift lever through all positions, pausing in each position for 3-4 seconds.
- Stop the engine and check the level. If the mark is below the Cold mark, then you need to add fluid.
- Reinstall the removed protective screens and make a test drive over a distance of 20-25 km, allowing the automatic transmission to warm up to operating temperature.
- Check the fluid level with the engine running. It should rise to the Hot mark.
In the Aisin 6-speed gearbox, instead of a dipstick, a plastic tube screwed into the drain hole is used to check the level.
To remove liquid, the measuring element is unscrewed. The level is checked on a warm unit with the engine running. When you unscrew the drain plug, single drops should come out of the hole. If there is no leak, then you need to add fluid through the hole on the side of the crankcase.
How to change it yourself?
A Toyota Camry oil change is required approximately once every 10 thousand kilometers. These are the optimal times, during which a lot of dirt does not have time to accumulate, while the liquid accumulates enough to be used up. If you use a branded one, you can postpone the replacement for several thousand km; if it’s Lukoil, it’s better not to deviate too much.
If necessary, you can change the engine oil in your own garage. To do this, you need to be well prepared, have the necessary tools, filters and gaskets, as well as a container for waste fluid.
Changing the engine oil is carried out according to the following scheme:
- the car is placed over a pit or driven onto an overpass. The engine needs to be pre-warmed;
- After this, you need to remove the crankcase protection element, unscrew the drain plug, the oil will drain into a placed bucket. This will take about a quarter of an hour;
- then you need to replace the filter, tighten the drain plug and put it back;
- the new one is filled through the cap located on the engine, it is under the hood;
- check the fluid level, start the car, wait about a minute until the engine shows that it is working correctly, and turn it off again;
- At the very end we check the oil again. We do this after the engine has cooled down; if the level is insufficient, you need to top it up. If there is a lot of fluid, you can leave it as is, the car itself will squeeze out the excess.
How to identify original Toyota oil by the appearance of the packaging?
In the CIS countries, car owners are more concerned about the authenticity of Toyota oil. Because often a fake is passed off as an original.
We will briefly tell you how to distinguish original Toyota oil from counterfeit ones by external signs.
Plastic canister
To distinguish the original from a fake by the appearance of a plastic 5-liter canister, study the following.
- Lid. The real lid differs in color (the fake one is much lighter) and stamping, which is clearly visible in the photo.
- Plastic color. The original packaging is light gray glossy. The fake one is darker and doesn’t shimmer as much.
- Marking on the bottom. On a real canister, all the symbols are clear and easy to read. The non-original is blurry and blurry.
- Stickers on the canister. On the back side there is a multi-part sticker, the top layer peels off easily, you can easily read what is written inside. The top layer of a fake peels off poorly, can tear, and does not stick back well.
Metal containers
There is a stereotype that lubricant in metal containers is counterfeited less often due to the fact that a tin canister is more expensive to manufacture. Maybe this was once the case, but now you can buy fake oil in metal.
We list a few differences between the original in a tin container and the fake:
- Metal color and texture.
- Pen. In the original it is fastened neatly, in the fake it is noticeable negligence.
- Weld seam. For a real canister it is processed perfectly, but for a fake it is a completely different matter.