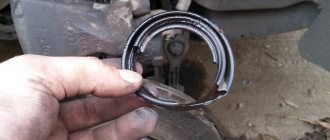
The brake pads on the Land Cruiser Prado must be replaced when they are worn out. It all depends on who operated the car and how. On average, the pads are enough for 40-50 thousand kilometers, but the main criterion will be their thickness. So for the apron and rear pads the minimum thickness is 1 mm. With a smaller thickness, there is already a danger that the driver will not monitor wear and tear and scuffing may appear on the brake disc from the metal base. In addition, the pistons of the brake mechanisms may jam when working in extreme positions. If it's time for you to change your brake pads, then our article will help you with this.
Maintenance regulations for Toyota Land Cruiser Prado 150
List of works and spare parts for maintenance recommended by the manufacturer:
List of works10 t.20 t.30 t.40 t.50 t.60 t.70 t.80 t.90 t.100 t.
| Valve clearance check | P | |||||||||
| Drive belts | P | P | P | P | P | |||||
| Engine oil, engine oil filter | Z | Z | Z | Z | Z | Z | Z | Z | Z | Z |
| Coolant for engine, power steering, window and headlight washers | P | P | P | P | P | P | P | P | P | P |
| Vehicle components and assemblies 1 | P | P | P | P | P | P | P | P | P | P |
| Radiator 2 | P | P | ||||||||
| Exhaust systems | P | P | P | P | P | |||||
| Battery 3 | P | P | P | P | P | P | P | P | P | P |
| Fuel filter | Z | Z | Z | Z | Z | |||||
| Fuel filter-sump | P | P | P | P | P | P | P | P | P | P |
| Air filter | Inspection is carried out every 5,000, replacement - every 30,000 | |||||||||
| Air flow meter purge | P | |||||||||
| Checking idle speed | P | P | P | P | P | |||||
| Checking exhaust smoke | P | P | ||||||||
| Fuel tank cover, fuel lines | P | P | P | |||||||
| Fuel vapor adsorber | P | P | ||||||||
| Brake system 4 | P | P | P | P | P | P | P | P | P | P |
| Parking brake | P | P | P | P | P | |||||
| Brake fluid | P | P | P | Z | P | P | P | Z | P | P |
| Steering 5 | P | P | P | P | P | P | P | P | P | P |
| Lubricating driveshafts and checking the tightening torque of driveshaft bolts | S/R | S/R | S/R | S/R | S/R | S/R | S/R | S/R | S/R | S/R |
| Drive shafts and drive shaft boots | P | P | P | P | P | P | P | P | P | P |
| Suspension joints, joint boots, wheel bearing play | P | P | P | P | P | P | P | P | P | P |
| Automatic transmission (AT) | P | P | ||||||||
| Checking the oil in the transfer case | P | P | ||||||||
| Checking and changing the front differential oil | P | Z | P | Z | P | |||||
| Checking and changing rear differential oil | P | Z | P | Z | P | |||||
| Tires | P | P | P | P | P | P | P | P | P | P |
| Exterior and interior lights, sound signals, windshield wipers and washers | P | P | P | P | P | P | P | P | P | P |
| Cabin filter | Z | Z | Z | Z | Z | Z | Z | Z | Z | Z |
| Air conditioning systems | P | P | P | P | P | |||||
1 - check for leaks and external damage 2 - check that the radiator is clean, clean if necessary, check the hose connections for correct placement, absence of corrosion, etc. 3 — check the charge, level and density of the electrolyte, the condition of the terminals 4 — check the brake pedal, the condition of the brake pads, discs, calipers, the travel of the parking brake lever, the absence of leaks, the condition of pipelines, hoses, connections, cylinders, cleaning and lubrication of the brake mechanisms 5 — checking for leaks, play, condition of boots, ease of rotation of the steering wheel
replacing brake discs on a Prado 150 yourself
Z - replacement P - check and replacement (adjustment, lubrication) as necessary P - check the tightening torque C - lubrication
Service interval: the odometer reading or the period specified in the vehicle's owner's manual, whichever comes first.
How to change it yourself
Let's look at the process of replacing the handbrake cable on a car with rear drum brakes using the Daewoo Matiz as an example.
- Remove the center console.
- Loosen the left and right cable loop locknuts.
- Remove the thrust bracket, and then remove the cable from the grooves of the bracket.
- Next, you need to remove the cable from the roller groove. For convenience, you can sacrifice the integrity of the floor carpet - cut it at the location of the roller mechanism. It is also advisable to unscrew the handbrake lever bracket from the body.
- The roller has a movable connection on a sleeve, which is fixed with a stopper. To release the cable, the stopper will need to be removed.
The peculiarity of the Daewoo Matiz parking brake is that the contours of the cable pass above the niche of the fuel tank. To access the brackets, it is enough to lower the tank by about 15-20 cm and move it slightly towards the rear of the car. When lowering this way, there is no need to disconnect the power supply connector for the fuel section elements or disconnect the hoses.
- Unscrew the fuel tank mounting bolts, first placing a stop under the tank.
- Unscrew the 4 handbrake cable brackets.
- Pull the cable out of the technological hole in the body, keeping the sealing plug intact.
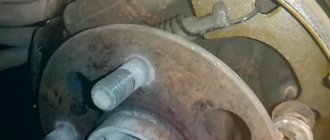
- Remove the rear wheels.
- Remove the boots and unscrew the hub nuts on both sides. After this, remove the drums, holding the wheel bearings with your thumb.
- Remove the handbrake cable from the brackets.
- Pull out the bracket securing the cable housing at the entrance to the brake shield.
- Release the cable ends from engagement with the brake shoe manual drive lever.
- Pull out the old parking brake cable.
Installing a new cable
- Guide the middle part of the cable into the car interior.
- Lay the handbrake cable along the bottom of the car, securely fixing it in the mounting brackets.
- Insert the cable into the brake shield and install a locking stopper in the special groove.
- Hook the end of the cable into the notch on the brake shoe manual drive lever.
- Install the sealing collar of the technological hole.
- Screw on the fuel tank.
- Install the brake drums.
- Fix the middle part of the parking brake cable in the groove of the roller and assemble the adjusting mechanism and parking brake lever in the reverse order of removal.
Using the adjusting nut, tighten the handbrake cable. Since we have examined the process of adjusting the hand brake mechanism and selecting the degree of cable tension in detail, we will not repeat it.
We recommend watching a video of replacing the handbrake cable on a Daewoo Matiz, VAZ 2110, Opel Astra F, as well as a Ford Focus, which is equipped with rear disc brakes. The videos will help you understand how to replace the handbrake cable on typical types of parking brake designs.
Maintenance “Toyota Land Cruiser Pravdo 150”
Maintenance of the Toyota Land Cruiser Prado 150 is an activity that is carried out on a regular basis. Their goal is to ensure the correct functioning of the components, mechanisms, assemblies and systems of a vehicle of this model, as well as to extend the period of their operation. Being the key to safe driving and allowing you to optimize the costs of servicing and repairing this car, they are relevant for any of its owners.
“Land Cruiser Prado 150” represents the latest, fourth generation of this family. Japanese engineers created it on a modernized 120-series platform, and its sales began in 2009. The model was created in order to solve problems of increased complexity, providing maximum comfort and safety of operation. In order to maintain it in proper condition, you need to ensure its proper care - and maintenance does this job well.
Maintenance of Prado 150 at Toyota Taganka
The Toyota Taganka service center invites you to undergo maintenance on your Toyota Land Cruiser Prado 150. We have been servicing and repairing this model for several years now. Our craftsmen have hundreds of its copies, the owners of which have become our regular customers. They know that by contacting us, they will receive the best of what is available on the capital's market.
READ Replacing Timing Belt Volkswagen Passat B3 Diesel
Our mechanics and diagnosticians have been certified by Toyota. They are well acquainted with the technical features of the model and know well which oils and technical fluids are best used for it, guided by the manufacturer’s recommendations.
The process uses dealer-grade equipment and tools, licensed software with all current updates, as well as original consumables and components. They are presented in variety in our warehouse, where they come from suppliers proven by many years of cooperation. We are confident in their original origin and provide them at prices below dealer prices.
Problems when paying with bank cards
Sometimes difficulties may arise when paying with Visa/MasterCard bank cards. The most common of them:
- There is a restriction on the card for paying for online purchases
- A plastic card is not intended for making payments online.
- The plastic card is not activated for making payments online.
- There are not enough funds on the plastic card.
In order to solve these problems, you need to call or write to the technical support of the bank where you are served. Bank specialists will help you resolve them and make payments.
That's basically it. The entire process of paying for a book in PDF format on car repair on our website takes 1-2 minutes.
Source
Toyota Prado 150 car maintenance calculator from Toyota Taganka
The price of maintenance is calculated individually, based on the following parameters:
- Mileage;
- Services that are needed;
- Price of consumables;
- Price of additional services.
You can pre-calculate the cost of maintenance for a Toyota Prado 150 using our online calculator. To do this, go to the appropriate section, select the “Prado 150” model, its mileage, the services you need - and get numbers that are as close as possible to the exact ones. You can also familiarize yourself with the tariffs in the price list in the “Maintenance” section.
Our
We provide a full range of services, which includes the following:
- Handbrake adjustment;
- Comprehensive maintenance;
- Replacement of technical fluids in the engine, automatic/manual transmission, components and mechanisms;
- Replacement of air, heating and cabin filters;
- Flushing the engine power system on the stand;
- Prevention of brake calipers;
- Throttle valve adaptation;
- Replacing front and rear wipers.
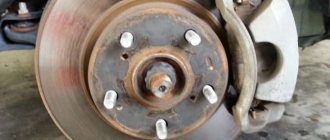
How to restore brake discs
There are no difficulties with repairing the front elements - they can be sharpened without removing them from the car (if it has front-wheel drive). Start the engine and use a special tool to process the working surface of the part. If you have special equipment, you can also sharpen the rear brake disc of a KIA-Sorento. The rear wheel is removed, then the car is raised on a jack. Next, the device is attached to the wheel bolt through a device and sets the disk to rotate. Using another device that is attached to the caliper, the groove itself is performed.
You can also perform this procedure on a lathe. But then you will have to remove the disk and take it to a turner. As a result, we get the most even and smooth surface. However, after installing the disc on the car, beats may occur.
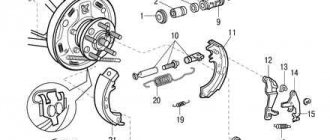
Features of adjustment on the Prado 120
The parking brake system is designed according to the general principle and is aimed at fixing a crossover with any engine in a stationary state, regardless of the stopping place (road, slopes). The tension is adjusted through the box between the seats and/or the hole in the drum disk (if the upper tension of the cable is not enough).
Therefore, when replacing brake discs and pads, adjustments must be made using the standard method.
The video “how to tighten the handbrake on a Prado 120” will clearly show the tensioning process
To adjust the handbrake on the Prado 120, you can not completely remove the glove box and disassemble the console. To gain access to the adjusting nut, you need to remove the panel with cup holders. They are attached using self-tapping screws (at the bottom). There is no need to pull the lever. This may prevent the console from being installed in place.
https://youtube.com/watch?v=oFL964Puvl8
How to diagnose
There are some standards of car behavior that may indicate whether the rear brake discs need to be replaced or not. You should pay special attention to these symptoms, because safety depends on them.
The first thing that will tell you about wear is if the rear brakes lock when you press the brake pedal. You can also recognize a brake disc failure by a characteristic grinding sound when you press the pedal. In addition, during braking, vibrations, jerking and other sounds may occur that were not previously present. You can also see the degree of wear visually - chips, cracks, and edges are visible on worn brake discs. It is quite possible to carry out diagnostics yourself using a measuring tool. For example, the rear brake discs (2nd generation Megane included) have a nominal thickness of 8 mm. As for the minimum indicator, the manufacturer states that it is 7 mm.
You can carry out diagnostics right in the garage, but you must first remove the wheels. Next, replacement, repair or a trip to the service station is carried out. If the rear brake disc has a defect such as uneven thickness, then a groove can be performed to restore it in this way. If surface destruction is observed, only replacement of the component in question will save.
When the parking brake needs to be adjusted
You need to check the operation of the handbrake on the Land Cruiser Prado regularly. Car experts recommend carrying out an inspection every 30,000 kilometers traveled or monthly. If problems with its operation are suspected, then inspection is required immediately.
A working handbrake is capable of:
- When stopping or on a slope, ensure that the vehicle remains stationary.
- Provide assistance during an emergency stop.
- Help to enter a controlled drift.
- If the foot brake fails, take over its functions.
The Land Cruiser 100 handbrake is adjusted after replacement:
Also, this work on Toyota Prado must be carried out after adjusting the position of the pads and in the event of a significant increase in the brake lever stroke.
Restore or change?
When it is possible to determine the degree of wear (or if you notice that the brake pedal jerks when braking), the car owner is faced with the following question: replace the damaged part or try to restore it? Many are trying to implement the second option. It must be remembered that the disc can be sharpened, but only if the residual thickness is four or more millimeters.
Service center specialists recommend changing the rear brake discs (Ford is no exception). However, if the prices for a new part seem too high, you can try to do the repair yourself.
It is important not to forget that the greater the layer of metal that is removed during the repair, the shorter the service life of the part being described. Also, experts do not recommend installing contract disks. In this case, you will not have accurate information about where they were installed, how they were operated, and the like. They may also have to be repaired soon.
Replacement of front brake pads and discs of Toyota Avensis
Replacing the front brake pads or brake discs on a Toyota Avensis won’t take much work, but if you want to do everything exclusively according to the manufacturer’s recommendations, then it’s worth taking the time to properly reassemble the brake caliper and change the pads.
To replace the pads and disc you will need:
- a set of keys for “12”, “14”, “17”;
- mounting tool or large pliers (to embed the brake caliper);
- flat screwdriver;
- metal brush;
- wedge and lubricant.
After looking through the photo report on replacing the front brake pads and discs on a Toyota Avensis T25, you can easily cope with such a task yourself, and not take the car to a service center (where, by the way, it is not a fact that you were able to replace the pads as per the instructions).
Rear pads
Rear pads on Avensis come in both disc and drum types.
Original catalog numbers of disc brake pads: 0446605010; 0446605020.
The parameters of these pads are shown in the table:
Technical dimensions of rear pads
| Height, mm | Thickness, mm | Width, mm |
| 46.1 | 16.3 | 102 |
- NiBK PN1239
- Kashiyama D2239M
- TRW GDB3337
The parking brake shoes (drum) are separate. The original catalog number is 0449505040.
Technical dimensions of the pads
| Diameter, mm | Width, mm |
| 172 | 32 |
Based on the relevant parameters, the use of brake friction linings from other manufacturers is allowed.
- NiBK FN0621
- Bosch 0986487679
- TRW GS8752
But if you replace brake pads on a Toyota Avensis T270 (3rd generation), then the selection situation will be more complicated. The dimensions of the front discs are the same as in the second Avensis, but the sizes and numbers of the pads will be different. The rear brake system is completely different from the previous generation (only disc), although this is from Bosch.
Components market overview
The Land Cruiser has disc brakes around the entire perimeter of the vehicle, which greatly simplifies the procedure for replacing pads.
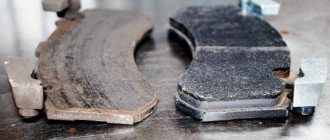
The average service life of stock pads on an SUV of this type is 50,000 km, after which the consumables must be replaced. When choosing a new set of brake pads, it is important to pay attention to the markings of the parts - the number and branding marks must match the values engraved on the old set.
| Manufacturer | vendor code | Structural arrangement | Wear indicator | Approximate cost, rub. |
| TEXTAR | 2194701 | Front axle | In stock | 1520 |
| TEXTAR | 2194703 | Rear axle | In stock | 1570 |
| TYG | GX 04465 | Front axle | Absent | 1980 |
| TYG | GX 04454 | Rear axle | Absent | 2030 |
| Novline | TRJ150 | Front axle | Absent | 2100 |
| Novline | GRJ151 | Rear axle | Absent | 2210 |
Note! It is necessary to change brake pads as a complete set on the entire axle of the car - that is, install a pair of new parts on each wheel.
This is necessary to ensure safe operation of the vehicle: uneven wear of the pads can cause overheating and further failure of the brake system or wheel locking.
What pads to install on Toyota Avensis
Front pads
Original pads are installed on the front wheels, regardless of the engine type. Although they may differ in article numbers, all numbers cross each other.
Instead of original ones, pads from other manufacturers are often used:
- NiBK PN1233
- Kashiyama D2233M
- Bosch 0986494054
Pads for Toyota Avensis 3
The pads for the third generation of cars are already installed depending on the size of the installed engine.
There are two types of brake pads with distinctive parameters indicated in the table. Regardless of the type of front pads, they all come in combination with discs with a diameter of 295 mm and a thickness of 26 mm.
For the first type of pads, the dimensions indicated in the table will correspond to their originals: 0446502280, 044650F010, 044650F011.
Technical dimensions of Avensis III (T270) front brake pads
| Height, mm | Thickness, mm | Width, mm | |
| TYPE 1 | TYPE 2 | ||
| 65.4 | 62.5 | 19 | 151 |
It is possible to replace original spare parts with pads of related brands:
- NiBK PN1837
- Bosch 0986495106
- Remsa 134112
The second type of original pads, the dimensions of which are indicated in the table, include: 0446505260, 0446505300
Technical dimensions of the pads
| Height, mm | Thickness, mm | Width, mm |
| 61.3 | 150.9 | 19 |
- ABE C12134ABE
- Asimco KD2533
- Asimco KD2537
Rear brake pads.
The original pads from Toyota for the rear wheels are as follows: 0446605040; 0446605041; 0446605042.
These pads come in combination with discs with a diameter of 290 mm and a thickness of 11 mm. On third-generation cars there are no drum brakes for the handbrake; their function is performed by rear pads, the technical dimensions of which are indicated in the table:
Rear pad sizes for Avensis T270
| Height, mm | Thickness, mm | Width, mm |
| 49.9 | 16.2 | 109 |
- NiBK PN1838
- Bosch 0986494403
- LYNXauto BD7599
Unscrew the caliper guide bolts to remove it. Upper.
We also unscrew and remove the bottom bolt ourselves.
Evaluate Niva wear on the inner and outer pads. and if you only need to replace the front brake pads on a Toyota Avensis, then the process is much shorter than if you also change the discs (you will not need to remove the bracket and the disc itself), but if you also change the brake disc, then we continue the work further and you need.
Unscrew the two bolts securing the caliper bracket
Then, if the dick is stuck to the hub, you will need to screw an M8 bolt into the hole to remove it.
Remove the Avensis front brake disc.
Next, we are preparing to reinstall the disc and pads. To do this, you first need to press in the brake caliper piston. You can unscrew the cap of the brake fluid barrel and push in the piston, or if you don’t have them in the garage, then simply install it (substituting old pads).
READ 014104 Error Opel Astra h
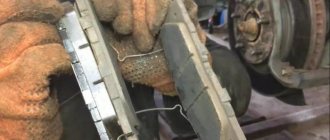
To change it properly, you need to thoroughly clean the bracket and pad seats from dirt and rust. Therefore, we take out the retaining springs and if new ones are included with the pads, then we change them, and if not, then we clean them, rinse them with brake pads and put them back.
Clean the pad guides with a metal brush.
We insert the pieces of iron (fixing plates) into place.
So, before installing the guide calipers, they need to be lubricated with a special lubricant so that they do not sour or jam (ensures uniform wear of the pads).
We install the guides in place and make sure that the anthers are not torn.
fill the rubber boot with a flat screwdriver and check how the guide moves.
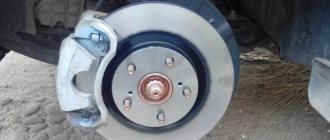
We degrease and clean the brake disc from any remaining transport lubricant.
We put the disk on the hub and reassemble it in the reverse order.
At the same time, lubricate the pad guides with copper grease
This is how the back side of the pad lubricates itself.
After the pads and discs on the Toyota Avensis have been replaced and everything has been assembled (don’t forget to screw on the brake barrel cap and check the fluid level in it), let the pads work. You need to press the brake pedal several times until the caliper piston brings the pads to the disc. For the first 100 km, extreme braking should be avoided.
Caliper repair
If the brake system seems to be in order, but malfunctions still occur in its operation, you need to pay attention to the caliper. In the best case, the repair will take no more than an hour, in the worst case, you will have to tinker with the Toyota Prado.
To completely remove the caliper, remove the wheel and unscrew an additional pair of bolts securing the part. The caliper is attached to the brake hose, and the spare part cannot be allowed to dangle on it, so you need to think about fixing it in advance: either hang it on a wire or support it with a stand.
Often the problem is with the guides. Clogged anthers are cleaned with “VD-40” and blown out with air or replaced. The guides themselves are treated with lubricant. This completes the resuscitation efforts.
If first aid does not help, you will have to act more decisively. Before the operation begins, the pads are taken out. Repair of the front caliper of Prado 120 or 150 occurs in the following order:
- Cleaning. The connection between the caliper and the hose is cleaned with “VD-40” or solvent. The hose is pinched and unscrewed. It is recommended to have a container on hand into which the brake fluid will flow. The hole in the caliper is either closed with a bolt, or the liquid is drained from the part.
- Parsing. After fixing the caliper, remove the piston from it and take out the cuff (o-ring). The parts and the places where they were located are cleaned of dirt.
- Collection. The cuff returns to the groove, and brake fluid is used as a lubricant. The piston is replaced if necessary. To install it in the caliper, it is lubricated and pressed halfway into the mechanism with your fingers. A boot is placed on top of the piston. Afterwards the structure is put back together.
- If after repair the pads cannot be returned to their place, they are tightened with pliers.
It is recommended to go through this part regularly - this way you will be able to detect problems before they become serious.
What are the best front brake discs on the Prado 150?
As I have already written several times, the car bounced quite a bit on the steering wheel when braking. Especially when it was necessary to reset from 120 km/h to 40 km/h. Since the car's suspension was normal, I guessed that the problem was in the brake disc, which was moving, but scientifically it warped.
Analysis of materials from the Internet showed that the problem is widespread. There are two religions - some change discs, others sharpen them, polish them, or otherwise harden them.
The problem with the fingers is that the rotating disc is closer to the pads in some places than in other places. When activated, the pads only move on the bumps, this causes intermittent braking - such as the abs effect.
By the way, there is an alternative hypothesis regarding the reasons for the brake disc drooping. It seems that brake fluid that has not been changed for a long time absorbs a lot of water, the water causes the calipers to rust, the pads begin to fit crookedly to the discs and this kills them.
The solution that came first was sanding. In Kazan, the first company that came across asked 2,200 rubles for a pair of discs. I thought it was normal, especially since the procedure does not involve removal and their machine is expensive and precise.
I drove it. The idea is all right. The management is a little harsh and stupid, but otherwise everything is ok. They say that big Toyotas often come. Initially, they change the disks, then they simply grind them. In Inetiki I was never able to hear any clear arguments against polishing other than “money down the drain.” Considering that disc changers claim that the problem does not go away and that those who polished often report normal flight a year after polishing the procedure, I think it is reasonable.
And one more moment. The technician who worked on my Prado said that my drive was damaged mainly by rust and the car being idle for a long time. That’s how it was before I bought the car. Perhaps this aspect will somehow help me in the fight against the scourge of disks - I’m not going to store the car in the garage.
Hello again everyone! Weekends are like weekends, but I have the track again. I noticed that the steering wheel was shaking when braking, I thought there was an imbalance on the summer tires due to inactivity over the winter, I went to a tire shop, they checked it and everything was fine. Wheels and tires are in perfect condition and without any complaints.
Well, guides, tell me what to do or any suggestions. Replacement with stock or tuning?
after much questioning and options, the choice was made. DBA DBA2736S BRAKE DISC DBA LC150PRADO/GX460 AC. SERIES T2 2 pcs price 53000 tenge or 16060r
I'm not a racer, not a car-driven tuner. But since such a booze has begun, I want to collect the opinions of respected owners of the Toyota Land Cruiser Prado 150 about the most budget option for upgrading the brake system, which is guaranteed to correct the problem with temperature changes in the geometry of the brake discs.
As I understand it, the original discs are driven precisely because of their small size. A small disk cannot quickly redistribute heat and sooner or later bend.
Here and there I see various options for upgrading disks. But all without article numbers and a clear sequence of operations. As a person who is far from tuning in general, I would just like to have instructions like:
1. You order a disc (part number such and such), calipers (part number such and such) and brake linings (part number such and such). The cost of the entire package for 2021 is such and such, the work will cost approximately that much.
I am interested in the most affordable option for upgrading the brake system, tested by real people and guaranteed to solve the problem.
I plan to summarize all the complete answers into a convenient text on the same page, so that it would be convenient for me and other car enthusiasts who encounter this problem to look for a simple and cheap solution.
Sources:
https://fb.ru/article/270735/zadniy-tormoznoy-disk-zamena-i-remont https://etlib.ru/report/914-zamena-perednih-tormoznyh-kolodok-i-diskov-tojota-avensis https://lubimauto.ru/perednie-tormoznye-diski-na-prado-150-kakie/