The 4th generation Toyota Rav has disc brakes installed around the entire perimeter of the car, which significantly increases the efficiency and reliability of the braking system.
However, it should be remembered that the average service life of the pads is 50-60,000 km, after which the parts must be replaced.
| Manufacturer | vendor code | Structural arrangement | Wear indicator | Approximate cost, rub. |
| MEYLE | 04466-33180 | Front axle | In stock | 1255 |
| MEYLE | 04466-33480 | Rear axle | In stock | 1250 |
| GLOBER | RA16002849 | Front axle | Absent | 1000 |
| GLOBER | RA2420975 | Rear axle | In stock | 1250 |
| ASHIKA | RA3725202 | Front axle | In stock | 1310 |
| ASHIKA | RA3725202 | Rear axle | In stock | 1350 |
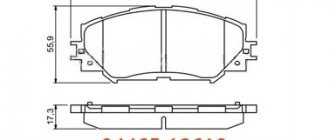
When selecting brake pads, it is recommended to pay attention to the original set, which provides the optimal level of braking, taking into account speed fluctuations and vehicle weight.
If you don’t want to install stock pads, you can purchase analogues from well-known brands, but the rule here is “the more expensive, the better quality” and you shouldn’t skimp on parts.
When to replace
The documentation for your car contains information when it is necessary to replace the brake pads in a Toyota Rav-4. But as mentioned earlier, this number is conditional, so you need to adjust it to your conditions. There are a number of signs that indicate your SUV's brake pads need to be replaced. These include:
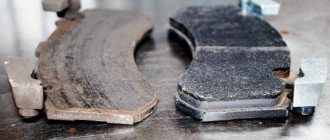
- The appearance of a distinct squeal when braking. This indicates complete wear of the friction linings. The squeak indicates that the metal part of the structure is directly interacting with the disk. Urgent replacement required.
- Changes in brake pedal travel. As the pad wears, the distance between it and the disc increases. This gap affects not only the pedal travel, but also the time required for the disc and pad to contact.
- An increase in the force required to press the brake pedal is also a consequence of the point described above.
- Beating in the brake pedal. Causes uneven pad wear or damage. Here you definitely need to replace the Toyota Rav 4 brake pads.
- A sharp increase in brake fluid consumption may be a sign of increased wear on the vehicle's pads.
Drivers are also recommended to carry out a visual inspection every 10 thousand kilometers. If you find metal shavings on the brake discs, this is a clear sign of complete wear.
The vehicle manual clearly states the minimum brake pad thickness. Measure the part, and then compare the obtained indicator with the required one.
The presence of chips, microcracks and any other damage on the block indicates the need for urgent replacement.
Which pads are better to put on the Rav-4?
The best option is to install the original product. The manufacturer offers high-quality products designed specifically for this make and model of car. These pads guarantee maximum service life and highest strength. This includes products from ADVICS and TEXTAR.
If the price tag is too steep, then it’s worth considering analogues. The market offers inexpensive and fairly high-quality brake pads from brands such as NiBK, Nisshinbo, and Kashiyama. Manufacturers offer a wide range, so you can choose the right product depending on your budget.
Pad replacement procedure
First, it should be noted that all pads must be replaced at once or in pairs. You can change only the front brake pads of the Rav-4, as well as the rear ones directly. It is prohibited to replace only one side. This will result in uneven braking forces on each side, as well as instability during braking.
To perform dismantling, you will need a nut wrench, new brake pads, and a jack. For maximum convenience (subject to availability), please use a lift. It is recommended to purchase caliper lubricant to treat the guides.
To change the pads on the front wheels, follow these steps:
- Place the jack on the required side, and then lift the wheel you plan to work on. Remove the wheel by unscrewing the five bolts.
- Next you need to remove the caliper. There are two bolts on the inside. Unscrew them using a 14mm spanner.
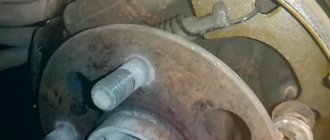
- After removing the caliper, you will see the brake pads on the disc. They can be simply detached by hand.
- Remove the metal bracket from the old part and then place it on the new block.
- Do the same with the pad installed on the other side of the disc.
- Next, you need to lubricate the caliper guides. Remove the guide bolts and apply lubricant. Check that the anthers are not damaged.
- Place the caliper in its place. If it does not fit on the pads, it is necessary to “sink” the piston by pressing it inward a short distance.
- Screw the mounting bolts into place.
- Replace the wheel. The nuts must be tightened in a staggered pattern to prevent wheel distortion.
Be sure to check the brake fluid level in the reservoir. If necessary, simply top it up. The procedure for replacing the pads for the rear wheels is no different. After this you can do a test drive.
Timely replacement of brake pads is the key to your safety. Check their condition regularly. As you can see, you do not need any specialized tools or special skills for dismantling. The replacement can be made in a garage in 10-20 minutes. You will not only gain invaluable experience, but also save a decent amount on car service costs.
Source: https://jrepair.ru/to-toyota/zamena-tormoznykh-kolodok-v-toyota-rav-4
How to install new pads on the rear of a Rav 4: step-by-step instructions
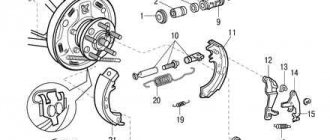
Replacing pads on the rear wheels has several features due to structural differences - the discs on the rear axle have large dimensions and braking efficiency. To install a new set of brake pads at home, you will need the set of tools described above, as well as a pair of working hands and up to an hour of free time. The entire scope of work is carried out as follows:
- First, we drive the car onto a level surface and place wheel chocks under the front wheels, preferably on both sides. Next, we stick the first gear on the box;
- Then, under the rear seats, you need to find an inspection hatch that will lead to the distribution cables coming from the parking brake. On the rear cables, it is necessary to loosen the tension as much as possible, which will ensure convenience in further repairs;
- Now we dismantle the wheels and pull out the brake caliper, having previously unscrewed the bolts securing the part. In order not to disconnect the brake pipes, the caliper can be tied to the rear bumper;
- Next, we dismantle the pads, having first disconnected from the front the hook that connects the brakes to the handbrake via a cable. After cleaning the parts, we clean the brake disc from traces of scale or corrosion, and also change the boots on the brake piston if necessary;
- Now we install a new set of pads. Pay attention to the surface of the disc - there should be no traces of grease or any liquids on the part. If it is difficult to install the pads, you need to pump out a little brake fluid from the reservoir under the hood and push the brake piston to the side until it stops with a wrench or screwdriver;
- Then we assemble the brake mechanism and repeat the procedure with the second Toyota wheel. When completing repair work, it is necessary to bleed the brakes and, if necessary, add brake fluid to the mark on the tank reservoir, and also tighten the handbrake cables.
After replacing the brake pads on the car, it is recommended to undergo a short break-in - during the first 100 km, do not allow emergency or prolonged braking.
During the first hundred kilometers, the friction layer of the pads rubs against the surface of the brake disc, which can cause overheating or wheel locking due to uneven fit of the linings.
Weaknesses and disadvantages of Toyota Rav 4 of all generations
This car has remained very popular for several decades on the market for good reason. More than half of the owners of this crossover do not complain about their car, although the Toyota Rav 4 still has shortcomings.
They are not so critical and appear much less frequently than in cars of a similar class and price range, however, they exist. Below we consider the sores of Rav 4 in several generations.
Weaknesses of Toyota Rav 4 II generation
The second generation was released in 2000, captivating with its appearance and upsetting car owners with its exterior. Cheap plastic in the interior, three switches on the console, coupled with rattling panels disappointed many fans of this crossover.
Owners of an SUV differ from drivers of sedans in that they can afford to go outdoors, however, with a small trunk this is hardly possible. Manufacturers of the second generation Rav 4 did not take this fact into account, and this is a significant drawback.
The main "sore" of the II generation Rafchik is its suspension, namely the steering rack. It becomes unusable very quickly, after about 50 thousand km, as evidenced by knocking on the steering wheel during sharp turns.
The Achilles heel of the second Rav 4 for Russia was the direct fuel injection system, which implies the use of only high-quality gasoline. It simply cannot “digest” other fuel, namely the 3S-FSE(D-4) engine. Fuel is injected directly into the cylinders, rather than into the intake manifold as on the standard system.
Toyota RAV 4 (4th generation) replacement of front brake pads. Video instruction
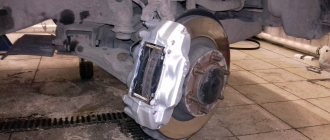
We are repairing a Toyota RAV4, 4th generation, 2015, on which the front brake pads need to be replaced. We'll show you how you can do it yourself.
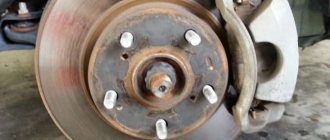
Raise the car and remove the wheels. Unscrew the upper and lower guide bolts:
You can, of course, unscrew only the bottom one and lift the bracket up, but we always check the operation of the guides without fail.
And not in vain, in our case they were running with a little tension, they need to be removed, cleaned and re-lubricated.
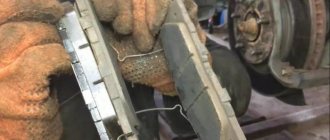
We take out the guides, clean them and apply a special grease for calipers, to the grooves (there are 3 in total) and a little from above, insert them back into the boot:
We check the boot for holes.
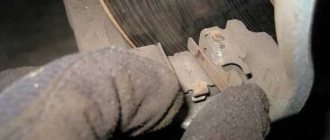
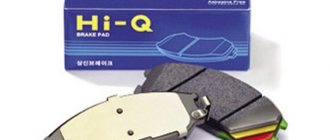
We have new front brake pads from SANSING, their number in the spare parts catalog is SP-2138. We remove the outer and inner radiators and squeaks from the old pads. If necessary, clean the seat with a metal brush and install the pads.
Use a clamp to compress the brake cylinder:
It often happens that when the pads wear down to zero, the boot on the piston may become slightly skewed, so pay attention to this and correct it with your hands so that it fits into place in shape.
If this is not noticed, the boot may tear on the block during installation. We put the piston in place and tighten both bolts. Replacement is complete.
Before driving, press the brake pedal several times.
Video of replacing front brake pads in Toyota RAV 4 (4th generation):
Backup video on how to replace the front brake pads in a Toyota Rav 4:
Read times: 1,060; Today: 1
Source: https://remontautohelp.ru/toyota-rav-4-4-pokolenie-zamena-perednikh-tormoznykh-kolodok-video-instrukciya/
How often are brake discs replaced?
Car manufacturers do not regulate at what mileage to change brake discs. The intensity of their wear is largely related to the conditions of use and driving style of the car. An aggressive driving style in city traffic, with frequent and sudden stops, leads, among other things, to accelerated wear of the rubbing parts of the braking system.
It is recommended to monitor the condition of brake discs and pads at every opportunity: during scheduled maintenance, during seasonal tire changes or suspension repairs. If there is the slightest doubt about the normal operation of the brakes, it is necessary to carry out unscheduled diagnostics.
It is mandatory to check the brake system elements as part of the regular maintenance schedule for each dealer vehicle. In this case, the thickness of the discs and the residual height of the friction linings of the pads are measured. If the values are close to the minimum and the remaining life of the part may be enough until the next maintenance, it must be replaced.
The interval at which to change brake discs on each individual car depends on a number of conditions: its type, operating conditions, driving style and maintenance features.
In most cases, the front brake discs of a passenger car may not require replacement up to 100,000 km or more, taking into account normal urban operating conditions.
On heavy SUVs, the service life of front discs is approximately 60-80 thousand kilometers . Rear brake discs can take many times longer to wear out without replacement.
Factors that shorten the replacement interval of disks
- In addition to natural wear and tear during operation, the following factors influence the reduction of brake disc replacement intervals:
- — use of non-original brake discs and pads of low quality;
- — overheating of the disks followed by sudden cooling, which will lead to deformation or warping of the working surface and the need for grooving;
- — grooving of discs in order to eliminate beads or runout during braking;
— features of the material of manufacture. The quality of the metal from which the disk is made directly affects its performance and service life.
Car manufacturers directly indicate that when replacing, only original brake discs or recommended replacements are used. These spare parts are manufactured taking into account the characteristics of the brake system of a particular car model. The same applies to pads, since the composition of cheap friction linings often does not meet the quality or application requirements for a particular vehicle.
Low quality pads lead to accelerated wear of disc surfaces and negatively affect braking performance. The operation of the brakes is often accompanied by a squeaking or grinding noise, causing severe discomfort.
Vibrations during braking caused by deformation of the disc surface are a fairly common complaint from car owners. The reason is warping in the form of microscopic waves on a perfectly flat working surface of the part. This is caused by exceeding the normal operating temperature and sudden cooling. For example, prolonged and intense braking followed by driving through a puddle.
A method for correcting a malfunction that significantly impairs the car's handling and brake performance is grooving. As a result, all irregularities are removed from the surface of the disk, but at the expense of reducing its thickness. If the residual thickness is close to the permissible minimum, such a disk must be replaced. These parts should be replaced in pairs to evenly distribute the load on the brake mechanisms.
When the working surface of the disc is abraded, collars remain on its edges, where there is no contact with the friction material of the pad. It is usually recommended to eliminate them by grooving , since they can come into contact with the lining during braking and cause a squeak. In some cases, grooving is performed along with replacing the pads.
Increased wear of brake discs may be due to the characteristics of the material used to make them.
The softer metal used in production leads to accelerated abrasion of their surfaces under normal vehicle operating conditions. The service life of even the original disk is approximately 40-50 thousand kilometers.
However, the manufacturer defines this service life as normal for a part classified as consumables.
Source avtoexep.ru
Features of updating the brake system Brake discs in Toyota cars play an extremely important role. The safety of driving a car depends on them. During operation, the working surface of these elements gradually deforms, which leads to an increase in the likelihood of an emergency situation occurring on the road. Therefore, to ensure adequate operation of the brake system of a Toyota car
it is necessary to constantly monitor the condition of its elements.
When is it necessary to replace Toyota brake discs?
The following signs may indicate the need to restore the performance of Toyota disks:
:
- increase in braking distance;
- the brake pedal is too “soft” and its vibration is strong when pressed;
- significant movement of the car to the side during braking;
- the occurrence of whistling and squealing;
- rapid consumption of brake fluid.
The decision on the need to carry out work to replace brake discs on a Toyota
can be accepted only after a comprehensive and thorough diagnosis.
This technical operation will be required if during diagnostics the following is discovered
:
- mechanical damage;
- significant wear;
- deformation due to overheating;
- corrosion;
- the brake system will need to be improved.
How often should brake discs be changed on Toyota cars?
The time interval after which it is necessary to repair and change elements of the brake system is in a wide range. On average, these technical procedures should be carried out at a service station every 60-70 thousand kilometers.
. The exact time will depend on the intensity of exposure to the following main factors:
- the climate in which the machine is operated;
- road surface condition;
- driving style of the car owner. In the case of extreme driving (frequent long-term braking), the system parts will wear out much faster;
- quality of brake system elements.
In addition, the wear and tear of parts is significantly negatively affected by anti-icing agents used by road utilities on roads in winter.
Installation of brake pads on the front axle of Toyota Rav 4: everything you need to know
Installing consumables on the brake mechanism for Toyota is not difficult and can be easily done with one pair of working hands, even at home.
To replace the pads, you will need a minimum set of tools, namely: a set of wrenches and sockets, a Torx car wrench, a slotted screwdriver, WD-40 fluid or equivalent, as well as a jack or access to a lift.
The brake system maintenance procedure itself is carried out according to the following scenario:
- First, we prepare the car for servicing - we drive the car onto a level area, place wheel chocks under the rear wheels, and also engage the parking brake and reverse gear on the box;
- Next, use a wheel wrench to unscrew the nuts on the wheel and remove it, after jacking up the front of the Toyota;
- Then you need to unscrew the central bolts securing the brake caliper, after which we remove the part from the brake mechanism and hang it from the front bumper with soft wire. This is required in order not to damage the brake hose and to carry out replacement without the need to remove the pipes;
- Move the guides to the side and remove the fingers. Now the pads can be dismantled, and the brake mechanism can be prepared for servicing - it is recommended to lubricate the fingers, clean the surface of the discs from scale and traces of corrosion, and also replace damaged boots on the brake caliper or guides;
- We install a new set of pads by first squeezing the brake piston with a wrench. If difficulties arise when squeezing, you should pump out some brake fluid from the expansion tank under the hood and repeat the procedure;
- After replacing the pads, we assemble the brake mechanism and put the wheel in place, then we repeat similar procedures with the other side of the car.
Something to remember! You should not save on replacing brake system consumables or use worn-out parts beyond their expiration date.
It is necessary to change the pads in a timely manner and in a complete set - that is, a pair for each wheel, otherwise there is a possibility of uneven grip of the wheels, which will lead to the car skidding or flying off the road.