To replace, we will need: a cylinder head, a jack, a flat-head screwdriver, a socket wrench, pliers (preferably 2 pcs.) and a bolt.
First, you need to place the car on a flat surface so that it cannot roll away without assistance. Do not use the handbrake, only “park”.
Place stops, for example stones, under the front and rear wheels of the front wheel (on the side opposite to the one where we are replacing the pads, that is, if we change the pads on the right side, then put the stops on the left, and then change them)
We disassemble the wheel and remove the old pads
After preparing the car for replacing the pads, loosen the nuts on the wheel.
Raise the car on a jack . To prevent the car from standing only on a jack during replacement (after all, this is not a very stable support), I advise you to place bricks under the car.
There are protruding ribs running under the bottom (something like stiffening ribs), so I put bricks under them.
Then I lower the car so that it rests on the bricks (but I don’t remove the jack completely, it will serve as additional support) and now you don’t have to worry about the car falling.
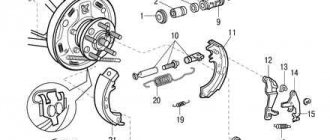
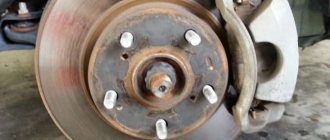
Unscrew the nuts completely and remove the wheel. Now you need to remove the drum. This is why we need a bolt. It must have an M8 thread
Screw the bolt into any of the two holes on the drum. To twist it, we need a socket wrench. I had it at 12, but it depends on what kind of bolt you have.
We screw it in until the drum noticeably moves away from the support disk (the round cup that is located behind the drum and to which all the drum brake mechanisms are attached).
Now we unscrew the bolt (otherwise the drum will not be removed due to skew), if the drum cannot be removed, then screw the bolt into the second hole. After removing the drum, the bolt (if it is still screwed in) can be unscrewed immediately; here we will no longer need it.
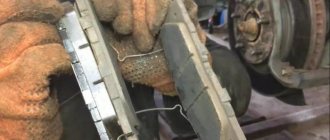
Now you need to remove the spacer spring. This is easier to do in the place where the spring sticks out. For the right side it is on the left (if you look at the brake mechanism), for the left side it is on the right (again, if you look at the brake mechanism). I removed the right pads.
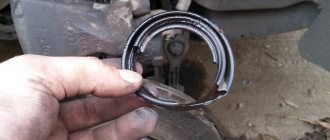
In order to unhook the spring, we clamp it with pliers, as in the figure. Then we stretch the spring (using pliers, of course) in the direction shown by the arrow. When the spring comes out of engagement with the block (as in the figure), pull it towards you, but do not let it compress again until we pull it out of the hole.
Then we return the spring to a compressed state, without releasing it from the pliers (if you throw it, it will shoot out and can damage the piston boot). On the second side it will come off easily, because it will already dangle freely.
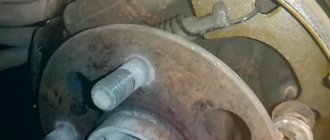
Now remove the pad clamps. You can remove the lock washer by hand. To begin, press with your finger (on the back of the support disk) the rod on which the spring and the lock washer are held. You can see a slot on the washer (red rectangle in the photo above).
You need to hold the rod and turn the washer 90 degrees so that the protrusions of the rod fall into the slot of the washer. If everything is done correctly, the washer and spring can be easily removed. We put them aside (we don’t throw them on the ground, because they can simply be trampled, and this is a very important detail).
Here is the rod itself. Here is the spring and washer. We remove the lock from the second block in the same way. That's it, the pads can be removed. They are connected from below by such a spring
It doesn’t interfere at all with removing the pads, but it can easily get lost, so we put it aside towards the latches.
Now one of the pads no longer holds on to anything. Let's see if the new pad has such a spring and such an expansion plate. This spring and plate together with a gear wheel on a spacer sleeve. This wheel forms a mechanism for distributing the pads.
If there is none of this (and when I bought the pads, I didn’t have any of this on them), then everything needs to be rearranged. There is nothing complicated here. Unhook the spring from the plate and pins, and remove the plate from the trunnion (the rod on which it sits).
We put everything on the new block in the same way. All pads are different, the pads for the right side are different from the pads for the left, so before installing the plate you need to make sure that this is really the right pad.
Now the second block. It is still attached to the handbrake cable. In order to unhook it from the cable, you need to hold the block in one hand and compress the spring with the other in the direction of the red arrow.
When the spring is sufficiently compressed, turn the lever in the direction of the green arrow and remove the cable. Here is the actual cable without the block. And here is the block.
The lever must also be moved to the new block (if it does not have one). we turn the block over, and we see something like a washer there, with the help of which the lever pin is fixed
Unscrew it with a screwdriver and remove it. We move the lever to the new block and install the washer. To prevent it from falling out, we clamp it with pliers.
How to change the rear brake discs of a Toyota Corolla
Toyota cars have long been considered the undisputed leaders in sales in the markets. Directly, the Toyota Corolla is even listed in the Guinness Book of Records as the best-selling car in the world. Toyota Corolla, despite the huge competition, has practically no analogues. Few cars can boast the same excellent ratio of price, quality, wear resistance of parts and, most importantly, safety.
But, unfortunately, even such cars require maintenance and repair, especially if your car has already crossed the line of 10 years of operation. What you should especially pay attention to are the brakes. And we're not just talking about Toyota cars. Good brakes mean excellent safety, or a saved pedestrian. This article will focus on a more in-depth inspection of brake discs and pads.
Basic information about the brake system of Toyota Corolla
Corollas are equipped with a dual-circuit hydraulic system, divided between the front and rear wheels. The master cylinder has two containers that supply both circuits with liquid. If one fails, the second will still work. Basically, these cars are always equipped with ventilated disc brakes at the front, and drum-disc brakes at the rear. Each of these types of brakes adjusts automatically, regardless of pad wear.
When to change brake discs and pads
Without special knowledge, you can determine that the brake system is living its last days. The main signs of unstable brake operation:
- Periodic wheel runout when turning and driving on uneven surfaces
- Changing the vehicle's trajectory when braking
- Extraneous knocking or grinding noise when pressing the brake pedal
It is recommended to change both the disc and pads at once in order to increase their service life and improve the safety of the car. Despite this, it is still necessary to periodically inspect the brake system for preventive purposes.
Based on statistics from Toyota service centers, on average, front brake discs are replaced at a mileage of 100-130 thousand km. The rear ones are more resistant to stress.
In general, the principle of replacing brakes is almost the same for all cars, only the design feature of the brakes differs. Let's move on directly to the process of replacing the brake system:
- Remove fluid from the brake master cylinder reservoir.
- Jack up the car on the desired side and remove the wheel. Turn the steering wheel to the side as far as it will go.
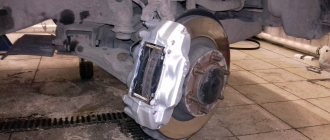
- Unscrew the lower caliper bolt, disconnect it and hook it with a wire so that it is raised.
- Remove the pads, after which you can unscrew the upper caliper bolt and disconnect it from the bracket.
- Turn the steering wheel to the side where the replacement process is taking place, and unscrew the two bolts of the caliper bracket, then remove it.
- Screw two M8 bolts into the special holes for dismantling until the disk is removed.
- Install the new disc and caliper bracket.
- Lubricate the guide bolt.
- Press in the piston of the brake cylinder and install the caliper.
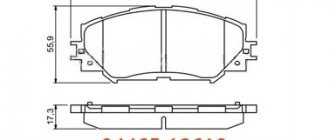
Many drivers, in order to save a little money, do not replace their brake pads with new ones. This is an extremely unreasonable act, because old worn-out pads have a surface that does not correspond to the new disc. It is not difficult to imagine what will happen to the brake disc itself. It will also have uneven output and after a certain time you will experience a creaking or whistling noise when braking due to a small amount of play.
Features of replacing rear brake discs
This procedure is identical to replacing the front brakes, with the exception of some nuances:
- Release the handbrake
- Before removing the old disc, tighten the handbrake pads with a screwdriver
- After replacing the pads, first spread them until there is no rotation, and then close them a little until they rotate freely.
After the procedure for replacing brake discs and pads, it is necessary to fill in new fluid and bleed the hydraulic system. The most important conclusion: brakes should be given special attention and always kept in good condition. It doesn’t matter how fast a car goes, it is important that this car stops efficiently and quickly.
Source: https://lubimauto.ru/kak-menjat-zadnie-tormoznye-diski-tojota-korolla/
We install new pads and put everything back together
Now we put the new pads in place. First, we hook up the handbrake cable. It hooks on the same principle as unhooks. But the spring should not fall into the gap, otherwise further installation will be difficult.
We install this block in place. The locking rod must fit into the hole opposite which this notch on the block is located.
You can’t just hook the washer with your fingers, so we clamp it with pliers. Holding the rod from the reverse side (as when removing it), we put a spring on it, then put on the washer (here you will have to apply some force) and turn it (only it, the rod must remain motionless) 90 degrees so that the rod is fixed in the recess on the washer.
Now we hook a spring from below, we hook a second block to it and install the spring.
The spring should be behind the limiter; if it is in front of it, the pads will simply jam. We fix the second block in the same way as the first.
Now install the spacer sleeve. First you need to twist it to the minimum length. The thread here is reversed, so to twist it, you need to twist it counterclockwise rather than clockwise. The bushing is installed in a strictly defined manner.
When installing, the green mark should rest against the lever in the dream marked with a green circle, the red mark with a red circle, the blue mark with a blue one, and the protrusion marked with purple should be behind the block.
Now we engage the bushing spring from the side of the red mark. We check that the pads fit into the slots on the pistons (green ovals). Now we hook the spring from the second side.
We rest our thumb against the block (as in the photo), clamp the spring with pliers (in the same place as when removing it) and begin to stretch it until it is in front of the hole (circled in red). We hook the spring to the block and the main part of the installation is completed.
Now you need to separate the pads. We clamp the protrusion of the expansion plate with pliers and lower it down. This plate rests against the gear on the bushing and prevents it from spinning.
We rotate the hub so that the notch on it is opposite the gear.
Using pliers (as in the photo), or using a flat-head screwdriver, we turn the gear (remember that the thread on it is reversed) until the pads are separated a sufficient distance.
It will become sufficient when the drum is placed tightly on the pads. You must remember to put the plate back in place. It shouldn't stay like this. So you need to install it like this. At the same time, you can check the racks, for example, mine leaked.
That's it, put the drum in place, tighten the wheel. And don’t forget that the nuts need to be screwed crosswise.
Naturally, it doesn’t matter which nut to start with, but the nut screwed on second should be screwed opposite the first, the third opposite the fourth. The second side is similar. That's it, we lower the car and go check the brakes.
Good luck with the repair, I hope everything is clear.
Useful video
We recommend watching the video below:
In order to make your car ride more enjoyable and not cause problems or inconvenience to you or others, you need to service it in a timely manner. Replacing brake pads does not take much time, money and effort, and if you wish, you can do it yourself. The main thing is to choose the right tools and spare parts for your car.
One of the most important safety elements in a car is its braking system. The life and health of people, as well as the safety of the vehicle itself, depend on the quality of its work. The system's job is to effectively reduce the speed of the car after it accelerates. In this article we will talk about how to replace brake pads on a 2008 Toyota Corolla.
Do-it-yourself replacement of front pads on a Toyota Corolla
The pads located on the front wheels wear out faster than the rear ones, so if you hear a clear squeaking noise during braking, you should understand that this is a sign of wear.
The sequence of actions will be as follows:
- Place the Corolla on a jack and remove the front wheel;
- Unscrew the upper and lower bolts by 14, holding the pad support;
- The free end of the caliper is brought out, and it is worth paying attention to the fact that there is no tension in the hose;
- It is necessary to remove the pads on both sides. If they are strongly welded on both sides, you can use a screwdriver, but do not use excessive force.