#RTI_products #replacement_brake_boot #replacement_boot_cylinder #wear_boot #reason_for_boot_wear #signs_of_wear #replacement_boot_brake_cylinder
The car requires constant monitoring by the driver (owner). Any worn parts must be replaced promptly. It is better to do this in advance, which will avoid dangers. So, if the brake cylinder boot fails, it cannot be restored, but it is quite possible to replace it with your own hands. To do without a workshop, you need to have at least some experience in car repair. If there is one, we’ll look at how to change the brake cylinder boot so that you can carry out the procedure yourself.
How does the part change?
First you need to take care of the reliability of the car. Place it in gear and apply the handbrake. If this is not done, when one part of the machine is lifted, it may roll away. You also need to prepare a set of tools and the boot itself.
It is better to buy an original part. Of course, the required modification is not always available on the market. What to do in this case? You can use analogues - many modern manufacturers provide such parts. They are often no worse in quality than the original ones.
So, let's look at how to change the boot on the brake piston:
- remove the wheel;
- unscrew the 2 bolts at the rear of the caliper;
- remove the bracket and the caliper itself;
- Next, you need an assistant who will sit behind the wheel and start pumping the brake pedal so that the piston comes out a little.
We remove the old torn element. After this, lubricant must be added to the mechanism. Then you can put a new boot on it. All that remains is to check the tightness of the connection and reassemble everything in reverse order.
So, we looked at how to change the rear brake cylinder boot without using the services of professionals. If everything is done consistently and carefully, the procedure will be of high quality, and the element will last many thousands of kilometers without replacement.
Replacing the brake cylinder boot (prevention of brake pads)
I had a free day to repair the caliper (when I was changing the pads, I saw a crack in the boot). We ordered repair kits for all 4 calipers, installed only the front ones (it takes a lot of time to assemble/disassemble). The process itself is not complicated, the main thing is to do it consistently and not forget to put anything in its place.
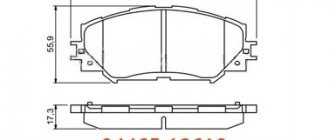
Front caliper repair kit 4605A259
Rear caliper repair kit 4605A262
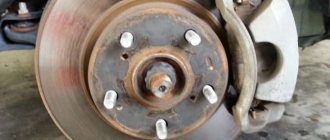
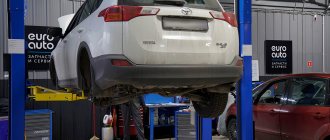
1. Pull off the wheel by hanging the car on a jack
2. Unscrew the lower and upper guides of the caliper (mine were sour, WD helped)
3. Unscrew the brake fluid supply hose to the caliper (pay attention to the copper washer, you can see in the photo, you can’t lose it, the same one is located between the hose fitting and the clamping bolt)
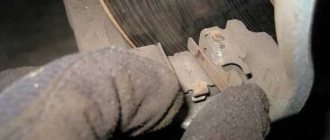
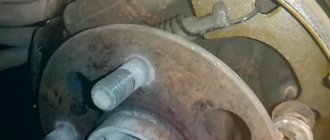
4. Pull out the cylinder (I did not use any adapters to pump pressure into the caliper, etc., I carefully grabbed the piston and began to pull, slowly, with tension, but it came out)
5. Next, we remove the old boot and the O-ring, the ring is located inside the brake cylinder, it has its own seat, we pick it carefully so as not to leave any nicks
6. Clean the piston and cylinder (I cleaned it with carb cleaner)
7. We take out the repair kit, take the rubber seal and boot.
8. Lubricate the sealing ring with grease from the bag (red) and place it in its seat.
9. Apply the same lubricant to the cylinder walls and the piston itself
10. We insert the piston back, making sure that it does not pull the rubber sealing ring inward.
11. Take the boot, turn it inside out and apply grease to its inner side
12. We put it in its place, or rather “press it in” (it took me about 5 minutes for him to sit down, he constantly tries to jump out)
This completes the main part. The repair kit still contains the caliper guide anthers and the rubber band for the lower finger; we also lubricate them and put them in their places, having first removed the old ones and cleaned the mounting holes of the fingers from the dirt of the old grease.
13. Take the caliper ready for installation, screw on the brake fluid supply hose (don’t forget about the copper washers)
14. Lubricate the guides (only high-temperature lubricants!) Put the caliper in its place, screw in only the top finger, after installing the pads, screw in the lower finger
15. Tightening torque of the fingers - there is no need to pull all the way, otherwise souring and breakage of the thread will inevitably occur.
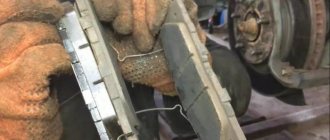
Next, we take the pads, lubricate all their installation connections, anti-squeak plates, install them, lower the caliper (the upper finger holds it), screw the lower finger into place.
Next, you need to bleed the system, I forgot to unplug the terminal from the battery, so the ABS error came out, but after I drove along the highway and braked until it triggered, it disappeared.
PS: When the fluid supply hose is unscrewed, the brake fluid begins to flow out, and not just flow out, but imperceptibly and very quickly, it seemed like droplets, but no, ALL of it flowed out!
The hole in the hose fitting is very small, I don’t even know what to plug it with. I decided for myself that repair of calipers should be done with replacement of brake fluid (it won’t be superfluous)
After bleeding the entire system, you definitely need to bleed the clutch; it is fed from the same tank.
Source: https://www.drive2.ru/l/6397055/
What I use is a universal lubricant. You can lubricate absolutely everything in a caliper, including using it as a high-temperature lubricant. In addition to the cuff (oil seal) of the brake cylinder, but its lubrication was not part of my tasks.
Lubricate all 4 pad guides. Perhaps in the photo I even applied a bit too much of it. On the internal ones, it is more convenient to apply lubricant to the pads themselves.
Lubricate the anti-squeak plate on the inner block where it mates with the brake cylinder.
We apply lubricant to the caliper guide; you need the minimum amount shown in the photo, maybe a little more. This is the top guide.
To get a picture like this. In the photo there is already a lower guide with a rubber ring and it is shorter than the upper one. Be careful not to get confused. To do this, I usually take them out one by one, so as not to think about it.
We install the assembled pads with plates and support guides in place. The guide boots have already been worn through at this point.
I will lubricate them lightly on the outside, with excess grease that will come out after installing the guides. It is necessary to make sure that the anthers are positioned with their edges in the grooves of the surfacing.
In principle, this happens automatically when you press the guide harder, but you need to check it.
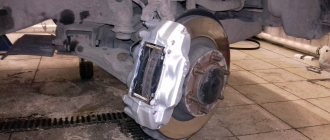
Well, the cleaned mechanism is ready to install the caliper back on the bracket.
Naturally, we also clean the protective boot of the brake cylinder and its piston. The counter part on the anti-squeak plate is already lubricated.
We put on the caliper. Since we did not replace the worn pads with new, thicker ones, it fits on with barely noticeable tension, and there is no need to crush the TC.
Don't forget to remove the wire on which the caliper was hung.
All is ready.
Screw in and tighten. Bolts into the guides in place, similar to unscrewing, with keys 14 and 17.
And people forget to do this because they are happy that everything is ready, putting the wheel back in place. It’s good that, as a rule, these bolts are found right away, but you have to jack up and remove the wheel...
After the wheel is on, I turn the steering wheel from lock to lock several times at low speed, and release the brakes several times at higher speeds so that everything falls into place. If 2-3 clicks occur when turning the steering wheel, this is normal.
PS: There is an opinion, and I agree with it, that the pad guides need to be cleaned until shiny and not smeared at all. As I noticed, everything works for a long time and perfectly even without lubrication, and there is much less dirt, and it does not depend on what kind of lubricant is used to lubricate them, I have tried others. This is especially true for the rear pads, there is much more dirt there. Since there is a statement that can be argued with, in a photo report, one can argue with textbooks and with oneself, I did not, and for the sake of completeness, I smeared it. I haven't been doing that lately.