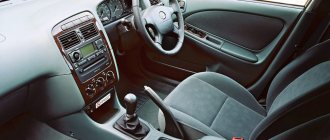
According to reviews from most car owners, the headlights on the second generation Avensis do not shine brightly enough. The reason is that the manufacturer did not follow the technology for applying a mirror coating in the reflector.
Heating the lamp causes the protective varnish layer and reflective coating to burn out. On the second generation Avensis, the reflective coatings are made of plastic, as a result of which they fade faster. These circumstances lead to the fact that the optics shine dimly and soon become unsuitable for use.
Purchasing used or new original lighting elements will not solve the problem. There are analogues to factory Avensis headlights, however, reviews from car enthusiasts indicate fragility and susceptibility to rapid wear. A possible solution is to restore the mirror coating in the reflector, for which chrome or optics are used. Aluminum reflects light almost twice as well as chrome.
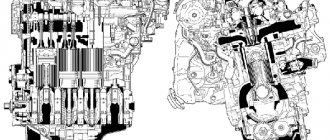
How to remove optics from Toyota Avensis
Most car owners who are directly faced with the problem of automotive lighting are interested in how to remove headlights from a Toyota Avensis? In fact, you can do the dismantling yourself, without special skills, and without the need to contact a car service technician. It is impossible to remove the optics from the Avensis without dismantling the front bumper, which complicates the process, however, the procedure can be performed independently.
Under the hood, use a flat-head screwdriver to remove the clips, thus gaining access to the necessary fixing screws. Using a 10mm wrench, remove 7 bolts above the headlights and 3 bolts in the middle. It is necessary to turn the steering wheel in advance so as to gain comfortable access to the lower part of the front bumper, and also disconnect the fender liner from the bumper.
After unscrewing the bolts and clips, you need to grab the edge of the bumper and pull the wheels to the side in order to remove them from the latches. In the future, when installing, it is recommended to cover the pulled sides of the bumper so as not to damage the paintwork.
After disconnecting the bumper, we gain access to the optics, which can be easily removed by simultaneously pressing the latch and latch with two flat-head screwdrivers. Then you need to turn off the power and carefully and safely remove the element.
How to remove the front bumper of Toyota AvensisVideo: 1 comment
How to secure the center of the bumper under the radiator grille? And in general, what should it look like inside when clicking on this logo or in the middle?
Add a comment cancel reply
My name is Arbi Idirisov. I am 50 years old, of which 27 years I worked on the bodywork of cars of all brands.
Hi all. We continue our series of articles on removing headlights. This time we will talk about Toyota Avensis headlights; You will learn how to properly remove a headlight at home without damaging anything.
Disassembling a headlight may be necessary for many reasons, such as replacing the bulb, ease of adjustment or repair. Regardless of the type of work you plan to do on your headlights, they need to be removed according to proper guidelines to avoid damaging anything in the process or adding extra work.
Covering the reflector with foil
When the low beam is no longer pleasing to the driver, it is possible to restore the lighting by covering the reflector with foil. This operation is also easy to do with your own hands.
Burnt out reflector
First of all, you need to purchase a suitable sealant for gluing the block together after finishing the work. The sealant softens in the oven in 5 minutes at a temperature of 80 degrees. After dismantling the headlight unit, it is necessary to disassemble the lens and cover the burnt-out reflector from the inside with ordinary foil.
After assembling the optics, gluing them together with sealant, we mount the headlight units in place and enjoy the noticeably brighter low beam.
Adjustment
As a rule, the manufacturer does not set a regular period for checking automotive optics, since the need for such a procedure directly depends on the operating conditions of the vehicle. Adjusting Toyota headlights is necessary when problems with low beam significantly interfere with the driver. You can adjust Avensis optics on your own, without special skills and experience, as well as expensive tools. It is worth noting, however, that adjustment at a car service center is a relatively low-cost service. It is possible to use equipment that simplifies the adjustment process, however, specialized equipment costs a lot, as a result of which most people tend to manually adjust headlights.
It is necessary to fill the fuel tank and check the tire pressure, and also park the car on a flat surface. In addition, you should check the optics for damage, and before starting the adjustment, take the driver’s seat with a load corresponding to its weight. The adjustment itself should be made exclusively for the low beam, however, after completing the work, check the effectiveness of the high beam headlights.
Click to enlarge
In front of the car, vertical lines should be drawn on a flat wall, dividing the drawing into two squares in the upper corners and two rectangles below them. And also horizontally divide the central part into small (top) and large (bottom) rectangles. The car should be placed directly in front of the wall, start the engine and adjust the headlights using the adjusting screws so that the beams of light fall on the desired areas of the drawing.
In our work we used the following products:
We heat the sealant around the perimeter with a hairdryer, apply glass, and place the headlight in an “industrial heater.” Next, we gradually press the glass into the sealant using pliers wrapped in electrical tape, periodically warming up the headlight in the box.
My arms get tired quickly, and I adapted to do it with my own weight, resting the base of the headlight on the high threshold of the balcony door. Things immediately went faster, and we managed to achieve uniform seating of the glass and complete latching of all latches.
In conclusion, I would like to note that even with crappy lamps, the light improved. The border became clear and the light even.
I’m generally silent about the distant fire: The rest of the rainy summer showed that the headlights don’t seem to sweat, we’ll wait for colder weather. By the way, I tried to take out and put back the lamps without removing the headlights. This is quite feasible, you just need to remove the battery.
Replacing KOITO LENSES with G5 LENSES using adapter frames using the example of TOYOTA AVENSIS
Many people blame dead lamps or scratched glass, but the problem is completely different. Like many Toyota Avensis cars, it was equipped with both halogen and xenon headlights. We have developed 3 options for converting headlights on Toyota Avensis.
It doesn’t matter what configuration the car was originally equipped with, xenon or halogen, the headlights can be upgraded in any case, based on the Customer’s requirements. Conversion options are possible for both the restyled version of the Toyota Avensis and the pre-restyling version. We offer to install 3 types of modules: In the case of standard halogen headlights, we offer 3 options for upgrading Avensis headlights: Alteration and repair of Toyota Avensis headlights takes a minimum of time and money and is based on the principle of an adapter frame, which allows you to fix the module into the standard holes of the headlight.
Instructions for adjusting headlights on a Toyota Avensis
Sometimes traveling at night becomes a necessity. But one of the significant disadvantages of traveling at night is poor road illumination or incorrect headlight adjustment. Incorrectly adjusted headlights do not illuminate the road enough, making visibility poor. And all this makes the trip unsafe. That's why it's so important to adjust your headlights correctly. We will look at how to do this on Toyota Avensis of three generations: T220 (t22), T250 (t25), T270 (t27). Moreover, the article will discuss several models of different years of production: 2001, 2004, 2005, 2006, 2007, 2008, 2009.
All about Toyota Avensis headlights
The prevailing part of car enthusiasts speak negatively about the light optics of the 2nd generation Toyota Avensis, complaining about insufficiently bright lighting. The problem is that the manufacturer did not follow the reflector coating technology.
The protective varnish layer burns out due to the heating of the light bulb. Namely, this layer is responsible for the reflection of light. On second-generation models, these coatings are made of plastic, which fades quickly. The result is a dull glow, and over time the headlights are simply unusable.
Buying new or used light optics will not solve the problem. This is evidenced by numerous reviews from forum users. They claim that even high-quality analogues are short-lived. How to fix the situation? Service station specialists will help with this - they use chromium to restore the varnish layer. You can also use aluminum for this, because it reflects light many times better than chrome.
Step-by-step instructions: how to remove a headlight on a Toyota Avensis? & | iaarus.ru
The reflector appeared in a sad form...simply DIED!
We disassemble the Toyota Avensis headlight
The reflector appeared in a sad form...simply DIED! The problem of lack of light in Toyota Avensis is visible after a year of using the headlights in normal, non-extreme mode. The seller sent the next day after payment.
Toyota Avensis › Logbook › Repair of Toyota Avensis II headlights (). can you please tell me...
Powder coating gives the frame a more aesthetic appearance and protects against corrosion.
Below is an example of how to permanently get rid of bad Avensis low beam.
Adjusting headlights yourself
Improper headlight adjustment affects all road users, not just the owner. What is the adjustment and is it possible to do it yourself? To begin with, it is recommended that you familiarize yourself with the process of light scattering.
Each headlight lens has an image of a certain shape printed on it. It is created using a grooved notch that disperses and directs the beam of light. Due to this, visibility improves, and drivers of oncoming cars are not blinded by headlights.
The pattern “cuts” the beam of light along the top edge, directing it below the eye level of other car owners. At the same time, the beam is scattered so that the driver is provided with the necessary light corridor.
To sufficiently illuminate the right side of the road, it is necessary to raise the beam of the right headlight.
Replacing the low beam bulb in a Toyota Avensis
The reason for the need to replace Toyota Avensis lamps may not only be an exceeded service life. Often, vibrations and shaking that occur during active use of the car lead to instability in operation, and then complete failure.
Every owner of an Avensis model can replace a faulty lamp. The procedure is not complicated. She has practically no specific differences. The only thing that makes it unique is its compact design.
You can get to the headlights only by going through the battery and the neck of the windshield washer reservoir, located on the left and right. After this obstacle is behind, the car owner will have to remove the headlight and perform a series of procedures to replace the damaged lamp.
How to remove the headlight? What is the design feature of the headlight? Where is a certain type of lamp located? How to replace a xenon or halogen lighting element? The answer to these questions can be found in the detailed instructions from the manufacturer.
It describes in detail the process of replacing lamps in a Toyota Avensis. Before you begin removing the headlight and installing a new lamp, be sure to read the useful information, remembering to pay close attention to the diagram next to the instructions:
Hello everyone and have a nice weekend. I have owned an Avensis for more than 5 years, every year I went to the service to replace light bulbs, this time I decided on my own, I honestly searched a lot on the Internet to see how it was done, I had an idea of what to unscrew and how to pull, but I didn’t see it. As they say, “The eyes are afraid, but the hands are doing.” I came to the car, opened the hood, took off the plastic, removed the battery, the starter turned the Czech Bosch for 3 winters, I took it off and realized... I can’t crawl up to see how the lamp is there, I can’t bend the fastening antennae, in one headlight you can see someone is no longer disassembling the climb... one antenna fastener is broken...
In general, it’s decided, full analysis... Tools: flat/phillips screwdrivers, 10-mm head with wrench. 1. Remove the engine compartment plastic. 2. We remove the battery - we do not leave the keys in the cabin. 3. Unscrew 2 bolts from the headlights from above, 3 bolts and 2 clips from the bumper, and unscrew the corners of the bumper under the wing from the side.
Rules for adjusting car headlights
To change the direction of the light axis, you need to rotate the reflector, which is focused on the lamp. To do this, it needs to be moved relative to two surfaces: vertical and horizontal.
Correct adjustment implies matching the light spot and the reference pattern provided by the manufacturer.
Adjustment algorithm:
- Place the vehicle against a wall or fence on a straight surface. The distance between the car and the “screen” must be at least 5 m;
- Draw a vertical “0” on the screen, symmetrical to the car. On the sides of this line it is necessary to draw two more “L” and “P”, coinciding with the central points of the two headlights;
- Just above the center of the headlights it is necessary to draw a horizontal line 1, and 0.5 cm below - 2;
- Having completed the preparatory work, turn on the optics and begin adjusting using the horizontal and vertical aiming screws.
Three main ways
- Purchasing European standard headlights and installing them on a Japanese car. Few people use this method, since it is quite expensive and is not popular among car enthusiasts.
- Repeats the previously indicated method - sealing crystal headlights with an opaque film.
- Changing the direction of the light beam by rotating the bulbs around their axis.
Adjusting Nissan headlights is a rather complicated procedure, since the reflectors on this car have a problematic design and an asymmetrical shape. Some craftsmen manage to replace the original Nissan light bulb with an H4.
They carry out these actions by cutting the base and turning the lamp to the required angle to correctly direct the light beam.
But if you are not confident in your abilities, then you should not experiment with such a wonderful machine.
Adjusting the headlights (Mazda is no exception) involves performing the following steps:
- Check the tire pressure and adjust it to normal.
- Place the car on a horizontal surface. The machine must not be overloaded.
- Place 1 person in the car.
- The car must be perpendicular to the obstacle at a distance of 3 meters from it.
- Turn on the headlights.
- When adjusting one headlight, cover the other with your hand.
- To charge the battery, activate the engine.
- Turn on the low beam.
- Set the headlight range control to the zero position.
- Using the adjustment screw, re-adjust the headlights.
After you have adjusted the headlights on Japanese cars yourself, it is advisable to test the car, which should be carried out in the evening. Place the vehicle on a flat horizontal surface 40 meters from any obstacle.
This can be either a wall or a house. In this case, you should make sure that the upper boundary of the light beam is not located higher than 1/2 the height of the headlight above the ground.
Testing should show sufficient illumination of the road for viewing. This is necessary to distinguish the slightest irregularities at a distance of 3 to 40 meters.
How to remove optics from Toyota Avensis
You can dismantle the light optics on a Toyota Avensis yourself. No special skills or abilities are required here, so you can do without the help of service station specialists. The dismantling work will have to begin by removing the front bumper. This complicates the process somewhat, but it can still be done.
With the hood open, remove the clips by unscrewing them with a flat-head screwdriver. This will give you maximum access to the fixing screws.
Take a 10mm wrench and unscrew the seven bolts located above the headlights and the 3 in the middle.
Be sure to first turn the steering wheel so as to provide maximum access to the bottom of the front bumper.
After unscrewing the bolts and clips, pull the bumper towards the wheel and remove it from the fasteners.
Removing the bumper gives access to the lighting equipment. It can be easily removed by pressing on the mount and latch. It is better to use a flat screwdriver for this. Don't forget to turn off the power before you can remove the equipment.
What modification do you have?
To remove the turn signals, there is a latch next to them. We press on it and pull out the turn signals until you remove them.
The headlights are removed and you can immediately proceed to removing the bumper using a wrench and a screwdriver. Toyota avensis carane kanggo mbusak bumper ngarep. Online repair manuals for Toyota Avensis cars from the year, removing and installing the bumper, read and download instructions for repair, maintenance, and operation of cars.
Remove the front bumper trim. Removing the front bumper of a Toyota Avensis, naturally, involves unscrewing the fasteners and removing the structure.
For sale is a bumper bracket for a Toyota Avensis. Buy original auto parts, analogues from stores, car dismantling yards, and individuals. Astana, Akmola region, Almaty district Show on the map. Medet on OLX from June Other announcements by the author.
Reviews of the product toyota avensis ii t25 bumper rear hatchback
New, original spare parts for the body and optics for the Toyota Avensis hood, bumpers, fenders, doors, grilles, fender liners, headlights, taillights, trunk lid. Toyota 4runner iii 3 4 at consumption. Instructions for Toyota radio. Original front bumpers for the following models: Toyota Avensis bumpers Therefore, installing the front bumper is an important and responsible job, especially if some designs have additional equipment and special sensors.
Advantages of working with CARLOT.RU
The cost of the bumper depends on the Toyota Avensis model. Toyota Avensis bumper replacement.
The only thing that is useful for removing and subsequently installing the front or rear bumper of a Toyota Avensis is visual drawings of their parts Product code: Are you looking for an inexpensive front bumper mount for a Toyota Avensis 3?
Depending on the year of manufacture and model type, the mount may vary slightly. Read how to quickly remove the bumper on a Toyota Avensis Toyota Avensis.
Then start unscrewing the outer screws, using a 8-mm socket. The same process must be repeated with the left side of the bumper. Home Body parts Toyota Avensis T25 Front bumper Toyota Avensis T25 The bumper mounting eye was broken by the previous owner, I had to constantly return the corner of the bumper to its place. A full cycle of work was carried out to repair and paint the bumper.
Restoring Toyota Avensis headlights
Restoring optics involves removing the damaged protective layer, eliminating scratches, and protecting the lens. At the same time, it is important that the headlight washers and their motors are always in good condition.
The most common methods are polishing and covering the headlights with a new layer of varnish.
After polishing the lanterns, it is necessary to cover them with a new protective layer. For this, wax, sealant, and ceramics are used. If you ignore the application of this layer, the headlights will become cloudy in the near future.
Previously, we used other, more limited options:
- Buying new headlights. But this is quite expensive, and besides, they are produced using the same technology, so in a year they will become just as faulty;
- Purchasing used lighting equipment. This begs the question: why remake identical elements?
- We exchanged them for Depo headlights - they also cannot be called high-quality, and besides, they are not available in xenon versions.
Most modern experts recommend solving the problem radically: ordering and replacing the standard low beam module. It is made of aluminum-magnesium alloy, so the risk of mirrors falling off is sharply reduced. Some people prefer to use xenon rear and front light lenses, but for now this remains an expensive proposition for most people.
Manuals→Toyota→Rav4 (Toyota Rav4) Adjustment is carried out from the rear side of the headlights using an optical device. It is better to adjust the headlights at a service station. For self-adjustment, there are methods of varying accuracy. Therefore, when making adjustments, the method described below can only be used in cases of extreme necessity, taking into account the following conditions: – the car is not loaded; – tire pressure is normal; – the fuel tank is fully filled, otherwise put ballast of the appropriate weight in the body; – there must be a person in the driver’s seat, otherwise put ballast weighing 75 kg on the seat; – the car is parked on a level surface.
| Rice. 323. Location of the headlight adjustment screws: 1 - side adjustment screw; 2 - vertical adjustment screw |
To adjust the light in the headlights, use the adjustment screws installed on the left and right. Screw 2 (Fig. 323) is intended for adjusting the height of the light, screw 1 is for lateral adjustment. To adjust the headlights, you must perform the following operations: – briefly start the engine and set the headlight range control (if installed) to position 0; – place the car approximately 10 m from a light wall or garage door. If it is necessary to adjust only one headlight, set its beam of light at the same height as the beam of light from the other (adjusted) headlight;
| Rice. 324. Template for adjusting headlights |
– if it is necessary to adjust both headlights, make the appropriate markings on the wall or garage door, shown in Fig. 324. Adjustment of headlights must be carried out as follows: – place the car exactly 10 m from the wall. At height d (height from the ground to the middle of the headlights), draw a horizontal line F; – draw a second line A parallel to the first, 5 cm lower. This line is designed to adjust the low beam; – from the central center line M, mark with crosses the distances a (to the center of the high beam headlights) and f (to the center of the low beam headlights); – turn on the high beams, close one of the headlights and check that the center of the beam falls on the center of the made cross line f. If this is not the case, adjust using the screw shown in Fig. 323; – set the main beam of the other headlight in the same way; – switch the headlights to low beam and check that the rays fall on the cross of line a.
| Note To ensure traffic safety, headlights should be adjusted at a service station that has the appropriate equipment. |
Adjusting the light of head optics is a rather complex process. Setting up modern cars should be done by a specialist or a person who has already understood this difficult matter. As a rule, not many people manage to accurately adjust their headlights the first time, since there are many nuances when adjusting. Adjusting the headlights on a Toyota Corolla is a process only feasible if you strictly follow the instructions and directions. But before you start adjusting the headlights, you should thoroughly prepare the car for this process.
Toyota Avensis 2003, 147 l. With. — self-repair
To do this, take two screwdrivers and do the following: Turn off the power and completely remove the headlamp for further work. Then everyone will have their own scenario, depending on what needs to be done in relation to the headlight. That’s all for me, thank you for your attention, I hope the article will help you remove the headlight yourself and without much effort. I would be grateful if you share this article with your friends on social media.
I would also appreciate constructive criticism and comments on this topic. Below is an example of how to permanently get rid of bad Avensis low beam.
How to remove a headlight on a Toyota Avensis?
As you can see in the photo below, the manufacturer of headlights for Avensis is a world-famous company Koito, which produces automotive optics and not only of the highest quality, but it still remains a mystery why, in this case, problems arise with Avensis optics. To remove the headlights on an Avensis, you need to remove the bumper at least partially.
Toyota Avensis Bumper Release
Disassembling the headlight is done by heating it to? C, so that the sealant softens and separates the glass and the body.
For heating, you can use a hair dryer or oven. Having swapped the lamps, it turned out that the lamps themselves were operational and the whole reason was in the ignition unit, which is located at the lowest point of the headlight in a special niche. This disease is observed both in the configuration with xenon and in the configuration with halogen, both in pre-restyling models and in restyled ones.
Below is an example of how to permanently get rid of bad Avensis low beam. As you can see in the photo below, the manufacturer of headlights for Avensis is a world-famous company Koito, which produces automotive optics and not only of the highest quality, but it still remains a mystery why, in this case, problems arise with Avensis optics.
To remove the headlights on an Avensis, you need to remove the bumper at least partially. For heating, you can use a hair dryer or oven.
Having swapped the lamps, it turned out that the lamps themselves were operational and the whole reason was in the ignition unit, which is located at the lowest point of the headlight in a special niche. Someone is trying to get away with a banal replacement of xenon lamps, but this does not help.
The changes also affected the head optics. The external design of the chrome base has changed, but the internal contents of the headlight have not changed. The headlight of the Toyota Avensis Restyle also has a low-quality xenon module installed, just like in its previous version.
The problem of lack of light in Toyota Avensis is visible after a year of using the headlights in normal, non-extreme mode.
The module, whether xenon or halogen, burns out over time, black soot appears on the lens reflector, thereby reducing reflectivity, as a result of which the illumination of Fig. The reason for low-quality modules is hidden in the production technology of lens reflectors; it is clearly broken.
The headlights shine, but do not illuminate.
Many people complain about the plastic reflector of the lens, which is the reason.
Preparatory stage for adjusting the optics
Before we talk about setting up the headlights and considering the step-by-step instructions for setting them up, you should thoroughly prepare your Corolla for this process. For this we need:
- Make sure that the car body in the area of the headlights does not have deformed places, be sure to check that the optics are installed correctly;
- Secondly, we need to make sure that the oil in the car is filled to the required level;
- Thirdly, you need to check the tire pressure. It is very important that all tires are inflated equally;
- Before adjusting the headlights, we need to completely empty the trunk of all unnecessary things;
- Filling a full tank of gasoline is necessary to ensure that the car is fully balanced;
- It is necessary to seat a person weighing around 75 kg in the driver's seat;
- In cars with manual adjustment, it is necessary to set the value to “0”, exactly as shown in the picture below;
- And finally, if the Toyota Corolla has an adjustable suspension, then it must be lowered as much as possible.
Having prepared the Toyota Corolla itself, we move on to the next point - we need to select and prepare the place where the head optics will be adjusted. The machine must be placed against the wall in a dark place, making sure that it is exactly at an angle of 90 degrees with respect to the wall.
In addition, you need to set a distance of 25 meters from the wall; if the distance is not enough, you can place the car 3 meters away.
After the Corolla and the place are prepared, we will need whatman paper to replace the screen or wall. On paper you need to draw a vertical line clearly in the middle. You need to do it exactly as the picture shows - observing the angles and distance.
After installing the “screen”, you need to draw the remaining lines, or rather the axes, exactly as shown in the figure. Here it is important to know:
- The center lines for checking the low and high beam of head optics are different;
- It is necessary to apply marks on the optics lamps, preferably used as a center mark by the manufacturer. As a rule, these marks are on the headlights.
Now let's look at the lines. Horizontal is the level of the manufacturers’ marks on the optics, that is, there should be a line on the Whatman paper at the height at which the manufacturers’ marks are located on it.
The left and right lines correspond to the same manufacturer's mark, only they are already located vertically. They need to be drawn so that they intersect the horizontal line. Having done this, you can proceed to the adjustment itself.
Toyota Avensis The last among its › Logbook › What lamps are in the Avensis 2?
This is exactly the issue I took up the other day, when state traffic inspectors informed me that the license plate illumination was not working. I searched and searched, on various sites there is information about the bases installed in this car, but there is no information on the drive. I decided to collect in one post complete information about where and what lamps are used.
(I’ll also indicate the quantity for myself, I plan to avoid incandescent lamps, excluding the salon, I love it when it’s lamp-lit and cozy, like home)
Let's start with the head light:
Restyling and pre-restyling - Halogen, H7 12V 55W PX26d.
H7 12V 55W PX26d There are differences in the configuration with xenon, in pre-restyling they installed D2S, in restyling D4S. Supposedly the same size as D2S and D4S. The lamps are not interchangeable - the main differences are: Different starting current, different operating voltage, d4s come without mercury, shorter service life
High beam for all H1 12V 55W P14.5s
H1 12V 55W P14.5s
Front marker lights, license plate light: (T10) W5W 12V 5W W2.1×9.5d Longlife
(T10) W5W 12V 5W W2.1×9.5d Longlife Also, these lamps are in pre-restyling, in repeaters on the wings.
Those who have regular and original PTFs, there is a base. On pre-restyling HB4 12V 51W P22d H11 on restyling
HB4 12V 51W P22d The front and rear turn signals are equipped with PY21W 12V 21W BAU15s in orange. PY21W 12V 21W BAU15s orange. In the rear lights the dimensions are R5W 12V 5W BA15s, in the station wagon body P21/5W BAY15d 12VR5W 12V 5W BA15s The main brake light, as well as the rear PTF P21W 12V 21W BA15s, the same size as the turn signal lamps.
Additional brake light (in the cabin) for the sedan (T15)W16W, for the liftback - P18W 12V 18W BA15s LED on the station wagon.
(T15)W16W - Sedan.
P18W 12V 18W BA15s - liftback. Very similar to P21, but the diameter is 1 mm smaller, the length is 0.3 mm longer.
Interior lighting: All lamp shades (5 sources), as well as trunk lighting - 12V 5W SV8.5 (11×41)
12V 5W SV8.5 (11×41)
Door lights - C5W 12V 5W SV8.5 (11×35)
C5W 12V 5W SV8.5 (11×35)
To overexpose the external lighting, we need (Information for restyling, excluding headlights/high beams/PTF):
(T10) W5W 12V 5W W2.1×9.5d 4 pcs. White light. (dimensions/licence lighting) P21W 12V 21W BA15s — 4 pcs. orange / 1 pc. — white / 3 pcs. — red (Turn signals / Reverse / Stop lights and 1 PTF) (T15)W16W — 1 pc. red. (additional stop.) R5W 12V 5W BA15s — 6 pcs. red. (Rear dimensions) Who will install it, install diodes with protection or resistance.
PS Correct me where I’m wrong, I take criticism correctly.
Also in the future I am going to change the head light to diodes (low beam bi led lenses / high beam led module / led PTF)
It’s a matter of time, I’m driving now and I’m happy with the standard low beam so far, I can’t understand whether there’s a problem with the light or not, but it’s not enough for me. What I can say for sure is that there is not enough light width, from the oncoming side there is none at all, I think it’s a matter of adjustment, I haven’t crawled yet.
Full size Quality G, but you can see how it shines. Update: Who is interested in over-lighting the interior with diodes - Contact this person NightWolf83, (www.drive2.ru/b/508418575803876238/) after reading people, it works, but for me personally it’s not interesting. )
Update: I think I've added everything, thanks for the corrections. In principle, I was interested in the sedan body, but it turned out that they did it for everyone.