Toyota Corolla CV joint replacement
Constant velocity joints (CV joints) are the main culprits of problems associated with front wheel drives. At the same time, they themselves are quite durable, and fail mainly due to damage to the anthers , which protect the hinges from water and dirt.
Replacing a Toyota Corolla CV joint is not the easiest or cheapest thing, so it is important to periodically inspect the protective covers and change them as soon as possible. If water or dirt gets into the hinges, they can fail after just a few hundred kilometers , while intact anthers will ensure their long-term operation.
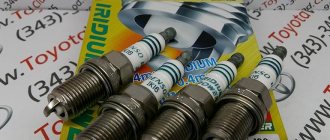
The original CV joint (outer right Toyota 4346009R20, 4346009R30) comes with the drive, so it is quite expensive, around 16,000-19,000 rubles. But the internal 4304002030, although separate, is not significantly cheaper. So most often, the owners of this car buy separately granules from HDK, FEBEST (0110ZZE150 external and 111ZZE120 internal) or intended for installation on another Corolla or Auris.
The process of replacing the rear wheel bearing on a Corolla 150
Replacement of the rear wheel bearing is carried out together with the hub, since the unit is non-separable. Instructions are given below.
- Engage first gear in case of manual transmission or move the selector to “parking” mode if automatic transmission is installed.
- Place wheel chocks.
Today, it is the car of the Japanese manufacturer that is the most common in the world. The merit of this is the excellent combination of price and quality. For example, a car can travel more than a million kilometers if original parts are installed. The same front wheel bearing of a Toyota Corolla 150 can travel about 100 thousand kilometers before it needs to be replaced.
And when this moment comes, the process itself is not difficult and can be done if you have high-quality spare parts and the proper set of tools. You can learn more about the process of replacing the front wheel bearings of a Toyota Corolla from this article.
Faults associated with Toyota Corolla CV joints
Vibration when driving - there may be severe wear on the outer wheel drive joint, deformation of the wheel drive shaft, or wear on the rollers of the inner wheel drive joint. In this case, you will have to replace a worn joint, CV joint assembly or inner CV joint.
The car pulls to the side - the inner CV joint race is damaged or worn out, or the outer CV joint is worn out/damaged. Replacement to come.
Lubricant leaks on the CV joints - either the clamps are not tightened properly, or the boots are torn. Clamps - tighten, boots - replace.
Noise or knocking noise while driving in the area of the front wheel - the rollers of the inner CV joint of the wheel drive are worn out and it’s time to change it.
Knocks when turning - extreme wear of the outer CV joint; replacement is needed.
Symptoms of CV joint malfunctions
A characteristic sign of a malfunction of the internal hinges is an unpleasant crunching sound that appears when the unit is operating. However, car owners often confuse this sound with the crunching sound of an external CV joint. To correctly diagnose a breakdown, the operating features of the mechanism are taken into account.
For example, the outer “grenade” begins to crunch when the car moves sharply with the wheels turned out or while the car is moving around turns. It is in these cases that the grenade is maximally loaded.
To test the operation of the internal CV joint, the car is taken out onto an uneven road. A dirt road with numerous holes and gullies is ideal. The car suspension on such a route will be constantly loaded, which will cause angular and axial displacements of the joint cage. When the internal grenades wear out, you will hear a characteristic crunching sound.
Less often, the driver can report wear of the internal joints by a feeling of vibration when driving on a flat road. This symptom is ambiguous, because Even examining the car on a lift does not guarantee that the cause of the breakdown will be determined. For advanced diagnostics, it is better to contact a workshop.
How to change CV joints on a Toyota Corolla
To do this, you will need to remove the front wheel drive assembly. Then proceed to disassemble the grenades (external or internal) by holding the drive in a vice. So, first of all, look at the visual dismantling of the Toyota Corolla drive shaft using the example of a car in the E110 or E120 body, since the procedure is similar to that on the Auris and Corolla E150 cars produced after 2006.
When replacing an external or, especially, an internal CV joint, you have to pull the entire drive shaft out of the box, so first of all, don’t forget to drain the oil from the Toyota Corolla gearbox (at least half).
Remove the wheel and unscrew the hub nut with a 30mm socket.
According to the instructions, you need to unscrew the two nuts (at “19”) securing the strut to the steering knuckle.
but then the alignment will go wrong, so it will be easier to unscrew the ball joint from the lower arm (there are 2 nuts and a key bolt at “17”) and disconnect the stabilizer bar link (the so-called bone).
Then we remove the drive with the external CV joint from the steering knuckle and pull it completely out of the box. To do this, turn the steering wheel a little to the side, tapping a little with a hammer (preferably with a mallet) on the axis of the outer CV joint, so as not to damage the thread, and pull the axle out of the hub. At the other end, in order to remove the inner CV joint, you may need a pry bar.
If you are going to change only the outer CV joint or its boot itself, then you can also do without dismantling the inner grenade along with the shaft and draining the oil. Simply remove the clamp that secures the inner boot on the grenade and pull out the shaft with the tripod.
By the way, before removing the shaft from the inner CV joint, it is recommended to put marks on the shaft and the grenade itself. Using a screwdriver, press out the small clamp of the CV joint boot; by the way, it is disposable and cannot be reused. We install a special puller for removing CV joints. Let's secure it more securely. Using a baited nut and a ratchet with a head, we “squeeze” the CV joint out of its seat. We remove the puller. Moving the part from side to side, we remove the CV joint.
To remove the anthers, you need to remove the retaining ring holding the tripod and knock it off the shaft with the bearings. Then continue disassembly, rinse everything well to remove old grease and refill the hinges with fresh grease.
Next, how to disassemble the drive shaft and replace the Toyota Corolla CV joint will be shown in this instruction:
When everything was changed, both grenades were filled with grease, we installed everything removed in the reverse order.
Then we put everything back together, replacing the boots and clamps. We insert the tripod into the grenade, put on the boot, and insert the outer grenade into the hub.
Source
Spare parts Toyota Corolla NZE121, 1NZFE
After examining the inner rubber, as well as both on the other side of the car, we decided that we needed to change them all at once so that there would be no problems in the future. All the CV joint rubber bands have small cracks and are already quite worn out.
The first thing we need to do is simply remove the wheel, after first jacking up the car from the front. Next we need to remove the cotter pin and control washer. This is not difficult to do if the grenade for Toyota Corolla is a suitable and convenient tool.
After the sprocket has been removed, let's unscrew the hub nut. The most convenient way to do this is with a deep head on the Toyota Corolla brake.
For easy unscrewing, we use a large wrench, possibly with an additional lever.
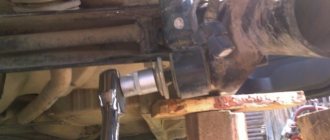
The photo shows a nut that needs to be unscrewed. It is recommended to replace the external boot by removing the internal one, after first pulling the tripod off the shaft.
In order to remove the drive shaft, all you need to do in the least painless way for wheel alignment is unscrew the ball joint from the lower arm - there are two nuts and only one bolt the size of To make things easier, we treat all the bolts we need with a special grenade liquid for Toyota Corolla liquid wrench, it will help unscrew even the most dried-on bolts and nuts. After applying the liquid, it takes some time to soak. After the liquid has done its job, and this is minutes, we take the grenade keys to the Toyota Corolla and begin to unscrew the bolts and nuts we need.
The drive shaft itself can be removed entirely, that is, the outer joint can be removed from the hub and the inner one can be pulled out from the gearbox. At the same time, it is important not to forget to drain the transmission oil from the box itself.
Replacing a CV joint on a Toyota Corolla Instructions on how to change a CV joint on a Corolla E110 E120 and E150
In the suspension of a Toyota Corolla car, there are main key elements that play a huge role while driving, such as the CV joint.
Thanks to this part, torque is transmitted to the wheels at different angles. It is a hinge that needs to be changed periodically, since over time it fails, as a result of which it is necessary to make major repairs or change it completely. Used only for front wheel drive vehicles. The hinges wear out quickly due to careless use of the car, as well as under the influence of the environment.
CV joint puller: types and principle of operation
The general technique for removing a grenade from an axle shaft is quite simple - you need to pull the nodes in opposite directions with great force. This cannot be done by hand; you need a mechanical puller for the CV joint.
- The inertial tool works according to the familiar principle of a reverse hammer. With its help, you can remove the CV joint without removing the entire suspension assembly of the car. One part of the hinge is fixed to the axle shaft, and the dismantled middle is removed for maintenance. Using a special eye, the hammer guide is attached to the axle shaft with a hub nut. A few sharp blows are enough, and the spline joint, compressing the locking spring, comes out of the holder without damage.
- CV joint boot puller, working on the wedge principle. To create the spreading force, two support platforms are required. We create one of them using clamps placed on the removable CV joint axle shaft. The second is made in the form of a split ring. It rests against the clip, like on silent block removers. Wedges are inserted between them (on both sides to ensure uniform force). How to apply the effort is not important. Typically, wedges are driven in using two hammers of equal weight. It is enough to move the axle shaft by 3-5 mm, and the retaining ring is compressed, freeing the movement of the part. There are also pneumatic boot removers.
- It is convenient to use a screw puller when the entire CV joint is removed from the car. This bulky design allows you to work with units of any size, since the length can be adjusted. A homemade CV joint puller is made for a specific car, while a factory tool is more universal. It consists of two thrust (more precisely, tensile) platforms connected by longitudinal rods (rows of holes are located on the rods to adjust the distance between the supports). One platform is fastened with a clamp, the second with its eye is put on the threaded connection of the axle shaft. By rotating the hub nut, you create enough force to compress the retaining ring.
Such devices make it possible to save on visiting a car repair shop. You can purchase the tool at any auto store: both universal and for specific CV joint models.
Drive seal
An oil seal is a device designed to seal the joints of moving and stationary surfaces of a car. It is used to seal joints of rotating shafts and parts operating on the principle of reciprocating movements.
Thus, they do not allow grease and oil to leak out. When the drive seals are torn or damaged, fluids enter the parts and cause various damage to the mechanics of the machine. To avoid such cases, it is necessary to strictly monitor the level of wear of the drive seals.
The oil seal is installed in the power unit. The crankshaft contains two such parts at once. The shafts also have two oil seals. The parts are made from material that is resistant to temperature changes. The fact is that the seals heat up as a result of the rapid movement of parts.
When to replace
There is a set of typical symptoms that appear when hinges wear or break, which are simultaneously used during diagnosis and determination of a specific unit to be replaced:
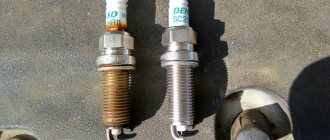
- an external inspection revealed catastrophic damage to the cover with signs of old age; instead of lubricant, a mixture of wet dirt and rust has been working inside the hinge for a long time, there is no point in going through such a hinge, it needs to be changed;
- when turning under traction, a characteristic crunch or ringing blows are heard, which, after lifting the car, are clearly localized in the drives;
- when the car rolls, the sound is heard from the inside of the drive, and when turning the minimum radius, the outer hinge manifests itself;
- extreme case - the drive is completely cut off, the balls are destroyed, the car cannot even move, instead a grinding noise is heard under the bottom.
Replacing a single hinge is advisable if you are sure that all the others have not lasted long and are in good condition. Otherwise, it makes sense to listen to the manufacturer's instructions and replace the drive assembly.
The fact is that in addition to the CV joint there are two splined connections to the shaft, over time they work together and play appears. Such a drive will click or rattle even with new parts, and in advanced cases, vibrations or complete destruction of the remnants of the spline connection may appear. This will also damage the parts you just replaced.
Outer and inner CV joint
A CV joint is a joint that is responsible for transmitting torque at different angles. The main task of the part is to transmit torque to the wheels of the vehicle. This is a consumable that wears out quickly and requires frequent replacement. If the rubber does not cover the hinges tightly enough, the lubricant will not stay inside. The service life of the CV joint will be noticeably reduced.
When the rubber band breaks, not only does the lubricant quickly run out, but dust and dirt also gets inside the part. This leads to increased wear levels. In this case, the part will have to be completely replaced.
However, if the rubber band broke recently, you can simply purchase a repair kit and replace it yourself. Be sure to polish, lubricate and wash the part before installing a new rubber band.
Incorrect operation of the CV joint can cause problems with the front wheels, or more precisely, with their drive. The original CV joint is quite durable, and damage is caused by failed boots.
If you feel that the car is vibrating when moving, the cause of the problem lies in the deformation of the shaft, wear of the external drive joints or wear of the rollers of the internal drive joint.
If lubricant leaks are detected, you need to tighten the clamps or replace damaged boots. If your car pulls sideways, you also need to replace the CV joint. The reason lies in the fact that the race of the inner (in some cases, outer) CV joint is worn out or severely damaged.
The limiting wear can be called knocking on corners. In this case, the problem can only be solved by completely replacing the CV joint.
A little more about CV joints
The hinge provides torque transmission at different angles. Its main purpose is to transmit torque to the wheels. In the automotive industry it is used only for front-wheel drive cars, which is exactly what our Corollas are.
The hinges wear out quite quickly, especially under the influence of the environment and careless operation of the car. It is very important that the rubber tightly covers the hinges themselves, and also keeps all the lubricant inside, which is intended to increase the service life of the part.
Most often, replacement is necessary precisely because the rubber band breaks. When this happens, all the lubricant is quickly used up and dirt gets inside, which quickly wears out the CV joints.
At such moments, the part requires complete replacement.
However, if you notice that the rubber band has burst or just torn, you should buy a repair kit and change the rubber band, having first washed, polished and lubricated the part itself.
Replacing the constant velocity joint on a Toyota Corolla
Before we begin the procedure, we will tell you what we needed and how long it took us. Let's start with spare parts, materials and tools.
First of all, we needed a repair kit - a rubber band and a metal insert from the company 1-56 Maruichi, we also needed a special lubricant - we used NEO LUBRICANT and Liqui Moly 47 Langzeitfett + MoS2.
We will also need a garage - it is important to have a completely dust-free environment, as well as a set of tools that will help disassemble the car.
So let's get started. For us it all started when the CV joint rubber broke. We decided it was not too late to replace it, but if you want to install a new part, this instruction will also help you. Let's look at the photo. This is exactly what our torn CV joint rubber looked like.
After examining the inner rubber, as well as both on the other side of the car, we decided that we needed to change them all at once so that there would be no problems in the future. All the CV joint rubber bands have small cracks and are already quite worn out.
The first thing we need to do is simply remove the wheel, after first jacking up the car from the front. Next we need to remove the cotter pin and control washer. This is not difficult to do if you have a suitable and convenient tool. Let's look at the photo.
After the sprocket has been removed, let's unscrew the hub nut. The most convenient way to do this is with a 30-degree deep socket. For convenience, just turn on the gear or ask someone to hold the brake pedal. For easy unscrewing, we use a large wrench, possibly with an additional lever. The photo shows the nut that needs to be unscrewed.
It is recommended to replace the external boot by removing the internal one, after first pulling the tripod off the shaft.
In order to remove the drive shaft, you just need to unscrew the ball joint from the lower arm in the least painless way for wheel alignment - there are two nuts and only one bolt size 17.
, and also unscrew and disconnect the anti-roll bar strut (as it is popularly called - a bone).
To make things easier, we treat all the bolts we need with a special liquid - liquid wrench, it will help unscrew even the most dried-on bolts and nuts. After applying the liquid, it takes some time to soak.
After the liquid has done its job, which is 15-20 minutes, we take the keys and begin to unscrew the bolts and nuts we need. Let's look at the photo.
The drive shaft itself can be removed entirely, that is, the outer joint can be removed from the hub and the inner one can be pulled out from the gearbox. At the same time, it is important not to forget to drain the transmission oil from the box itself. We previously drained it.
But as for pulling out the internal grenade, nothing worked here, so we used the second option and removed the clamp that secures the internal boot on the grenade and pulled out the shaft with the tripod. In this scenario, there is no need to drain the oil, since the internal grenade remains in the box.
Next, we turn the steering wheel a little in the direction from which we will change the anthers or the CV joint itself. Lightly tap with a wooden mallet on the axis of the outer CV joint. This is necessary in order not to damage the thread. And slowly pull the axle out of the hub, while pulling the stand slightly to the side.
Next, remove the boot clamp from the inside of the CV joint, remove the boot from the grenade and remove the tripod. This is not difficult to do, look at the photo.
It is, of course, recommended to make notes which bearing should go into which grenade hole during reassembly. So, our drive shaft is removed.
- Next, remove the retaining rings and knock off the ring holding the tripod with bearings from the shaft.
- Next, remove the inner boot, then the outer boot.
Then we clean, lubricate and install everything in the reverse order, replacing the anthers with new ones. Let's look at the whole process in photographs. We clean exclusively with gasoline, wipe with any lint-free cloth, and use a brush when cleaning.
This completes the process of cleaning and replacing CV joint boots. As we see everything is very easy and simple, we did the same on the other side. If for some reason you want to change the CV joint completely, buy the entire assembly and install it after removing the drive shaft.
Where can I find repair instructions for Toyota Corolla? And also how to replace the CV joint with your own hands?
Thus, in general, all repair instructions are located in a book that usually comes with the car and this book is called Toyota Corolla Repair Manual (year of manufacture). If for some reason you do not have this manual, do not be lazy, go to the market or car service center and buy this manual.
It will be useful not only from the point of view of descriptions of the parts located in the car, but will also allow you to understand how they interact with each other. So, in this article we will look at replacing the outer left CV joint on a Toyota Corolla, since it is often the one that breaks down on the road.
It is necessary to remove the wheel and pull out the cotter pin (the main thing is not to lose it).
Special attention! On Russian cars the head must be elongated, on a Toyota Corolla it is suitable for an ordinary tool, that is, at any moment. Unscrew the nut, unscrew the 3 bolts from below using a hijack.
DETAILS: Replacing the vacuum brake booster of a VAZ 2121 Niva with your own hands
Raise the suspension, remove it together with the ball arm (where you unscrewed the 3 bolts), move the steering knuckle to the side, pull out the CV joint. Be careful when pulling out the CV joint! On the inside there is another internal CV joint, some have it secured very tightly, that is, if you pull it out, the CV joint will remain in the box, and the core will pop out. You can tear the boot, and it will be extremely difficult to get the CV joint itself.
If the CV joint is still stuck, knock it out with a hammer. Be sure to drain some of the oil so it doesn't drip onto the ground.
As you may have noticed, in writing this article, various terms were used that most likely will not be clear to you, especially for beginners. Therefore, it is recommended to purchase a Toyota Corolla Repair Manual, where you can find an alphabetical index of all terms used not only in various Internet articles, but also in the manual itself. And repairing a Toyota Corolla with your own hands will become a simple and exciting task.
The replacement will take place with complete removal of the hub. Spray the nuts of the steering tip, ball, caliper, and hub with WD40. The amount of WD depends on the contamination and “sticking” of the nuts.
2. remove the steering tip from the hub: - take out the pin securing the steering tip, - unscrew the nut, BUT NOT TO THE END, leave a couple of turns so that the nut does not fall off, - pry it off with a ball puller. without a puller - apply SIDE blows with a hammer to the place where the hinge is attached to the tip, - then unscrew the nut completely and carefully move the steering wheel to the side.
Grenade replacement
There is a suspicion that it was a grenade. Crunching noise when turning. who changed it, tell me what to replace it with (meaning the manufacturer) and how to make it (without servicemen)
There are 8 replies to this topic
vik writes: There is a suspicion that it was a grenade. Crunching noise when turning. who changed it, tell me what to replace it with (meaning the manufacturer) and how to make it (without servicemen)
The outer grenade crunches. You change it. I can't even recommend the manufacturer. I changed it a couple of times on different cars, the CV joint manufacturers were different. but everything seemed to be going well. I don't even remember the names of the manufacturers. In general, I advise you to change the entire drive, it’s faster and easier, and a little more expensive. It’s a little hard to knock down an external grenade; easier grenades can be used on cars with a 1.8 engine or more. The procedure is like this. 1. Place the automatic transmission selector lever in park and tighten the handbrake. 2. Unscrew the outer end of the drive and loosen the large drive nut from the outer end. 3. Jack up the car and remove the wheel. 4. Unscrew and remove the two lower shock absorber mounting bolts. 5. Unscrew and remove the fastenings to the brake hose stand and the ABS sensor wiring. 6. Using a mounting tool, shaking the hub, remove the ears of the strut from the steering knuckle of the hub. 7. Unscrew the previously loosened large nut. 8. Move the hub outward and, tapping the end of the drive with a plastic or wooden mallet, pull out the grenade from the splines of the hub (the hub comes out, the drive comes out towards the box). 9. You crawl under the car, wipe off dirt and sand with a rag from the internal grenade and adjacent parts so that during assembly and disassembly the dirt does not get into the internal grenade. 10. Remove the clamp from the boot of the internal grenade. 11. Holding the body of the internal grenade in place, pull the drive out, it comes out together with the boot of the internal grenade. Try to pull the body of the internal grenade out of the box, otherwise you won’t be able to catch the dextron from the box
Source
Seal selection
| Manufacturer | vendor code | Cost, rub) |
| Musashi | T1245 | 250 |
| THO | 01010158 | 165 |
| FEBEST | 95HAY35550915C | 103 |
| Toyota (original) | 9031628003 | 579 |
Oil seals are an inexpensive consumable that needs to be changed quite often. In this case, overpaying for original components is irrational. You can safely purchase seals using high-quality THO or FEBEST.
All analogues of oil seals are made of high-quality rubber and do not allow any technical fluids to pass through. Therefore, you should not be afraid that the internal parts will rust from grease or oil.
Original components cost from 16,000 rubles (for an outer CV joint). The internal one costs slightly less. If you want to replace the outer CV joint with an original part, purchase components with article number 4346009R20, 4346009R30.
If your budget is somewhat limited, you can purchase similar parts at a more affordable price. Let's look at the most popular options for choosing a CV joint for a Toyota Corolla.
| Manufacturer | vendor code | Cost, rub) |
| HDK | TO009A48 | 2846 |
| URW | MS212M0N | 3271 |
| ASVA | TYIUYAR15 | 2355 |
| LYNXauto | CO7507 | 1136 |
DETAILS: Where is the Opel Astra J (gasoline, diesel) fuel filter located and how is it replaced: instructions, photos. video
As it became clear from the summary table, the cost of non-original parts is much less. At the same time, their quality is in no way inferior to the original ones. The main thing is that the components you purchase are fully suitable for the car. Don't forget to check the article numbers so as not to stumble upon a Chinese counterfeit.
Replacing the oil seal on a Corolla 120
If you notice that the seals are not working correctly - for example, oil is leaking, it is time to replace them. To do this, prepare in advance keys for nineteen, a screwdriver, a jack and a dry cloth (needed to wipe off any remaining technical fluids). Then:
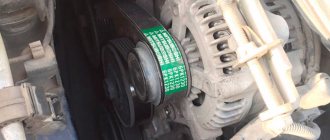
- Using a nineteen key, we get rid of the tension roller bracket. After removing the belt from the generator, you need to raise the right side with a jack.
- We get rid of the wheel by removing the protection. As soon as we gain access to the pulley, we can proceed to directly removing the old oil seal.
- Using a screwdriver, we wedge the flywheel and remove the bolt with a 19mm head.
- We remove the pulley by hand. We remove the old oil seal and wipe off any remaining oil from it.
- We drive in a new oil seal using a hammer or any other available tool.
- We assemble the parts in reverse order.
This completes the process of replacing the oil seal. Be sure to check that it is installed as tightly as possible. If you installed the new part incorrectly, you will soon notice leaks of technical fluids again.
Replacing CV joint oil seals Toyota Sprinter Carib Ae95
Replacing
CV joint oil
seals Toyota Sprinter Carib ae95
Creator: Van (Vlad-k), Vladivostok Year of manufacture: 1991 Engine: 4A-FHE, 1.6 l. Body brand: AE95 Body type: Station wagon Transmission: automatic Drive: full Ownership period: During the year
Fuel consumption: city 12 l., mixed cycle. 8-9 l.
I bought it a year earlier, even before the first increase in duties. Back then you could get a trouble-free device for 2500-3000, I didn’t have that left.
According to the old bad tradition, I again took a used car (before that there was a Nissan AD from 1988, when I realized with fear that it would soon turn 9 years old here, I decided to sell it as soon as possible, later no one would take it at all). I decided to buy Kariba a long time ago, they are very beautiful in the 95 body. I've been reading a book on the Caribbean and looking at the advertisements here.
I looked at only 4 cars, our client is left with the traders, as they agreed, they asked for 1800 and were not inferior. The first one didn’t impress me, the equipment was standard, the left mirror was damaged. The other one was even better, but we have 4 years and mileage accordingly. 179,000 km (in fact, I bought it later).
The 3rd was the youngest, we only had it for a year, but the equipment was no good, there was no spoiler, no glove compartment near the ceiling, and the receiver with one speaker completely finished me off. The 4th one I liked was more than just anyone: one hundred percent complete, a hatch, a spoiler, a super salon, a screwed-up tape recorder, a bunch of cracks on the front fender and a non-working power steering.
Adaptations
Professionals do not use any specialized equipment when replacing CV joints. However, if you lack the skills, a device for pulling a “grenade” from the shaft can help, at least psychologically. They can be of different designs; the common thing is a clamp fixed to the drive shaft and a screw puller that pulls the hinge from it.
Sometimes the existing shank of the outer race with a standard hub nut screwed onto it is used as the working thread of this puller. The device is as trustworthy as it is inconvenient in practical work.
The bottom line is that the grenade is held on the shaft by a spring retaining ring, which is recessed into the groove of the splined part under pressure from the inner race. The angle of attack of the cage chamfer on the ring greatly depends on the deformation of the ring, the presence of lubricant and rust, and the chamfer configuration.
It often happens that the ring does not sink in, but rather jams, and the greater the force, the stronger its resistance. In this case, a sharp blow works much more effectively than even significant pressure developed by the puller thread.
And the entire procedure for installing a device in a limited space takes a lot of time. But sometimes it actually works, simultaneously preventing the transfer of loads to the adjacent hinge.
Collecting shruz
We fill the outer CV joint with lubricant. It is required to put approximately 100-120 grams into the hinge and boot. We put on a new boot and secure it with clamps.
Next, we assemble the internal tripod hinge. You must remember to first put the small boot clamp on the shaft, then the boot itself.
The tripod fits on with difficulty; the easiest way to adjust it is with a 24mm socket.
We place it on top of the tripod and lightly tap it with a hammer and press it onto the shaft, while trying not to damage the bearings.
We also use a socket to fix the retaining ring.
For the inner joint, I used Slipkote Polyurea CV Joint Grease, a polyurea-based lubricant specifically formulated for tripods with needle bearings.
Manufacturers do not recommend using graphite-containing CV joint lubricants, which are used in ball joints, in internal tripod-type joints with needle bearings.
We remove the old grease from the internal grenade and put the remaining grease into it. The internal hinge requires 180-190 grams.
We insert the tripod into the grenade, put on the boot, insert the outer grenade into the hub and secure it with the hub nut.
We screw the ball joint to the lower arm (2 nuts and 1 bolt, tightening torque 142 Nm). We insert the stabilizer link pin into the mounting ear on the lower arm and tighten the nut to a torque of 44 Nm.
The drive shaft is in place.
We put on the wheel, lower the car and tighten the hub nut to a torque of 216 Nm. We put on the star lock washer and insert the cotter pin.
Since I drained the old oil from the box, I decided to fill it with fresh Liqui Moly GL4/GL5 SAE 75W-90 for manual transmissions and axle reducers.
For the C150 box you need 1.9 liters, I could fit both liter cans (maybe because the car was jacked up on one side, on the left).
The drain and filler plugs are the same, both 24, the washers under them were not wrinkled, I left them, the tightening torque of the plugs is 39 Nm.
Well, I filled in the oil using a rubber tube and a funnel.
CV joint seals on Toyota Corolla E150: what and when to change?
Installing new seals on the hinges is an integral part of servicing the vehicle chassis - neglecting replacement reduces the service life of CV joints. To replace, in addition to new seals and lubricant, you will need socket heads “30” and “13”, as well as a slotted screwdriver and a hammer. To replace consumables on CV joints you must:
- Place the vehicle on a lift or jack up the front of the vehicle;
- Drain the oil from the junction box;
- Next, you will need to remove the right drive and, using the tip of a screwdriver, remove the oil seals from the housing of the crankcase and the box;
- Then we lubricate the new part with oil and install the appropriate clamp for fixation, after which we install the oil seal in place;
- Now install the drive and fill in the transmission oil.
In order not to damage the new oil seal, it is also recommended to install the part using the tip of a slotted screwdriver, having previously wrapped the slot with masking tape or electrical tape.
We clean everything from dirt and dust
Now you need to wash both hinges in gasoline or some solvent to remove old grease, sand and dust that got through the crack in the boot.
Old grease can be easily washed off with a brush. It is worth noting that at first I washed the tripod and the gasoline did not change much in color and remained transparent, although the lubricant was dark gray in color, but when I washed the outer CV joint.
Then the gasoline in the bath turned black (a graphite-containing CV joint lubricant was used). It follows from this that I used different lubricants for the external and internal hinges (as it should be).
Wipe everything with a clean rag and let the solvent dry a little.
For the outer joint I used Liqui Moly 47 Langzeitfett + MoS2 CV joint lubricant with molybdenum disulfide.
Replacement internal and external
Before replacing, you must prepare the following tools:
- Round nose pliers or a special puller to remove the retaining ring;
- Thin pliers;
- Repair kit;
- Special lubricant, alternatively you can use Neo and Liqui Moly 47;
- Hammer;
- Set of socket heads;
- Jack;
- Grease WD 40
- The screwdriver is preferably flat.
When everything is prepared, you can start changing the CV joint on a Toyota Corolla:
- On the replacement side, the car is jacked up and the wheel is removed;
- The control washer and cotter pin are removed;
- The nut at the hub is unscrewed; you can unscrew it using a 30mm socket; to lock the unscrewing element, you can press the brake pedal;
- The ball joint is disconnected from the lower arm; to do this, two nuts are tightened;
- The anti-roll bar link is unscrewed and disconnected;
Important: If during work you encounter difficulties with unscrewing the bolts, you can use a special lubricant, for example WD 40.
The steering wheel is turned to the side, after which the clamp is pressed out of the boot using a screwdriver, then if there is a puller, then with its help the CV joint is squeezed out of the seat, after which it is removed. If there is no puller, then you need to tap on the axis of the outer hinge with a hammer or a wooden mallet, then pulling the stand a little to the side, the part is slowly pulled out from the axis of the hub. The clamp is removed from the inside of the part, then the anthers are removed from the grenade, after which the drive is removed.
In order to be able to dismantle the boot, it is necessary to remove the retaining ring that holds the tripod, after which the bearing is knocked off the shaft. When the work is done, all elements are cleaned, lubricated and installed in the reverse order, and all boots are replaced with new ones.
The main symptoms of a malfunction on a 120-150 body
Signs indicating that there are problems with this nodal system are as follows:
- Vibration occurs while driving. This may indicate that the outer joint of the wheel drive or its rollers are very worn;
- He begins to drive the car;
- Oil streaks have appeared on the CV joint; as a rule, the cause is poorly tightened clamps or damage to the boot;
- An extraneous knock or noise is heard in the area of the front wheel while driving;
- There is a knocking sound when turning.
Source
Types of CV joints
Based on their location on the drive, hinges are divided into external and internal. The division is not purely geometric; the nature of the operation of these CV joints is very different, which is why they are constructed differently.
If the external one is almost always a six-ball “grenade” of impressive size, then the internal ones are often a three-pin joint of the “tripoid” type with needle bearings.
An example of the operation of an outer CV joint.
How does the internal CV joint work?
But such differences have little effect on the replacement method; the insides of the CV joint will not affect the progress of work. The presence of balls will require greater care; they can easily be lost if handled carelessly.