During the computer check, a special built-in device is used - a diagnostic connector.
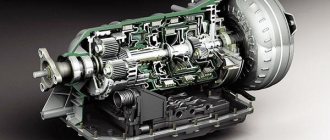
At the same time, the quality of operation of the injection engine, gearbox, electronic sensors, security system and other actuators is diagnosed. Errors recorded on the electronic control unit (ECU) are analyzed.
Self-diagnosis procedure
This function is available if the climate control on the Camry 40 is equipped with a unit with an LCD display. On older versions of units, diagnostics can only be carried out using a car scanner by connecting to the standard connector located near the steering column.
Self-diagnosis procedure
We are trying to carry out self-diagnosis of the climate systems in the car, you need to perform the following steps:
- Turn off the engine, turn off the ignition.
- Simultaneously press the Auto button on the climate control panel and the button that activates internal air circulation.
- While holding the buttons, turn on the ignition. At the same time, all indicators located on the remote control display will begin to blink, which indicates the start of the self-diagnosis process.
- After checking the display and diagnostics of the sensors, an error code will be displayed on the display in the place where the temperature is normally displayed.
- If 2 or more errors occur, they are displayed alternately, starting with the smallest code.
The climate control on the Toyota Camry is equipped with a considerable number of electric drives, the functionality of which can be checked by switching to self-diagnosis mode. To do this you need:
- Start the system self-diagnosis process as described above, then press the button that activates air circulation inside the cabin. Important: diagnostics must be performed on a fully warmed-up internal combustion engine.
- During the test, various fan operating modes will turn on alternately, with a delay of 1 second, and the dampers will open/close.
- You can increase the interval for changing modes by pressing the windshield defogger button.
- To exit the test mode for drives, relays and fans, press the AUTO button - in this case, the control unit will switch to the sensor test mode.
The diagnosis is completed by pressing the Off button.
Climate control for Toyota Camry
The climate control control unit on the Toyota Camry supports the memory clearing function. It should be carried out after eliminating errors that arose during the self-diagnosis process. It is performed as follows:
- The control unit is put into diagnostic mode.
- Press the front window heating and rear window heating buttons at the same time.
- The error memory has been cleared.
There are many reasons why the climate control on a Camry 50 or 40 shows errors during self-diagnosis: from missing contact to sensor failure.
Possible malfunctions that occur during climate control operation are as follows:
- sensor malfunction. Fixed by replacing it;
- control unit malfunction. Often, to fix the problem, it is enough to simply disassemble it and solder all the contacts;
- Damaged electrical wiring or sensor connectors. This often occurs as a result of unqualified intervention in the electrical equipment of a car;
- weak compressor drive belt tension or damage. In this case, you need to check the integrity of the belt;
- failure of the electromagnetic clutch sensor installed in the compressor;
- compressor failure or blockage;
- leakage or lack of refrigerant, or its level does not correspond to that established by the car manufacturer;
- lack of contact with the instrument panel or engine ECU.
It is also worth noting that the climate control on Camry 40 or 50 must be diagnosed in a well-lit room or outdoors - otherwise a light sensor error may occur.
How is this operation useful?
It is important to remember that data about an error that occurs must be entered into the memory of the on-board computer. If its power was not interrupted (the battery was not removed, for example), this data can be read from the instrument panel (Toyota) or pulled out from the computer itself (Nissan). In case of some malfunctions, the engine will immediately stall, but in some cases, when the malfunction prevents the operation of the machine, the error code is simply recorded in the internal memory of the computer.
This is very convenient, since later you will be able to find out all the details about the condition of your car. Actually, this is what self-diagnosis is good for. Toyota, therefore, compares favorably with other foreign cars in that you can save a lot on finding out the reasons why various problems occur.
In addition, this way you can find out the reasons why the car behaves abnormally from time to time. For example, you stopped due to a stalled engine in the middle of the road. We turned the key in the ignition a couple of times - the engine started up smoothly and the car drove on. What was it? You definitely won’t know anything by eye, but if you look at the contents of the on-board computer’s memory, everything will become clear. How does Toyota self-diagnosis start? Let's find out!
Description of the self-diagnosis process
First you need to check that the battery has a voltage of at least 11 volts, the throttle valve is closed, and all electrical appliances are turned off. For convenience, you also need to prepare a homemade jumper from a metal clip or wire.
- turn off the ignition;
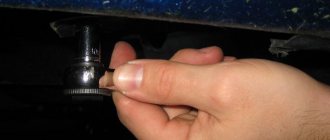
- using a paper clip, close the 4th and 13th contacts on the OBD-II connector;
- turn the key to “ON” mode (do not start the engine);
- after 4 seconds, read the ABS error code;
- remove the jumper clip from the installed contacts.
The error is indicated by two numbers: the first is counted by the number of blinking indicator lights every 0.5 seconds, then a break, the second is also counted by the number of blinks with an interval of 0.5 seconds. After 2.5 seconds, the next code is issued, etc. When all codes have been issued, after a break of 4.5 seconds, the codes are issued again. If there are no errors, the interval between signals is 0.25 seconds.
Two-digit ABS codes are deciphered using special tables.
Modern scanners
There are now many scanners available for reading car error codes that completely decipher error codes. These programs are translated into Russian, are easy to use and allow you to configure vehicle parameters. For example, the time when the headlights go out after turning off the ignition, after how many seconds the lights in the cabin go out when boarding, disembarking, and more.
The car owner should think about purchasing diagnostic equipment. Not bad manufacturers of diagnostic devices: Launch, ELM, Autel, Autocom, Carman.
Errors in the 4WS system
To read errors, you need to count the number of flashes of the 4WS lamp. In this case, the ignition must be turned on, and contacts TC and E1 in connector DLC1 must be closed.
Decoding the main errors:
Help from our specialists
Dear users of the Autofakty project! Unfortunately, it is extremely difficult to list all Toyota error codes and their detailed decoding. Therefore, if you were unable to find the answer to your question in our article, write to us in the comments at the bottom of the article. Please indicate the year of manufacture, car model, engine and gearbox type, as well as the error code for which you are looking for decoding. We will do our best to find an answer to your question as quickly as possible. Stay with us!
How to turn off the ABS lamp
Next, you need to eliminate the identified faults. To stop the warning light from flashing, it is not enough to eliminate the fault. To turn it off, do the following:
- Start the engine and drive for half a minute at a speed of 20 km/h.
- Make sure the ABS light is not flashing.
- Reset error code.
If this does not help, the lamp continues to blink, there is a second option:
- Stop the car for 5 - 7 seconds.
- Press the brake pedal several times.
- Continue driving at a speed of 50 km/h.
- Depress the brake pedal for three seconds.
- Repeat three times.
After the ABS light goes out, you need to reset the error code.
Visual inspection
First of all, you need to clean the car and carefully inspect the body, where there should be no gaps, damage, distortions, and so on. In addition to external data, the condition of the oil and other liquids of the machine
(engine oil, antifreeze, brake fluid, automatic transmission oil, power steering oil). It is necessary to look at these fluids, assess the presence/absence of leaks under the hood, as well as under the car itself and near the exhaust pipe. If there are such spots, then it is worth assessing the color of the leaked liquid and thus guess what exactly the malfunction is.
Do not neglect visual inspection data. After all, body distortions may indicate problems with the suspension, and oil stains near the exhaust pipe may indicate a heavy load on the engine and the possibility of its rapid wear.
Reset errors
After the repair has been made and the breakdown has been fixed, the error codes may not disappear on their own. There is also a certain sequence of actions to reset them. To do this, we again need a diagnostic connector.
To reset codes you need to:
- Turn on the ignition.
- At the DLC1 connector, short-circuit the TC and E1 terminals with a piece of wire or wire.
- In 3 seconds, press the brake as many times as possible, but not less than 8.
- Make sure the light blinks evenly at half-second intervals.
- Turn off the ignition and remove the jumper from the contacts.
- Make sure that the ABS indicator does not light up.
“Artem0023” explains in the video how to carry out self-diagnosis of Toyota cars step by step:
6.2.2. Self-diagnosis (OBD) system and codes
Digital voltmeter
Warning
On models from 1990 to 1994, the OBD1 self-diagnosis system is installed, and since 1995, the OBD2 self-diagnosis system is installed.
To determine fault codes in the OBD1 system, you simply need to disconnect the test connector located under the instrument panel. But to determine fault codes in the OBD2 system, you must use a special device to view fault codes. To diagnose the exhaust gas emission reduction system and control engine operation, it is advisable to use a digital voltmeter, which has a high input resistance and does not affect the operation of the circuit being tested (see Fig. Digital voltmeter ).
To determine fault codes and analyze engine control systems, it is necessary to use special scanners (see fig. Scanner ).
The ECM contains a built-in self-diagnosis system that detects and classifies faults in electrical circuits. When the ECM detects a malfunction, the check engine light comes on, the malfunction is identified, and a fault code is written and stored in memory.
There are four methods for self-diagnosis of engine malfunction. The check engine light comes on if there is a fault in the U-mode.
most user friendly.
Memory reading method.
Designed for the maintenance department to check stored fault codes.
Used to check faulty parts.
Cleaning method.
Designed to delete recorded fault codes.
| A digital voltmeter is used to diagnose the emission control system and control engine operation. | The scanner is used to determine fault codes and analyze engine management systems. |
| EXECUTION ORDER |
| 2. Turn on the ignition without starting the engine and check that the check engine light in the instrument cluster is on. | |
| 3. Watch the check engine light, which will highlight fault codes stored in the computer's memory. If there are no fault codes, the check engine light will not light up. If the check engine light flickers, it means that the fault method test connector is not disconnected. | |
| 4. Observe the check engine light to determine any fault codes. The first digit of the fault code is displayed with long flashes, and the second digit of the fault code is displayed with short flashes. For example, 4 long flashes represents the number 4, and two short flashes represent the number 2, that is, fault code 42. |
General procedure for diagnosing ABS and TRC
This is done in the following order:
Turn on the ignition without starting the car engine. If there are differential locks, they need to be disabled, otherwise the self-diagnosis of the Toyota engine simply will not start due to software restrictions.
Find the DLC 1 diagnostic unit (as we said, it is located under the hood), then, according to the “recipe” given above, insert a wire or wire jumper there. Note that the MR-2 model does not have the connectors we require in DLC 1. In this case, look for a dangling “medallion” with connectors that will hang near the engine. The body should say ABS.
The ABS lamp will begin to blink, using its signals to determine a specific malfunction.
After this, you can clear the computer's memory. You need to turn on the ignition, turn off the differential locks (if any), and then quickly press the brake pedal, and the interval between presses should not exceed three seconds. When the memory is completely cleared, the diagnostic lamp will begin to blink at intervals of 0.5 seconds between blinks.
In general, this is how Toyota ABS self-diagnosis is performed. The jumper with DLC 1 is removed, after which the standard part is installed in place. And in the case of ABS, the block is returned to its original state.
Other additions from this review
Code 31 - 3 flashes, pause, 1 flash MAP absolute pressure sensor in the intake manifold Open or short circuit in the electrical circuit of the MAP sensor. Code 32 - 3 flashes, pause, 2 flashes. Air flow meter V6 engine.
Air flow meter or air flow meter electrical circuit. Code 41 - 4 flashes, pause, 1 flash Throttle position sensor Open or short circuit in the electrical circuit of the throttle position sensor. Throttle position sensor or throttle position sensor circuit.
Toyota Camry 2006, 184 l. With. - electrical and electronics
Vehicle speed sensor or vehicle speed sensor circuit. Air conditioner switch or switch circuit. Air conditioner starter lock.
Toyota Camry error 40: fault codes, how to reset
HomeCamry Camry error codes help, using computer diagnostics, to make the correct “diagnosis”, to understand which element, motor sensor, gearbox, etc. has failed. This significantly speeds up car repairs. Modern scanners independently decipher error codes, but if you use diagnostic equipment that does not do this, we will try to help.
The inscription on the computer screen is CHECK VSC SYSTEM.
Proper diagnostic work on Camry 50
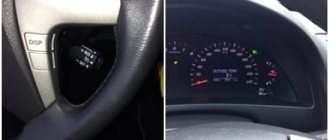
Diagnostic connector in Camry 30 The sequence for reading the error code is approximately the same for all Toyota cars:
- with the ignition off, connect the scanner to the diagnostic connector,
- establish a connection between the scanner and the phone via Bluetooth, if the diagnostic program is installed as an application on the smartphone; connect the scanner to a laptop computer on which the diagnostic program is installed,
- in the program menu to read the error code, select the Toyota Camry of the required year and body,
- turn on the ignition or start the engine and start scanning,
- the program will display error codes that have been stored in the vehicle control units since the last time the fault codes were deleted,
- delete all errors, drive the car for 2-3 kilometers and read again, now the equipment will show only existing problems, and not all, including those that have been resolved,
- write down the error codes, if the program decrypts, then write down or save the problems shown,
- After completing diagnostic operations, turn off the scanner and ignition.
After the manipulations have been performed, analyze the information received and troubleshoot.
Where is the OBD2 port in my car?
All cars are equipped with an OBD port to which the klavkarr diagnostic case can be connected. Sometimes the hardest part is finding that port! To save you time, we've made available (for free) information uploaded by our community of tens of thousands of users.
Since the introduction of the OBD standard, every vehicle has a standard 16-pin connector, as described on our OBD presentation page.
The norm states that the port should be located inside the vehicle. Depending on the make and model, it may be difficult to find.
Go to Toyota OBD2 car scanner
Use our search engine below to find your OBD2 port!
All compatible brands (in alphabetical order)
Download the app “Where is my OBD2 port? Find him!
Our application “Where is my OBD2 port? Find it!” available on Google Play and the App Store. Click on the links below to download and install on your smartphone:
Is your car not on the list? If you would like to help make this page accessible to everyone, please send us your photos through the app
.Electrical connection diagram
Modern scanners
There are now many scanners available for reading car error codes that completely decipher error codes. These programs are translated into Russian, are easy to use and allow you to configure vehicle parameters. For example, the time when the headlights go out after turning off the ignition, after how many seconds the lights in the cabin go out when boarding, disembarking, and more.
The car owner should think about purchasing diagnostic equipment. Not bad manufacturers of diagnostic devices: Launch, ELM, Autel, Autocom, Carman.
Toyota Camry 40 error codes
Check VSC System - a message appears on the on-board computer screen.
The Check VSC System notification itself does not carry specific information; it is a warning that something is wrong with the car. There may not be any significant problems, for example, if you refuel with the engine running, or you have recharged a dead battery, Check VSC System will appear. If there is no breakdown, the message will go away, turn off and start the car 10 times or disconnect the terminal from the battery for 5 minutes. The notification does not go away, then carry out computer diagnostics of the Camry.
The inscription on the computer screen is CHECK VSC SYSTEM.
Other diagnostic control
When asking for help in diagnosing a car at a service center, you can order a test using compression measurements
, as well as
inspection of the Toyota Camry chassis
. When measuring compression, the pressure in the cylinders is checked, which makes it possible to find out about existing and just beginning problems with the engine. During the chassis inspection, the car is placed on a stand, after which the suspension is checked. The condition of the springs, shock absorbers, the condition of the brake system, and the tightness of the hydraulic and brake systems are determined.
Toyota Camry XV30
If self-diagnosis of the machine does not give the most reassuring results, then you should consider contacting a service center. After all, a timely call for service often makes it possible to identify a car problem at an early stage and significantly save on repairs.
- Tweet
- Share 0
- +1
- LinkedIn 0
P0351, P0352, P0353, P0354, P0355, P0356
Ignition coil errors, the last two can only appear on Toyota V6 engines, for example, 2GR-FE. Reasons for these codes:
- faulty ignition coil,
- faulty wiring leading to the coils,
- broken electronic control unit.
To accurately determine the malfunction, use an oscilloscope to measure the electrical signal from the ignition coil that showed the error. If you don't have an oscilloscope, you can swap the potentially faulty coil with another. For example, there is an error P0351, we moved the coil from the first cylinder to the second, now the scanner shows P0352 - the problem is in the coil, but if the code remains the same P0351 - the wiring or ECU is faulty.
What does error 21 mean?
You can set error code 21 (or P0135) for a Toyota engine by diagnosing the vehicle.
If the car is not new, you should first reset the previous diagnostic data. Next, the car should be driven for some time (about half an hour) and the self-diagnosis process can be repeated. Only in this case can you be sure that error 21 exists and the electronic control unit produces reliable and not outdated data.
Code meaning
If the diagnostic conclusion is error code 21, then your “iron friend” has problems with the oxygen sensor (or Lambda Probe). This part is very important for your car, because it is responsible for maintaining the optimal ratio of air and fuel entering the cylinder of the engine system. 14.7:1 - these indicators are considered the most successful in the ratio of air and fuel. In modern engine models, the lambda probe is installed in at least two places: before the catalyst and after. In this case, the most accurate information is sent to the electronic unit. In the diagnostic report, Toyota error 21 looks like this: “OBD 2 this = error P0135 O2 Sensor Heater Circuit Malfunction (Bank 1 Sensor 1)=”
The essence of the problem lies in the malfunction of the oxygen sensor heater, which results in overheating of the catalyst. The service life of an oxygen sensor in our harsh conditions is relatively short, only about 2 years. In addition to the conditions in which the car is operated, the service life can also be affected by the technical condition of the engine.
Symptoms of “disease code 21” in a Toyota engine
All deviations in the operation of the car as a result of the failure of the oxygen sensor can be divided into two types:
- As a result of increased fuel content/lack of air (rich mixture).
- As a result of increased air content/lack of fuel (lean mixture).
The very first and most obvious sign of error 21 is increased fuel consumption. Because as a result of a breakdown of the oxygen sensor, the electronic unit takes average readings of the air and fuel mixture.
In addition to increased fuel consumption, many other deviations can be observed, such as:
- reduction of dynamic capabilities;
- extraneous sounds in the gearbox;
- appearance of black smoke;
- decrease in the “sensitivity” of the car.
And this is not a complete list of troubles caused by the problem.
P0172
Error P0172 - Air/fuel mixture too rich. Causes:
- air intake system,
- faulty injectors,
- not working correctly mass air flow sensor,
- fuel pressure is outside acceptable limits,
- exhaust gas leak,
- the problem is in the circuit or in the oxygen sensor itself,
- ECU.
To make an accurate diagnosis, contact an experienced specialist. One option to eliminate the error is to replace the VVT-I valve.
P2237
P2237 – open circuit in the oxygen sensor (A/F) pumping current circuit, P2238 – low current in the oxygen sensor (A/F) pumping current circuit (1 row 1). We are talking about a lambda probe installed before the catalyst, which is located next to the engine. This error may not affect the behavior of the car, but fuel consumption will increase. We would like to warn against replacing this sensor with a non-original one.
The lambda probe, located before the catalyst near the engine, is replaced only with the original one. The second sensor installed after the catalytic converter can be replaced with a universal one. Using this head will allow you not to remove the heat shield when replacing failed lambda probes.
Important Note
It is important to remember one simple rule: all engines of the Japanese concern are initially equipped with almost identical diagnostic programs. However, due to design differences that can occur even within the same family of the same Corolla, the signals will be completely different.
It is completely pointless to present them on the pages of this article, since this data should be in the operating manual of your machine itself. We strongly do not recommend using data from other models, since with this approach you may completely incorrectly diagnose the problem that has arisen in your car.
P0137, P0157
P0137, P0157 – low voltage in the oxygen sensor circuit (bank 1, bank 2 sensor 2). Causes of errors P0137, P0157:
- open circuit, break in the heated oxygen sensor circuit, row 1,2 sensor 2,
- faulty lambda probe (heated oxygen sensor),
- air/fuel mixture sensor bank 1,2 sensor 1,
- leakage from the exhaust gas system.
New and Old Lambda Sensor If, during active air-fuel ratio control, the target ratio is rich but the heated oxygen sensor output voltage is less than 0.21 V (lean), the ECM treats this as an excessively low sensor output voltage and sets DTC P0137 or P0157 . During active air-fuel ratio control, if the target ratio is lean but the output voltage is greater than 0.59 V (rich), the ECM considers this to be an excessively high sensor output voltage and sets DTC P0138 or P0158.
If replacing the sensor did not bring results, then the technicians could have replaced the wrong sensor (this happens often), or the problem is not in the sensor, but in the circuit or in an exhaust gas leak. Check all connectors; they may have oxidized or moisture may have gotten into them. Visually inspect the wiring to see if its integrity is damaged. If the circuit is visually in order, then check its operation using an oscilloscope.
Catalog number 1 of the oxygen sensor installed before the catalyst.
The most common indicators
Fuel problems
This error has code value B 1206. Errors, according to the comments of many users, can occur for various reasons. Often this value is shown on the display during mechanical shocks to the car, as well as in the event of excessive fuel consumption associated with engine breakdowns. Despite the prevalence of this problem, if the treasured numbers are discovered, it is necessary to contact specialists who will conduct a full diagnosis and identify faults.
Indicator “low efficiency of catalysts”
If the numbers P0420 appear, these are error codes indicating insufficient efficiency of the catalyst system.
If the problems are not corrected in a timely manner, you will have to spend considerable effort and money on restoring the Toyota Camry automobile unit.
It’s bad if the resource is exhausted, but the problem can be solved: contact a specialized service, where you (or rather, your car) will be helped and assisted in finding problems.
Error 1604
This situation (referred to as P1604) indicates the presence of several (or one) unsuccessful attempts to start the car engine. The solution to the problem depends on the reason why the launch failed. If this is an incorrect start or mechanical action, it is worth trying again; if it is frosty or cold, reheat the unit. If the reason is unclear, only a qualified technician can provide proper assistance in solving this problem. The erroneous parameter P1604 is common, but this does not mean that it can be ignored.
Error value A799
This parameter can be deciphered in different ways, depending on the nature of the malfunction. This may indicate a malfunction of several elements or exceeding the course speed. Errors 799 are less common than other faults, but nevertheless they do occur. The first action that the driver must take is to understand the cause of the problem in order to ensure the stability of all vehicle systems. A competent approach to solving the problem will ensure your peace of mind and constant comfort.
Video
Toyota Camry error codesLink to main publication
| Code 1 – 1 flash, pause, 1 flash | No faults | |
| Code 12 – 1 flash, pause, 2 flashes | The NE signal does not arrive to the ECM within a few seconds after the engine starts. The G signal does not arrive to the ECU at engine speeds from 500 to 4000 rpm. | Electrical circuit of the ignition distributor. Distributor. |
Ignition unit. Electrical circuit of the ignition unit. Starter electrical circuit. ECM block.
Fault codes for gasoline engines (Toyota)————————————————————————————Self-diagnosis codes are read by the number of flashes of the “CHECK ENGINE” indicator when the “TE1” terminals are closed ”-“E1” connector DLC1 under the hood or “TC”-“CG” connector DLC3 under the dashboard and the ignition is on.12 - Crankshaft position sensor (P0335)13 - Crankshaft position sensor (P0335, P1335)14 - Ignition system , coil No. 1 (P1300) and No. 4 (P1315)15 - Ignition system, coil No. 2 (P1305) and No. 3 (P1310)16 - Automatic transmission control system18 - VVT-i system - phases (P1346)19 - Pedal position sensor accelerator (P1120)19 - Accelerator pedal position sensor (P1121)21 - Oxygen sensor (P0135)22 - Coolant temperature sensor (P0115)24 - Intake air temperature sensor (P0110)25 - Oxygen sensor - lean signal (P0171) 27 - Oxygen sensor No. 231 - Absolute pressure sensor (P0105, P0106)34 - Turbocharging system35 - Turbo pressure sensor36 - CPS sensor (P1105)39 - VVT-i system (P1656)41 - Throttle position sensor (P0120, P0121)42 — Vehicle speed sensor (P0500)43 — Starter signal47 — Additional throttle position sensor49 — Fuel pressure sensor (D-4) (P0190, P0191)51 — Switch status52 — Knock sensor (P0325)53 — Knock signal55 — Knock sensor No. 258 — SCV drive (D-4) (P1415, P1416, P1653)59 — VVT-i signal (P1349)71 — EGR system (P0401, P0403)78 — Injection pump (D-4)89 — ETCS drive (P1125, P1126, P1127, P1128, P1129, P1633)92 - Cold start injector (D-4) (P1210)97 - Injectors (D-4) (P1215) Fault codes for diesel engines (Toyota)——————————— ———————————————–12 — Crankshaft position sensor13 — Speed sensor14 — Injection advance angle adjustment valve15 — Throttle valve servomotor17 — Control unit signal18 — Electromagnetic bypass valve19 — Accelerator pedal position sensor22 — Coolant temperature sensor24 — Intake air temperature sensor32 — Correction resistors35 — Boost pressure sensor39 — Fuel temperature sensor42 — Vehicle speed sensor96 — EGR valve position sensor Automatic transmission fault codes (Toyota)——————————————— ———————————–Self-diagnosis codes are read by the number of flashes of the “O/D OFF” indicator when the “TE1”-“E1” terminals of the DLC1 connector under the hood or “TC”-“CG” of the DLC3 connector under the hood are closed instrument panel and the ignition is on (in this case, overdrive must be allowed - “O/D OFF” is not lit).11 - Normal37 - Automatic transmission input shaft speed sensor (P1705)38 - Automatic transmission fluid temperature sensor42 - Speed sensor (or output shaft speed sensor) (P0500)44 - Speed sensor (or rear output shaft speed sensor)46 - Accumulator pressure control solenoid (P1765)61 - Speed sensor (or front output shaft speed sensor)62 - Solenoid No. 1 ( P0753)63 — Solenoid No. 2 (P0758)64 — Torque converter lockup clutch solenoid (P0773)67 — Automatic transmission input shaft speed sensor68 — Torque converter lockup clutch control solenoid73 — Center differential lockup clutch solenoid ABS fault codes (Toyota)—————— —————————————————————Reading codes (models with DLC1 connector)— Turn on the ignition.— Jumper the “TC” and “E1” terminals of the DLC1 connector.— Remove the jumper from pins “WA” and “WB” of connector DLC1.— After 4 seconds, read the code by the number of indicator flashes.— Remove the jumper from pins “TC” and “E1.”
— Install a jumper on pins “WA” and “WB”.
Resetting codes (models with DLC1 connector)— Turn on the ignition.— Jumper the “TC” and “E1” terminals of the DLC1 connector (vehicle stationary).— Press the brake pedal eight or more times in an interval of three seconds.— The indicator should display the normal code ( blink 2 times per second).— Turn off the ignition.— Remove the jumper from the “TC” and “E1” terminals.
— Make sure the ABS indicator goes out. Reading codes (models with DLC3 connector)—Jump the “TC” and “CG” terminals of the DLC3 connector.—Turn on the ignition.—After 4 seconds, read the code by the number of indicator flashes.
— Remove the jumper from the “TC” and “CG” terminals. Resetting codes (models with DLC3 connector)— Jumper the “TC” and “CG” terminals of the DLC3 connector. — Turn on the ignition.
— Press the brake pedal eight or more times within an interval of three seconds. — The indicator should display the norm code (blink 2 times per second).
— Remove the jumper from the “TC” and “CG” terminals.
Code System11 Open circuit in the solenoid valve relay12 Short circuit in the solenoid valve relay circuit13 Open circuit in the electric pump relay circuit14 Short circuit in the electric pump relay circuit21 Open circuit or short circuit in the front right wheel solenoid valve22 Open or short circuit in the front left solenoid valve wheels23 Open circuit or short circuit in the rear right (left) wheel solenoid valve24 Open circuit or short circuit in the rear left (right) wheel solenoid valve31 Malfunction of the front right wheel speed sensor32 Malfunction of the front left wheel speed sensor33 Malfunction of the rear rotation speed sensor right wheel34 Malfunction of the rear left wheel speed sensor41 Battery voltage is too high or too low43 Malfunction in the deceleration sensor circuit44 Open or short circuit in the deceleration sensor circuit49 Open in the brake light switch circuit51 Short circuit or open circuit in the electric pump power supply circuit71 Low signal level from the frequency sensor rotation of the front right wheel72 Low signal level from the front left wheel speed sensor73 Low signal level from the rear right wheel speed sensor74 Low signal level from the rear left wheel speed sensor75 Incorrect signal change from the front right wheel speed sensor76 Incorrect signal change from the speed sensor rotation of the front left wheel77 Incorrect change in the signal from the rear right wheel speed sensor78 Incorrect change in the signal from the rear left wheel speed sensor79 Malfunction of the deceleration sensor98 - Vacuum sensor in the vacuum brake booster (C1200 SRS fault codes (Toyota)————————— —————————————————–Self-diagnosis codes are read similarly to others, by the number of flashes of the “SRS” indicator when the “TC”-“E1” terminals of the DLC1 connector under the hood or “TC”- are closed. “CG” of the DLC3 connector under the dashboard and the ignition is on.
Codes should be erased when the ignition is turned off. If the codes are stored, it is necessary to carry out the cleaning procedure: - connect two wires to the “TC” and “AB” terminals - turn on the ignition and wait at least 6 seconds - alternately, once a second, short the “TC” and “AB” terminals to ground ( pause between closures - less than 0.2 seconds) - after the third closure of the “TC” output, the indicator should flash at a high frequency - this means the codes are erased.
11 — Driver air protection igniter (short to ground)12 — Driver air protection igniter (short to power)13 — Driver air protection igniter (short circuit)14 — Driver air protection igniter (open circuit)15 — Front right SRS sensor (short or open) in the circuit)15 - Front right SRS sensor (short to ground or power)16 - Front left SRS sensor (short or open circuit)16 - Front left SRS sensor (short to ground or power)31 - Malfunction of the SRS control unit51 - Igniter Passenger CB (short to ground)52 - Passenger CB igniter (short to power)53 - Passenger CB igniter (short circuit)54 - Passenger CB igniter (open circuit)61 - Driver belt pretensioner igniter (short to ground)62 - Driver belt pretensioner igniter (short to power)63 - Driver belt pretensioner igniter (short circuit)64 - Driver belt pretensioner igniter (open circuit)71 - Passenger belt pretensioner igniter (short to ground)72 - Passenger belt pretensioner igniter (short circuit) to power supply) 73 — Passenger belt pretensioner igniter (short circuit) 74 — Passenger belt pretensioner igniter (open circuit) 4WS system fault codes (Toyota)—————————————————— ————————–Self-diagnosis codes are read by the number of flashes of the “4WS” indicator when the “TC”-“E1” terminals of the DLC1 connector under the hood are closed and the ignition is on.
Code System - -11 Electronic control unit 4WS12 Malfunction of the main electric motor of the rear steering gear13 Malfunction of the steering gear control drive21 Short circuit in the main electric motor system22 Open circuit in the main electric motor system23 Blocking of the main electric motor24 Malfunction of the main electric motor31 Open circuit in the reverse motor system32 Malfunction of the electric motor reverse gear41 Malfunction of the left front wheel speed sensor42 Malfunction of the 4WS system sensor43 Incorrect operation of the 4WS system sensor
Checking the airbag system indicator Set the ignition switch to the “ACC” or “ON” position, check that the warning light comes on and goes off after about 6 seconds. Note: If the ignition switch is in the “ACC” or “ON” position and the indicator remains on or flashes, check the fault code. If the indicator sometimes lights up or remains on even when the ignition switch is in the “OFF” position, check the indicator circuit for a short circuit .
Mechanism to prevent activation of the SRS system.
1. Set the ignition switch to the “ACC” or “ON” position and wait approximately 20 seconds. 2.
Install a jumper on terminals “TC” and “E” of the diagnostic connector. Note: Incorrect pin connections may result in system failure.
3, If there is no fault, the indicator will flash 2 times per second.
4. If there is a malfunction, the indicator will flash at a variable frequency. Identify trouble codes.
. The figure shows an example of the output of codes “11” and “31”.
5. Fault codes are displayed from the smallest. If codes are not output, check the “TC” output circuit of the diagnostic connector.
6. For decoding of fault codes, see the table “SRS system fault codes”.
Troubleshooting
Type 9 error codes common to all Toyota vehicles are represented by two-digit codes.
| Code | Decoding |
| 11 | No power to EFI unit |
| 12 | No signal from the engine speed sensor |
| 13 | No signal from the engine speed sensor at speeds above 1000 rpm |
| 14 | There is no signal from the minus ignition coil or from the minus coil number one (if there are two of them) |
| 15 | There is no signal from the minus of ignition coil number two |
| 16 | There is no connection between the automatic transmission control unit and the engine control unit |
| 17 | Incorrect signal from camshaft position sensor number 1 |
| 18 | Incorrect signal from camshaft position sensor number 2 |
| 21 | Incorrect signal from the oxygen sensor, if the engine is V-shaped, then the heater of the left main oxygen sensor is faulty |
| 22 | Incorrect signal from engine temperature sensor (THW) |
| 23 | Incorrect signal from the intake air temperature (THA) sensor |
| 24 | Incorrect signal from the intake air temperature (THA) sensor |
| 25 | Mixture too lean |
| 26 | Mixture too rich |
| 27 | Incorrect signal from the additional oxygen sensor (left for V-engines) |
| 28 | Incorrect signal from the oxygen sensor (on V-engines, the heater of the right main oxygen sensor) |
| 29 | The additional oxygen sensor is faulty (right for V-engines) |
| 31 | Incorrect signal from the air flow sensor or, if there is none, from the pressure sensor in the intake manifold (vacuum sensor) |
| 32 | Incorrect signal from air flow sensor |
| 34 | Boost faulty |
| 35 | Incorrect signal from the atmospheric pressure sensor in the intake manifold (vacuum sensor) |
| 38 | Automatic transmission fluid temperature sensor |
| 41 | Incorrect signal from throttle position sensor (TPS) |
| 42 | Incorrect signal from the vehicle speed sensor (speedometer) |
| 43 | No starter signal (STA) to engine control unit |
| 46 | Solenoid valve number 4 or its circuits are faulty |
| 47 | The auxiliary throttle position sensor (TPS) or its circuit is faulty |
| 48 | The auxiliary air supply control system is faulty |
| 51 | No idle signal from TPS |
| 52 | Incorrect signal from the knock sensor (if there are two of them, then from the left or from the front) |
| 53 | Problems in knock sensor control circuits (ignition timing) |
| 55 | Incorrect signal from the knock sensor (if there are two of them, then from the right or from the rear) |
| 61 | The main speed sensor or its circuit is faulty |
| 62 | Solenoid valve number 1 or its circuits are faulty |
| 63 | Solenoid valve number 2 or its circuits are faulty |
| 64 | Solenoid valve number 3 or its circuits are faulty |
| 65 | Solenoid valve number 4 or its circuits are faulty |
| 67 | The O/D switch or its circuit is faulty |
| 71 | EGR control system faulty |
| 72 | Fuel cut solenoid |
| 77 | The pressure control solenoid or its circuit is faulty (in the machine) |
| 78 | There is no signal to the fuel pump or its circuits are faulty |
| 81 | The circuit between TCM and ECT1 is faulty |
| 82 | The circuit between TCM and ESA1 is faulty |
| 84 | The circuit between TCM and ESA2 is faulty |
| 85 | The circuit between TCM and ESA3 is faulty |
| 86 | Engine speed sensor is faulty |
| 88 | The circuit from the engine control unit to the automatic transmission control unit is faulty |
| 89 | Communication between the engine control unit and the TRC system control unit is broken |
| 99 | No fault codes |