The presence of a chain in the drive of the Toyota Camry 40 gas distribution mechanism significantly increases the reliability of the motor compared to power units that use a timing belt. Despite this, the mechanism is still subject to wear. With high mileage, the chain stretches. In this case, it is recommended to replace it.
The Toyota Camry 40 was produced with 2.4 and 3.5 liter power plants. Both engines use a chain to drive the timing mechanism. For replacement, you can use both original spare parts and their analogues.
In the first case, the cost of the chain will be from 4,000 to 6,000 rubles. You can also buy an original chain from a wrecking yard. The price for a used spare part starts from 600 rubles. When purchasing a used chain, its remaining life is unknown.
From the factory, Toyota Camry 40 with a 2.4 liter engine is equipped with Toyota chain 1350628011 manufactured by Camellia. It is made using a single-row structure, but has sufficient strength. For the American market, the Camellia 1350628020 chain is used. These spare parts are completely interchangeable.
Original Toyota chain 1350628011
On cars with a 3.5-liter power unit, Toyota chain 1350631031 is used. Its manufacturer is Camellia. The chain is manufactured using a similar single-row technology.
Toyota timing chain 1350631031
Third-party manufacturers offer a lot of analogues for the original circuit. The best options, selected according to reviews from experienced car owners, are summarized in the table below.
| Manufacturer | vendor code | Engine volume, l | Approximate cost, rub |
| ROADRUNNER, South Korea | RR-1350628010 | 2.4 | 1000 |
| Ruei, China | RU28106 | 2.4 | 900 |
| ASParts | AS4674 | 2.4 | 1000 |
| NSP, Korea | NSP041350631031 | 3.5 | 2000 |
| PULLMAN, Germany | 3105360113 | 3.5 | 2500 |
Timing chain RR-1350628010
Timing chain RU28106
Timing chain NSP041350631031
Timing chain PULLMAN 3105360113
Many car owners do not purchase a chain separately, but a kit that includes all the related parts necessary to repair the timing drive.
The price for such a set ranges from 15 to 30 thousand rubles.
Replacing Chain Toyota Camry 3.5
Car reliability is a parameter that depends on a huge number of reasons. Replacing the valve cover gasket on a Toyota Camry 2004 V 2.4. Do it yourself. Previously, how to clean leather seats and floors on a Toyota Camry 40 2.4l, then 2az-fe - replacing the chain.
This particular indicator is often decisive for drivers when choosing a car. A timing chain is installed on the Toyota Camry.
There is an ongoing debate among car owners about which mechanism is better - a chain or a belt? The answer is obviously not obvious; each mechanism has both advantages and some disadvantages.
But the main positive feature that a chain drive has is the highest level of reliability (the chain mechanism on average lasts about 200,000 km traveled by the car).
Also, replacing the timing belt according to its own procedure is almost in all respects similar to that with regard to the chain. But if this unit is replaced on machines of 2013 or an earlier owner, this process will cost a large amount.
Reasons for replacing the belt mechanism
After 2013, Camry cars were made with engines of 3.5 and 2.4 liters. Replacing the timing belt. Why timing chains break on modern Toyota Land Cruiser 200.
Such engines are relatively reliable and can quietly (with proper maintenance) last more than 300,000 km. Replacing the chain, replacing the valve cover gasket for Toyota Camry Toyota Camry 2.4 vs 3.5.
But after a huge mileage or a long service life (more than 6 years), the chain tends to stretch, which can lead to an increase in fuel consumption (although this car, due to its dimensions, does not have moderate consumption, problems with the mechanism will lead to an increase in “appetite” up to 5 liters per hundred km). Kia kia rio 3 (Kia Rio 3) kia rio 3. Removing and installing the rear bumper.
Also, a malfunction of this unit will lead to a loss of power (which can have a critical effect on cars with a 2.4-liter engine). This article discusses the timing chain for Toyota Camry 40, the cost of the Camry 40 timing chain, the frequency of replacing the chain, and a description of the process of replacing the chain. Cars produced in 2013 and later received a more advanced unit; it has more applicable wear resistance features.
How to change the mechanism
It should be noted that the independent process of dismantling and installing a chain device is quite labor-intensive, and it is not recommended to create this function without the appropriate repair abilities (not basic, but professional).
In addition, the price of materials for replacement will be about 20,000 rubles (when purchasing, be sure to pay attention to the quality of the chain and related consumables - replacement should be created only with unique spare parts). Also, when making adjustments or replacements, you will need a special tool.
In addition to different wrenches (with different head sizes) and screwdrivers, devices are needed to adjust the chain tension. Replacing spark plugs for Ford Focus 3 Ford Mondeo. Failure of Ford Focus 3. On. Replacing the timing chain of Toyota Camry 2.4 and 3.5. If repairs are required, the dismantling procedure is done as follows:
Also, when making adjustments or replacements, you will need a special tool. In addition to different wrenches (with different head sizes) and screwdrivers, devices are needed to adjust the chain tension. Replacing spark plugs for Ford Focus 3 Ford Mondeo. Failure of Ford Focus 3. On. Replacing the timing chain of Toyota Camry 2.4 and 3.5. If repairs are required, the dismantling procedure is done as follows:
- It is necessary to ensure the electrical safety of the car by disconnecting the battery terminal.
- Then you should lift the car using the appropriate devices, remove the right front wheel and drain the engine oil.
- Next you need to remove the air filter and adjacent pipes.
- The next step is to dismantle the generator and the engine support strut (right).
- Then you need to disconnect the cylinder head cover and ignition coils.
- The next step is to remove the timing chain tensioner.
- Next comes the removal of the power belt mechanism and the engine crankshaft pulley, and the crankshaft sensor should also be removed.
- Then you need to remove the oil pan (by removing the standard sealant).
- After these procedures, you need to begin dismantling the attachments (rotor, shoe and chain guide).
- Then you should install a new chain and align all the marks using a special key.
- Reassemble the structure in reverse order.
Conclusion
Replacing the timing chain on a Toyota Camry 2.4 yourself is a rather complex process that must be performed with the help of one or more assistants, and the work can last several hours.
Results
The entire process of replacing timing components on a Toyota Camry takes several days, including disassembly and assembly. The timing belt is one of the key factors that determines the efficiency of the engine, and the replacement process is quite complicated. After replacing a worn and ineffective timing chain with a new one, the operation of the vehicle will be ensured by stability for hundreds of thousands of kilometers.
It is recommended to carry out replacement only by professional technical service, because The process itself is a complex repair and involves disassembling the engine and related mechanisms.
Top Sources used:
- https://avtomechanic.ru/toyota-camri/dvigatel-1az-fe-i-2az-fe/kak-zamenit-tsep-grm-dvigatelya-2az-fe-toyota-camry
- https://m.etlib.ru/report/1441-zamena-tsepi-grm-tojota-kamri-xv40
- https://camryfan.ru/remont/1281-zamena-cepi-grm-na-tojote-kamri.html
Toyota Camry 2.5 4door. sedan, 181 hp, 6 automatic transmission, 2014 – 2021 - signs of wear on the engine timing chain
contents .. 1529 1530 1531 ..
Main signs of engine timing chain wear
— rough and uneven idling (the result of changes in valve timing);
- chirping and rustling noises - especially at idle, when the oil pressure is very low;
— maximum tensioner output (visible after removing the cover);
— wear of the sprocket teeth (visible after removing the cover);
— the corresponding parameters taken from the phase sensor (using a diagnostic tester).
Symptoms of a malfunction are a crackling sound, a clattering sound, a rattling sound when starting a cold engine, the Check Engine lights up, or the engine simply won’t start.
Premature chain wear due to manufacturing defects. A stretched chain can jump over several links. This results in a drop in power, acceleration dynamics, increased fuel consumption, increased engine noise, etc. Malfunction of the intake camshaft position regulator. It should be replaced with a new optimized version. Stuck tensioner. The chain tensioner hangs in one position, as a result the chain does not acquire normal tension. Thermal protection for the oil pipeline. When replacing a stretched chain, the heat shield wrapped along the oil line to the turbine must be replaced.
If you notice any of these symptoms, you should not delay a trip to a car service center, since a broken timing chain in some cases can lead to a major overhaul of the engine.
How often should the timing chain be replaced?
It all depends on the specific engine model. Each engine model has its own standards for replacing the timing chain. On average, the timing chain needs to be changed every 100 thousand km, but this is a very average value; for some models it may be less, while for others it may be much more. Most modern cars, when the timing chain approaches a condition requiring replacement, display a check engine error, so you will know exactly when it is time to change the timing chain.
Tips for operating and replacing timing drive
- in most new cars, the service life of the chain is less than the service life of the engine;
— it is recommended to monitor the condition of the chain every 100,000 km;
- pay attention to unusual noises, especially after starting;
— use only recommended types of oils;
- avoid extending the oil change period - the more often the better;
— normal oil pressure guarantees the operation of the chain tensioner;
- if you change the chain, be sure to replace the gears (sprockets) and guides - they also wear out;
— when replacing, you should use original components or high-quality substitutes.
Specifications
Technical parameters of Toyota Camry 2.5 / Toyota Camry in a 4-door body. sedan with 181 hp engine, 6 automatic transmission, produced from 2014 to 2017.
Engine
- Fuel brand: Gasoline AI-95
- Engine capacity, cubic meters see: 2494
- Valves per cylinder: 4
- Power, hp: 181
- Achieved at vol. per minute: 6000
- Torque, Nm/rev. in min.: 231/4100
- Maximum speed, km/h: 210
- Acceleration time to 100 km/h, sec.: 9
- Fuel consumption (in the city), l. per 100 km: 11
- Power system: Injector
Dimensions
- Length, mm: 4850
- Width, mm: 1825
- Height, mm: 1480
- Wheelbase, mm: 2775
- Front wheel track, mm: 1575
- Rear wheel track, mm: 1565
Other
- Number of seats: 5
- Tire size: 215/60 R16
- Curb weight, kg: 1455
- Permissible weight, kg: 2100
- Trunk volume, l: 506
- Fuel tank volume, l: 70
contents .. 1529 1530 1531 ..
Disadvantages of the 1AZ-FE engine
Disadvantages the 1AZ-FE engine
Cylinder block, cylinder head without the possibility of repair
The cylinder block and head do not structurally imply the possibility of repair. If the liners are worn out or if there are deviations in geometric dimensions due to wear, the block can be sold as scrap metal. The picture is exactly the same with the head. The design of the head is not designed for repair, i.e. It is impossible to replace or repair valves, as well as seats along with glasses for adjusting thermal clearances.
Lack of repair dimensions for piston and crank group elements
This drawback will force you to buy new parts and assembly units for the piston and crankshaft group, and this will entail high costs.
The fuel pump is not designed for domestic gasoline
The problem is the wear of the plunger pair when the engine runs on domestic gasoline and the subsequent entry of gasoline into the engine crankcase, reducing the viscosity of the engine oil. Further, all the rubbing elements of the engine will wear out rapidly (camshaft cams, liners, piston, etc.). Unfortunately, our gasolines do not contain lubricating additives, unlike foreign ones. A sign of wear on the plunger pairs is interruptions in the operation of the motor.
Resonant vibration at low speeds
This problem is not uncommon in engines and you may already be familiar with this phenomenon. On this engine, vibration appears at speeds of 500-600 rpm. It is impossible to eliminate it; this is a design flaw.
Engine jerking is a sign that the throttle valve block in the intake cylinder, as well as the intake manifold with flaps, need to be cleaned of carbon deposits. Don't doubt it will help.
The engine, despite its shortcomings and weak points, is good, but... 1. Requires strict adherence to operating rules and timely maintenance. 2. As you already understand, the engine is beyond repair and is good until it reaches the mileage for repair, which is about 300 thousand km. Here you need to calculate correctly and not make a mistake. Otherwise, invest a lot of money in repairs. PS Dear owners of cars with a 1AZ-FE engine! Please write to us about your cases of any problems related to the engine.
Related posts:
What engines are on Honda cars?
Weaknesses and disadvantages of the Ecotec A18XER engine
Weaknesses and disadvantages of Duratec 1.6, 2.0 engines
Weaknesses and disadvantages of engines K20A(B, Z), K20A4, K24A…
Weaknesses and disadvantages of the 1C diesel engine
About Hyundai and Kia engines for Russia
23 comments on the article “Weaknesses and disadvantages of the 1AZ-FE engine”
I bought a 2005 RAF 4, the problem was that after a year of operation the oil pressure warning light came on. Twice during the year I washed the oil pump screen to remove carbon deposits. Once again the light came on and the engine began to pull worse and a slight knocking sound appeared. Possible oil starvation. I don’t know whether to change the crankshaft with liners or an already contract engine. Everything is expensive and the reason for the breakdown and why the mesh gets clogged is not clear. Oil change was on time and good.
Reply ↓ Admin
Post author22.04.2017 at 06:29
Sergey, what is the operating time of the engine? Did you open the head cap? There may be soot up to the ceiling, so whether you wash it or not, all this crap will get into the clean oil. Have you measured the compression in the cylinders? How are things going with the oil level? Is it dropping noticeably or not?
I bought a 2007 Toyota ISIS in 2014, the picture is the same as Sergei’s. What to do? Apparently, you will have to buy an engine.
And I have the same picture on my 2007 Isis. At a traffic light, when the speed drops, the check engine light comes on. From what? Sincerely, Vladimir
Good afternoon guys. And I bought a 2006 Toyota Noah AZR60 and operated it in difficult conditions and under good load; after 5 years and 270,000 miles, the engine began to wear out the intake camshaft and precisely the journal that drives the fuel injection pump. Over the past three months I have replaced two camshafts. Otherwise, the engine is very good and in general the car is super in any conditions, even northern ones.
Good afternoon While looking for a car, I found a very decent Camry with a 1AZ-FE engine, with a mileage of 265 thousand. The author of the article writes that the resource is 300 thousand. The car is just ideal, the engine works perfectly. Should I take it or not? I'm asking for advice.
Take it. If anything, you can find a contract engine inexpensively.
Please tell me the approximate price for the 1az engine.
For January 2021 1AZ-FE from Europe 70,000 rubles block + head, without attachment. You can only bring 1AZ-FSE from Japan, it has a different cylinder head and pistons.
Hello! Please tell me, I have a 2005 Toyota Camry 2.4 volume. The engine recently broke down, I want to install a 2.4 liter engine from 2007. Will it fit?
On cold start there is a lot of noise from the engine, but after warming up it stops making noise. 1AZ engine for Toyota Rav 4 II generation.
Do not worry! The peculiarity of these engines is noise when cold. Many motors have vibration.
Hello! Tell me, is it possible to change the plunger pair, and where is it located? I have a problem on my Avensis 2.0 l, 2006 - the idle speed fluctuates. The oil smells like gasoline, I changed the injection pump, nothing has changed.
Toyota Voski 2003 with 1AZ FSE stalls when hot. After 20 minutes of idling, I start driving, after 100 meters it stalls and does not start. After a short wait, you can drive for as long as you like, but if you stop and stand for 10 minutes, everything repeats. Please tell me what is the reason.
I bought a Rav 4 (2001) with a manual transmission, the mileage was about 300,000 km. The former owner did not spare money on it; if something was replaced, it was with the original one. After driving 300 km, I was pleasantly surprised by the car, from its behavior on icy roads to the ease of maintenance. The first thing that happened, as many say only for me, was the front stabilizer burst, moreover, on a flat asphalt road. Next, the wheel bearings had to be replaced. My point of joy was the engine wedge. Although I checked the oil regularly, the oil pressure sensor was working properly. Disassembling the engine showed that the head was not damaged, and the oil caps were replaced. Lapped the valves. I bought the block, crankshaft, piston, pan, flywheel used. The timing chain and rollers ran for about 12 thousand before it was replaced, and it was decided not to change it. After assembly, my unfortunate motor ran for fifty years. Having assembled the engine and started it, it worked like clockwork, there was no limit to my delight. But after starting the engine, the speed did not drop from 3000 rpm to idle speed. After the engine had completely warmed up, the speed dropped only to 1500. The diagnostics did not lead to anything, the marks were still there, the throttle (mechanical) was cleaned twice with complete disassembly. At one point the engine stalled, having previously emitted a sour crackling sound. Having opened the valve cover, I went crazy, the VVT-I fell apart, having done a lot of things, but the chain was tensioned... We turned the intake camshaft several teeth, I haven’t looked further yet, my hands don’t rise, and the oil level is 3 mm below the top mark on the dipstick.
To Anonymous. The fuel pump in your tank is covered, I also had it on my 2002 Voxy.
Toyota Avensis 2004. Same situation. Replaced the DPRV sensor. Didn't help... Did you solve the problem? Share.
RAV-4 with 1AZ-FSE. As the temperature dropped, vibration of the return hose began, which was transmitted to the body so strongly that it was audible in the cabin. It disappeared after the air temperature rose to +15 C. I read on the Kaldinovod forum that the problem was a clogged fuel filter. I bought a Chinese Mashuma from Hyperauto and it got even worse. There was a problem with starting the engine in the morning when it was cold. I changed the injection pump and nothing changed. The scanner did not show any errors. I bought a contract fuel pump assembly from Toyota ISIS for 500 rubles. I replaced the cover on the case. I installed the old one from RAV-4. And here it is a miracle, the internal combustion engine operates quietly without vibration. Moral of the story - buy contract parts. Run away from Chinese fuel pumps and fuel filters and Yan Xin fuel supply branches.
Hello! Trouble happened. In cold weather, the engine starts normally, but if you drive a couple of kilometers at speed and release the gas pedal, the speed drops, and the engine jerks trying to operate at minimum speed or stalls. In the warm season, there are no such problems! Tell me, what could be the reason?
With a mileage of 200,000 km on a 2007 RAV4, I had to clean the engine sump of deposits and the oil pump.
Hello everyone, tell me! Toyota Voxy 2005 - when working on site on a warm engine at low speeds, some kind of knocking or clanking appeared, I can’t understand the reason, but I can’t hear anything from outside?
Operating instructions for Toyota Camry
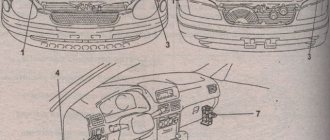
The Toyota Camry V40 operating manual, the manual of which is attached to each car, helps the driver understand the operation of all its systems and additional options.
With each restyling, new Camry models are equipped with more technologically advanced electronic assistants and new options that have several operating modes; their description and main purpose are included in the vehicle repair and operation manual, with the help of which the car owner can easily understand the indicators on the dashboard and the units located in the cabin control of various systems.
For what purposes is a car manual needed?
The operating instructions are intended to help the car owner understand the operation of all components of the car that require periodic maintenance, and it also describes all its available functionality and weight and dimensions.
After reading the manual for the car, its owner will receive the necessary information about the required service interval for the power unit, transmission components and the replacement of various technical fluids, which significantly affect the trouble-free operating period of the car.
In addition to the technical equipment, the owner needs to know the purpose of all indicators on the instrument panel, signaling the serviceability or breakdown of power components and electronic systems of the vehicle, as well as the possibility of eliminating some problems on their own.
What is included in the instruction manual
The standard contents of the instructions and maintenance recommendations are as follows:
- General description of the vehicle and its overall dimensions.
- General description of the engine with its technical characteristics.
- Transmission modification and operation.
- Chassis design.
- Type of steering device.
- Description of the brake system.
- Description of lighting and mounted electrical equipment.
- Description of body elements.
- Power supply diagram and relay location with fuses.
Guide and purpose of some options for popular Camry modifications
At the beginning of 2001, Toyota released onto the world market a completely updated fifth generation of the sedan under the designation V30, the configuration and equipment of which were considered the most technologically advanced at that time.
One of the most interesting innovations was the installation of a mechanism with a SV (SV) button on the left side of the dashboard, the task of which was to tilt the steering column upward when removing the ignition key from the lock, which allowed the driver to comfortably get in and out of the car.
An important point in the operation of the CB mechanism is the position of the button, which must be pressed. If not, then the steering column will not be able to automatically tilt and the driver will need to use the adjustment lever.
In the subsequent sixth and seventh generations of the Toyota Camry 40 and Camry V50, launched on the market in 2006 and 2011, respectively, the SV option was slightly modernized after numerous reviews from car owners about its periodic failures. It was preserved in the 2015 restyling.
Instructions for the multimedia system and changes to its functionality
After 2007, the Toyota Camry V40 began to be equipped as a separate option with a new multimedia system, which was developed for the Japanese automaker by JBL. She was able to support navigation mode using special software.
With each restyling of the popular sedan, the functionality of the multimedia system also changes, the first update of which took place in 2011, as a result of which the diagonal of the monitor slightly increased and the ability to touch control all entertainment functions was added, including the use of new navigation maps.
Instructions for the operation and functionality of the navigation system are available on the company’s website https://content.toyota.ru/catalogues/manual/Camry/mc-camry_navi.pdf, where they are regularly subject to changes in 2014 and 2015. With its help, the car owner will receive up-to-date information on operation.
Conclusion
Toyota Camry is one of the most reliable modern cars; all its generations, including those that entered the market in 2015, have excellent technical equipment, which is accompanied by an informative instruction manual to unlock its full potential.
Electrical equipment
The electrical equipment of the Toyota Camry is traditionally reliable. True, network failures occur periodically, however, they are not widespread. The headlights and interior lighting bulbs burn out, but replacing them is cheap.
Regarding electrics, it is worth giving an example of replacing the engine compartment wiring: Toyota Camry 2009, ACV 40 body, 2AZ-FE 2.4 liter engine. The car stalled when switching the automatic gearbox selector. The owner spoke about an unsuccessful repair attempt at a service center, where they installed a new fuel pump, fuel filter and crankshaft position sensor, and also tried to replace the throttle valve and mass air flow sensor from a similar car. The car continued to stall when switching the automatic transmission selector. The assumption that this case was non-trivial lifted my spirits and encouraged me to quickly start troubleshooting. The scanner did not clarify the situation: there are no errors in the memory, all engine operating parameters are normal, the control unit correctly perceives the position of the automatic transmission selector. All that remains is to rely on the motor tester. As it turned out later, the defects interfered with the operation of the engine control unit. To eliminate them, it was necessary to repair the engine compartment wiring. The car stopped stalling when switching the automatic transmission selector.
In xenon headlights, after 100 thousand km, the bulbs and ignition units burn out (from 18,500 rubles). Under Russian operating conditions, headlight washer nozzles jam; cleaning costs from 1,800 rubles. And if the fluid is consumed too quickly, check the integrity of the washer reservoir (RUB 4,500), the fact is that it is located under the front bumper and even with a slight impact it bursts.
On a V6, at 150 thousand km, individual ignition coils begin to burn one after another - the time has come. Toyota Camry ACV40 ignition coils are so-so, for the 2AZ-FE engine - the cost of the coils is 8,000 rubles, 2,500 rubles each. per piece
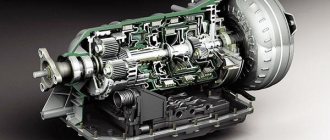
Motor modifications
The Toyota 2AZ power plant has the following modifications:
- 2AZ-FE – basic version of the engine with power from 149 hp;
- 2AZ-FSE (163 hp) – 2AZ-FE analog engine with direct injection system;
- 2AZ-FXE – used for hybrid models.
The hybrid Camry XV40 is equipped with 2AZ-FXE
Procedure for replacing rear bushings
On a Toyota Camry, replacing the rear suspension silent blocks is carried out in a similar way: the seats are thoroughly cleaned, then primed and treated with lubricant.
Replacing rear suspension silent blocks on a Camry
To install the bushings on the trailing arm, you can use a stationary vice
It is important to install the bushing evenly - otherwise it will become skewed and eventually jam halfway
After installing them, you can put the trailing arm in place and begin one of the most difficult procedures - repairing the wishbones. Replacing floating silent blocks on a Camry St. 40, as well as on other modifications of the car body of this brand, is a very labor-intensive process. The fact is that these silent blocks are produced without a metal clip, and the collars located at the edges prevent them from fitting normally in the lever. Therefore, to facilitate their installation, it is recommended to use a special mandrel: a piece of pipe 15–20 centimeters long. The diameter on one side of the mandrel is equal to the diameter of the seat in the lever, and on the other it exceeds it. The result is a kind of conical structure, passing through which the rubber bushing is gradually compressed, which facilitates the process of pressing it into the seat of the transverse arm. Without this mandrel, replacing the rear silent block on a Camry, as on most Toyota cars, is almost impossible.
Replacing rear silent blocks on Camry 40
When choosing spare parts, you need to take into account that the rigidity of polyurethane is several times higher than the rigidity of rubber, and this complicates the process of pressing them. It is for this reason that experienced car owners prefer to install conventional rubber bushings. Replacement is carried out as follows:
- The inside of the mandrel, lever and the surface of the silent block are thoroughly lubricated with Litol or special lubricant.
- The bushing is perfectly evenly installed in the mandrel and gradually pressed using a large vice or a hydraulic jack. You need to ensure that the narrower edge of the mandrel fits as tightly as possible to the lever.
- In some cases, you can cut off one shoulder of the rubber bushing with a knife - this will make it easier to press it into the lever.
As practice shows, replacing the rear silent blocks on Camry 40 wishbones takes the most time for car owners.
Replacing silent blocks and levers on a Toyota Camry 40 is one of the most common types of suspension repairs.
Despite the fact that this type of repair is not the easiest, it can be performed either at a specialized service station or by the car owner independently.
If you have some special devices, replacing silent blocks is not difficult, but in some cases a hydraulic press with a force of up to 15 tons may be required.
Why is replacement required?
A completely natural question that many people ask. After all, if the chain is so reliable and durable, and if used correctly, it lasts as long as the engine, why are people so often interested in replacing the chain?
The operation of the timing belt directly depends on the condition, degree of wear and quality of the chain. When the motor is running, the mechanism also works actively, and under heavy loads. And in this mode, not a single element can serve forever. The process of gradual wear and tear begins. If even one tooth on the chain breaks, slippage will occur. Even this alone can lead to a series of malfunctions and complete failure of the unit. As practice shows, if the circuit breaks, problems appear with the engine valves, which must eventually be replaced. If it is a diesel engine, then there is a risk of camshaft failure. In this situation, it is necessary to change not only the chain, but also the camshaft, valves and head gasket.
If you change the chain untimely, the consequences can be extremely serious, and you will have to spend an impressive amount of money to eliminate them.
In this regard, it is recommended to carry out diagnostics in a timely manner. If you notice signs of wear, the chain must be replaced. By the way, if you buy a used car, be sure to examine the condition of the chain drive. The element is not the cheapest, and therefore the cost of putting the car in order will increase significantly.
Replacing a component yourself
Want to save money? It is quite possible to replace the chain with your own hands. However, this task is not an easy one, so it is better not for a beginner to take on it. Expect to spend at least 3-4 hours. You also need to prepare a place and a set of tools in advance.
Let's look at the process of replacing a chain using the Nissan Almera N16 Classic as an example.
Platform and tools
It is advisable to carry out the work where there is a lift, overpass or pit. Prepare the following tools:
- hex key 6;
- socket heads sizes 12, 13 and 14;
- chisel and hammer;
- clean cloth for wiping;
- containers into which technical fluids will need to be drained;
- adjustable and torque wrenches;
- block of wood;
- sealant and “anti-silicone” (degreaser);
- and, of course, a new chain.
Workflow for dismantling and installation
- The first thing to remove is the cables connected to the ignition coil. After this, you can unscrew the coils and put them aside. Be sure to label these components with numbers in the order in which they were removed - this will help avoid confusion during assembly.
- Separate the air pipes from the valve cover. The cover itself is secured with bolts. They also need to be unscrewed - then it will be possible to remove the part.
- Remove the right engine mount, otherwise it will interfere with further work.
- Locate the engine oil drain hole. Place a container under it and unscrew the cap. Wait until the technical fluid flows into the container. Remove the oil filter.
- Take another container. Find the lower radiator hose clamp and remove it. The coolant should also flow into the container. After this, find the radiator cap and unscrew it to remove any remaining coolant.
- Afterwards you need to remove the radiator and remove the generator drive belt. Then remove the supply hose clamp (you may need to loosen it first).
- The next task is to dismantle the cylinder head. The cover of this component is secured with four bolts. They need to be unscrewed, after which it will be possible to remove both the cover itself and the fan and its components.
- You need to remove the engine sump. This can be done by first removing the muffler (it is installed on several bolts).
- Slightly loosen the bolts that secure the pump pulley. This will make it possible to remove the belts connecting to the control and climate control components.
- Locate the space between the side of the crankcase and the crankshaft. Place a block of wood there and carefully remove the crankshaft pulley. To unscrew its bolt, use a socket head of the appropriate size. If you cannot reach the bolt, use an extension.
- Find the water pump pulley and remove it too. Under this part there is a gasket, which should also be removed. We'll have to temporarily get rid of the oil pump.
- That's it, the preparatory work is completed. You can proceed directly to dismantling the old chain. The camshaft gears are secured with bolts that must be unscrewed. The camshaft itself will have to be fixed with an adjustable wrench.
Dismantling the chain is carried out in the following order.
Remove the damper (bar at the top). We remove the hydraulic tensioner and the bar responsible for tensioning the damper. It may be worth replacing the tensioner - especially if your car has an older version where the valve is in the stem rather than the head. Take the bottom bar and put it on the hairpin. We remove the chain itself. We get rid of the gear located at the bottom using a flat-head screwdriver.
Compare the old chain with the new one. Most likely, the used version will be slightly longer than the new one. The increase in size occurs due to stretching. Place the new version in place of the old one and lubricate it with machine oil. That's it, all that remains is to install the parts in place. Before doing this, clean the mechanism components
Degreasing and cleaning the side of the engine is carried out using “anti-silicone” and a clean cloth. The new component must be installed so that the marks on it and on the pulleys match (this is important!). After this part of the work is completed, the side of the engine is lubricated with a new layer of sealant
Tighten the bolts that secure the cover and wait until the sealant sets. After this, you can perform the work in reverse order.
The same marks that must correspond to one another
Video on solving chain problems on Nissan Almera
As you can see, to replace the chain it was necessary to disassemble almost half of the main components of the car. If you are not confident in your abilities, it is better to turn to specialists. Replacing the timing chain is a job for those who know their car well.
Timing and engine assembly
Before installation, timing elements should be lubricated. Assembly begins with the crankshaft (gear, ring, bushing), then the dampers (without tightening). Place the chains first on the crankshaft, then on the driven gear. Install the drive gear on the lower chain and then on the upper chain. Tighten dampers.
Tighten the chains by turning the camshaft counterclockwise with a wrench, while the intermediate and crankshaft should not(!) rotate.
After assembling the timing belt, install the cover, treating the sealing surface with sealant. Next, you should secure the hydraulic tensioners and the crankshaft pulley. Then the cylinder head cover, also treated with sealant. Connect the power steering and ignition, install the radiator.
Signs and causes of wear on stabilizer bushings on a Toyota Camry 40
The original bushings on the Camry, front and rear, are made of rubber, so they are subject to wear not only from loads, but also simply from time, even during gentle use. This part is constantly exposed to external factors, which gradually destroy the material and change the geometry of the product.
Toyota service manuals indicate that stabilizer bushings must be replaced when abrasions, cracks or changes in the structure of the product appear, but no less than once every 30,000 km (in practice, much less) or every 2 years. In conditions of imperfect road surfaces, severe damage to the stabilizer and its components is caused when hitting bumps or a wheel falling into a hole at high speed.
In practice, car owners do not remember these details until the stabilizer plays and, as a result, noticeable manifestations of a malfunction in the car’s chassis. Signs of wear on the front and rear stabilizer bushings may include:
- squeaks or clicks heard when the body tilts;
- vibration in the chassis, transmitted to the car body;
- knocking noises when driving at low speed over small uneven surfaces;
- general instability when moving.
The appearance of any of these “symptoms” requires an immediate inspection of the chassis to identify the cause and eliminate it.
When to replace
This information should be present in the manual for your vehicle. As a rule, the belt is replaced every 50 thousand kilometers. For a chain this figure is two to three times higher. It is approximately 100-250 thousand km.
It is imperative to buy a quality product. A bad belt will not only last a short time, but can also cause the breakdowns described above. The desire to save on it will lead you to even greater waste.
Check the belt tension regularly. This is easy to do. On a long straight section, try turning the belt around its axis. It should rotate a maximum of 90 degrees. If this figure is higher, it is necessary to tighten it, perhaps even change the Toyota timing belt. You can see the play of the links on the chain, and also determine its wear by the shift of the tensioner. If it is shifted more than 70 percent, it means the chain has used up its life.
We change the chain drive ourselves
Of course, such repairs can be entrusted to specialists, but these instructions are intended for those who do everything themselves. This process cannot be called simple, but any car enthusiast can handle it, if he so desires.
- First, remove the covers from the valves and motor.
- Disconnect the left terminal of the battery.
- Raise the car with a jack and remove the right wheel. After this we will be able to see the crankshaft pulley.
- We place a lining under the motor and remove its support.
- We remove the generator belt.
- Now we need to unscrew the bolt on the crankshaft pulley; to do this, the crankshaft itself will have to be locked.
- The power steering generator may be interfering with us. If so, it will need to be removed. After this, the side cover can be easily removed.
- We remove the hydraulic tensioner, having first dismantled its shoe. Move the gear aside and remove the chain.
- Let's start installing the new chain.
As you can see, there is nothing difficult about this. Be sure to check the alignment of all marks. If they do not match, the chain installation process will have to be repeated. After installing the new drive, we start the car and check its operation.
A few tricks
- All instructions write about the need to dismantle the oil pan. But you don’t have to do this. This action is recommended to be performed only to prevent dirt from getting there. Just cover it with a rag.
- Dismantling the cooling radiator, and therefore draining the antifreeze, is also extra work that need not be done. You can get to the timing chain without this extra hassle.
- Many people unscrew the motor eye with the tube. This is also optional. You can only bend the tube. It is copper and will give in easily. And if you remove the eye, you will have to unscrew a bunch of bolts to do this. Why do we need this extra red tape...
- The bolt on the crankshaft pulley can be easily unscrewed with a 19mm head. No special tools are needed for this.
- Do not start removing the chain from the tensioners because the sprockets may jump off the marks. You need to start the process of removing the chain by unscrewing the bolt that secures the left camshaft. To do this, the camshaft will have to be fixed between cylinders 3 and 4.
- After installing the chain, the crankshaft should be turned 2 times. In this case, the marks on the sprockets must coincide with the marks placed on the casting.
When should you change the alternator belt?
The frequency of replacing the electric generator drive belt is indicated in the vehicle maintenance instructions. It should be remembered that the period on the same machine supplied to different markets may differ. This is due to different climatic conditions and dust levels in the air, which additionally destroy the material of the product.
For example, the Volvo company recommends making an initial replacement after 80 thousand km, and each subsequent change is performed after 60 thousand km. At the same time, on cars from the European market, the belt is changed every 180 thousand km. On VAZ cars, the product rarely lasts more than 30 thousand kilometers.
A typical sign of a stretched belt is a whistling sound that occurs when starting the engine or after driving through a puddle. The source of the sound is the strap material sliding along the surface of the pulley. Usually the whistle quickly disappears and appears again when starting the engine or after another puddle. In this case, the owner needs to check the belt tension and try to bring it to the standard.
What affects wear?
Factors influencing the life of the drive belt:
- Product operating conditions. The ingress of dust, abrasives or chemicals will significantly reduce the life of the strap. Long-term use at low air temperatures has a negative effect on the material.
- Condition of pulleys. The appearance of beating or deformation leads to the destruction of the tracks and edges of the belt.
- Tension. If the tension is too low or too high, the belt will wear out at an accelerated rate.
- Belt release date. Rubber is susceptible to aging, so the strap may break down while in packaging in the warehouse. Violations of storage rules have an additional negative impact.
- Belt manufacturer. There are products made by small companies from low-quality materials. Such straps can break after several thousand kilometers.
Signs of belt wear and product replacement are demonstrated in a video filmed by Vladimir Bazekin.
A little theory
Chain drives transmit rotational force from the crankshaft to the camshaft, which is located in the cylinder head of overhead valve engines.
Chains are divided into 2 categories. They can be toothed or roller. Roller mechanisms, unlike gear ones, are not so widespread. Therefore, it is gear systems that are most often found on cars with a timing belt, which include a chain drive. Gear units are distinguished by their high smoothness, they are quite reliable, and produce an insignificant level of noise during the operation of the internal combustion engine. In terms of their characteristics, the use of toothed chains brings them much closer to belt drives. One can argue endlessly about which one is better. But we won’t dwell on this today.
The chain is tensioned due to the operation of hydraulic tensioners, for which motor oil is used as a working fluid. The lubricant is supplied through the engine lubrication system.
Depending on the number of camshafts, that is, camshafts, the number of tensioners also differs. On cars there are from 1 to 3 units.
The service life of the chain directly depends on what the element is made of, how high quality it is and the degree of effectiveness of the heat treatment performed. Similar requirements are placed on timing sprockets, since they constantly operate together with the chain. Do not forget about the influence on the condition of the unit of the engine lubrication system, the quality of the oil itself and timely replacement of the fluid. In practice, when the part is made of high-quality materials, and the correct tension was carried out as part of the service, plus lubricant was introduced on time, then replacing the chain may be necessary at the same time as replacing the motor itself.
That is, you understand that a stretched chain cannot function for a long time and effectively. If you want to extend the life of this unit, initially take a high-quality chain, adjust its tension correctly and lubricate the drive generously with high-quality oil.
Replacing the timing chain on a Toyota Camry
Toyota Camry is a popular car on Russian roads. Great demand was ensured due to the good price-quality ratio, as well as adaptability to domestic roads.
However, any machine mechanism has a finite operational life, after which it fails. Frequent problems include broken or stretched timing chains. Below you will find information on choosing a reliable timing chain and replacing it. Considering that there are two of them - going to the camshaft and crankshaft - the article discusses the replacement of both chains.
The timing chain mechanism controls the gas flows in the engine cylinders, changing the phase of their operating mode. This leads to heavy loads on the timing chains, which sooner or later fail and need to be replaced.
What is the main danger
When the belt breaks, the crankshaft and camshaft become desynchronized. The crankshaft continues to spin, but the camshaft remains in place. The cylinder constantly hits the valves. As a result, you will either completely “lose” the valves or permanently deform the cylinder. In any case, this is an extremely serious breakdown, the elimination of which is not cheap.
Slipping a few teeth is not as critical, but can also cause irreparable damage, so all drivers should regularly check the condition of the belt and inspect it for damage or tears.
Procedure for replacing racks
To carry out the work you will need the following set of tools:
- jack;
- balloon;
- set of keys and sockets;
- special ties for springs;
- gas key.
Replacing the front struts on Toyota Camry 50 and 40 is performed as follows:
- The car is jacked up, then the front wheel is removed.
- Unscrew the 2 bolts securing the hub to the bottom of the strut.
- The fastenings of the brake hose and ABS wires are unscrewed from the rack.
- The hood is opened, then the 3 bolts securing the strut support to the body are unscrewed.
- The stand is removed.
- Installation of the rack is carried out in the reverse order.
Procedure for replacing struts
Along with replacing the strut, it is recommended to replace the stabilizer strut on a Toyota Camry - it also affects the directional stability of the car. The links are attached on both sides of the car to the lever and rod with just two nuts, and replacing them is not difficult.
If the strut is not replaced entirely, but only the failed shock absorber needs to be replaced, then proceed as follows:
- On the rack removed from the car, a spring is tightened and fixed using special ties.
- Then the central nut in the strut support that secures the shock absorber is unscrewed. Often the strut rod rotates, making it impossible to unscrew the nut. In this case, you need to grab the rod with a gas wrench, after which the nut can be unscrewed.
- After this, the strut support is removed and the spring is pulled out.
- A rubber gasket is placed on the lower support of the new shock absorber, then the spring is installed.
- A rubber boot is installed on the shock absorber rod.
- The rack support is installed and tightened with a nut.
- The ties are removed from the spring, then the finished rack is installed in place.
Replacing racks
Replacing the rear struts on a Toyota Camry with replacing the shock absorber is carried out in the same way.
The procedure for replacing the rear struts is almost the same as the front struts, with some exceptions:
- The car is jacked up, then the wheel is removed.
- The bolts securing the strut to the wheel hub are unscrewed, the ABS wire and brake hose are removed.
- Then the back of the rear sofa in the car is removed, after which access to the nuts is opened, with the help of which the upper support is attached to the body.
- The nuts of the upper support are unscrewed, then the stand is pulled out.
- Installation is carried out in reverse order.
When choosing spare parts, it is recommended to pay attention to originals or OEM manufacturers who manufacture spare parts under Toyota license. As a rule, their factories are located directly in Japan, but not in China
It is worth noting that replacing rear struts on Toyota Camry 40 and 50 is performed 2–3 times less often than replacing front struts. But at the same time their cost is 15–20% higher.
Useful information about chain replacement and condition
Computer diagnostics is considered a simple but at the same time effective way to check the condition of the timing chain. But for this you will need to visit a car service that has the appropriate equipment at its disposal.
Please note that the engine and timing belt operate under constant load, at high speeds and vibration. This contributes to high tension on the chain, which can lead to subsequent destruction of the assembly.
A metallic knock indicates that the chain has already stretched or has begun to slip. Even one such sign clearly indicates that the unit needs to be changed. You should also pay attention to the chain if:
- the engine temperature rises for no apparent reason;
- valves are knocking;
- strange and incomprehensible metallic sounds appear;
- Thick smoke pours out of the exhaust pipe;
- a drop in power is felt;
- the car moves as if in jerks;
- fuel consumption increases, etc.
On many modern cars that use a timing chain drive, a special indicator is installed. With its help, a motorist can promptly replace errors associated with the operation of the gas distribution mechanism. If there is an indicator and it has worked, then you should start replacing it. If stretched, jumping will begin, and this will result in damage to the cylinder head. At best, you can get by by replacing the cylinder head gasket and changing bent valves. At worst, the entire cylinder block will need to be replaced.
If you have anything to add, or want something on the topic, write in the comments.
That's all I have. Thank you all for your attention! Subscribe and tell your friends about our site!
( 5 ratings, average: 5.00 out of 5)