Generator Toyota Corolla, Generator repair
- 46961 Views
Toyota Corolla cars are equipped with three-phase alternating current generators with electromagnetic excitation, with a built-in rectifier unit and an electronic voltage regulator. The generator shaft is mounted on closed bearings that do not require additional lubrication throughout its service life. The generator shaft is driven into rotation from the crankshaft pulley by a poly V-belt. To reduce belt wear in cases where sudden
When the engine crankshaft speed decreases, the generator rotor rotates by inertia; the generator pulley is equipped with a freewheel that transmits rotation in only one direction.
Recently, many companies have appeared that specialize in the repair of imported generators and starters. There you can diagnose a faulty unit, purchase spare parts for any generator (starter) model, and receive qualified advice. If you are not sure that you can repair the generator (starter) yourself, it makes sense to contact a company where the repair of these components will be carried out quickly, efficiently and, as a rule, at an affordable price. However, on cars with high mileage, it is often more profitable to replace the assembly with a new one than to replace failed parts.
Toyota Corolla alternator replacement
You will need: all the tools for removing the engine mudguards, as well as 10" and 12" wrenches, and a flat-blade screwdriver.
1. Remove the right front wheel
2. Remove the lower and right side engine mudguards
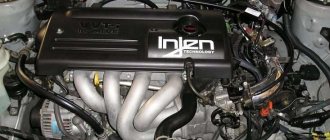
3. Remove the decorative engine cover
4. Remove the front trim of the engine compartment
5. Disconnect the wire from the negative terminal of the battery.
6. Press out the clamp of the prozode harness block.
7. . and disconnect the block from the generator.
8. Press out the fasteners securing the protective cap.
9. . and remove the protective cap of the generator output.
10. Unscrew the nut securing the power cable lug.
eleven. . and disconnect the power cable from the generator.
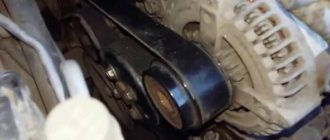
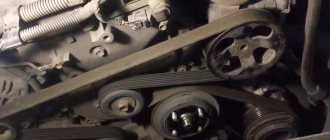
12. Loosen the tension on the accessory drive belt and remove the belt from the generator pulley.
13. Turn out the top one.
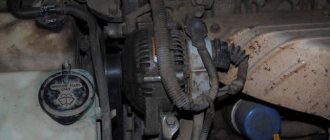
14. . and the lower generator mounting bolts (shown by the arrow) and remove the generator from the car.
15. Install the generator in the reverse order of removal and adjust the tension of the accessory drive belt
Toyota Corolla generator repair
Complete disassembly of the generator is not recommended, so it is better to contact a workshop that specializes in repairing generators. This subsection shows only the replacement of the brush assembly and rectifier unit.
You will need: 10" and 22" wrenches, 10" socket head, Phillips screwdriver, screw puller, hammer, caliper, tester.
1. Remove the generator from the car
2. Remove three nuts.
3. . and remove the back cover of the generator.
4. Remove the insulating sleeve of the generator power contact.
5. Check the resistance of the rotor winding by connecting the tester to the slip rings. The resistance should be approximately 2.3-2.7 ohms. If the tester shows infinity, it means there is a break in the windings and the rotor needs to be replaced.
6. Check the diodes of the rectifier unit. Connect one wire to the ground of the rectifier unit, the second to the diode terminal.
7. . and then swap the wires. The diode must pass current only in one direction. If the diode passes current in both directions, it means it is faulty.
8. Check the remaining diodes in the same way.
9. To replace the rectifier unit, remove the five screws and remove the rectifier unit.
10. Remove the two screws securing the brush holder.
eleven. . and remove it.
12. Check the ease of movement of the brushes in the brush holder and their protrusion when free. If the brushes protrude less than 4.5 mm, replace the brush holder assembly.
13. Check the rotor winding for short to ground. To do this, connect the tester probes to the rotor pole and alternately to the slip rings. The measured resistance must be infinitely large, otherwise replace the rotor.
Principle of operation
The operation of the Toyota Corolla E150 generator, like other units of this brand, begins immediately after starting the engine, and during operation it constantly recharges the engine battery, preventing it from being completely discharged. Its action is based on the well-known principle of electromagnetic induction, according to which a magnetic flux passing through the winding of a copper coil provokes the formation of a voltage at its terminals, the magnitude of which is directly proportional to the speed of rotation.
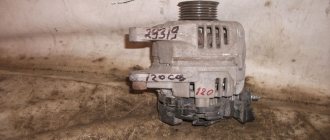
The generator unit of the Corolla 120, as well as models with a different body (for example, Fielder 14, Corolla 121 models) is located in the front of the engine and is activated by the crankshaft. The closed-type bearings on which the shaft is mounted are designed for the entire period of operation of the vehicle, without additional lubrication.
With a high mileage of the Toyota Corolla E150, as well as older versions of the car, it is recommended to check and, if necessary, repair or replace the unit. The following may indicate that the generator has a malfunction:
- Battery discharge light that does not go out after starting the engine. This indicates that the belt has become loose (it needs to be tightened) or the reason is in the unit itself (worn brushes need to be replaced, there is a break in the winding, the diode kit needs to be changed).
- Power is not supplied to the battery, the cause may be an oxidized terminal, a loose belt, or a non-working battery.
- The battery is being recharged - the cause could be any of the faulty elements of the mechanism.
- The appearance of a characteristic whistle in the area where the generator is located most often occurs due to a high degree of belt tension and a high load on the bearing.
Any repairs or replacements must be carried out only after the vehicle has been completely de-energized and all terminals from the battery have been disconnected.
Description of generator brushes
The brushes in question are installed on many vehicles that have not only an internal combustion engine, but also an electric motor. The most popular in use are EG-4. This model is quite convenient because it has standard operating parameters that are suitable for cars of different years of manufacture. Of course, there are other models of these parts. They have an excellent safety margin because they contain a special composition.
On domestically produced cars, the parts described above are located under the right front headlight, and they are not difficult to find. To find them, you need to open the hood. The eye immediately falls on the generator, and there are two strange lids on it that look like tin cans. These are generator brushes.
Mechanism for current wire
Toyota Corolla Fielder. The procedure for removing and installing the generator on the 1ZZ-FE engine
1. Remove the right side of the engine protection
2. Remove the accessory drive belt. Slowly turn the tensioner clockwise and remove the belt
3. Remove the generator, a) Disconnect the wiring clamp.
b) Remove the “+B” terminal c) Disconnect the connector. d) Unscrew the 2 bolts and remove the generator
4. Install the generator. Tightening torque: M8 29 Nm; M10 58 Nm
In what cases does an element need to be replaced?
Generator brushes, as mentioned above, are installed, among other things, in trucks, urban engines and other mechanisms where the key element is the electric motor. It doesn't matter what machine the part is in - they always do the same job.
In order to understand whether they are worth changing, you need to observe how many millimeters they protrude from their allocated space. Must be at least five millimeters. If the readings are lower, it means the brushes are worn out and it’s time to dismantle them.
Graphite products can be of different models. These models differ from each other not only in design, but also in purpose. The criterion for choosing a part is the electric motor and the principle on which it operates. You can even choose “standard” devices. This type is suitable for most cars, but the downside is that their quality leaves much to be desired. After all, it’s worth remembering: the “longevity” of the vehicle depends on the choice of brushes.
Several parts for the vehicle
In the case of an engine that requires a large number of revolutions, it is best to buy high-quality graphite brushes that are equipped with a high-quality composition. It will protect parts from rapid destruction, and therefore the vehicle will be safe longer.
It would be advisable to check the serviceability of the brushes every few years. The advantage when checking the functioning of a part is that there is no need to remove the generator, because the necessary parts are located right on top. We will explain further why and how to change the brushes on the generator (author - Evgeniy Aleksandrovich).
But in most generator brushes they will hint at replacement with the following indicators:
- Sudden chaotic shutdown of electronics in the car. It is often not easy to immediately understand the reason for such behavior. Therefore, it is best to check the serviceability of the mechanisms and, in particular, the unit.
- If suddenly the lighting in the car interior has deteriorated, and if the external optics have begun to work a little worse, this may be one of the signs that the devices need to be replaced.
- The voltage drops and the battery quickly discharges. After this, the battery is often difficult to charge.
Generator brush holder
Malfunctions and diagnostics
The symptoms are typical for most generators, including the Japanese brand Toyota Corolla. Faults are classified into two main groups: with a mechanical or electrical component. Among other breakdowns, the following should be highlighted:
Difficulty starting the engine
The first sign of unstable work. The algorithm for supplying current from the source to the battery is broken. A “depleted” battery is unable to fully crank the starter for a long period. The opposite effect cannot be ruled out when the battery receives excess charge, which also has a detrimental effect on the unit as a whole. The electrolyte boils away in the “jars”, the plates fall off, and a short circuit occurs. On Japanese Toyota cars, a relay is preinstalled that scans the voltage online. As soon as the indicator drops below o, the engine will not start, despite the full operation of the battery and starter. Ignorance of this subtlety leads to the fact that an inexperienced master initially follows the wrong path. Ultimately, the repair cannot be completed due to an error at the beginning of the algorithm.
A faulty alternator is the cause of battery drain
Flickering light, dim lighting fixtures
The second “obvious” symptom of a malfunction in the power supply system. True, it is noticeable only at night. There are two reasons for unstable operation: the generator or the drive belt. To a lesser extent, the reason is insufficient fixation of the instrument panel and contact connectors.
A yellow indicator on the center console indicates a breakdown.
The battery is not fully charged; it is impossible to determine the exact resource. In practice, the duration does not exceed several tens of kilometers. As soon as the battery stops supplying current and a spark to the spark plugs, the car will stop. To extend the “trip” as much as possible, turn off all third-party consumers of electrical energy. Standard Toyota Corolla batteries become unsuitable for further use after the first, deep discharge.
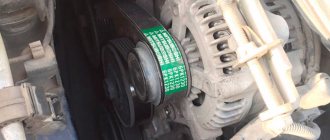
Characteristic whistling of the drive belt
In most cases, the reason lies in a weakening of the tension, a broken belt, deformation of the tensioner, or mounting of the generator. Ignoring the malfunction leads to incomplete charging of the battery due to the lower rotation speed. At the same time, we expect problems with the air conditioning system supercharger, crankshaft and camshaft. A total of four mechanisms are driven, not counting the deflection rollers.
Burning smell from under the hood
Light smoke from the engine compartment is a sign of a short circuit in the electrical wiring or a jammed drive belt on the generator.
Ringing metallic sound from under the hood
Due to systematic loads and elevated temperatures, rolling bearings fail prematurely. The lubricant is pushed out of the cavity, the rollers jam, and the bearing is destroyed. The cause of the squeak can also be a faulty damper coupling. It is necessary to carry out diagnostics to identify the breakdown.
Noise is produced by electrical appliances that operate unstably. The hum is identical to the sound of high-voltage wires when they are energized.
DIY replacement instructions
Replacing generator brushes does not require special skills, funds or even time.
The step-by-step action plan is simple:
- It is necessary to remove the terminals from the battery.
- Remove the regulator, which is usually located on the opposite side of the generator.
- Clean the holder from dirt and dust. It would be a good idea to clean the springs and slip ring, which perform locking properties.
- In some cases, it will be advisable to grind the carbon devices into the collector. This can be done using fine glass sandpaper with a slight grain size.
- After that, replace the old brush with a new one. The brush holder should help the part slide freely, that is, the brush holder should not fit tightly.
- After this, reassemble the brush assembly in reverse order and return the negative battery cable to its place.
Toyota Corolla Fielder. The procedure for removing and installing the generator on the 2ZZ-GE engine
1. Remove the right side of the engine protection
2. Remove the accessory drive belt.
a) Remove the clamp of the air conditioning system tube. b) Slowly turn the tensioner clockwise and remove the belt
3, Remove bracket No. 1 of the generator.
4. Remove the generator. a) Disconnect the wiring clamp
b) Remove the “+B” terminal c) Disconnect the connector. d) Unscrew the 2 bolts and remove the generator.
5. Install the generator. Tightening torque: M8 29 Nm; M10 58 Nm
Toyota Corolla Fielder. Generator disassembly procedure
1. Remove the generator pulley a) Hold special tool “A” with a torque wrench and tighten special tool “B”. Tightening torque 39 Nm
b) Clamp the special tool “C”, as indicated in the figure, and install the generator on it.
c) To unscrew the pulley fastening nut, turn special tool “A” in the direction shown in the figure.
Warning: to avoid damage to the rotor shaft, unscrew the pulley mounting nut no more than half a turn.
d) Remove the generator from the special device “C”
e) Unscrew special device “B” and remove special devices “A” and “B”
e) Unscrew the pulley mounting nut and the generator pulley.
2. Remove the brush holder. a) Remove the rear cover of the generator. b) Remove the brush holder cover. c) Remove the brush holder.
3. Remove the voltage regulator.
4. Remove the straightening highlight.
5. Remove the generator rotor.
a) Unscrew the terminal securing nut. b) Remove the housing of the rectifier unit.
c) Remove the rotor from the front cover of the generator
Downloading a book
After successfully completing the payment (by any method) and returning to the KrutilVertel store from the payment system website, you will be taken to the successful payment page:
The book you purchased will be in your personal account, from where you can always download it.
Please note that after making the payment, you need to return back from the payment system website to the KrutilVertel website. If for some reason you did not return back to the site and closed the payment system tab with a message about the successful completion of the payment, please let us know - we will send you a letter indicating access to download the book
If for some reason you did not return back to the site and closed the payment system tab with a message about the successful completion of the payment, please let us know - we will send you a letter indicating access to download the book.
Where to repair Toyota Land Cruiser 100
Auto service Solntsevo
Address: JSC Moscow, Glavmosstroy str. 7a
Telephone
Metro: Borovskoye Shosse, Solntsevo, Govorovo
Opening hours: Mon–Sun: from 9:00 to 21:00
Car service Altufyevo
Address: North-Eastern Administrative District, Moscow, Ilimskaya st. vl.3Zh, building 3
Telephone
Metro: Altufyevo, Bibirevo, Lianozovo
Opening hours: Mon–Sun: from 9:00 to 21:00
Auto service Volochaevsky
Address: SEAD Moscow, Volochaevskaya str. 12a
Telephone
Metro: Ploshchad Ilyich, Rimskaya, Kurskaya
Opening hours: Mon–Sun: from 9:00 to 21:00
Auto service Sokol
Address: Northern Administrative Okrug, Moscow, Ostryakova str., 3
Telephone
Metro: Sokol, Airport
Opening hours: Mon–Sun: from 9:00 to 21:00
Fili car service
Address: JSC Moscow, Tuchkovskaya str. 13, building 2
Telephone
Metro: Bagrationovskaya, Fili, Business Center
Opening hours: Mon–Sun: from 9:00 to 21:00
Car service Domodedovo
Address: Southern Administrative District, Moscow, Kashirskoye sh. d.67 p.14
Telephone
Metro: Domodedovskaya, Zyablikovo, Krasnogvardeyskaya
Opening hours: Mon–Sun: from 9:00 to 21:00
Car service Sh. Entuziastov
Address: Sh. Entuziastov 56с44
Telephone
Metro: Perovo, Novogireevo, Sokolinaya Gora
Opening hours: Mon–Sun: from 9:00 to 20:00