Payment for goods and downloading of the book in electronic form (PDF format) is made on the website.
To do this, you need to find the book you are interested in and click on the “Buy” button. The price of the book is indicated on the button.
For convenience, the price on the website for residents of Russia, Belarus and Kazakhstan is presented in rubles.
For residents of Ukraine in hryvnias, and for all other countries - dollars.
After clicking on the “BUY” button, a payment window will open where you can select a payment system with which you can pay for the selected book using any bank card (Visa, MasterCard, MIR, etc.)
When you click on the “Pay by bank card” button, the Portmone payment system will open, which is the easiest way to make a payment.
In addition, the website offers four payment systems for payment:
- Yandex (payment from any bank cards, Yandex Money account, QIWI Wallet, terminals, etc.);
- Portmone (payment from any bank cards, Portmone account);
- PayPal (payment from any bank cards, PayPal account);
- WebMoney (payment from any bank cards, payment from WebMoney wallets).
Payment via Yandex Cashier
After selecting payment via Yandex, the Yandex Cashier payment system will launch, where you need to select a convenient payment method (bank card, QIWI, Yandex Money account, etc.)
After specifying payment details and confirming payment, payment for the goods will occur.
If you have a bank card in a currency other than the ruble, then the money will be debited from the card at the rate of the Central Bank of Russia at the time of the purchase.
This payment method is optimal for residents of Russia, Kazakhstan and Belarus.
Official website of the Yandex Kassa payment system https://kassa.yandex.ru
CV joint selection
Original components cost from 16,000 rubles (for an outer CV joint). The internal one costs slightly less. If you want to replace the outer CV joint with an original part, purchase components with article number 4346009R20, 4346009R30.
If your budget is somewhat limited, you can purchase similar parts at a more affordable price. Let's look at the most popular options for choosing a CV joint for a Toyota Corolla.
| Manufacturer | vendor code | Cost, rub) |
| HDK | TO009A48 | 2846 |
| URW | MS212M0N | 3271 |
| ASVA | TYIUYAR15 | 2355 |
| LYNXauto | CO7507 | 1136 |
As it became clear from the summary table, the cost of non-original parts is much less. At the same time, their quality is in no way inferior to the original ones. The main thing is that the components you purchase are fully suitable for the car. Don't forget to check the article numbers so as not to stumble upon a Chinese counterfeit.
Payment via Portmone
After selecting payment through Portmone, the payment system will launch, where you need to select the payment method: bank card or Portmone account.
The price in the Portmone payment system is converted into dollars at the exchange rate of the Central Bank of the country where you are located.
If you have a bank card in a currency other than the dollar, then the money will be debited from the card at the rate of the Central Bank of your country at the time of the purchase.
After specifying payment details and confirming payment, payment for the goods will occur.
Official website of the Portmone payment system https://www.portmone.com
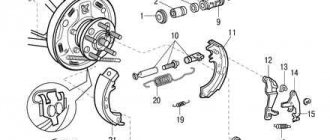
Outer and inner CV joint
A CV joint is a joint that is responsible for transmitting torque at different angles. The main task of the part is to transmit torque to the wheels of the vehicle. This is a consumable that wears out quickly and requires frequent replacement. If the rubber does not cover the hinges tightly enough, the lubricant will not stay inside. The service life of the CV joint will be noticeably reduced.
When the rubber band breaks, not only does the lubricant quickly run out, but dust and dirt also gets inside the part. This leads to increased wear levels. In this case, the part will have to be completely replaced.
However, if the rubber band broke recently, you can simply purchase a repair kit and replace it yourself. Be sure to polish, lubricate and wash the part before installing a new rubber band.
Incorrect operation of the CV joint can cause problems with the front wheels, or more precisely, with their drive. The original CV joint is quite durable, and damage is caused by failed boots.
If you feel that the car is vibrating when moving, the cause of the problem lies in the deformation of the shaft, wear of the external drive joints or wear of the rollers of the internal drive joint.
If lubricant leaks are detected, you need to tighten the clamps or replace damaged boots. If your car pulls sideways, you also need to replace the CV joint. The reason lies in the fact that the race of the inner (in some cases, outer) CV joint is worn out or severely damaged.
The limiting wear can be called knocking on corners. In this case, the problem can only be solved by completely replacing the CV joint.
Payment via PayPal
After selecting payment via PayPal, the PayPal payment system will launch, where you need to select the payment method: bank card or PayPal account.
If you already have a PayPal account, then you need to log into it and make a payment.
If you do not have a PayPal account and you want to pay using a bank card via PayPal, you need to click on the “Create an Account” button - shown with an arrow in the picture.
PayPal will then prompt you to select your country and provide your credit card information.
After specifying the information required to make the payment, you must click on the “Pay Now” button.
Official website of the PayPal payment system https://www.paypal.com
Payment via WebMoney
After selecting payment via WebMoney, the payment system will launch, where you need to select the payment method: bank card or WebMoney wallet.
If you already have a WebMoney wallet, then you need to log into it and make a payment.
If you do not have a WebMoney wallet and you want to pay in another way, you need to select any of the methods that WebMoney offers and make the payment
After specifying payment details and confirming payment, payment for the goods will occur.
Official website of the WebMoney payment system https://www.webmoney.ru/
Replacing the outer and inner CV joints on a Corolla 120
Replacing a part is quite problematic, so it is better to check its condition yourself in advance. If dust, dirt or water gets into the CV joint, it can fail even on a new car. Solid anthers protect against this well. In some cases, it is necessary to replace the grenade or boot specifically.
To work, you need to purchase several tools that allow you to quickly remove all fasteners. You will need to prepare a hammer, a hacksaw, pliers, a flat head screwdriver, and a circlip puller.
- Remove the front wheel drive. Before the operation, it is advisable to drain the oil from the gearbox to avoid leakage.
- Squeezing the drive in a vice, we disassemble the external grenades. Do not forget that the entire input shaft must be pulled out completely from the box.
- Getting rid of the wheel. To do this, unscrew the hub nut using a 30mm socket. Then unscrew the ball joint from the lower floor. We use the seventeen key for this.
- We disconnect the stabilizer bar link and remove the drive with the external link. Turn the steering wheel and tap the axle with a hammer, then remove the drive from the box and the axle from the hub.
- If you are replacing the outer STRUS, it is not necessary to remove the inner grenade. You can simply remove the clamp securing the inner boot.
- Now pull out the tripod shaft. Use a screwdriver to press out the small boot clamp. Do not forget that it is impossible to reinstall it - you need to purchase a new one.
- To remove the STRUS, you will need to install a puller. We fasten it securely.
- We remove the STRUS by “shaking” the engine several times. We remove the anthers, dismantle the retaining ring and knock it off the shaft.
- We wash all parts from oil and grease. Re-lubricate the hinges. We install the new STRUS in place of the old one. After replacing the parts, we assemble everything in the reverse order.
We check the functionality of the new parts. This completes the process of changing the STRUS to a Toyota Corolla 120. If you doubt that you can replace the part yourself, it is better to contact specialists in this field. Of course, the services of a car dealership are quite expensive, but by using them, you receive a guarantee that the entire mechanism is working properly.
Downloading a book
After successfully completing the payment (by any method) and returning to the KrutilVertel store from the payment system website, you will be taken to the successful payment page:
On this page you need to indicate your e-mail, where access to download the book will be sent.
If you are already registered on our website, then simply follow the link to your personal account.
The book you purchased will be in your personal account, from where you can always download it.
Please note that after making the payment, you need to return back from the payment system website to the KrutilVertel website.
If for some reason you did not return back to the site and closed the payment system tab with a message about the successful completion of the payment, please let us know - we will send you a letter indicating access to download the book.
Seal selection
Purchasing oil seals to replace them is a fairly simple task that does not require special knowledge. You can purchase original components from Toyota. The article number for them is 9031628003. Don't forget to check it before purchasing. The most popular oil seal production companies among car owners are:
| Manufacturer | vendor code | Cost, rub) |
| Musashi | T1245 | 250 |
| THO | 01010158 | 165 |
| FEBEST | 95HAY35550915C | 103 |
| Toyota (original) | 9031628003 | 579 |
Oil seals are an inexpensive consumable that needs to be changed quite often. In this case, overpaying for original components is irrational. You can safely purchase seals using high-quality THO or FEBEST.
All analogues of oil seals are made of high-quality rubber and do not allow any technical fluids to pass through. Therefore, you should not be afraid that the internal parts will rust from grease or oil.
Problems when paying with bank cards
Sometimes difficulties may arise when paying with Visa/MasterCard bank cards. The most common of them:
- There is a restriction on the card for paying for online purchases
- A plastic card is not intended for making payments online.
- The plastic card is not activated for making payments online.
- There are not enough funds on the plastic card.
In order to solve these problems, you need to call or write to the technical support of the bank where you are served. Bank specialists will help you resolve them and make payments.
That's basically it. The entire process of paying for a book in PDF format on car repair on our website takes 1-2 minutes.
If you still have any questions, you can ask them using the feedback form, or write us an email at [email protected]
Replacing the rear crankshaft oil seal
1 To perform this procedure, the gearbox must be removed from the vehicle (see Chapter 7A or 7B). Remove the flywheel/faceplate as described in paragraph 14.
2 The rear crankshaft oil seal can be replaced without removing the oil pan and oil seal housing, however, using this method is not recommended, since when removing and installing the oil seal there is a high probability of damage to the crankshaft and oil seal seat, as well as damage to the oil seal itself. If you want to try, carefully pry the oil seal with a screwdriver and pull it out of the mounting hole (see Fig. 15.2)
Rice. 15.2. Carefully pry the old oil seal with a screwdriver and pull it out of the mounting hole.
Wipe the oil seal seat clean and use sandpaper to remove any burrs that could damage it prematurely. Lubricate the working edges of the new oil seal and the crankshaft journal with multi-purpose grease. Carefully place the oil seal onto the crankshaft with the working edges facing inward. Using a piece of metal pipe or a suitable head with an outer diameter slightly smaller than the diameter of the mounting hole, using it as a mandrel, evenly press the oil seal into the mounting hole to the depth noted during removal. Be careful—the seal lip is very hard and can be easily damaged during installation. Wash off all traces of oil. Install the flywheel/faceplate as described in paragraph 14.
3 The next method is much preferable, but its use requires removing the engine oil pan (see paragraph 12) and the oil seal housing.
4 After removing the oil pan from the engine cylinder block, unscrew the oil seal housing bolts and remove the housing. Remove all traces of the old gasket.
5 Place the oil seal body on wooden blocks and use a screwdriver and hammer to knock out the old oil seal from the back side (see Fig. 15.5).
Rice. 15.5. Place the body together with the oil seal on wooden blocks and knock out the oil seal from the inside
6 Press the new oil seal into the body using a block of wood or a piece of pipe whose outer diameter is slightly smaller than the outer diameter of the oil seal (see Fig. 15.6). Be careful not to damage the oil seal in the mounting hole when installing.
Rice. 15.6. Press the new oil seal into the body using a block of wood or a piece of pipe of the appropriate diameter.
7 Lubricate the crankshaft journal and seal lip with multi-purpose grease. Place a new gasket on the cylinder block.
8 Slowly and carefully slide the oil seal onto the crankshaft journal, using a smooth object such as a wrench extension to help you.
9 Screw in and tighten the bolts to the torque specified in the Specifications. The bottom edge of the gland body mating flange should not protrude beyond the edge of the block mating flange (pan guide).
10 All subsequent operations are performed in the reverse order of removal.