5824 Apr 20
Toyota Corolla cars are famous for their reliable performance and unpretentiousness. Dynamic, durable cars have earned enormous popularity in Russia, as they seem to be created for domestic road and climatic conditions. However, all the positive aspects are offset by the presence of a robotic gearbox - a convenient thing, but a priori capricious and fragile. The “robot” does not tolerate excessively low and high temperatures, extreme driving techniques, or even long continuous operation of the vehicle. The article will discuss how to stabilize the operation of MMT and adapt it for operation in the harsh Russian reality.
Causes of breakdowns
The Toyota Corolla clutch actuator is one of the most vulnerable parts of a robotic gearbox. The reasons for the breakdown of this mechanism are both extreme driving and service life.
So, if the clutch release actuator is out of order, or you already feel that this mechanism will soon “break down,” then you need to try to repair it. Or replace it with a new one if the repair does not bring the desired result.
However, before you repair the Toyota Corolla clutch actuator with your own hands, you need to figure out what the problem is and what its causes are.
Methods for restoring the performance of the clutch actuator
The simplest and most easily accessible way to repair a clutch actuator is to replace damaged bushings with similar ones, machined from soft metals - bronze or brass.
Another option for repairing the clutch actuator may be to purchase Chinese analogues “to match the original”. Experience shows that the quality of the latter in repairs is extremely low. They don't last long. Repairing a servo drive means restoring the wear of its shaft and installing new bushings. At the same time, free and smooth sliding of these parts relative to each other is achieved.
Experienced craftsmen recommend a radical repair of the actuator - replacing the bushing with bearings (ball). This will give two advantages at once: durable bearings with lubricant inside the housing will allow you to forget about problems with this unit for a long time; the low rolling resistance of these elements will reduce the operating current consumption of the servo drive by half. This will delay the possible time of repair until the sale of the car.
A number of malfunctions
One of the most common signs of a malfunction of the Toyota clutch actuator is both an “inexpressive” start when the car starts moving, and the occurrence of shocks and jerks when changing gears. In addition, so-called clutch overheating may occur.
However, these signs are not obvious. The thing is that the electronic control unit (ECU) adapts the operation of the sensors, clutch system and even the engine to a specific driving style.
Overheating of the clutch system is much easier to detect: firstly, by obvious signs: an icon in the form of a red gear will light up on the dashboard. And a “burnt” smell may appear in the car interior. The manual transmission may “freeze” in neutral.
If error P0810 occurs, do not reset the ECU settings. The fact is that by resetting the settings, you can skip the notification about the breakdown of the gear selection actuator.
Error correction
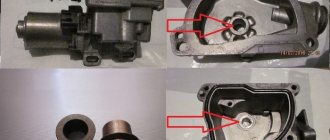
Improper disassembly of the device may cause some problems. One of the most common problems is mutual misalignment of the mounting locations of the actuator gears. As a rule, information on troubleshooting the problem is not described in the technical documentation. So now let’s take a closer look at this problem ourselves. There is nothing complicated here; all you need is skillful hands and a certain level of ingenuity.
So, let's begin. Before assembling the actuator, it is necessary to dismantle both sensors for selecting and engaging gears. After removing them, it is necessary to check the state of fastening of the sensor drives to the shafts of the gear sectors. You should make sure of the following:
- We check whether the drive rotors are unscrewed - if there is such a problem, then tighten them;
- We check the rotors for play - if there is any, it also needs to be eliminated.
The rotors should be securely fixed. As a rule, a special thread sealant is used for this, which will securely fix the axles in their places. The photo below shows the location of each of them.
The main reason for the inability to synchronize the gearbox on a car, as well as the cause of an actuator error - in the on-board computer may be a drive rotor that is not properly attached to the gear sector shaft.
If everything is in order, then we move on to the next step. We open access to the gear sector and install them clearly according to the marks on the gears. In the photograph, these marks are circled and indicated by arrows.
After setting the marks, you should scroll the gear sectors to the engagement positions of the middle parts of the sectors; when this point is reached, it must be marked with a marker.
After completing these steps, we install the gear selection shaft into the actuator itself until the splines enter the intermediate gear sector, approximately 5 millimeters. We turn the rotor of the gear selection sensor drive counterclockwise until the plastic gear stops and finally slide the shaft into the actuator. Here, the sensor drive rotor must, simultaneously with the movement of the shaft, rotate through an angle of exactly 90 degrees counterclockwise. Let's look at the photo.
After completing all these actions, we check the correct installation of the selection shaft and gear shift, and also check the position of the gear sector. The latter must be aligned with the protrusion of the shaft housing. Everything is very clearly visible in the photo.
We make sure that there is no mutual displacement of the marks applied earlier. This is very easy to do; the photos below indicate places that should be checked.
Next you need to install the gear selection sensor. For correct installation, you should move the gear selection shaft 15 millimeters out of the actuator, after which you just install the sensor and insert the shaft until it stops. We scroll the sensor to the right all the way - you should turn it clockwise until the mounting holes coincide. We fix the sensor.
We check the position of the neutral mark and install the actuator back in its place.
After installing it correctly, attach the battery terminal and conduct a test drive. If there is any malfunction in gear shifting, as well as in their selection, we check everything again. Toyota Corolla, Auris (Auris), Yaris, Aygo, Verso in 1 day,
otherwise MMT (Multimode manual transmission). You can contact us both for scheduled maintenance (MOT) and in case of an emergency. Clutch replacement and other types of repair work are carried out with a warranty, the duration of which depends on the nature of the fault repaired and is measured in intervals from 6 months to 2 years.
Don't waste time, call us right now if:
- at the beginning of movement, when the brake pedal is released, the car, being on a horizontal surface, does not move;
- untimely gear shifting, both up and down;
- clutch slipping occurs;
- sudden knocking of the gear into neutral;
- the appearance of noise in the transmission;
- shocks when switching (most often when switching from second to third gear);
- Oil leaks detected.
We use dealer equipment and software to diagnose robotic gearboxes on Toyotas.
Consequences of resetting the ECU
The clutch is not working stably: firstly, the electronic control unit will set a new reference point, as a result of which discrepancies may arise in the operation of the clutch disc. There is a great danger of severe wear of the clutch - the ECU will update the sensor readings, which will no longer display the actual degree of wear of the clutch disc. Well, if the clutch is badly worn, then errors and breakdowns associated with the robotic gearbox may occur. The speed of movement of the disk will also decrease, and this leads to the appearance of error P0810.
The result of all of the above malfunctions is the inability to move in such a car.
Concept of the Toyota Corolla robotic gearbox actuator
In the early 2000s. on Corolla cars, instead of a manual gearbox, a robot appeared, simplifying the process of driving a car. The transmission included a manual 5-speed gearbox and a servo drive that controlled the clutch and shift drive.
The electronic controller automatically determined the moment of upshifting or downshifting, taking into account engine speed, speed and driving resistance.
Purpose
The device acts on the lever that opens the clutch. When the torque supply from the engine is stopped, the second servo drive turns on the speed in the gearbox. The actuator then smoothly engages the clutch, ensuring acceleration of the vehicle without jerking or vibration.
Device and principle of operation
Inside the unit there is a DC electric motor, which is connected to the clutch control rod by a mechanical transmission. There is a sensor that determines the position of the clutch disc and sends a signal to the gear selection servo drive.
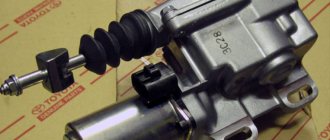
Clutch actuator device.
When a signal is sent from the controller, the engine disengages the clutch through the rod (simulating pressing the pedal with your foot). After starting the required speed, the actuator smoothly turns on the supply of torque from the engine crankshaft.
A few words about regular MMT
Toyota Corolla 150, 2007, 2008 cars are equipped with MMT 89530-12290. This device has a number of imperfections and shortcomings, which, by the way, was recognized by the automobile concern.
In order to find out which actuator is installed on the car, it is necessary to remove the lower glove compartment cover, and from the driver's seat on the car body you can find the number of the MMT installed on the vehicle.
Actuator device repair
Repairing the Corolla E150 clutch actuator will stabilize the operation of the robot. Do-it-yourself repair procedure.
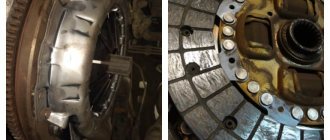
Check clutch
To do this, you need to accelerate the vehicle to 50–60 km/h, switch the robot to manual adjustment mode and engage fifth gear. In this case, you need to depress the gas pedal as much as possible and make sure that the speedometer and tachometer needles move synchronously. This indicates that the clutch is working properly.
Determine actuator error
To determine possible errors, it is necessary to stop the machine, move the robot to the neutral position, turn off the parking brake and the ignition system. Using SST, connect the TC and CG pins of the DLC3. Next, you need to turn on the ignition system, while releasing the brake pedal. The diagnostic system will start. All dashboard lights will flash, and if an error occurs, a red gear will appear and flash at regular intervals. If no errors are found, then blinking will occur without long breaks.
Remove and disassemble the MMT
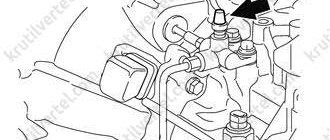
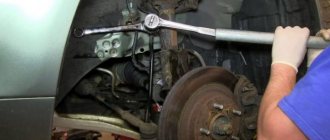
In order to troubleshoot the actuator, it must be removed. You can get to the mechanism only by removing the battery and its platform. Then it is worth disconnecting the chips from the engine and sensor. Afterwards, you can remove the actuator directly (it is secured with three bolts).
Next, the engine is disconnected from the actuator, and the internal space of the mechanism is cleaned of dust and dirt.
In addition, during disassembly it is important to check the brushes and replace them if necessary (if their length is less than three millimeters).
Replacing brushes should be carried out with extreme caution, since new breakdowns are possible during this process. You should immediately check the Corolla 150 clutch actuator motor; to do this, you need to look at the wiring. There should be no plaque, dirt or “oldness” on it. If there is an unpleasant burning smell, it means that the actuator motor has burned out and should be replaced.
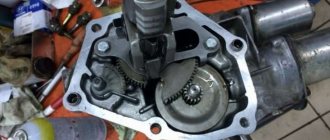
Next, you can disassemble the MMT. To do this, you need to unscrew the fastening elements of the sensor; it is also worth remembering the exact location of this part. After the sensor has been removed, you need to find a plate with antennae; it is attached to nuts that need to be unscrewed. To determine the correctness of the disassembly process, the rod is placed in a certain position. To do this, you need to take a screwdriver and turn the rotating element in the groove of the drive motor. The rod should be extremely compressed inward.
Afterwards you can dismantle the fastening elements and open the MMT cover. Next, the drive rod is untwisted and pulled out. It is necessary to clean the mechanism from old grease and clean the block from dirt and dust.
After cleaning, it is necessary to diagnose the MMT for the presence of possible breakdowns. One of the simplest diagnostic methods is the following: you need to pull out the spring and assemble the entire mechanism to check. Most often, bushings wear out, and the most common problem is a poorly manufactured drive. Therefore, before purchasing a new actuator, you should ask yourself: where is this important mechanism made?
It is worth purchasing only original spare parts or their equally high-quality analogues, and also beware of Chinese counterfeits.
Install the device
During assembly, all components are installed in the reverse order. In this case, it is necessary to lubricate all bushings, bearings and the worm shaft. After installing the actuator, the rod is placed in its outer limit position and “started” half a turn. The sensor is placed on the antennae, after which the part is rotated clockwise, this is necessary to fix the sensor with fasteners. Afterwards you need to lubricate the clutch fork, install the drive, chips on the motor and the drive sensor.
In the end, all that remains is to install the battery and adjust the clutch position.
Checking and replacing brushes
Checking whether the brushes are the cause of the problem is quite simple. To do this you will have to remove the servo drive. This is done as follows:
- open the hood;
- remove the terminals from the battery;
- remove the battery;
- dismantle the platform on which it is located by unscrewing the four fastening bolts;
- after the pad is removed, you will see the clutch actuator itself.
Next, you will need to disconnect all the connectors from it (there may be one connector, but modern car models typically have several). After the wires are disconnected, you need to unscrew the three bolts holding the servo and remove it.
Having removed the clutch actuator, carefully inspect it for external damage, and then start looking for the motor contacts - connectors that were disconnected before.
Then, using a hex wrench, unscrew the three bolts that secure the motor to the gearbox. After the bolts are removed, remove the motor and check its serviceability. To do this, you need to apply 12-volt voltage to the contacts. If the engine does not start, you can try to press the brushes with a screwdriver or other object and reconnect them to the battery. If the motor starts to function provided that the brushes are pressed, then the malfunction is caused by them. If the reaction does not occur regardless of the position of the brushes, then it needs to be replaced with a new one.
We recommend
“Replacing the Ford Focus clutch: detailed instructions” Read more
Having assessed the motor visually, disassemble it into two halves; most likely, this will require some effort. Inside the case you will see magnets, as well as a cover armature with a bearing and a battery.
Having dismantled this part of the engine, you can begin replacing the brushes. To do this, remove the plastic cover held by the bearing. To remove the bearing, you need to use a modified two-legged puller. Standard pullers will not help you cope with the task. In addition, stock up on a brush assembly from a VAZ generator.
Another necessary tool that you cannot do without when replacing clutch actuator brushes is a vice. The anchor must be inserted into place and carefully clamped. The puller's legs are ground to a certain size, after which it is positioned on the armature to remove the bearing. The difficulty you will encounter here is that the puller shaft does not rest against the armature. You can deal with this problem by simply placing a key. For safety reasons, the puller legs need to be secured with tape or tape, then they will be accurately fixed to the bearing. The wrench will serve as a lever with which the bearing will be removed.
After dismantling the bearing, it is time to remove the plastic cover. To do this, you just need to remove it, after pulling out the anchor.
After removing the old brushes, replace them with new ones, carefully soldering each brush to the contacts on the connector. This is done using a soldering iron, tin and rosin. The soldering itself is carried out in compliance with the necessary rules. Before you begin, the wires need to be cleaned, removing plaque, traces of oxidation, etc. This work must be done efficiently, since during vehicle operation the clutch actuator is subjected to vibration loads, which will ultimately lead to the breakage of poorly soldered wires.
After replacing the brushes, reassemble the clutch actuator in reverse order and evaluate its operation while operating the vehicle. The actions taken will cope with the malfunction and extend the life of the engine.
Refinement of the mechanism
As mentioned earlier, the Toyota Corolla E150 robot clutch actuator is an extremely “capricious” part that requires constant maintenance. Due to wear of the bushings, failure of the actuator motor, or problems with sensors, the robotic gearbox behaves “inappropriately,” which can lead to problems with the car’s engine.
Many car enthusiasts are trying to upgrade their clutch actuator. The first modification is that it is necessary to replace the bushings, wiring and motor. After replacing these components, the robotic box begins to show more stable and reliable operation. A modernized actuator can serve faithfully for a long time. However, the deep modernization of the MMT clutch actuator ends with the replacement of certain components.
Every client of our service at Izhorskaya 5 receives this.
- High qualification of our craftsmen;
- Repair of Toyota robotic gearbox in 1 day;
- Affordable prices for repairs of Toyota robots;
- Spare parts and consumables available;
- FREE TOWER before service;
- FREE DIAGNOSTICS
If problems arise or to perform scheduled maintenance, please contact us at:
Our phone numbers and addresses are in the Contacts section on the right->>>>>
Results
The Toyota Corolla robotic gearbox has two actuators: MMT and AMT. The first is responsible for the clutch, the other for shifting gears. When the MMT fails, the AMT also begins to operate unstably. Almost all mechanisms of the Corolla robot operate according to this “domino principle”: if one is broken, then the other will not be able to function as it should. To repair it, you need to completely disassemble the box repair kit. There are many descriptions and photos on the Internet that tell not only about manual transmission breakdowns, but also about methods for deep modernization of the MMT clutch actuator.